当前位置:网站首页>事件的传递和响应以及使用实例
事件的传递和响应以及使用实例
2022-06-12 13:26:00 【Li.CQ】
在项目中使用响应链的地方
1. 在scrollView 中添加 slider
// - 方案一
-(BOOL)pointInside:(CGPoint)point withEvent:(UIEvent *)event{

    if (CGRectContainsPoint(self.subView.frame, point)) {
        self.scrollEnabled = NO;
        return YES;
    }
    self.scrollEnabled = YES;
    return YES;
}

// - 方案二
-(UIView *)hitTest:(CGPoint)point withEvent:(UIEvent *)event{
    if (CGRectContainsPoint(self.subView.frame, point)) {
        self.scrollEnabled = NO;
        return [super hitTest:point withEvent:event];
    }
    self.scrollEnabled = YES;
    return [super hitTest:point withEvent:event];
}

// - 方案三
- (UIView *)hitTest:(CGPoint)point withEvent:(UIEvent *)event {
   UIView *view = [super hitTest:point withEvent:event];
   if([view isKindOfClass:[UISlider class]]) {
       self.scrollEnabled = NO;
   } else {
      self.scrollEnabled = YES;
   }
   return view;
}
2. 设置 scrollview 做的选项卡的 view 在第一个选项上是可以左滑返回
// - 设置 scrollview 做的选项卡的 view 在第一个选项上是可以左滑返回

-(UIView *)hitTest:(CGPoint)point withEvent:(UIEvent *)event{

    if ([[super hitTest:point withEvent:event] isKindOfClass:[UIControl class]]) {
        return [super hitTest:point withEvent:event];
    }else{
        if ((self.contentOffset.x == 0) && (point.x < 30)) {
            return nil;
        }
         return [super hitTest:point withEvent:event];
    }

}
3. 让事件穿透view
// - 设置事件可以穿透 view
@implementation DYContainerBgView
/** 可以透过事件 */
- (UIView *)hitTest:(CGPoint)point withEvent:(UIEvent *)event{
    if ([super hitTest:point withEvent:event] == self) return nil;
    return [super hitTest:point withEvent:event];
}

@end
4. 事件传递的解析
- 名词解释
- 事件传递 : 从上到下的顺序 (UIApplication–>UIWindow–>递归找到最合适处理的View),即从父控件到子控件的寻找过程 (事件传递最重要的就是找到合适的View来接收事件, 从父视图到子视图查找, 同一父视图, 从后加入到父视图 到 先加入到view的顺序遍历);
- 事件响应 : 从下到上的顺序 (实现View的touchesBegan方法,如果该View不能处理事件,则向上传递给它的父控件),从子控件传递给父控件(找到合适的View之后就会调用该View的touches方法进行响应处理具体的事件,如果当前的view 不响应touch 方法, 就查找上一响应者(superviwe, 或者view的控制器)来响应事件);
// - 示例代码 :
- (void)viewDidLoad {
    [super viewDidLoad];

    QGView *v1 = [[QGView alloc]initWithFrame:CGRectMake(90, 90, 200, 200)];
    v1.backgroundColor = [UIColor redColor];
    v1.testStr = @"v1";
    [self.view addSubview:v1];

    QGView *v2 = [[QGView alloc]initWithFrame:CGRectMake(90, 90, 180, 180)];
    v2.backgroundColor = [UIColor greenColor];
    v2.testStr = @"v2";
    [self.view addSubview:v2];

    QGView *v3 = [[QGView alloc]initWithFrame:CGRectMake(90, 90, 160, 160)];
    v3.testStr = @"v3";
    v3.backgroundColor = [UIColor redColor];
    [self.view addSubview:v3];

    QGView *v31 = [[QGView alloc]initWithFrame:CGRectMake(0, 0, 120, 120)];
    v31.backgroundColor = [UIColor greenColor];
    v31.testStr = @"v31";
    [v3 addSubview:v31];

    QGView *v32 = [[QGView alloc]initWithFrame:CGRectMake(0, 0, 100, 100)];
    v32.testStr = @"v32";
    v32.backgroundColor = [UIColor redColor];
    [v3 addSubview:v32];

    QGView *v33 = [[QGView alloc]initWithFrame:CGRectMake(0, 0, 80, 80)];
    v33.backgroundColor = [UIColor greenColor];
    v33.testStr = @"v33";
    [v3 addSubview:v33];
}
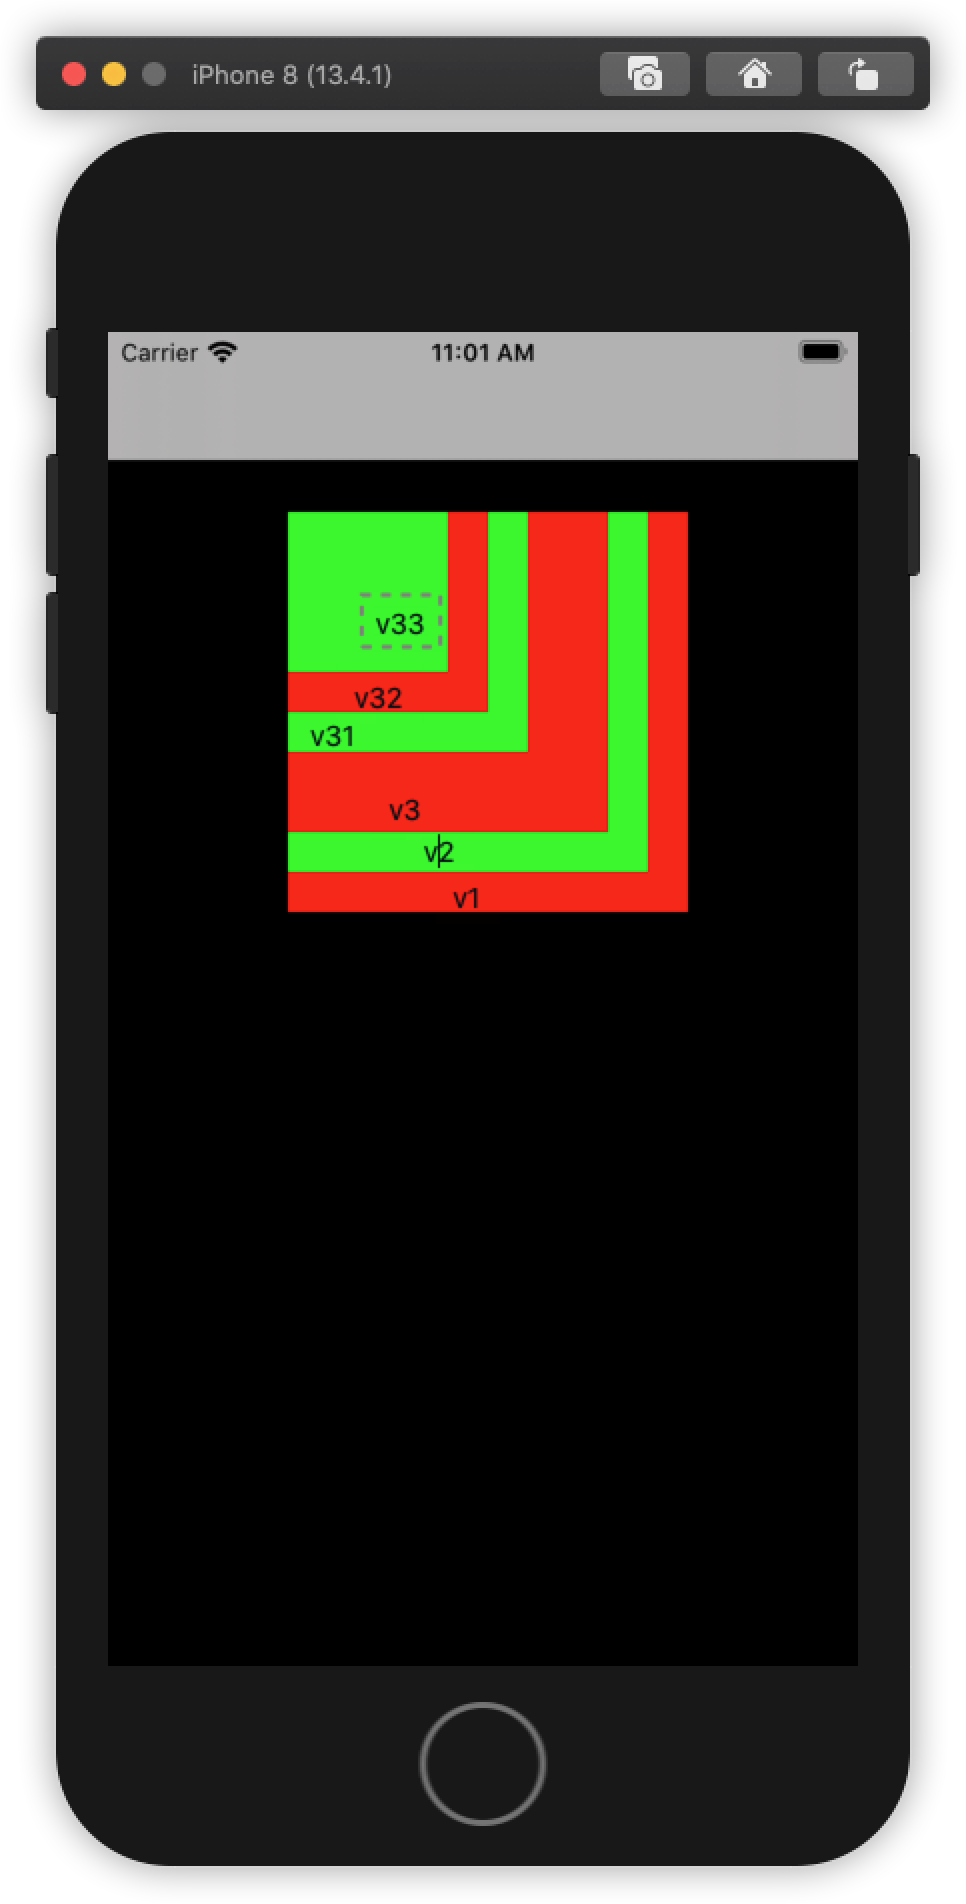
在self.view.subView 数组中, 后添加的view, 越在数组靠后的元素, 在view中的层级越高, 越接近用户
// - 测试 :
1. 点击v3
2020-05-11 11:12:54.027766+0800 Demo_001[2008:56637] pointInside v3, ruturn : 1
2020-05-11 11:12:54.027995+0800 Demo_001[2008:56637] pointInside v33, ruturn : 0
2020-05-11 11:12:54.028168+0800 Demo_001[2008:56637] hitTest v33, ruturn : (null)
2020-05-11 11:12:54.028309+0800 Demo_001[2008:56637] pointInside v32, ruturn : 0
2020-05-11 11:12:54.028438+0800 Demo_001[2008:56637] hitTest v32, ruturn : (null)
2020-05-11 11:12:54.028569+0800 Demo_001[2008:56637] pointInside v31, ruturn : 0
2020-05-11 11:12:54.028674+0800 Demo_001[2008:56637] hitTest v31, ruturn : (null)
2020-05-11 11:12:54.029436+0800 Demo_001[2008:56637] hitTest v3, ruturn : <QGView: 0x7f9bede05ad0; frame = (90 90; 160 160); layer = <CALayer: 0x600003ec0780>>

2. 点击v33
2020-05-11 11:13:54.777979+0800 Demo_001[2008:56637] pointInside v3, ruturn : 1
2020-05-11 11:13:54.778181+0800 Demo_001[2008:56637] pointInside v33, ruturn : 1
2020-05-11 11:13:54.778399+0800 Demo_001[2008:56637] hitTest v33, ruturn : <QGView: 0x7f9bede0ca40; frame = (0 0; 80 80); layer = <CALayer: 0x600003ec0aa0>>
2020-05-11 11:13:54.778587+0800 Demo_001[2008:56637] hitTest v3, ruturn : <QGView: 0x7f9bede0ca40; frame = (0 0; 80 80); layer = <CALayer: 0x600003ec0aa0>>

3. 点击v31
2020-05-11 11:15:13.166848+0800 Demo_001[2008:56637] pointInside v3, ruturn : 1
2020-05-11 11:15:13.167039+0800 Demo_001[2008:56637] pointInside v33, ruturn : 0
2020-05-11 11:15:13.167145+0800 Demo_001[2008:56637] hitTest v33, ruturn : (null)
2020-05-11 11:15:13.167275+0800 Demo_001[2008:56637] pointInside v32, ruturn : 0
2020-05-11 11:15:13.167396+0800 Demo_001[2008:56637] hitTest v32, ruturn : (null)
2020-05-11 11:15:13.167503+0800 Demo_001[2008:56637] pointInside v31, ruturn : 1
2020-05-11 11:15:13.167669+0800 Demo_001[2008:56637] hitTest v31, ruturn : <QGView: 0x7f9bede08420; frame = (0 0; 120 120); layer = <CALayer: 0x600003ec0a40>>
2020-05-11 11:15:13.167813+0800 Demo_001[2008:56637] hitTest v3, ruturn : <QGView: 0x7f9bede08420; frame = (0 0; 120 120); layer = <CALayer: 0x600003ec0a40>>

4. 点击v1
2020-05-11 11:16:01.172527+0800 Demo_001[2008:56637] pointInside v3, ruturn : 0
2020-05-11 11:16:01.172711+0800 Demo_001[2008:56637] hitTest v3, ruturn : (null)
2020-05-11 11:16:01.172835+0800 Demo_001[2008:56637] pointInside v2, ruturn : 0
2020-05-11 11:16:01.172931+0800 Demo_001[2008:56637] hitTest v2, ruturn : (null)
2020-05-11 11:16:01.173068+0800 Demo_001[2008:56637] pointInside v1, ruturn : 1
2020-05-11 11:16:01.173249+0800 Demo_001[2008:56637] hitTest v1, ruturn : <QGView: 0x7f9bede06520; frame = (90 90; 200 200); layer = <CALayer: 0x600003ec01e0>>
结论 : 当前的vc的所有subView, 自外向内调用; 再从找到view的subView中, 自外向内调用
边栏推荐
- 2062: [example 1.3] movie tickets
- torch_ geometric message passing network
- Hardware composition of embedded system - introduction of embedded development board based on ARM
- 【云原生 | Kubernetes篇】Kubernetes 网络策略(NetworkPolicy)
- Computational hierarchy -- the problem of large numbers multiplying decimals
- Octopus network progress monthly report | may 1-May 31, 2022
- What if the MySQL installation on the apple computer is completed and cannot be found
- 关于#SQLite写注册功能时,数据表查询出错#的问题,如何解决?
- 字节序数据读写
- Pytoch official fast r-cnn source code analysis (I) -- feature extraction
猜你喜欢

list和dict的应用

How to balance multiple losses in deep learning?

imagemagick:a gentle introduction to magick++

torch_geometric mini batch 的那些事

Build an embedded system software development environment - build a cross compilation environment

多源BFS问题 模板(附题)

Bitmap, bloom filter and hash sharding
![Will the next star of PPT for workplace speech be you [perfect summary] at the moment](/img/11/ac67db2641f42ef3d09417b790feb8.png)
Will the next star of PPT for workplace speech be you [perfect summary] at the moment

Openstack network

LeetCode滑动窗口刷题总结
随机推荐
看完这一篇就够了,web中文开发
2065: [example 2.2] sum of integers
在 Debian 10 上独立安装MySQL数据库
创新实训(十二)项目总结
[EDA] chip layout design: VLSI layout design using electric
Dameng database DM8 Windows environment installation
LeetCode滑动窗口刷题总结
Informatics Olympiad all in one 1000: introductory test questions
view的子视图的递归
Freshman girls' nonsense programming is popular! Those who understand programming are tied with Q after reading
"New continent" of mobile application going to sea
IC chip scheme fs4062b for lithium battery charging with 5V boost to 12.6V
leetcode 47. Permutations II 全排列 II(中等)
The goods are full. You must take this knowledge
Pytoch official fast r-cnn source code analysis (I) -- feature extraction
import torch_ Data view of geometric
C语言【23道】经典面试题【下】
[brush title] probability of winning a draw
2064: [example 2.1] exchange value
字节序数据读写