当前位置:网站首页>6.项目上线
6.项目上线
2022-06-11 21:44:00 【Python_21.】
1. 购买阿里云服务器
* 1. 阿里云地址: https://www.aliyun.com/

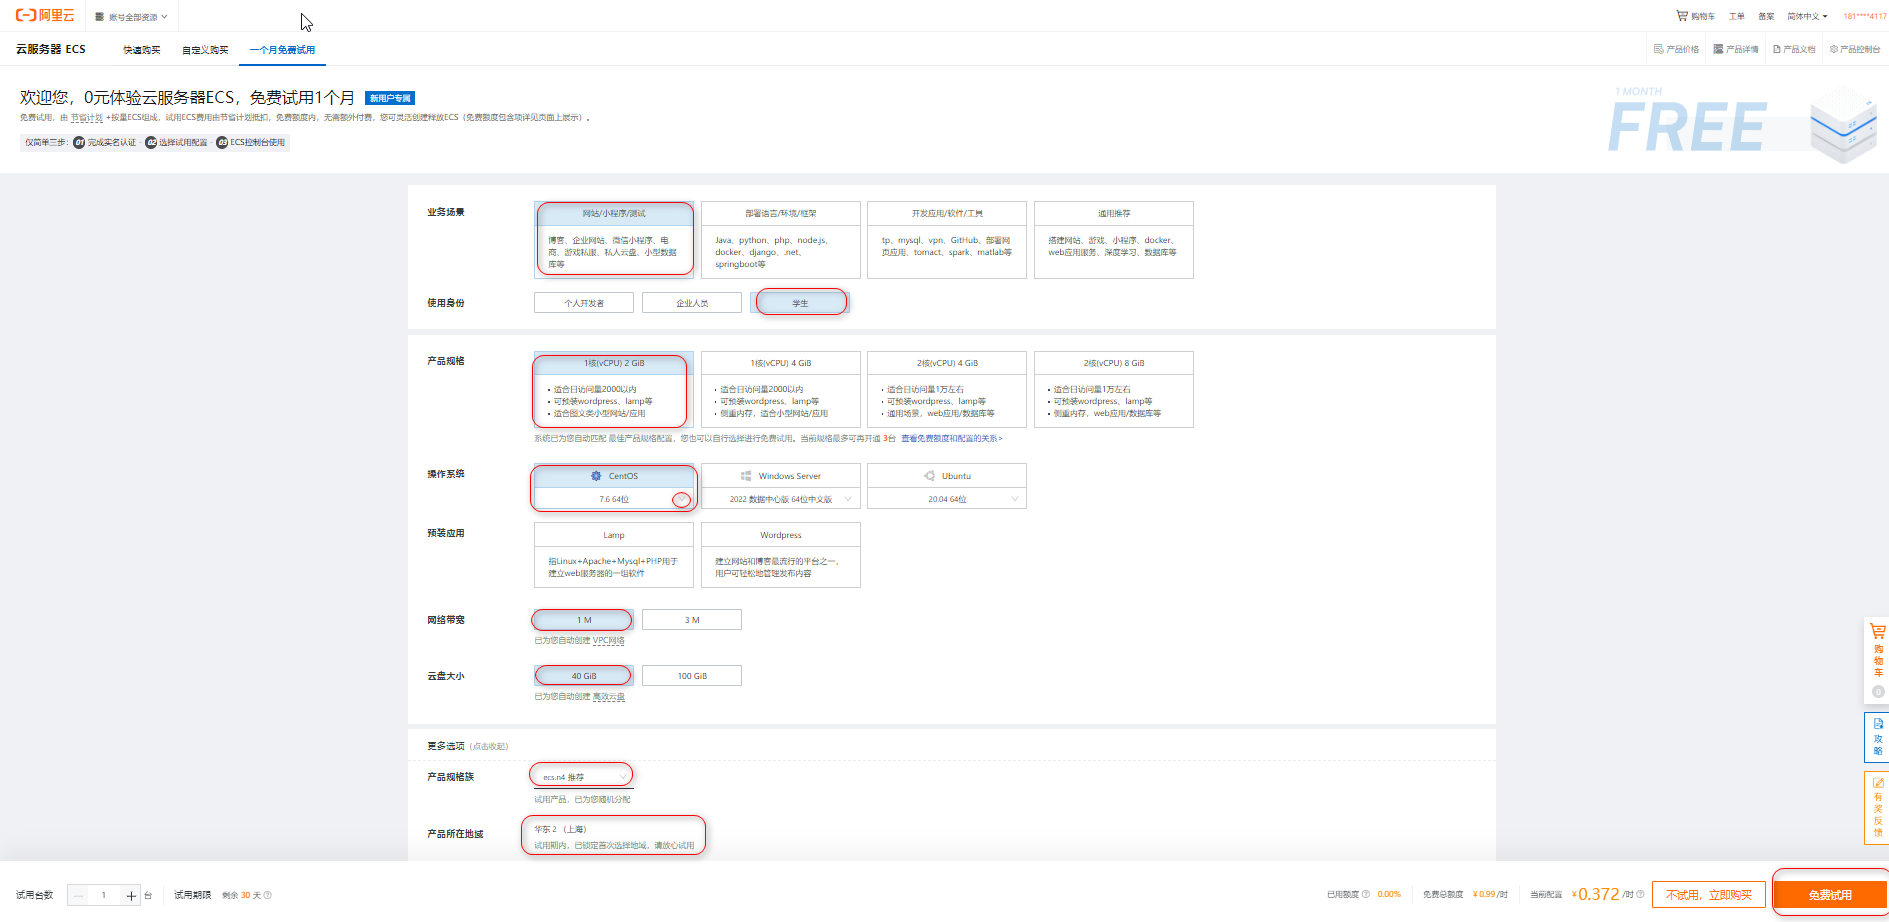
* 2. 免费试用地址: https://ecs-buy.aliyun.com/ecs/#/trial
业务场景: 网站/小程序/测试
使用身份: 学生
产品规格: 1核2G
操作系统: CentOS 7.6 64位
网络带宽: 1M
云盘大小: 40G
产品规格族: ecs.n4
产品所在地域: 华东2(上海)
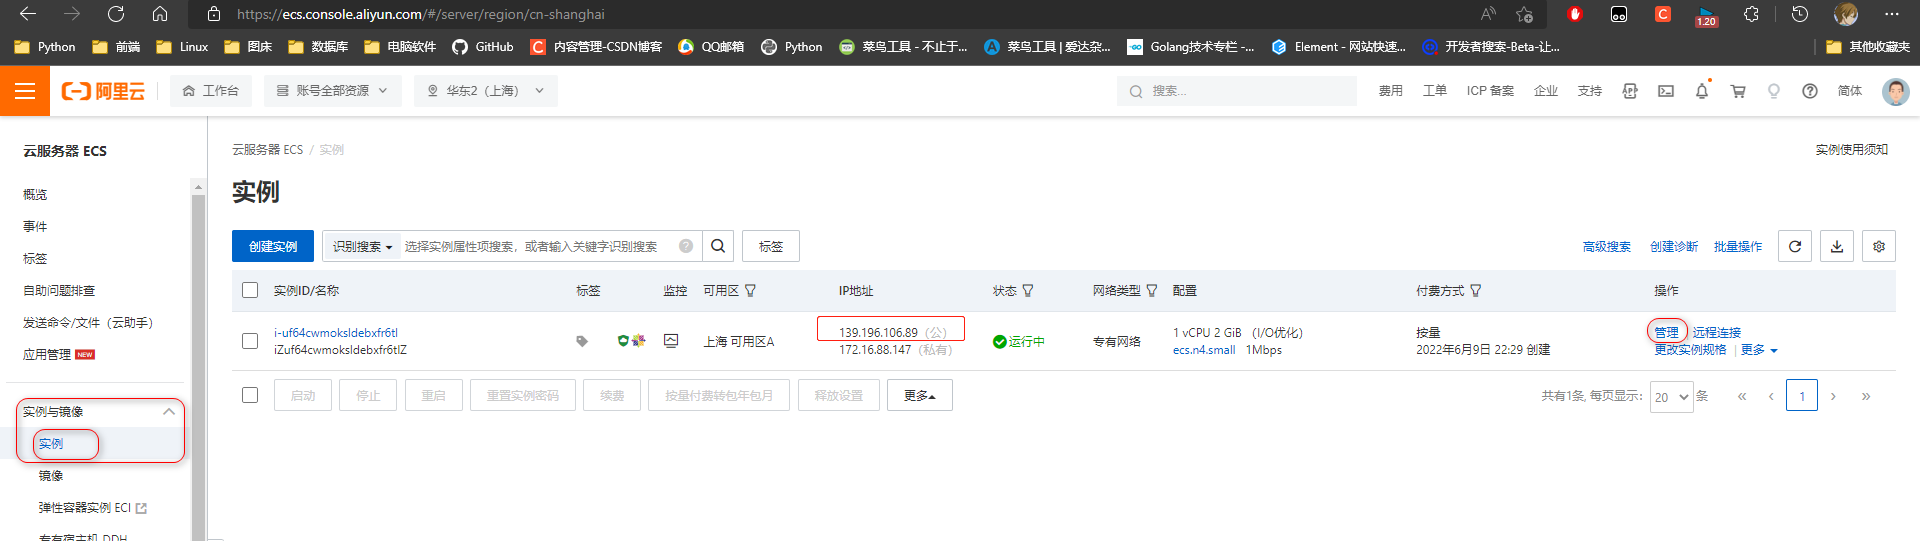
* 3. 实例面板
     1. 复制公网ip地址 139.196.106.89
     2. 点击管理 修改实例主机名(不想改就不改)

* 4. 配置安全组规则(开放80 与 3306端口访问)
     测试直接选择全部即可.


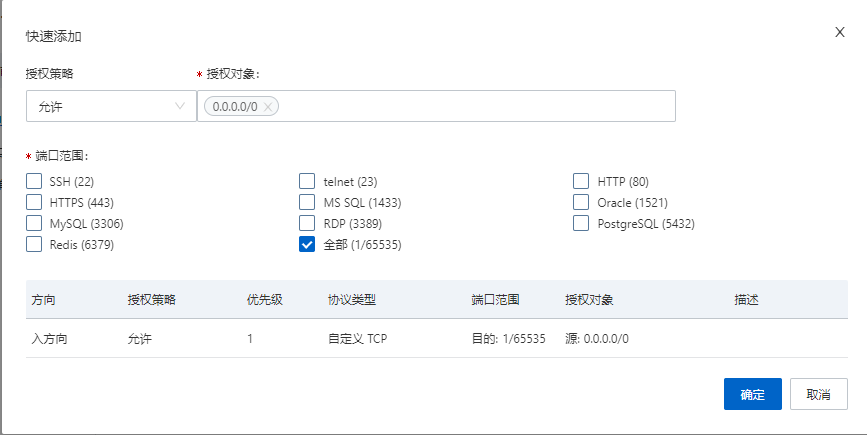
* 5. 重启配置生效

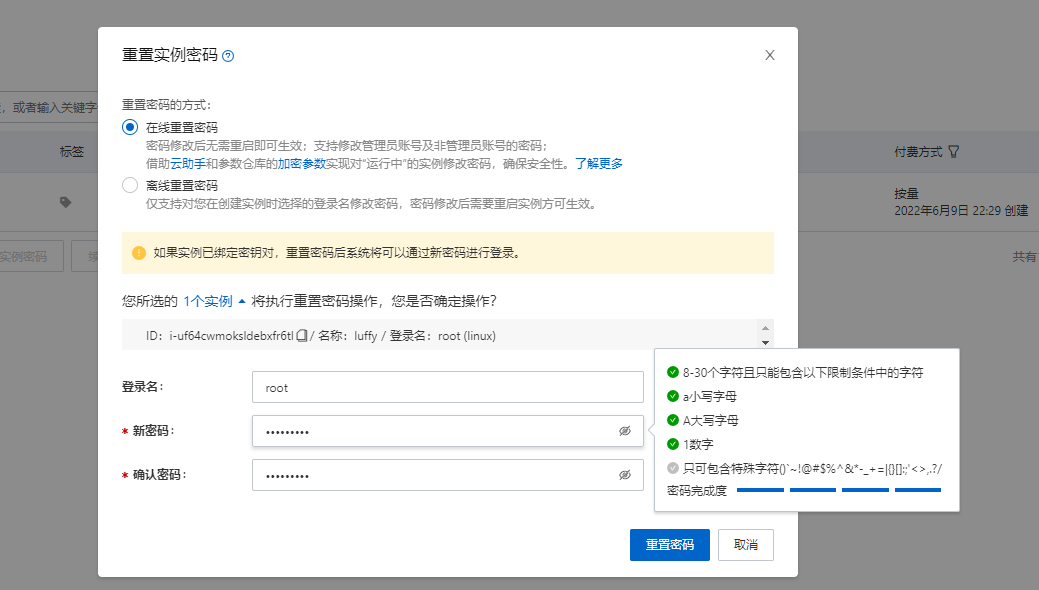
* 6. 重置密码
     登入账户: root
     登入密码: Zxc123456

2. 连接与配置
2.1 远程连接服务器
可以使用git bash 连接
命令: ssh root@主机公网地址
# 连接命令
$ ssh [email protected]
The authenticity of host '139.196.106.89 (139.196.106.89)' can't be established. ED25519 key fingerprint is SHA256:+vr8sbnN6VF09DDaYMB0mY8opwbqPrHwXXKhZZc0I8s. This key is not known by any other names # 是否确实要继续连接(是/否/[指纹])?对 Are you sure you want to continue connecting (yes/no/[fingerprint])? yes Warning: Permanently added '139.196.106.89' (ED25519) to the list of known hosts. # 输入密码 [email protected]'s password:Zxc123456
Last login: Thu Jun  9 23:31:39 2022 from 101.82.120.253

Welcome to Alibaba Cloud Elastic Compute Service !

[[email protected] ~]#

借助 FinalShell SSH远程服务器管理工具, 连接远程服务器.
* 1. 下载地址: http://www.hostbuf.com/downloads/finalshell_install.exe
* 2. 安装: ↓
* 3. 连接信息
     主机(公网ip): 139.196.106.89
     用户名: root
     密码: Zxc123456

* 4. 双击创建的连接菜单

* 5. 保存连接信息

* 6. 连接成功, 展示服务器的命令行窗口

2.2 服务器配置
* 1. 更新服务器软件包(很多软件要很久)
     命令: yum update -y
* 2. 安装软件管理包和可能使用的依赖
	命令:
	yum -y groupinstall "Development tools"
    yum install openssl-devel bzip2-devel expat-devel gdbm-devel readline-devel sqlite-devel psmisc libffi-devel -y
3. 项目上线前准备
3.1 后端
* 1. 将dev.py的配置信息复制一份到prod.py中.
# 上线关闭 debug模式
DEBUG = False

# 运行的host, 自己购买的服务器的公网地址, * 代表所有
ALLOWED_HOSTS = ['*']

# 时区首字母一定要大写, 在本地小写没出问题
TIME_ZONE = 'Asia/Shanghai'

# 数据库redis在服务器本地, 连接地址不需要修改


# 支付宝回调地地址
# 后台URL 公网地址
BASE_URL = 'http://139.196.106.89:8000'
# 前台URL 前台访问默认端口号为80, 可以不写
LUFFY_URL = 'http://139.196.106.89:80'

# 后台异步回调地址
RETURN_URL = BASE_URL + '/order/success/'
# 前台同步回调地址(没有/结尾)
NOTIFY_URL = LUFFY_URL + '/pay/success'
时区首字母一定要大写, 在本地小写没出问题

* 2. wsgi.py使用prod.py配置
...
os.environ.setdefault('DJANGO_SETTINGS_MODULE', 'luffy.settings.prod')
...
* 3. 复制一份manage.py管理文件改名为manage_pord.py,
     本地运行使用manage.py启动项目
     上线运行使用manage_pord.py启动项目.
...
os.environ.setdefault('DJANGO_SETTINGS_MODULE', 'luffy.settings.prod')
...
* 4. celery_task下导入django的配置文件修改为线上配置文件
...
os.environ.setdefault('DJANGO_SETTINGS_MODULE', 'luffy.settings.prod')
...
* 5. 查询模块及版本并追加到文件中
pip freeze > requirement.txt
很多模式是模块的依赖文件, 在安装模块时会自动下载. 可以清除被依赖下载的模块, 整洁一些, 也可以不修改.
celery==4.4.6
Django==2.2.14
django-cors-headers==2.0.0
django-filter==21.1
django-import-export==2.7.1
django-redis==5.2.0
djangorestframework==3.10.3
djangorestframework-jwt==1.11.0
Pillow==9.1.0
PyMySQL==1.0.2
python-alipay-sdk==3.0.4
qcloudsms-py==0.1.4
redis==4.3.1


django-crispy-forms>=1.6.0
django-import-export>=0.5.1
django-reversion>=2.0.0
django-formtools==2.1
future==0.15.2
httplib2==0.9.2
six==1.10.0
* 6. 在项目下创建git忽略文件 .gitignore
     将所有的数据库迁移文件忽略, 不然在服务器中无法进行数据库迁移.
     *_initial.py
     *_auto_*_*.py

* 7. 上传到远端仓库
git add .
git commit -m '上线准备'
git pull origin dev
git push origin dev
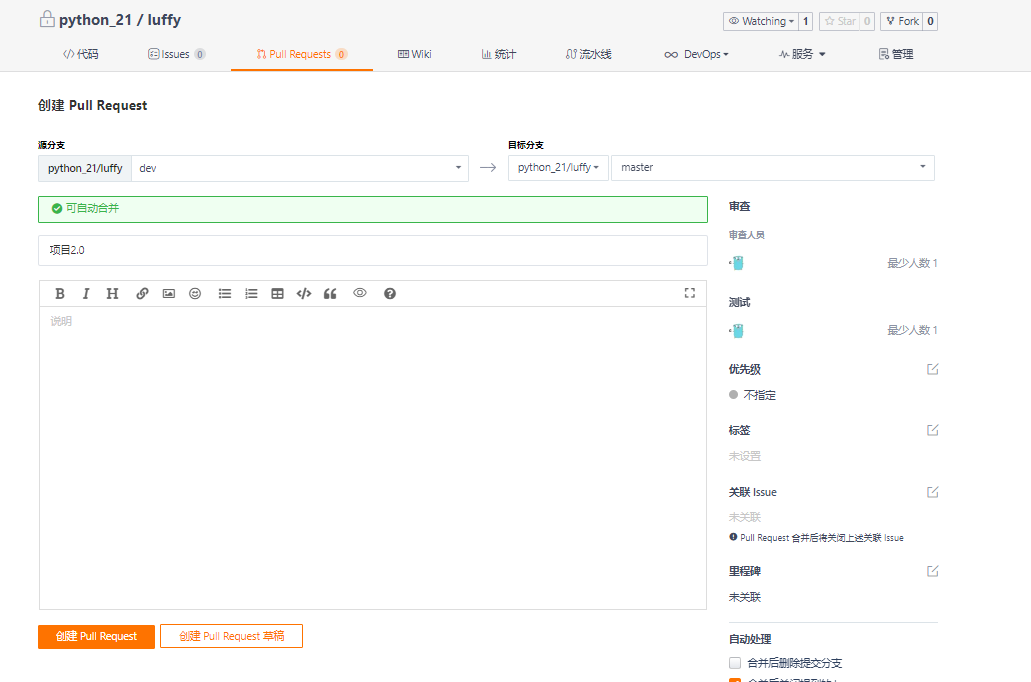
* 8. 项目合并


3.2 前端
* 1. 修改前端访问后端的地址
     base_url: 'http://139.196.106.89:8000'

* 2. vue编译文件 将前端项目工程编程成一个单html的项目
     命令: npm run build

* 3. 将dist编译项目上传到服务器中
命令: scp -r dist项目路径 root@主机公网地址:主机目录
# 在前端项目目录中右击打开 git bash
scp -r dist [email protected]:~
[email protected]'s password: Zxc123456
# 开始上传文件
...


* 4. 服务器查看上传文件
  文件上传到~ home目录下, 当前位置在home目录, 使用ls命令查看目录下文件
  展示dist 表示上传成功!

4. 安装mysql&创建数据库
4.1安装mysql
* 0. 切换到home目录下
     命令: cd ~
[[email protected] ~]# cd ~
[[email protected] ~]# pwd
/root
* 1. 下载mysql57客户端
     命令: wget http://dev.mysql.com/get/mysql57-community-release-el7-10.noarch.rpm
     ls查看下载的客户端文件

* 2. 安装安装mysql57客户端
	命令: yum -y install mysql57-community-release-el7-10.noarch.rpm
* 3. 安装安装mysql57服务端
     命令: yum -y install mysql-community-server
     如果提示密钥问题:
     失败的软件包是:mysql-community-client-5.7.38-1.el7.x86_64
     GPG  密钥配置为:file:///etc/pki/rpm-gpg/RPM-GPG-KEY-mysql
	 先执行: rpm --import https://repo.mysql.com/RPM-GPG-KEY-mysql-2022 再输入安装命令
* 4. 启动mysql57服务端
     命令: systemctl start mysqld.service
* 5. 查看服务端启动状态
     命令: systemctl status mysqld.service

* 5. 查看mysql默认密码
     命令: grep "password" /var/log/mysqld.log
* 6. 登入mysql
	 命令 mysql -uroot -p 密码

* 7. 修改密码(密码要有大小写特殊符号)
     命令: ALTER USER 'root'@'localhost' IDENTIFIED BY 'new password';
mysql> ALTER USER 'root'@'localhost' IDENTIFIED BY 'Zxc123456?';
Query OK, 0 rows affected (0.00 sec)
* 8. 退出并重新登入验证密码
	退出登入命令: exit
mysql> exit
Bye
[[email protected] ~]# mysql -uroot -pZxc123456?

4.2 创建数据库
* 1. 管理员连接数据库
     命令: mysql -uroot -pZxc123456?
* 2. 创建数据库
     命令: create database luffy default charset=utf8;
* 3. 配置任意ip都可以连到接数据库 (用户 luffy 密码 Luffy123?)
     命令: grant all privileges on luffy.* to 'luffy'@'%' identified by 'Luffy123?';
* 4. 由于数据库版本问题, 可能本地连接不上, 为本地用户单独配置
	命令: grant all privileges on luffy.* to 'luffy'@'localhost' identified by 'Luffy123?';
* 5 .重新加载权限
     命令: flush privileges;
* 6. 查看用户信息
     5.7及之后版本命令: select user, host, authentication_string from mysql.user;
4.3 本地连接到远程数据库
* 1. 新建连接

* 2. 连接配置
	 连接名: 阿里云luffy
     主机(公网id): 139.196.106.89
     端口: 3306
     用户名: luffy
     密码: Luffy123?

4.4 备份数据
* 1. 保存本地luffy的数据库的结构和数据

* 2. 保存数据到服务器的数据库中

5. 安装redis
* 0. 切换到home目录下
     命令: cd ~
[[email protected] ~]# cd ~
[[email protected] ~]# pwd
/root
* 1. 下载redis-5.0.5源码包
      命令: wget http://download.redis.io/releases/redis-5.0.5.tar.gz
* 2. 解压安装包
     命令: tar -xf redis-5.0.5.tar.gz
* 3. 进入解压目录
     命令: cd redis-5.0.5
* 4. 编译&安装(将C语言源码编程成linux下的可执行文件)
     命令:  make
* 5. 启动服务端&客户端
     需要在redis目录下执行启动客服端服务端代码
     启动服务端: ./src/redis-server
     启动客户端: ./src/redis-cli

* 6. 建立软连接(将服务端与客户端添加到环境变量下的目录中)
     命令:
     ln -s ~/redis-5.0.5/src/redis-server /usr/bin/redis-server
     ln -s ~/redis-5.0.5/src/redis-cli /usr/bin/redis-cli
     启动客户端: redis-server
     启动服务端: redis-cli
6. 安装Python3.6环境
* 0. 切换到home目录下
     命令: cd ~
[[email protected] ~]# cd ~
[[email protected] ~]# pwd
/root
* 1. 下载Python3.6.7源码包
      命令: wget https://www.python.org/ftp/python/3.6.7/Python-3.6.7.tar.xz
* 2. 解压安装包
     命令: tar -xf Python-3.6.7.tar.xz
* 3. 进入解压目录
     命令: cd Python-3.6.7
* 4. 配置安装路径:/usr/local/python3
     命令: ./configure --prefix=/usr/local/python3
* 5. 编译并安装
     命令: make && sudo make install
* 6. 建立软连接(python3, pip3)
     命令:
     ln -s /usr/local/python3/bin/python3.6 /usr/bin/python3
     ln -s /usr/local/python3/bin/pip3.6 /usr/bin/pip3
* 7 配置pip源, 阿里云服务器不用配置, 默认配置阿里源
1. 创建pip配置路径
命令: mkdir ~/.pip

2. 进入目录编辑配置文件:填入下方内容
命令: cd ~/.pip && vim pip.conf

[global]
index-url = http://pypi.douban.com/simple
[install]
use-mirrors =true
mirrors =http://pypi.douban.com/simple/
trusted-host =pypi.douban.com
7. 安装Nginx
Nginx是一个高性能的HTTP和反向代理服务器.
Nginx监听8000端口转发到uwsgi(uwsgi的端口不能是8000了)
Nginx反向代理, 监听8000端口可以转发到多个django项目中.
* 0. 切换到home目录下
     命令: cd ~
[[email protected] ~]# cd ~
[[email protected] ~]# pwd
/root
* 1. 下载nginx1.13.7
      命令: wget http://nginx.org/download/nginx-1.13.7.tar.gz
* 2. 解压安装包
     命令: tar -xf nginx-1.13.7.tar.gz
* 3. 进入解压目录
     命令: cd nginx-1.13.7
* 4. 配置安装路径:/usr/local/nginx
     命令: ./configure --prefix=/usr/local/nginx
* 5. 编译并安装
     命令: make && sudo make install
* 6. 建立软连接:终端命令 nginx
     命令: ln -s /usr/local/nginx/sbin/nginx /usr/bin/nginx
* 8. nginx命令
启动: nginx

关闭: nginx -s stop

重启: nginx -s reload

查看端口, 强行关闭:
    ps -aux|grep nginx
    kill <pid:进程编号>
8. 前端部署
* 1. 移动vue单页面项目并重命名
     命令: mv ~/dist /home/html
* 2. Nginx配置目录,
     备份配置, 填入下方内容.
# 切换目录
命令: cd /usr/local/nginx/conf

# 重命名, 将默认的配置文件加上后缀.bak
命令:  mv nginx.conf nginx.conf.bak

# 新建nginx.conf 配置文件
命令: vim nginx.conf

# vim插入模式 命令: i

events {

    worker_connections  1024;
}
http {

    include       mime.types;
    default_type  application/octet-stream;
    sendfile        on;
    server {

        listen 80;  # 监听端口
        server_name  127.0.0.1; # 改为自己的域名,没域名修改为127.0.0.1:80
        charset utf-8;
        location / {

            root /home/html; # html访问路径
            index index.html; # html文件名称
            try_files $uri $uri/ /index.html; # 解决单页面应用刷新404问题
        }
    }
}

# 退出插入模式到命令行模式: esc按键
# 保存并退出命令: wq
* 3. 启动nginx
     命令: nginx
* 4. 访问公网地址: http://139.196.106.89/
      前端项目部署完成

9. 后端部署
9.1 下载代码
* 1. 切换到home目录
     命令: cd /home
* 2. git下拉项目到服务器中
     命令: git clone https://gitee.com/python_21/luffy.git
     Username for 'https://gitee.com': 1360012768@qq.com
     Password for 'https://[email protected]@gitee.com': xx密码xx
	...

9.2 创建虚拟环境
* 1. 安装依赖模块
     命令:
     pip3 install virtualenv
     pip3 install virtualenvwrapper
* 2. 建立虚拟环境软连接
	 命令:  ln -s /usr/local/python3/bin/virtualenv /usr/bin/virtualenv
* 3. 配置虚拟环境(文件末尾填入下方内容)
     命令: vim ~/.bash_profile
# vim插入模式 命令: i

VIRTUALENVWRAPPER_PYTHON=/usr/bin/python3
source /usr/local/python3/bin/virtualenvwrapper.sh

# 退出插入模式到命令行模式: esc按键
# 保存并退出命令: wq

* 4. 更新配置文件内容
     命令:  source ~/.bash_profile
* 5. 创建虚拟环境
     命令:  mkvirtualenv luffy
* 6. 进入虚拟环境
     命令: workon luffy
* 7. 虚拟环境中安装项目使用的模块
    pip install uwsgi
    pip install -r /home/luffy/requirement.txt
通过requirement.txt下载模块报错
vim /home/luffy/requirement.txt 修改requirement.txt文件
# 将 celery==4.4.6 改为 celery>=4.4.6  放宽范围
# 将 Pillow==9.1.0 改为 Pillow==8.4.0  最新版本只有8.4.0
celery>=4.4.6
Django==2.2.14
django-cors-headers==2.0.0
django-filter==21.1
django-import-export==2.7.1
django-redis==5.2.0
djangorestframework==3.10.3
djangorestframework-jwt==1.11.0
Pillow==8.4.0
PyMySQL==1.0.2
python-alipay-sdk==3.0.4
qcloudsms-py==0.1.4
redis==4.3.1

django-crispy-forms>=1.6.0
django-import-export>=0.5.1
django-reversion>=2.0.0
django-formtools==2.1
future==0.15.2
httplib2==0.9.2
six==1.10.0
9.3 数据库迁移
rm -rf /home/luffy/luffy/apps/user/migrations/0*
rm -rf /home/luffy/luffy/apps/home/migrations/0*
rm -rf /home/luffy/luffy/apps/course/migrations/0*
rm -rf /home/luffy/luffy/apps/order/migrations/0*
 在虚拟环境下执行:
 python manage_prod.py makemigrations
 python manage_prpd.py migrate
9.4 运行SQL文件加载本地的数据


9.5 启动django项目
启动的django项目现在没有任何样式.
* 1. 启动代码:  (地址 0.0.0.0 端口 8000, 在虚拟环境下执行 workon luffy)
     命令: python /home/luffy/manage_prod.py runserver 0.0.0.0:8000
* 2. 浏览器访问django项目
     地址: http://139.196.106.89:8000/xadmin/

10. 安装uwsgi
* 1 虚拟环境下安装 uwsgi (前面已经安装了)
   进入虚拟环境命令: workon luffy
   安装uwsgi: pip install uwsgi
* 2. 真实环境下安装 uwsgi (一定要指定pip3)
     退出虚拟环境命令: deactivate
     安装uwsgi: pip3 install uwsgi
* 3. 为真实环境的uwsgi建立软链接
     命令: ln -s /usr/local/python3/bin/uwsgi /usr/bin/uwsgi
* 4. 软链接测试(输入uwsgi展示版本信息则说明正常)
     命令: uwsgi

* 5. 在后端项目的根目录下建立uwsgi的配置文件
     命令: vim /home/luffy/luffy.xml
     使用Nginx转发, Nginx监听8000端口号, Django不能再使用8000端口号了, 使用8808,
     Nginx监听请求后转发给Django的8808端口.
<uwsgi>
   <socket>127.0.0.1:8808</socket> <!-- 内部端口,自定义 django使用这个端口启动 -->
   <chdir>/home/luffy/</chdir> <!-- 项目路径 -->
   <module>luffy.wsgi</module>  <!-- 使用wsgi文件, 项目名.wsgi文件-->
   <processes>4</processes> <!-- 进程数 -->
   <daemonize>uwsgi.log</daemonize> <!-- uwsgi的日志文件 -->
</uwsgi>
* 6. Nginx配置文件添加监听后端端口的配置
     命令: vim /usr/local/nginx/conf/nginx.conf
events {

    worker_connections  1024;
}
http {

    include       mime.types;
    default_type  application/octet-stream;
    sendfile        on;
    server {

        listen 80;  # 监听端口
        server_name  127.0.0.1:80;  # 改为自己的域名,没域名修改为127.0.0.1:80
        charset utf-8;  #
        location / {

            root /home/html;  # html访问路径
            index index.html;  # html文件名称
            try_files $uri $uri/ /index.html;  # 解决单页面应用刷新404问题
        }
    }
    # 新增的server
    server {

        listen 8000;  # 监听端口
        server_name  127.0.0.1; # 改为自己的域名,没域名修改为127.0.0.1:80 简写为 127.0.0.1
        charset utf-8;
        location / {

           include uwsgi_params;
           uwsgi_pass 127.0.0.1:8808;  # 端口要和uwsgi里配置的一样
           uwsgi_param UWSGI_SCRIPT luffy.wsgi;  #wsgi.py所在的目录名+.wsgi
           uwsgi_param UWSGI_CHDIR /home/luffy/; # 项目路径
        }
    }
}
* 7. 配置之后重启生效
     先查看Nginx是否启动
     没有启动执行启动命令: nginx
     否则执行重启命令: nginx -s reload
# 查看Nginx是否启动, ↓ nginx没有执行
[[email protected] ~]# ps -aux|grep nginx
root     30083  0.0  0.0 112824   988 pts/0    R+   22:01   0:00 grep --color=auto nginx
* 8. 使用uwsgi启动Django项目(在虚拟环境下使用uwsgi启动Django 进入到uwsgi: workon luffy)
     命令: uwsgi -x /home/luffy/luffy.xml
[[email protected] ~]# uwsgi -x /home/luffy/luffy.xml
[uWSGI] parsing config file /home/luffy/luffy.xml

# 四个uwsgi进程
[[email protected] ~]# ps -aux|grep uwsgi
root     19802  0.0  0.5 179420  9852 ?        S    21:51   0:00 uwsgi -x /home/luffy/luffy.xml
root     19803  0.0  0.4 179420  8348 ?        S    21:51   0:00 uwsgi -x /home/luffy/luffy.xml
root     19804  0.0  0.4 179420  8348 ?        S    21:51   0:00 uwsgi -x /home/luffy/luffy.xml
root     19805  0.0  0.4 179420  8348 ?        S    21:51   0:00 uwsgi -x /home/luffy/luffy.xml
root     20842  0.0  0.0 112824   984 pts/0    R+   21:52   0:00 grep --color=auto uwsgi
* 9. 浏览器访问django项目
	 地址: http://139.196.106.89:8000/xadmin/
11. 收集静态资源
* 1. 创建静态文件目录
     命令: mkdir  /home/luffy/luffy/static
* 2. 编辑线上配置文件
     命令: vim /home//luffy/luffy/settings/prod.py
# 修改static配置, 新增STATIC_ROOT, STATICFILES_DIRS
STATIC_URL = '/static/' # 这句默认就有的 在下面插入下面两句
STATIC_ROOT = '/home/luffy/luffy/static'
STATICFILES_DIRS = (os.path.join(BASE_DIR, "static"),)
# 退出并保存 esc --> wq
* 3.  迁移静态样式(在虚拟环境下执行! 进入虚拟环境: workon luffy)
      命令: python /home/luffy/manage_prod.py collectstatic
* 4. 重启uwsgi(在虚拟环境下执行 )
   关闭 uwsgi: pkill -f uwsgi -9
   启动 uwsgi: uwsgi -x /home/luffy/luffy.xml
* 5. Nginx配置文件中配置static的访问地址
    命令: vim /usr/local/nginx/conf/nginx.conf
# 最大连接数 1021
events {

    worker_connections  1024;
}
# http监听配置
http {

    include       mime.types;
    default_type  application/octet-stream;
    sendfile        on;
    server {

        listen 80;  # 监听80端口
        server_name  127.0.0.1;  # 改为自己的域名,没域名修改为127.0.0.1:80
        charset utf-8;
        location / {

            root /home/html;  # html访问路径
            index index.html;  # html文件名称
            try_files $uri $uri/ /index.html;  # 解决单页面应用刷新404问题
        }
    }
    server {

        listen 8000;  # 监听8000端口
        server_name  127.0.0.1; # 改为自己的域名,没域名修改为127.0.0.1:80
        charset utf-8;
        location / {

           include uwsgi_params;
           uwsgi_pass 127.0.0.1:8808;  # 端口要和uwsgi里配置的一样
           uwsgi_param UWSGI_SCRIPT luffy.wsgi;  #wsgi.py所在的目录名+.wsgi
           uwsgi_param UWSGI_CHDIR /home/luffy/; # 项目路径
        }
        # 新增的配置静态文件
        location /static {

            alias /home/luffy/luffy/static;
        }
    }
}
* 6. 重启nginx
     停止nginx: nginx -s stop
     启动nginx: nginx
* 7. 访问django项目后台(有了样式)
	地址: http://139.196.106.89:8000/xadmin/

12. 测试
* server需要启动: redis-server
* nginx需要启动: nginx
* 虚拟环境下使用uwsgi启动django:  uwsgi -x /home/luffy/luffy.xml
访问地址: http://139.196.106.89:80
12.1 基础功能测试
首页

搜索

课程详情

12.2 购买课程


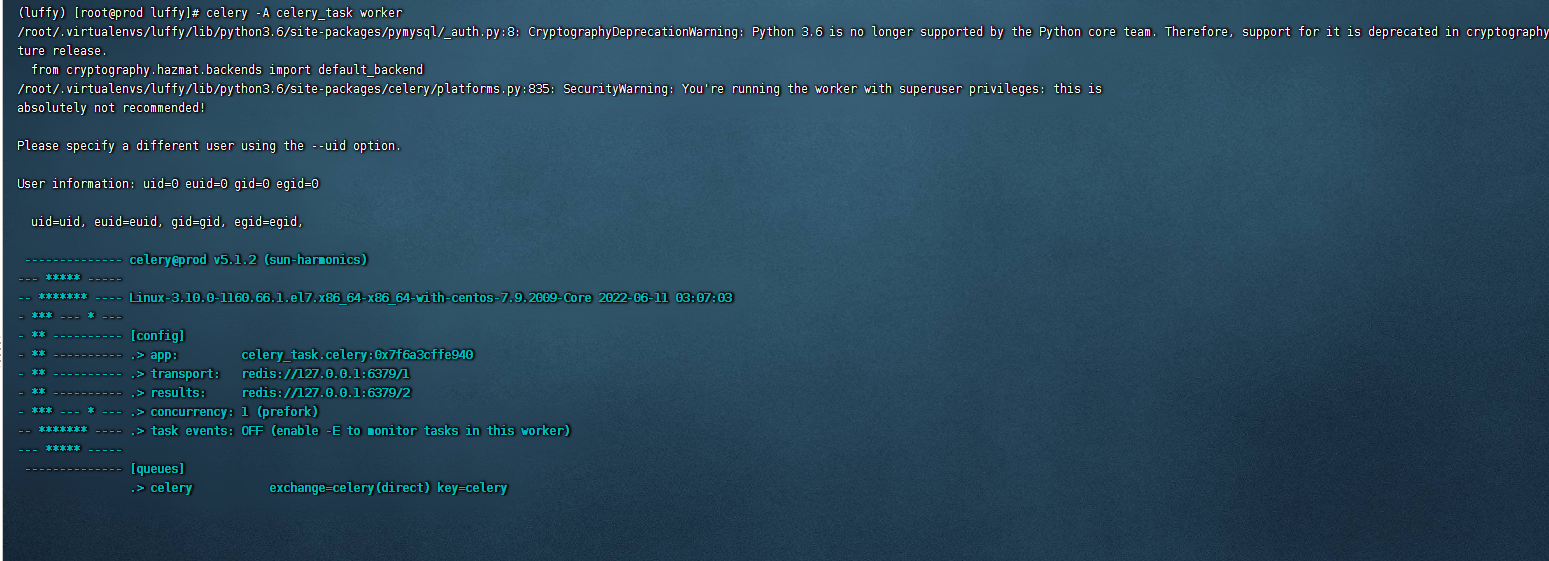
13. 开启定时更新缓存
开设两个终端, 都切换到 lufffy目录下: cd /home/luffy
* 在虚拟环境下执行!
启动worker端命令: celery -A celery_task worker
启动beat端命令: celery -A celery_task beat

边栏推荐
- Release of version 5.6 of rainbow, add multiple installation methods, and optimize the topology operation experience
- Builder pattern
- 高考结束,人生才刚刚开始,10年职场老鸟给的建议
- 如何查看win系统的安装日期
- 不使用加减乘除做加法
- 行而不辍,未来可期|云扩科技入选上海市专精特新企业
- 打印机无法打印测试页是什么原因
- JVM | virtual machine stack (local variable table; operand stack; dynamic link; method binding mechanism; method call; method return address)
- [v2.1] automatic update system based on motion step API (repair bug, increase completion display, support disconnection reconnection and data compensation)
- Superscalar processor design yaoyongbin Chapter 2 cache -- Excerpt from subsection 2.4
猜你喜欢
Nmap进行主机探测出现网段IP全部存活情况分析

206.反转链表

R language book learning 03 "in simple terms R language data analysis" - Chapter 7 linear regression model
![[academic related] under the application review system, how difficult is it to study for a doctoral degree in a double first-class university?](/img/cd/e7ffecbee13596f2298ee8c0a5b873.jpg)
[academic related] under the application review system, how difficult is it to study for a doctoral degree in a double first-class university?

Building a custom CNN model: identifying covid-19

高考结束,人生才刚刚开始,10年职场老鸟给的建议

On the night of the joint commissioning, I beat up my colleagues
![[niuke.com] dp31 [template] complete Backpack](/img/81/5f35a58c48f05a5b4b6bdc106f5da0.jpg)
[niuke.com] dp31 [template] complete Backpack

Leetcode-129- sum of numbers from root node to leaf node

Release of version 5.6 of rainbow, add multiple installation methods, and optimize the topology operation experience
随机推荐
Dynamic memory management (1)
JVM class loader; Parental delegation mechanism
Matlab: 文件夹锁定问题的解决
JVM | runtime data area; Program counter (PC register);
2022-02-28(2)
Take off efficiently! Can it be developed like this?
D. Game With Array
[academic related] under the application review system, how difficult is it to study for a doctoral degree in a double first-class university?
Top - k问题
RPA+低代码助推品牌电商启新创变、重启增长
Collection of articles and literatures related to R language (continuously updated)
RPA super automation | nongnongji and cloud expansion accelerate financial intelligent operation
Leetcode-43- string multiplication
Usage of esp32c3 Arduino Library
In the post epidemic era, how can enterprise CIOs improve enterprise production efficiency through distance
继承的所有特征
超标量处理器设计 姚永斌 第2章 Cache --2.4 小节摘录
二分查找 - 学习
go io模块
自定义实现offsetof