当前位置:网站首页>三层架构 模拟
三层架构 模拟
2022-07-26 22:37:00 【安城倾目】
第一次简单模拟 ,基于xml
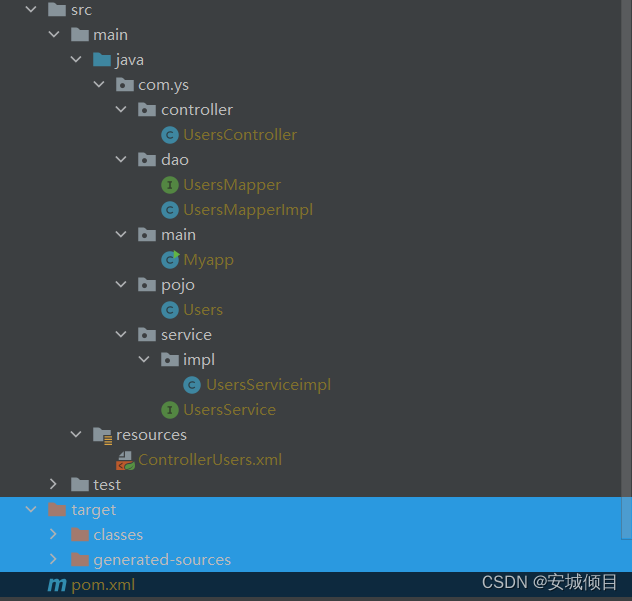
文件代码从上到下
package com.ys.controller;

import com.ys.dao.UsersMapper;
import com.ys.dao.UsersMapperImpl;
import com.ys.pojo.Users;
import com.ys.service.UsersService;
import com.ys.service.impl.UsersServiceimpl;

//界面层
public class UsersController {
//    界面层的功能实现就是对外提供访问的功能

//    如何访问业务逻辑层,创建业务逻辑层的对象
//    所有的界面层都有业务逻辑层的对象
//    界面层--》业务逻辑层--》数据访问层  一层一层调用
    public UsersService usersService;
    public int insert(Users user){
        return usersService.insert(user);
    }

    public void setUsersService(UsersService usersService) {
        this.usersService = usersService;
    }
}
package com.ys.dao;

import com.ys.pojo.Users;

public interface UsersMapper {
    //增加用户
    int insert(Users users);
}
package com.ys.dao;

import com.ys.pojo.Users;
//数据访问层的实现类
public class UsersMapperImpl implements UsersMapper {

    @Override
    public int insert(Users users) {
        System.out.println(users.getName()+"用户增加成功");
        return 1;
    }
}
package com.ys.main;

import com.sun.glass.ui.Application;
import com.ys.controller.UsersController;
import com.ys.pojo.Users;
import org.springframework.context.ApplicationContext;
import org.springframework.context.support.ClassPathXmlApplicationContext;

public class Myapp {
    public static void main(String[] args) {
//   创建容器并启动
        ApplicationContext applicationContext =new ClassPathXmlApplicationContext("ControllerUsers.xml");
//        取出对象
    UsersController usersController = (UsersController) applicationContext.getBean("UsersController");

//    测试
        int num =usersController.insert(new Users("王五",22,3));
        System.out.println(num);

    }
}
package com.ys.pojo;

public class Users {
    private String name;
    private int age;
    private int id;

    public String getName() {
        return name;
    }

    public void setName(String name) {
        this.name = name;
    }

    public int getAge() {
        return age;
    }

    public void setAge(int age) {
        this.age = age;
    }

    public int getId() {
        return id;
    }

    public void setId(int id) {
        this.id = id;
    }

    @Override
    public String toString() {
        return "Users{" +
                "name='" + name + '\'' +
                ", age=" + age +
                ", id=" + id +
                '}';
    }

    public Users(String name, int age, int id) {
        this.name = name;
        this.age = age;
        this.id = id;
    }
}
package com.ys.service.impl;

import com.ys.dao.UsersMapper;
import com.ys.dao.UsersMapperImpl;
import com.ys.pojo.Users;
import com.ys.service.UsersService;
//业务逻辑层的实现类
public class UsersServiceimpl implements UsersService {

//    切记,在所有的业务逻辑层中,都必定有数据访问层的对象
    private UsersMapper usersMapper;
    @Override
    public int insert(Users user) {
//        可以添加更复杂的业务
        return usersMapper.insert(user);
    }

    public UsersMapper getUsersMapper() {
        return usersMapper;
    }

    public void setUsersMapper(UsersMapper usersMapper) {
        this.usersMapper = usersMapper;
    }
}
package com.ys.service;

import com.ys.pojo.Users;

public interface UsersService {
//    增加用户
    int insert(Users user);
}
<?xml version="1.0" encoding="UTF-8"?>
<beans xmlns="http://www.springframework.org/schema/beans"
       xmlns:xsi="http://www.w3.org/2001/XMLSchema-instance"
       xsi:schemaLocation="http://www.springframework.org/schema/beans http://www.springframework.org/schema/beans/spring-beans.xsd">
<!--数据访问层的对象-->
    <bean id="UsersMapperImpl" class="com.ys.dao.UsersMapperImpl" ></bean>
<!--    业务逻辑层的对象-->
    <bean id="UsersServiceimpl" class="com.ys.service.impl.UsersServiceimpl">
        <property name="usersMapper" ref="UsersMapperImpl"></property>
    </bean>
<!--    界面层的对象-->
    <bean id="UsersController" class="com.ys.controller.UsersController">
        <property name="usersService" ref="UsersServiceimpl"></property>
    </bean>
</beans>
<!--注意对象注入必须要setXXX()方法-->
<!--查看是否需要注入,就去看类中有没有对象创建-->
<?xml version="1.0" encoding="UTF-8"?>
<project xmlns="http://maven.apache.org/POM/4.0.0" xmlns:xsi="http://www.w3.org/2001/XMLSchema-instance"
xsi:schemaLocation="http://maven.apache.org/POM/4.0.0 http://maven.apache.org/xsd/maven-4.0.0.xsd">
<modelVersion>4.0.0</modelVersion>
<groupId>org.example</groupId>
<artifactId>spring002</artifactId>
<version>1.0-SNAPSHOT</version>
<properties>
<project.build.sourceEncoding>UTF-8</project.build.sourceEncoding>
<maven.compiler.source>1.8</maven.compiler.source>
<maven.compiler.target>1.8</maven.compiler.target>
</properties>
<dependencies>
<dependency>
<groupId>junit</groupId>
<artifactId>junit</artifactId>
<version>4.11</version>
<scope>test</scope>
</dependency>
<dependency>
<groupId>org.springframework</groupId>
<artifactId>spring-context</artifactId>
<version>5.2.5.RELEASE</version>
</dependency>
<dependency>
<groupId>org.springframework</groupId>
<artifactId>spring-context</artifactId>
<version>5.2.5.RELEASE</version>
<scope>compile</scope>
</dependency>
</dependencies>
</project>
第二次模拟,基于注解改造
文件结构没有变化,代码从上到下为
package com.ys.controller;


import com.ys.pojo.Users;
import com.ys.service.UsersService;
import org.springframework.beans.factory.annotation.Autowired;
import org.springframework.stereotype.Controller;


//界面层
@Controller //由Spring创建界面层对象
public class UsersController {
//    界面层的功能实现就是对外提供访问的功能

//    如何访问业务逻辑层,创建业务逻辑层的对象
//    所有的界面层都有业务逻辑层的对象
//    界面层--》业务逻辑层--》数据访问层  一层一层调用
    @Autowired
    public UsersService usersService;
    public int insert(Users user){
        return usersService.insert(user);
    }

}
Dao接口方法未做改变
package com.ys.dao;

import com.ys.pojo.Users;
import org.springframework.stereotype.Repository;

//数据访问层的实现类
@Repository// 交给Spring框架去创建数据访问层的对象
public class UsersMapperImpl implements UsersMapper {

    @Override
    public int insert(Users users) {
        System.out.println(users.getName()+"用户增加成功");
        return 1;
    }
}
package com.ys.main;


import com.ys.controller.UsersController;
import com.ys.pojo.Users;
import org.springframework.context.ApplicationContext;
import org.springframework.context.support.ClassPathXmlApplicationContext;

public class Myapp {
    public static void main(String[] args) {
//   创建容器并启动
        ApplicationContext applicationContext =new ClassPathXmlApplicationContext("ControllerUsers.xml");
//        取出对象
    UsersController usersController = (UsersController) applicationContext.getBean("usersController");

//    测试
        int num =usersController.insert(new Users("王五",22,3));
        System.out.println(num);

    }
}
实体类未发生改变
package com.ys.service.impl;

import com.ys.dao.UsersMapper;
import com.ys.pojo.Users;
import com.ys.service.UsersService;
import org.springframework.beans.factory.annotation.Autowired;
import org.springframework.stereotype.Service;


//业务逻辑层的实现类
@Service //有Spring创建业务逻辑层的对象
public class UsersServiceimpl implements UsersService {

//    切记,在所有的业务逻辑层中,都必定有数据访问层的对象
    @Autowired
    private UsersMapper usersMapper;
    @Override
    public int insert(Users user) {
//        可以添加更复杂的业务
        return usersMapper.insert(user);
    }

    public UsersMapper getUsersMapper() {
        return usersMapper;
    }

    public void setUsersMapper(UsersMapper usersMapper) {
        this.usersMapper = usersMapper;
    }
}
Service接口没有发生变化
<?xml version="1.0" encoding="UTF-8"?>
<beans xmlns="http://www.springframework.org/schema/beans"
       xmlns:xsi="http://www.w3.org/2001/XMLSchema-instance"
       xmlns:context="http://www.springframework.org/schema/context"
       xsi:schemaLocation="http://www.springframework.org/schema/beans http://www.springframework.org/schema/beans/spring-beans.xsd http://www.springframework.org/schema/context https://www.springframework.org/schema/context/spring-context.xsd">
       <context:component-scan base-package="com.ys"></context:component-scan>
</beans>
pom.xml maven配置文件未发生变化
第三次模拟,基于xml,并对Spring进行拆分
将第一次模拟中的Spring配置文件按层次拆分为三个Spring文件
<?xml version="1.0" encoding="UTF-8"?>
<beans xmlns="http://www.springframework.org/schema/beans"
       xmlns:xsi="http://www.w3.org/2001/XMLSchema-instance"
       xsi:schemaLocation="http://www.springframework.org/schema/beans http://www.springframework.org/schema/beans/spring-beans.xsd">
<!--数据访问层的对象-->
    <bean id="UsersMapperImpl" class="com.ys.dao.UsersMapperImpl" ></bean>
<beans>
<?xml version="1.0" encoding="UTF-8"?>
<beans xmlns="http://www.springframework.org/schema/beans"
       xmlns:xsi="http://www.w3.org/2001/XMLSchema-instance"
       xsi:schemaLocation="http://www.springframework.org/schema/beans http://www.springframework.org/schema/beans/spring-beans.xsd">

<!--    业务逻辑层的对象-->
    <bean id="UsersServiceimpl" class="com.ys.service.impl.UsersServiceimpl">
        <property name="usersMapper" ref="UsersMapperImpl"></property>
    </bean>
<
</beans>
<?xml version="1.0" encoding="UTF-8"?>
<beans xmlns="http://www.springframework.org/schema/beans"
       xmlns:xsi="http://www.w3.org/2001/XMLSchema-instance"
       xsi:schemaLocation="http://www.springframework.org/schema/beans http://www.springframework.org/schema/beans/spring-beans.xsd">
<!--    界面层的对象-->
    <bean id="UsersController" class="com.ys.controller.UsersController">
        <property name="usersService" ref="UsersServiceimpl"></property>
    </bean>
</beans>
再创建一个整合的Spring配置文件
<?xml version="1.0" encoding="UTF-8"?>
<beans xmlns="http://www.springframework.org/schema/beans"
       xmlns:xsi="http://www.w3.org/2001/XMLSchema-instance"
       xsi:schemaLocation="http://www.springframework.org/schema/beans http://www.springframework.org/schema/beans/spring-beans.xsd">
   //单个导入
   <import resource="Spring文件名1.xml"></import>
   <import resource="Spring文件名2.xml"></import>
   <import resource="Spring文件名3.xml"></import>
  //批量导入
   <import resource="Spring_ *.xml"></import> //注意批量导入是的文件名,要格式一致,导入时写出公共部分然后不同的部分用*代替
</beans>
最后主方法中的getBean读取的是整合的Spring文件
UsersController usersController = (UsersController) applicationContext.getBean("整合Spring文件名");第四次模拟,基于注解,并对Spring进行拆分
将Spring文件按层次拆分为三个
<?xml version="1.0" encoding="UTF-8"?>
<beans xmlns="http://www.springframework.org/schema/beans"
       xmlns:xsi="http://www.w3.org/2001/XMLSchema-instance"
       xmlns:context="http://www.springframework.org/schema/context"
       xsi:schemaLocation="http://www.springframework.org/schema/beans http://www.springframework.org/schema/beans/spring-beans.xsd http://www.springframework.org/schema/context https://www.springframework.org/schema/context/spring-context.xsd">
       <context:component-scan base-package="com.ys.A"></context:component-scan>
</beans>
<?xml version="1.0" encoding="UTF-8"?>
<beans xmlns="http://www.springframework.org/schema/beans"
       xmlns:xsi="http://www.w3.org/2001/XMLSchema-instance"
       xmlns:context="http://www.springframework.org/schema/context"
       xsi:schemaLocation="http://www.springframework.org/schema/beans http://www.springframework.org/schema/beans/spring-beans.xsd http://www.springframework.org/schema/context https://www.springframework.org/schema/context/spring-context.xsd">
       <context:component-scan base-package="com.ys.B"></context:component-scan>
</beans>
<?xml version="1.0" encoding="UTF-8"?>
<beans xmlns="http://www.springframework.org/schema/beans"
       xmlns:xsi="http://www.w3.org/2001/XMLSchema-instance"
       xmlns:context="http://www.springframework.org/schema/context"
       xsi:schemaLocation="http://www.springframework.org/schema/beans http://www.springframework.org/schema/beans/spring-beans.xsd http://www.springframework.org/schema/context https://www.springframework.org/schema/context/spring-context.xsd">
       <context:component-scan base-package="com.ys.C"></context:component-scan>
</beans>
再创建一个Spring配置文件进行整合
<?xml version="1.0" encoding="UTF-8"?>
<beans xmlns="http://www.springframework.org/schema/beans"
       xmlns:xsi="http://www.w3.org/2001/XMLSchema-instance"
       xmlns:context="http://www.springframework.org/schema/context"
       xsi:schemaLocation="http://www.springframework.org/schema/beans http://www.springframework.org/schema/beans/spring-beans.xsd http://www.springframework.org/schema/context https://www.springframework.org/schema/context/spring-context.xsd">
     <import resource =" Spring_*.xml"></import> //批量导入,规则与xml的拆分相同,当导入也是相同的
</beans>
最后主方法中的getBean读取的是整合的Spring文件
UsersController usersController = (UsersController) applicationContext.getBean("整合Spring文件名");边栏推荐
- np. transpose & np.expand_ dims
- Chapter 2 develop user traffic interceptors
- 【面试:并发篇26:多线程:两阶段终止模式】volatile版本
- Bid farewell to wide tables and achieve a new generation of Bi with DQL
- Method of realizing program startup and self startup through registry
- Mysql database complex operations: Database Constraints, query / connect table operations
- 4-4 对象生命周期
- [netding Cup 2018] Fakebook records
- 分页插件--PageHelper
- Complete backpack and 01 Backpack
猜你喜欢

Azure synapse analytics Performance Optimization Guide (3) -- optimize performance using materialized views (Part 2)
数据库:MySQL基础+CRUD基本操作

上千Tile的倾斜模型浏览提速,告别一块一块往外蹦的尴尬

Azure synapse analytics Performance Optimization Guide (4) -- optimize performance using result set caching

The basic operation of data tables in MySQL is very difficult. This experiment will take you through it from the beginning

NFT display guide: how to display your NFT collection

第1章 开发第一个restful应用

Add an article ----- scanf usage

第2章 开发用户流量拦截器

分页插件--PageHelper
随机推荐
Oracle remote connection configuration
Part II - C language improvement_ 11. Pretreatment
MVC三层架构
【不积跬步无以至千里】统计日志指定时间段内的关键词
15_ Key function and principle
Paging plug-in -- PageHelper
Chapter 7 course summary
Transformers is a graph neural network
Meeting OA project seating function and submission function
Which securities company has the lowest commission? Is online account opening safe
Iptables prevent nmap scanning and binlog
2022.7.26-----leetcode.1206
Tensorflow2.0 deep learning simple tutorial of running code
力扣141题:环形链表
11_ Weather case - monitoring properties
[2016] [paper notes] differential frequency tunable THz technology——
Chapter 3 cross domain issues
07 design of ponding monitoring system based on 51 single chip microcomputer
Pytorch学习记录(二):张量
14_ Basic list