当前位置:网站首页>LVS+Keepalived群集
LVS+Keepalived群集
2022-08-04 17:33:00 【LEE_九月】
LVS+Keepalived群集
文章目录
一、概述
- Keepalived 的设计目标是构建高可用的 LVS 负载均衡群集,可以调用 ipvsadm 工具来创建虚拟服务器,管理服务器池,而不仅仅是用作双机热备
- Keepalived 也是一个基于VRRP协议来实现的LVS服务高可用方案,可以解决静态路由出现的单点故障问题
1.工作原理
- 在一个LVS服务集群中通常有主服务器(MASTER)和备份服务器(BACKUP)两种角色的服务器,但是对外表现为一个虚拟IP,主服务器会发送VRRP通告信息给备份服务器,当备份服务器收不到VRRP消息的时候,即主服务器异常的时候,备份服务器就会接管虚拟IP,继续提供服务,从而保证了高可用性
实现原理
- keepalived 采用 VRRP 热备份协议实现 Linux 服务器的多机热备功能
- VRRP(虚拟路由冗余协议)是针对路由器的一种备份解决方案
- 由多台路由器组成一个热备份组,通过共用的虚拟IP地址对外提供服务
- 每个热备组内同时只有一台主路由器提供服务,其他路由器处于冗余状态,若当前在线的路由器失效,则其他路由器会根据设置的优先级自动接替虚拟IP地址,继续提供服务
2.优点
- 使用 Keepalived 构建 LVS 群集更加简便易用
- 对 LVS 负载调度器实现热备切换,提高可用性
- 支持故障自动切换
- 支持节点健康状态检查
- 判断 LVS 负载调度器,节点服务器的可用性,当master 主机出现故障及时切换到 backup 节点保证业务正常,当master 故障主机恢复后将其重新加入群集并且重新切换回 master 节点(因为设置了优先级)
3.keepalived体系架构中主要有三个模块
| 模块 | 作用说明 |
|---|---|
| core | 为keepalived的核心,负责主进程的启动、维护及全局配置文件的加载和解析 |
| vrrp | 是来实现VRRP协议 |
| check | 负责健康检查,常见的方式有端口检查及URL检查或脚本检查 |
二、LVS+Keepalived部署
1.环境
负载调度器主DR模式服务器:192.168.36.10
负载调度器备DR模式服务器:192.168.36.20

Web1节点服务器:192.168.36.30
Web2节点服务器:192.168.36.40

客户端 win10:192.168.36.12
VIP地址:  192.168.36.200
#关闭防火墙、核心防护(四台全关)
[[email protected] ~]# systemctl stop firewalld
[[email protected] ~]# systemctl disable firewalld
[[email protected] ~]# setenforce 0
2.配置主负载调度器
2.1安装服务
[[email protected] ~]# yum install -y ipvsadm.x86_64 keepalived.x86_64
2.2修改配置文件keeplived.conf
[[email protected] ~]# cd /etc/keepalived/
[[email protected] keepalived]# cp keepalived.conf keepalived.conf.bak
[[email protected] keepalived]# vim keepalived.conf
! Configuration File for keepalived

global_defs {
   notification_email {
     [email protected]
     [email protected]
     [email protected]
   }
   notification_email_from [email protected]
   smtp_server 127.0.0.1
   #10行,邮件服务指向本地

   smtp_connect_timeout 30
   router_id LVS_01
   #12行,指定服务器(路由器)的名称,主备服务器名称须不同,主为LVS_01,备为LVS_02

   vrrp_skip_check_adv_addr
   vrrp_strict
   #本行注释掉

   vrrp_garp_interval 0
   vrrp_gna_interval 0
}

vrrp_instance VI_1 {
    state MASTER
    #20行,指定热备状态,主为MASTER,备为BACKUP

    interface ens33
    #21行,指定承载vip地址的物理接口

    virtual_router_id 10
    #22行,指定虚拟路由器的ID号,每个热备组保持一致

    priority 100
    #23行,指定优先级,数值越大优先级越高,主为100,备为90

    advert_int 1
    authentication {
        auth_type PASS
        auth_pass 666666
        #27行,主备服务器密码一致
    }
    virtual_ipaddress {
        192.168.36.200
        #指定群集VIP地址
    }
}

virtual_server 192.168.36.200 80 {
#34行,指定虚拟服务器地址(VIP)、端口,定义虚拟服务器和Web服务器池参数

    delay_loop 6
    lb_algo rr
    lb_kind DR
    #37行,指定群集工作模式,直接路由(DR)

    persistence_timeout 50
    protocol TCP

    real_server 192.168.36.30 80 {
    #41行,指定第一个Web节点的地址、端口
        weight 1

        #43行以下删除,添加以下健康检查方式
        TCP_CHECK {
                        connect_port 80
                        connect_timeout 3
                        nb_get_retry 3
                        delay_before_retry 3
                }
        }

        real_server 192.168.36.40 80 {
        #指定第一个Web节点的地址、端口

        weight 1
        TCP_CHECK {
                        connect_port 80
                        connect_timeout 3
                        nb_get_retry 3
                        delay_before_retry 3
                }
        }
}
2.3启动服务,查看虚拟网卡VIP
[[email protected] keepalived]# systemctl start keepalived
[[email protected] keepalived]# ip addr show dev ens33

2.4调整proce响应参数,关闭Linux内核的重定向参数响应
[[email protected] keepalived]# vim /etc/sysctl.conf
#行尾添加
net.ipv4.ip_forward = 1
net.ipv4.conf.all.send_redirects = 0
net.ipv4.conf.default.send_redirects = 0
net.ipv4.conf.ens33.send_redirects = 0

[[email protected] keepalived]# sysctl -p
#查看
3.配置ipvsadm
3.1配置负载分配策略,并启动服务
[[email protected] keepalived]# ipvsadm-save >/etc/sysconfig/ipvsadm
[[email protected] keepalived]# systemctl start ipvsadm.service
3.2清空ipvsadm里的策略,并添加策略
[[email protected] keepalived]# ipvsadm -C
[[email protected] keepalived]# ipvsadm -A -t 192.168.36.200:80 -s rr
[[email protected] keepalived]# ipvsadm -a -t 192.168.36.200:80 -r 192.168.36.30:80 -g
[[email protected] keepalived]# ipvsadm -a -t 192.168.36.200:80 -r 192.168.36.40:80 -g
3.3开启ipvsadm
[[email protected] keepalived]# ipvsadm
IP Virtual Server version 1.2.1 (size=4096)
Prot LocalAddress:Port Scheduler Flags
  -> RemoteAddress:Port           Forward Weight ActiveConn InActConn
TCP  dr1:http rr
  -> 192.168.36.30:http           Route   1      0          0
  -> 192.168.36.40:http           Route   1      0          0
[[email protected] keepalived]# ipvsadm -ln
IP Virtual Server version 1.2.1 (size=4096)
Prot LocalAddress:Port Scheduler Flags
  -> RemoteAddress:Port           Forward Weight ActiveConn InActConn
TCP  192.168.36.200:80 rr
  -> 192.168.36.30:80             Route   1      0          0
  -> 192.168.36.40:80             Route   1      0          0
[[email protected] keepalived]# ipvsadm-save >/etc/sysconfig/ipvsadm
4.Keepalived 配置
keepalived默认会把日志打在/var/log/messages。如果不进行配置的话,日志混在一起很难进行调试问题
4.1修改添加配置文件
[[email protected] keepalived]# vim /etc/sysconfig/keepalived
把KEEPALIVED_OPTIONS="-D" 修改为KEEPALIVED_OPTIONS="-D -d -S 0"

[[email protected] keepalived]# vim /etc/rsyslog.conf
#添加内容
local0.*                       /var/log/keepalived.log

#重启日志记录服务
[[email protected] keepalived]# systemctl restart rsyslog

#重启keepalived服务
[[email protected] keepalived]# systemctl restart keepalived

#可以查看下日志是否生成
[[email protected] keepalived]# cat /var/log/keepalived.log
5.配置备负载调度器
5.1安装服务
[[email protected] ~]# yum install -y ipvsadm.x86_64 keepalived.x86_64
5.2修改配置文件keeplived.conf
[[email protected] ~]# cd /etc/keepalived/
[[email protected] keepalived]# cp keepalived.conf keepalived.conf.bak
[[email protected] keepalived]# vim keepalived.conf
! Configuration File for keepalived

global_defs {
   notification_email {
     [email protected]
     [email protected]
     s[email protected]
   }
   notification_email_from [email protected]
   smtp_server 127.0.0.1
   #10行,邮件服务指向本地

   smtp_connect_timeout 30
   router_id LVS_02
   #12行,指定服务器(路由器)的名称,主备服务器名称须不同,主为LVS_01,备为LVS_02

   vrrp_skip_check_adv_addr
   vrrp_strict
    #本行注释掉

   vrrp_garp_interval 0
   vrrp_gna_interval 0
}

vrrp_instance VI_1 {
    state BACKUP
    #20行,指定热备状态,主为MASTER,备为BACKUP

    interface ens33
    #21行,指定承载vip地址的物理接口

    virtual_router_id 10
    #22行,指定虚拟路由器的ID号,每个热备组保持一致

    priority 90
    #23行,指定优先级,数值越大优先级越高,主为100,备为90

    advert_int 1
    authentication {
        auth_type PASS
        auth_pass 666666
        #27行,主备服务器密码一致
    }
    virtual_ipaddress {
        192.168.36.200
        #指定群集VIP地址
    }
}

virtual_server 192.168.36.200 80 {
#34行,指定虚拟服务器地址(VIP)、端口,定义虚拟服务器和Web服务器池参数

    delay_loop 6
    lb_algo rr
    lb_kind DR
    #37行,指定群集工作模式,直接路由(DR)

    persistence_timeout 50
    protocol TCP

    real_server 192.168.36.30 80 {
    #41行,指定第一个Web节点的地址、端口
        weight 1

        #43行以下删除,添加以下健康检查方式
        TCP_CHECK {
                        connect_port 80
                        connect_timeout 3
                        nb_get_retry 3
                        delay_before_retry 3
                }
        }

        real_server 192.168.36.40 80 {
        #指定第一个Web节点的地址、端口

        weight 1
        TCP_CHECK {
                        connect_port 80
                        connect_timeout 3
                        nb_get_retry 3
                        delay_before_retry 3
                }
        }
}
5.3启动服务、查看虚拟网卡VIP
[[email protected] keepalived]# systemctl start keepalived
[[email protected] keepalived]# ip addr show dev ens33
5.4调整proce响应参数,关闭Linux内核的重定向参数响应
[[email protected] keepalived]# vim /etc/sysctl.conf
#添加内容
net.ipv4.ip_forward = 1
net.ipv4.conf.all.send_redirects = 0
net.ipv4.conf.default.send_redirects = 0
net.ipv4.conf.ens33.send_redirects = 0

#查看
[[email protected] keepalived]# sysctl -p
6.配置ipvsadm
6.1配置负载分配策略,并启动服务
[[email protected] keepalived]# ipvsadm-save >/etc/sysconfig/ipvsadm
[[email protected] keepalived]# systemctl start ipvsadm.service
6.2清空ipvsadm里的策略,并添加策略
[[email protected] keepalived]# ipvsadm -A -t 192.168.36.200:80 -s rr
[[email protected] keepalived]# ipvsadm -a -t 192.168.36.200:80 -r 192.168.36.30:80 -g
[[email protected] keepalived]# ipvsadm -a -t 192.168.36.200:80 -r 192.168.36.40:80 -g
6.3开启ipvsadm
[[email protected] keepalived]# ipvsadm
[[email protected] keepalived]# ipvsadm -ln
[[email protected] keepalived]# ipvsadm-save >/etc/sysconfig/ipvsadm
7.配置节点服务器web1
7.1安装并开启httpd服务
[[email protected] ~]# yum -y install httpd
[[email protected] ~]# systemctl start httpd
7.2配置站点文件
[[email protected] ~]# vim /var/www/html/index.html
<h1>八百标兵奔北坡</h1>
7.3配置虚拟vip
[[email protected] ~]# cd /etc/sysconfig/network-scripts/
[[email protected] network-scripts]# cp ifcfg-lo ifcfg-lo:0
[[email protected] network-scripts]# vim ifcfg-lo:0
DEVICE=lo:0
ONBOOT=yes
IPADDR=192.168.36.200
NETMASK=255.255.255.255
7.4重启网络服务,开启虚拟网卡
[[email protected] network-scripts]# systemctl restart network
[[email protected] network-scripts]# ifup lo:0
[[email protected] network-scripts]# ifconfig lo:0
lo:0: flags=73<UP,LOOPBACK,RUNNING>  mtu 65536
        inet 192.168.36.200  netmask 255.255.255.255
        loop  txqueuelen 1000  (Local Loopback)
7.5设置路由
[[email protected] network-scripts]# route add -host 192.168.36.200 dev lo:0
[[email protected] network-scripts]# route -n
Kernel IP routing table
Destination     Gateway         Genmask         Flags Metric Ref    Use Iface
0.0.0.0         192.168.36.2    0.0.0.0         UG    100    0        0 ens33
192.168.36.0    0.0.0.0         255.255.255.0   U     100    0        0 ens33
192.168.36.200  0.0.0.0         255.255.255.255 UH    0      0        0 lo
192.168.122.0   0.0.0.0         255.255.255.0   U     0      0        0 virbr0
7.6调整 proc 响应参数
添加系统只响应目的IP为本地IP的ARP请求
系统不使用原地址来设置ARP请求的源地址,而是物理mac地址上的IP
[[email protected] network-scripts]# vim /etc/sysctl.conf
#添加以下内容
net.ipv4.conf.all.arp_ignore = 1
net.ipv4.conf.all.arp_announce = 2
net.ipv4.conf.default.arp_ignore = 1
net.ipv4.conf.default.arp_announce = 2
net.ipv4.conf.lo.arp_ignore = 1
net.ipv4.conf.lo.arp_announce = 2

#刷新查看
[[email protected] network-scripts]# sysctl -p
8.配置节点服务器web2
8.1安装并开启httpd服务
[[email protected] ~]# yum -y install httpd
[[email protected] ~]# systemctl start httpd
8.2配置站点文件
[[email protected] ~]# vim /var/www/html/index.html
<h1>炮兵并排北边跑</h1>
8.3配置虚拟vip
[[email protected] ~]# cd /etc/sysconfig/network-scripts/
[[email protected] network-scripts]# cp ifcfg-lo ifcfg-lo:0
[[email protected] network-scripts]# vim ifcfg-lo:0
DEVICE=lo:0
ONBOOT=yes
IPADDR=192.168.36.200
NETMASK=255.255.255.255
8.4重启网络服务,开启虚拟网卡
[[email protected] network-scripts]# systemctl restart network
[[email protected] network-scripts]# ifup lo:0
[[email protected] network-scripts]# ifconfig lo:0
lo:0: flags=73<UP,LOOPBACK,RUNNING>  mtu 65536
        inet 192.168.36.200  netmask 255.255.255.255
        loop  txqueuelen 1000  (Local Loopback)
8.5设置路由
[[email protected] network-scripts]# route add -host 192.168.36.200 dev lo:0
[[email protected] network-scripts]# route -n
Kernel IP routing table
Destination     Gateway         Genmask         Flags Metric Ref    Use Iface
0.0.0.0         192.168.36.2    0.0.0.0         UG    100    0        0 ens33
192.168.36.0    0.0.0.0         255.255.255.0   U     100    0        0 ens33
192.168.36.200  0.0.0.0         255.255.255.255 UH    0      0        0 lo
192.168.122.0   0.0.0.0         255.255.255.0   U     0      0        0 virbr0
8.6调整 proc 响应参数
[[email protected] network-scripts]# vim /etc/sysctl.conf
net.ipv4.conf.all.arp_ignore = 1
net.ipv4.conf.all.arp_announce = 2
net.ipv4.conf.default.arp_ignore = 1
net.ipv4.conf.default.arp_announce = 2
net.ipv4.conf.lo.arp_ignore = 1
net.ipv4.conf.lo.arp_announce = 2

[[email protected] network-scripts]# sysctl -p
三、测试
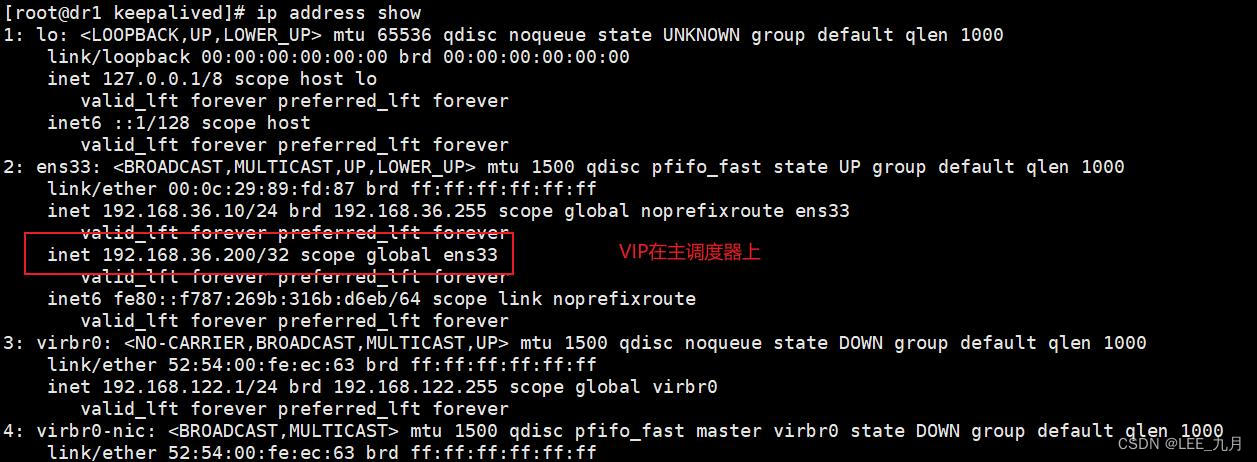
当前使用的为主DR服务器

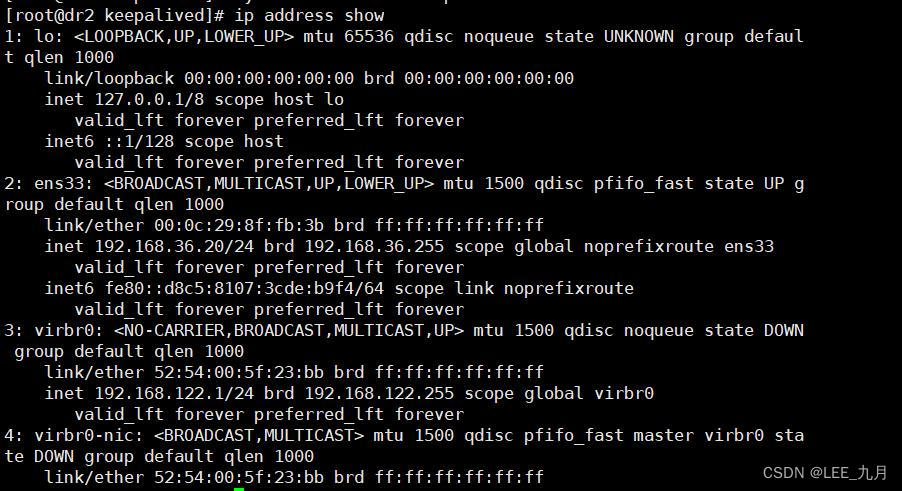
备调度器上没有VIP

断开主调度器
[[email protected] keepalived]# systemctl stop keepalived.service
可以看到主调度器的VIP已经没有了

已经漂移到备调度器上了

win10上测试


边栏推荐
猜你喜欢
随机推荐
两个对象相同数据赋值
荣耀发布开发者服务平台,智慧生态合作提速
(一)、线性表的顺序存储结构链式存储结构
基于大学生内卷行为的调查研究
WPF 修改 ItemContainerStyle 鼠标移动到未选中项效果和选中项背景
安装失败怎么办
C. LIS or Reverse LIS?
太一集团全资收购火币旗下社交产品火信
The use of QCompleter for Qt auto-completion
【web自动化测试】Playwright快速入门,5分钟上手
R语言ggpubr包的ggline函数可视化折线图、设置add参数为mean_se和dotplot可视化不同水平均值的折线图并为折线图添加误差线(se标准误差)和点阵图、设置折线和数据点边框颜色
华为云计算HCIE之oceanstor仿真器的安装教程
开发一套高容错分布式系统
CAS:385437-57-0,DSPE-PEG-Biotin,生物活性分子磷脂-聚乙二醇-生物素
JSP 标准标签库(JSTL)[通俗易懂]
第一章 对象和封装
学习探索-网站中引入百度统计
数字化金融企业的产品体系长啥样?
使用Redis做某个时间段在线数统计
关于ETL的两种架构(ETL架构和ELT架构)


