当前位置:网站首页>QT and OpenGL: load 3D models using the open asset import library (assimp)
QT and OpenGL: load 3D models using the open asset import library (assimp)
2022-07-07 23:53:00 【Raring_ Ringtail】
Qt and OpenGL: Use Open Asset Import Library(ASSIMP) load 3D Model
Translated from :https://www.ics.com/blog/qt-and-opengl-loading-3d-model-open-asset-import-library-assimp
By Eric Stone Wednesday, May 21, 2014
This blog post is the first in the series , This series of articles will show you how to OpenGL And Qt Use it together . In this issue , We will study how to use Open Asset Import Library(ASSIMP)(1) From some common 3D Model format loading 3D Model . This sample code requires Assimp 3.0 Above version . The code will also use Qt Multiple convenience classes of (QString,QVector,QSharedPointer etc. ).
Read page 2 part Qt and OpenGL: Use Open Asset Import Library(ASSIMP) load 3D Model
Introduce
First , We will create some simple classes to store the data of the model . structure MaterialInfo Will contain information about the appearance of the material . We will use Phong shading model (2) Coloring .
struct MaterialInfo
{

    QString Name;
    QVector3D Ambient;
    QVector3D Diffuse;
    QVector3D Specular;
    float Shininess;
};
LightInfo The structure will contain information about the light source :
struct LightInfo
{

    QVector4D Position;
    QVector3D Intensity;
};
Mesh Class will provide us with information about the grid . It does not actually contain vertex data of the mesh , But it has the information we need to get from the vertex buffer . Mesh::indexCount Is the number of vertices in the mesh ,Mesh::indexOffset Is the starting position of vertex data in the buffer ,Mesh::material Is the material information of the mesh .
struct Mesh
{

    QString name;
    unsigned int indexCount;
    unsigned int indexOffset;
    QSharedPointer<MaterialInfo> material;
};
A single model may have many different meshes . Node Class will contain the mesh and the transformation matrix that places it in the scene . Each node can also have child nodes . We can store all the meshes in a single array , But storing them in a tree structure makes it easier to animate objects . It can be regarded as a human body , It's like the body is the root node , The upper arm will be a child of the root node , The lower arm will be a child of the upper arm node , The hand will be the child node of the lower arm node .
struct Node
{

    QString name;
    QMatrix4x4 transformation;
    QVector<QSharedPointer<Mesh> > meshes;
    QVector<Node> nodes;
};
ModelLoader Class will be used to load information into a single root node :
class ModelLoader
{

public:
    ModelLoader();
    bool Load(QString pathToFile);
    void getBufferData(QVector<float> **vertices, QVector<float> **normals,
                        QVector<unsigned int> **indices);

    QSharedPointer<Node> getNodeData() {
     return m_rootNode; }
The usage of this class will be simple . ModelLoader::Load() Accept 3D Path to model file , And load the model . ModelLoader::getBufferData() Used to retrieve the vertex position of the indexed graph 、 Normals and indexes . ModelLoader::getNodeData() The root node will be returned .
Here is ModelLoader Private functions and variables :
    QSharedPointer<MaterialInfo> processMaterial(aiMaterial *mater);
    QSharedPointer<Mesh> processMesh(aiMesh *mesh);
    void processNode(const aiScene *scene, aiNode *node, Node *parentNode, Node &newNode);

    void transformToUnitCoordinates();
    void findObjectDimensions(Node *node, QMatrix4x4 transformation, QVector3D &minDimension, QVector3D &maxDimension);

    QVector<float> m_vertices;
    QVector<float> m_normals;
    QVector<unsigned int> m_indices;

    QVector<QSharedPointer<MaterialInfo> > m_materials;
    QVector<QSharedPointer<Mesh> > m_meshes;
    QSharedPointer<Node> m_rootNode;
The next step is to load the model . If not installed Assimp 3.0, Must be installed Assimp 3.0. Please note that ,Assimp 2.0 Does not work in this example . First , We include the necessary Assimp header :
#include <assimp/scene.h>
#include <assimp/postprocess.h>
#include <assimp/Importer.hpp>
This is a ModelLoader::Load() Function code :
bool ModelLoader::Load(QString pathToFile)
{

    Assimp::Importer importer;

    const aiScene* scene = importer.ReadFile(pathToFile.toStdString(),
            aiProcess_GenSmoothNormals |
            aiProcess_CalcTangentSpace |
            aiProcess_Triangulate |
            aiProcess_JoinIdenticalVertices |
            aiProcess_SortByPType
            );

    if (!scene)
    {

        qDebug() << "Error loading file: (assimp:) " << importer.GetErrorString();
        return false;
    }
Assimp Store all the information about the model here aiScene In the example . importer The object is preserved aiScene Ownership of objects , So we don't have to worry about it being deleted in the future . If an error occurs , The returned scene object will be null, So we check here , If an error occurs , Returns... From the function false.
About passing to importer More details about the logo of , Please see the Assimp Of postprocess.h file . The following is the introduction of the logo mentioned above :
GenSmoothNormals: If there is no normal in the model , Generate normal .CalcTangentSpace: Calculate tangent space , It is only necessary for normal mapping .Triangulate: Split an entity with more than three vertices into triangles .JoinIdenticalVertices: Connect the same vertex data , And improve performance by indexing graphics .
If scene Not for null, Then we can assume that the model has loaded correctly and started copying the required data . The data will be read in the following order :
1. texture of material (Materials)
2. grid (Meshes)
3. node (Nodes)
The material must be loaded before the mesh , The mesh must be loaded before the node .
Load material
The next step is to load materials :
    if (scene->HasMaterials())
    {

        for (unsigned int ii = 0; ii < scene->mNumMaterials; ++ii)
        {

            QSharedPointer<MaterialInfo> mater = processMaterial(scene->mMaterials[ii]);
            m_materials.push_back(mater);
        }
    }
All materials are stored in aiScene::mMaterials Array , And the array size is aiScene::nNumMaterials. We traverse each object , And pass it on to our processMaterial function , This function will return a new MaterialInfo object . then , Variable m_materials It will contain the material information of all meshes in the scene ( If available ).
Let's take a closer look at what we will use ModelLoader::processMaterial Realization :
QSharedPointer<MaterialInfo> ModelLoader::processMaterial(aiMaterial *material)
{

    QSharedPointer<MaterialInfo> mater(new MaterialInfo);

    aiString mname;
    material->Get(AI_MATKEY_NAME, mname);
    if (mname.length > 0)
        mater->Name = mname.C_Str();

    int shadingModel;
    material->Get(AI_MATKEY_SHADING_MODEL, shadingModel);

    if (shadingModel != aiShadingMode_Phong && shadingModel != aiShadingMode_Gouraud)
    {

        qDebug() << "This mesh's shading model is not implemented in this loader, setting to default material";
        mater->Name = "DefaultMaterial";
    }
    else
        ...
aiMaterial Class uses key value pairs to store material data . We copy the name , Then check the lighting model of this material . In this tutorial , We just need to focus on Phong or Gouraud shading model , therefore , If not one of them , Then set the name to “DefaultMaterial” To indicate that rendering should use its own material values .
Continue with the above code :
    ...
    }
    else
    {

        aiColor3D dif(0.f,0.f,0.f);
        aiColor3D amb(0.f,0.f,0.f);
        aiColor3D spec(0.f,0.f,0.f);
        float shine = 0.0;

        material->Get(AI_MATKEY_COLOR_AMBIENT, amb);
        material->Get(AI_MATKEY_COLOR_DIFFUSE, dif);
        material->Get(AI_MATKEY_COLOR_SPECULAR, spec);
        material->Get(AI_MATKEY_SHININESS, shine);

        mater->Ambient = QVector3D(amb.r, amb.g, amb.b);
        mater->Diffuse = QVector3D(dif.r, dif.g, dif.b);
        mater->Specular = QVector3D(spec.r, spec.g, spec.b);
        mater->Shininess = shine;

        mater->Ambient *= .2;
        if (mater->Shininess == 0.0)
            mater->Shininess = 30;
    }

    return mater;
}
We only deal with the ambient light , Diffuse reflection , Specular reflection and gloss are very sexy . You can go to here (3) See a longer list of available attributes . call aiMaterial::Get(key, value) Get the desired value , Then copy it to MaterialInfo object .
Please note that , We have reduced the ambient light value here . This is because we use for rendering OpenGL Shaders are only for ambient lighting , Diffuse and specular incident light use the same illumination intensity vector (LightInfo::Intensity). in addition , Our shader can illuminate the environment of the light source , Diffuse and specular components use separate vectors , To achieve better control . We also check whether the brightness value is specified for the model , without , The default value is set to 30.
Load grid
go back to Load() Function :
    if (scene->HasMeshes())
    {

        for (unsigned int ii = 0; ii < scene->mNumMeshes; ++ii)
        {

            m_meshes.push_back(processMesh(scene->mMeshes[ii]));
        }
    }
    else
    {

        qDebug() << "Error: No meshes found";
        return false;
    }
All meshes are stored in aiScene::mMeshes Array , And the array size is aiScene::nNumMeshes. We traverse each object , And pass it on to our ModelLoader::processMesh function , This function will return a new Mesh object . Variable m_meshes All meshes in the scene will be included .
here , Each mesh will be associated with a material . If no material is assigned in the model , It will have the default material , Its MaterialInfo::Name Set to DefaultMaterial. To load the mesh , We need to do the following :
- Calculate index offset (
Mesh::indexOffset). This will tell us where the data of the grid starts in the buffer . - Remove all vertex data from
aiMesh::mVertices[]Copy to our vertex buffer (ModelLoader::m_vertices). - Remove all normal data from
aiMesh::mNormals[]Copy to our normal buffer (ModelLoader::m_normals). - ( Optional , This tutorial does not cover ) Copy texture related data .
- Calculate the index data and add it to our index buffer (
ModelLoader::m_indices). - Set the index count of the grid (
Mesh::indexCount), This is the number of vertices in the mesh . - Set the material of the mesh (
Mesh::material).
QSharedPointer<Mesh> ModelLoader::processMesh(aiMesh *mesh)
{

    QSharedPointer<Mesh> newMesh(new Mesh);
    newMesh->name = mesh->mName.length != 0 ? mesh->mName.C_Str() : "";
    newMesh->indexOffset = m_indices.size();
    unsigned int indexCountBefore = m_indices.size();
    int vertindexoffset = m_vertices.size()/3;

    // Get Vertices
    if (mesh->mNumVertices > 0)
    {

        for (uint ii = 0; ii < mesh->mNumVertices; ++ii)
        {

            aiVector3D &vec = mesh->mVertices[ii];

            m_vertices.push_back(vec.x);
            m_vertices.push_back(vec.y);
            m_vertices.push_back(vec.z);
        }
    }

    // Get Normals
    if (mesh->HasNormals())
    {

        for (uint ii = 0; ii < mesh->mNumVertices; ++ii)
        {

            aiVector3D &vec = mesh->mNormals[ii];
            m_normals.push_back(vec.x);
            m_normals.push_back(vec.y);
            m_normals.push_back(vec.z);
        };
    }

    // Get mesh indexes
    for (uint t = 0; t < mesh->mNumFaces; ++t)
    {

        aiFace* face = &mesh->mFaces[t];
        if (face->mNumIndices != 3)
        {

            qDebug() << "Warning: Mesh face with not exactly 3 indices, ignoring this primitive.";
            continue;
        }

        m_indices.push_back(face->mIndices[0]+vertindexoffset);
        m_indices.push_back(face->mIndices[1]+vertindexoffset);
        m_indices.push_back(face->mIndices[2]+vertindexoffset);
    }

    newMesh->indexCount = m_indices.size() - indexCountBefore;
    newMesh->material = m_materials.at(mesh->mMaterialIndex);

    return newMesh;
}
Most of them are simple . Because only one buffer is used for each vertex (Assimp Each grid has a buffer ), Therefore, you need to add the offset to the index value .
aiMesh Store index data in aiFace Object array . aiFace Represents a basic drawing figure . If face The number of indexes of is not equal to 3, Then it is not a triangle , So we will ignore it in this tutorial .
If face It's a triangle , Then add the index value to m_indices. Remember to add vertex offset values to it , because Assimp The index given is relative to the grid , We store the indexes of all grids in a buffer .
Since we have processed all indexes of the grid , So now we can calculate the index count of the grid , And set the material of the mesh .
In this tutorial , We only focus on vertices , Normals and indexes , But you can load other information here , For example, vertex texture coordinates or tangents . Downloadable sample code (4) It also contains functions to obtain this information .
Load node
Next , We must start from the root node aiScene The nodes in the . Nodes define where the mesh is drawn relative to each other . Make sure aiScene The root node of is not null, Then pass it to processNode(), This will enable filling with all model data ModelLoader::m_rootNode.
    if (scene->mRootNode != NULL)
    {

        Node *rootNode = new Node;
        processNode(scene, scene->mRootNode, 0, *rootNode);
        m_rootNode.reset(rootNode);
    }
    else
    {

        qDebug() << "Error loading model";
        return false;
    }

    return true;
}
This is a processNode Implementation steps . We need to perform the following steps :
- ( Optional ) Set the name of the node .
- Set the transformation matrix of the node .
- Copy the pointer to each mesh of the node .
- Add child nodes , And call... For each child node
ModelLoader::processNode. This will recursively process all children .
void ModelLoader::processNode(const aiScene *scene, aiNode *node, Node *parentNode, Node &newNode)
{

    newNode.name = node->mName.length != 0 ? node->mName.C_Str() : "";

    newNode.transformation = QMatrix4x4(node->mTransformation[0]);

    newNode.meshes.resize(node->mNumMeshes);
    for (uint imesh = 0; imesh < node->mNumMeshes; ++imesh)
    {

        QSharedPointer<Mesh> mesh = m_meshes[node->mMeshes[imesh]];
        newNode.meshes[imesh] = mesh;
    }

    for (uint ich = 0; ich < node->mNumChildren; ++ich)
    {

        newNode.nodes.push_back(Node());
        processNode(scene, node->mChildren[ich], parentNode, newNode.nodes[ich]);
    }
}
Finishing work
This class can be used as follows :
    ModelLoader model;

    if (!model.Load("head.3ds"))
    {

        m_error = true;
        return;
    }

    QVector<float> *vertices;
    QVector<float> *normals;
    QVector<unsigned int> *indices;

    model.getBufferData(&vertices, &normals, &indices);

    m_rootNode = model.getNodeData();
thus , You have used OpenGL Display all the data required by the model .
Downloadable examples (4) Full source code for , Include qmake Project documents . If there is Assimp 3 The above Library , Then it can run on any platform . You may need to adjust the path in the project file . In the latest version of Linux( for example Ubuntu) On , Appropriate version Assimp Can be used as Linux Part of the distribution provides . stay Mac and Windows On , You may need to build from source Assimp. There are two groups of shaders and scene classes , One set for OpenGL 3.3, The other group is for OpenGL 2.1 / OpenGL ES2. It will try to run 3.3 edition , But if necessary, it should automatically fall back to GL 2 edition .
summary
This blog post demonstrates how to use Qt and Assimp Library loading 3D Model .
Read page 2 part Qt and OpenGL: Use Open Asset Import Library(ASSIMP) load 3D Model
reference
- Open Asset Import Library, accessed April 30, 2014, assimp.sourceforge.net
- Phong Shading, Wikipedia article, accessed April 30, 2014, en.wikipedia.org/wiki/Phong_shading
- Assimp Material System, accessed April 30, 2014, assimp.sourceforge.net/lib_html/materials.html
- Downloadable code for this blog post :OpenGL Blog post file
About author
Eric Stone
Eric yes ICS Software Engineer of , With the use of C++ Rich experience in programming . He has used it Qt and OpenGL Programming for more than six years , And has practical experience in developing applications on desktop computers and embedded devices .
original text :https://www.ics.com/blog/qt-and-opengl-loading-3d-model-open-asset-import-library-assimp
Welcome to my official account. Notes on Jiangda
边栏推荐
- Pigsty: out of the box database distribution
- 正畸注意事项(持续更新中)
- Navicat connects Oracle
- 数据分析系列 之3σ规则/依据拉依达准则来剔除异常值
- Aitm3.0005 smoke toxicity test
- 2022.7.7-----leetcode. six hundred and forty-eight
- Postgres timestamp to human eye time string or millisecond value
- FFA与ICGA造影
- Flash download setup
- Take you hand in hand to build Eureka server with idea
猜你喜欢

HB 5469民用飞机机舱内部非金属材料燃烧试验方法

One click free translation of more than 300 pages of PDF documents
postgis学习
Magic fast power

The file format and extension of XLS do not match
![[experiment sharing] log in to Cisco devices through the console port](/img/e4/fc72ed57de74a0dd51c484a1c2f348.png)
[experiment sharing] log in to Cisco devices through the console port
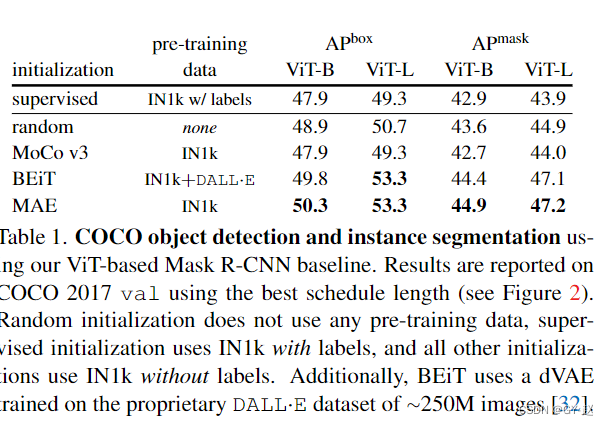
Benchmarking Detection Transfer Learning with Vision Transformers(2021-11)

数据湖(十五):Spark与Iceberg整合写操作
Laser slam learning (2d/3d, partial practice)
Pycharm basic settings latest version 2022

随机推荐
limit 与offset的用法(转载)
Oracle string sorting
P1308 [noip2011 popularity group] count the number of words
Reverse output three digit and arithmetic sequence
Is it safe for tongdaxin to buy funds?
Svn relocation
C - Fibonacci sequence again
Chisel tutorial - 02 Chisel environment configuration and implementation and testing of the first chisel module
FFA and ICGA angiography
自动化测试:Robot FrameWork框架90%的人都想知道的实用技巧
BSS 7230 航空内饰材料阻燃性能测试
35岁那年,我做了一个面临失业的决定
数据分析系列 之3σ规则/依据拉依达准则来剔除异常值
第四期SFO销毁,Starfish OS如何对SFO价值赋能?
@Configuration注解的详细介绍
Binary sort tree [BST] - create, find, delete, output
Download AWS toolkit pycharm
Uic564-2 Appendix 4 - flame retardant fire test: flame diffusion
gorm 关联关系小结
Pypharm uses, and the third-party library has errors due to version problems