当前位置:网站首页>520送什么?DIY一个高颜值RGB时钟,女生看了都想要
520送什么?DIY一个高颜值RGB时钟,女生看了都想要
2022-07-26 05:25:00 【小麦大叔】
点击上方“小麦大叔”,选择“置顶/星标公众号”
福利干货,第一时间送达

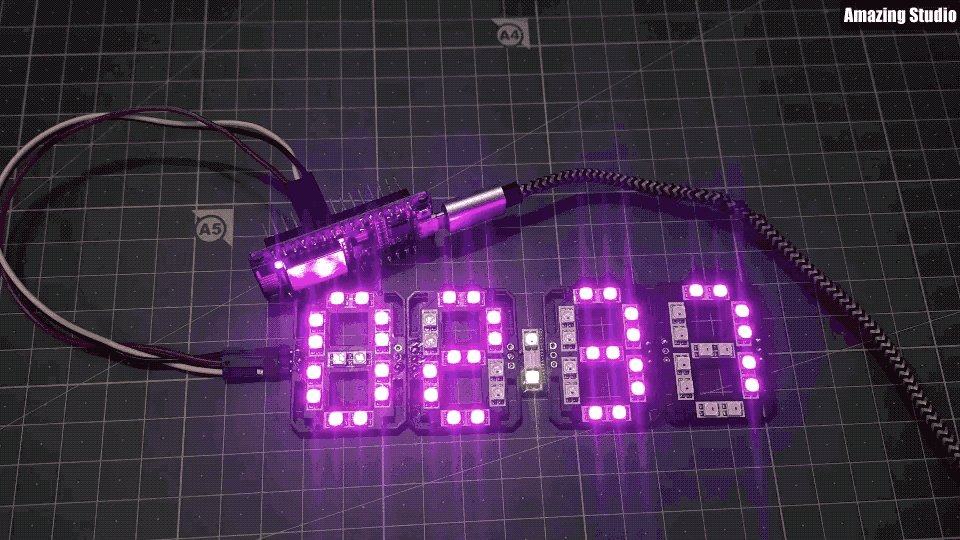
给大家分享一个用ESP8266做一个高颜值的RGB时钟的项目!
这个时钟还具有自动亮度控制功能并配备了温度传感器!
材料准备
PCB
ESP8266或Nodemcu
跳线
焊接工具
第1步: 准备工作


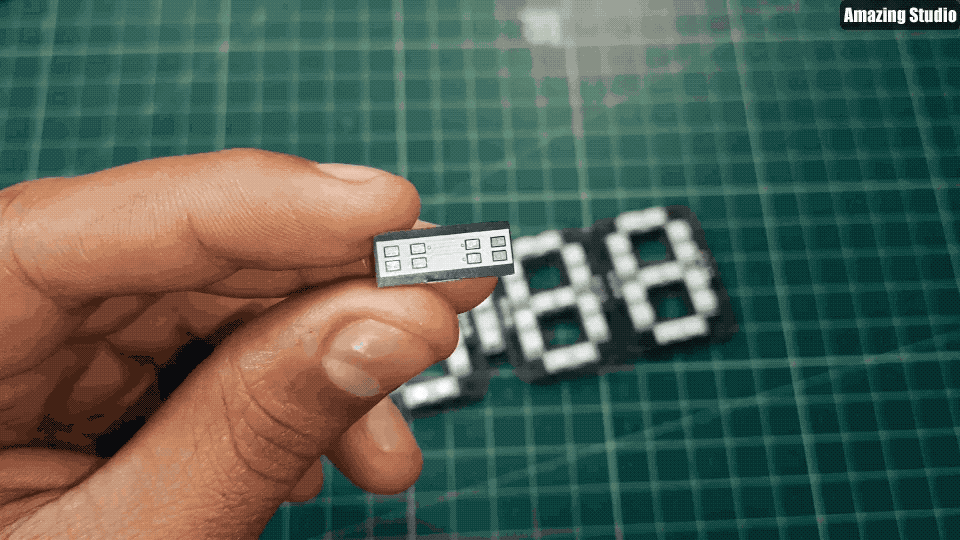
Neo Pixel是可寻址的LED,我们可以通过编程,让它显示任何一种颜色或者数字。
Neo Pixel有不同的smd封装,这个项目使用的是Ws2812b-5050 mini RGB。
这种迷你LED的额定电压为3.0V到5.5V,电流为16mA(每个LED)。
NodeMCU有3.3V的稳压器,可以正常驱动所有的LED。
第2步:使用Neo Pixel Led制作7段显示器


在这里,我们需要把所有的电源并联起来,把所有的数据连接串联起来,使用7段显示方法,如上图连接所有的LED。
每段有2个LED,整个面板总共有14个LED。
我们需要4个面板来显示时间(2个显示小时,2个显示分钟)。
当然还可以再连接两个面板来显示秒/任何其他数值,或者温度。
不管怎么连接,记住总是要把第一个面板的DOUT连接到第二个面板的DIN。
第3步:连接仪表盘

为了连接小时和分钟面板,在两面板之间有一个小的PCB板,名为Dash,包含了2个LED作为二进制数字,这2个LED灯每隔一秒就会发光一次。
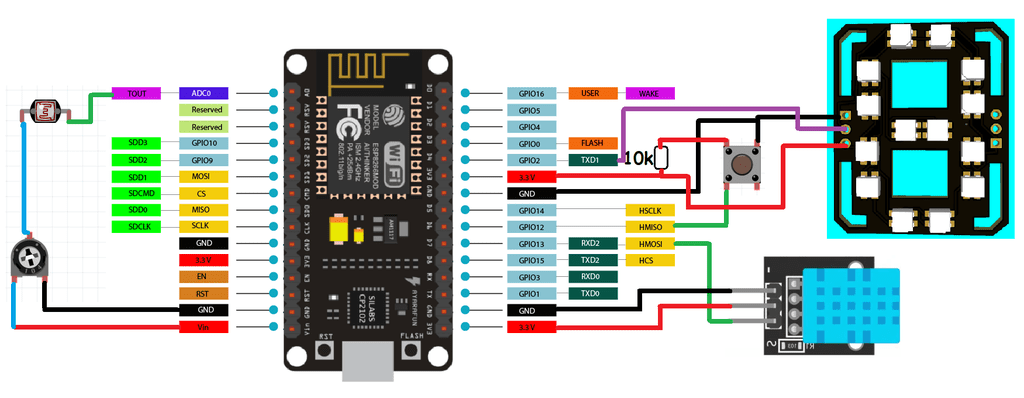
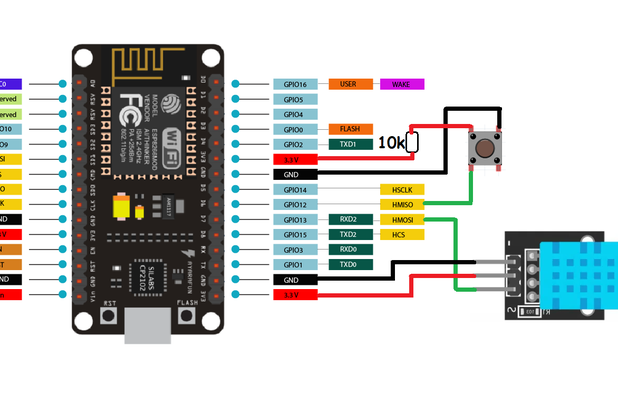
第4步:NodeMCU/ESP8266介绍

ESP8266集成了一个32位Tensilica处理器,标准的数字外围接口。
我们的ESP8266具有板载Wi-Fi支持,通过它我们可以连上互联网调整时间,而不需要任何RTC(实时时钟)模块。
这样子的话可以减少连接,使整个项目变得更简单一些。
第5步:代码中支持的功能
如果使用本文提供的代码,那么我们可以在这个7段时钟中增加2个额外的功能:
使用触觉开关的温度和湿度显示
在13号针脚上添加一个DHT11传感器,在12号针脚上添加一个触觉按钮,可以在屏幕上获得摄氏或华氏的温度值。
用一个10k电阻将按钮的第12针脚连接到5V,另一端连接到GND。也就是说,当按钮针脚被拉到GND时,显示器将显示温度读数。如果没有这个温度传感器,代码也可以工作,所以如果你想让项目简单一点,也可以不需要这些连接。
使用引脚A0的LDR传感器进行亮度控制

通过在A0引脚上做一个电阻分压器网络,添加一个带有10k电阻的LDR传感器,可以相应地改变亮度。
白天的亮度高,晚上的亮度低。如果你不想要可调节亮度,这部分代码也可以在没有这些传感器的情况下工作,它将会锁定在默认设置。
第6步:视频演示
第7步:7段时钟
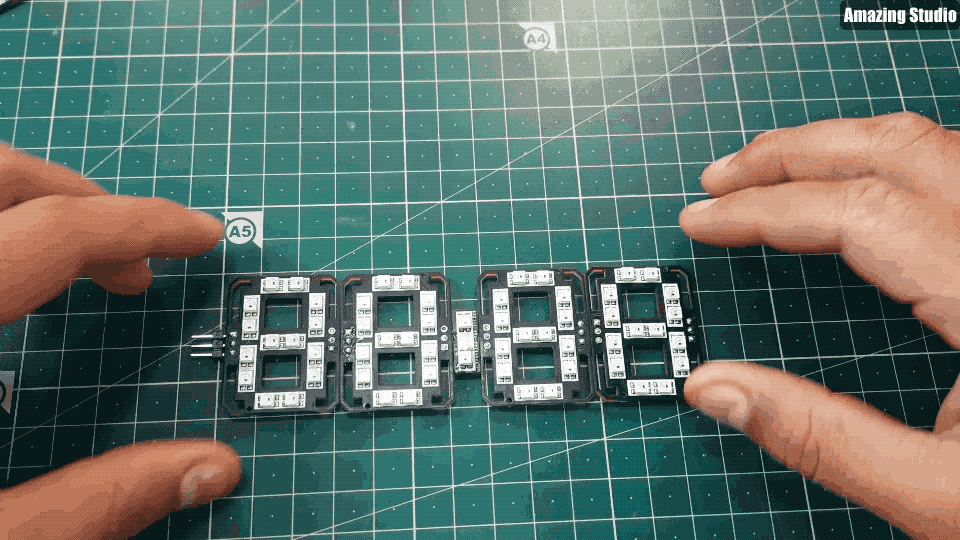

现在,我们有4个面板和一个Dash(仪表盘)。
根据上面GIF图来连接面板和仪表盘;将2个面板串联在一起。
然后使用上面给出的原理图连接NodeMCU。
第8步:代码
首先使用库来初始化代码:
#include <ESP8266WiFi.h>
#include <Adafruit_NeoPixel.h>
#include <WiFiUdp.h>
#include <NTPClient.h>
#include <TimeLib.h>
#include <DHT.h>
#include <Adafruit_Sensor.h>
定义所有像素、I/O引脚、传感器引脚:
#define PIXEL_PER_SEGMENT 2 // Number of LEDs in each Segment
#define PIXEL_DIGITS 4 // Number of connected Digits
#define PIXEL_PIN 2 // GPIO Pin
#define PIXEL_DASH 1 // Binary segment
#define LDR_PIN A0 // LDR pin
#define DHT_PIN 13 // DHT Sensor pin
#define BUTTON_PIN 12 // Button pin
3. 对于时间格式,使用Wi-Fi把ESP8266连接到互联网:
WiFi.begin(ssid, password);
Serial.print("Connecting.");
while ( WiFi.status() != WL_CONNECTED )
时间设置:
void disp_Time() {
clearDisplay();
writeDigit(0, Hour / 10);
writeDigit(1, Hour % 10);
writeDigit(2, Minute / 10);
writeDigit(3, Minute % 10);
writeDigit(4, Second / 10);
writeDigit(5, Second % 10);
disp_Dash();
5. 面板上的颜色设置:
if (index == 0 || index == 1 ) color = strip.Color(0, Brightness, 0);
if (index == 2 || index == 3 ) color = strip.Color(0, Brightness, 0);
if (index == 4 || index == 5 ) color = strip.Color(Brightness, 0, 0);
这只是一个简单的介绍,同时代码还有温度和自动时间选项。
温度模式可以通过数字针脚12的开关来选择。
第9步:完整代码
#include <ESP8266WiFi.h>
#include <Adafruit_NeoPixel.h>
#include <WiFiUdp.h>
#include <NTPClient.h>
#include <TimeLib.h>
#include <DHT.h>
#include <Adafruit_Sensor.h>

#define PIXEL_PER_SEGMENT  2     // Number of LEDs in each Segment
#define PIXEL_DIGITS       4     // Number of connected Digits
#define PIXEL_PIN          2     // GPIO Pin
#define PIXEL_DASH         1    // Binary segment

#define LDR_PIN       A0    // LDR pin
#define DHT_PIN       13    // DHT Sensor pin
#define BUTTON_PIN    12    // Button pin

// Uncomment the type of sensor in use
#define DHT_TYPE    DHT11     // DHT 11
//#define DHT_TYPE    DHT22     // DHT 22 (AM2302)
//#define DHT_TYPE    DHT21     // DHT 21 (AM2301)

#define TIME_FORMAT        12    // 12 = 12 hours format || 24 = 24 hours format

Adafruit_NeoPixel strip = Adafruit_NeoPixel((PIXEL_PER_SEGMENT * 7 * PIXEL_DIGITS) + (PIXEL_DASH * 2), PIXEL_PIN, NEO_GRB + NEO_KHZ800);
DHT dht(DHT_PIN, DHT_TYPE);

// set Wi-Fi SSID and password
const char *ssid     = "Hackster";
const char *password = "Sainisagar7294";

WiFiUDP ntpUDP;
// 'time.nist.gov' is used (default server) with +1 hour offset (3600 seconds) 60 seconds (60000 milliseconds) update interval
NTPClient timeClient(ntpUDP, "time.nist.gov", 19800, 60000); //GMT+5:30 : 5*3600+30*60=19800

int period = 2000;   //Update frequency
unsigned long time_now = 0;
int Second, Minute, Hour;

// set default brightness
int Brightness = 40;
// current temperature, updated in loop()
int Temperature;

bool Show_Temp = false;

//Digits array
byte digits[12] = {
  //abcdefg
  0b1111110,     // 0
  0b0110000,     // 1
  0b1101101,     // 2
  0b1111001,     // 3
  0b0110011,     // 4
  0b1011011,     // 5
  0b1011111,     // 6
  0b1110000,     // 7
  0b1111111,     // 8
  0b1110011,      // 9
  0b1001110,     // C
  0b1000111,     // F
};

//Clear all the Pixels
void clearDisplay() {
  for (int i = 0; i < strip.numPixels(); i++) {
    strip.setPixelColor(i, strip.Color(0, 0, 0));
  }
  strip.show();
}

void setup() {
  Serial.begin(115200);
  strip.begin();
  strip.show();

  dht.begin();
  pinMode(BUTTON_PIN, INPUT);

  WiFi.begin(ssid, password);
  Serial.print("Connecting.");
  while ( WiFi.status() != WL_CONNECTED ) {
    delay(500);
    Serial.print(".");
  }
  Serial.println("connected");
  timeClient.begin();
  delay(10);
}

void loop() {
  if (WiFi.status() == WL_CONNECTED) { // check WiFi connection status
    int sensor_val = analogRead(LDR_PIN);
    Brightness =40;
    timeClient.update();
    int Hours;
    unsigned long unix_epoch = timeClient.getEpochTime();   // get UNIX Epoch time
    Second = second(unix_epoch);                            // get seconds
    Minute = minute(unix_epoch);                            // get minutes
    Hours  = hour(unix_epoch);                              // get hours

    if (TIME_FORMAT == 12) {
      if (Hours > 12) {
        Hour = Hours - 12;
      }
      else
        Hour = Hours;
    }
    else
      Hour = Hours;
  }

  if (digitalRead(BUTTON_PIN) == LOW) {
    Show_Temp = true;
  }
  else
    Show_Temp = false;

  if (Show_Temp) {
    Temperature = dht.readTemperature();
    Serial.println(Temperature);
    clearDisplay();
    writeDigit(0, Temperature / 10);
    writeDigit(1, Temperature % 10);
    writeDigit(2, 10);
    strip.setPixelColor(28, strip.Color(Brightness, Brightness,  Brightness));
    strip.show();
    delay(3000);
    clearDisplay();
    Show_Temp = false;
  }
  while (millis() > time_now + period) {
    time_now = millis();
    disp_Time();     // Show Time
  }
}

void disp_Time() {
  clearDisplay();
  writeDigit(0, Hour / 10);
  writeDigit(1, Hour % 10);
  writeDigit(2, Minute / 10);
  writeDigit(3, Minute % 10);
  writeDigit(4, Second / 10);
  writeDigit(5, Second % 10);
  disp_Dash();
  strip.show();
}

void disp_Dash() {
  int dot, dash;
  for (int i = 0; i < 2; i++) {
    dot = 2 * (PIXEL_PER_SEGMENT * 7) + i;
    for (int j = 0; j < PIXEL_DASH; j++) {
      dash = dot + j * (2 * (PIXEL_PER_SEGMENT * 7) + 2);
      Second % 2 == 0 ? strip.setPixelColor(dash, strip.Color(0,Brightness ,0)) : strip.setPixelColor(dash, strip.Color(0, Brightness,0));
    }
  }
}

void writeDigit(int index, int val) {
  byte digit = digits[val];
  int margin;
  if (index == 0 || index == 1 ) margin = 0;
  if (index == 2 || index == 3 ) margin = 1;
  if (index == 4 || index == 5 ) margin = 2;
  for (int i = 6; i >= 0; i--) {
    int offset = index * (PIXEL_PER_SEGMENT * 7) + i * PIXEL_PER_SEGMENT + margin * 2;
    uint32_t color;
    if (digit & 0x01 != 0) {
      if (index == 0 || index == 1 ) color = strip.Color(Brightness, 0,  Brightness);
      if (index == 2 || index == 3 ) color = strip.Color(Brightness, 0,Brightness);
      if (index == 4 || index == 5 ) color = strip.Color(Brightness, 0,  0);
    }
    else
      color = strip.Color(0, 0, 0);

    for (int j = offset; j < offset + PIXEL_PER_SEGMENT; j++) {
      strip.setPixelColor(j, color);
    }
    digit = digit >> 1;
  }
}
第10步:完整电路图

第11步:PCB设计(面板部分)

主要的PCB设计,用于显示数字和其他字母。
第12步:PCB设计(Dash部分)


第13步:故障排除
DIN总是与DOUT串联在一起,如果接反了或从任何地方断开了,整个装置就会停止工作;按上面的图连接Dash;
确保所有的连接都焊接好,干焊会导致数据值和颜色的改变;
在焊接时,不要把印刷电路板加热太多,温度保持在300度。
第14步:完整展示

希望大家喜欢这个项目!公众号后台回复【RGB时钟】获取相关资料。
原文地址:https://www.instructables.com/RGB-7-Segment-Clock-Using-ESP8266/
原作者:sainisagar7294 译文首发于:DF创客社区
版权声明:本文来源网络,版权归原作者所有。版权问题,请联系删除。
往期推荐
do{} while(0) 只执行一次无意义?你可能真的没理解
边栏推荐
- Unity scene jump script
- Real scientific weight loss
- Leetcode linked list problem - 206. reverse linked list (learn linked list by one question and one article)
- Hack The Box - Web Requests Module详细讲解中文教程
- C language force buckle question 42 of rain. Four methods - violence, dynamic planning, stack, double pointer
- ALV报表流程图解
- Common solutions for distributed ID - take one
- 没背景、没学历?专科测试员进入互联网大厂是不是真的没希望?
- Okaleido上线聚变Mining模式,OKA通证当下产出的唯一方式
- kubernetes install completed
猜你喜欢

Knowledge points of Polymer Physics

MySQL basic learning
![提升命令行效率的 Bash 快捷键 [完整版]](/img/ec/f0dd2fbfac6853ae60d7cf52d8f3e1.png)
提升命令行效率的 Bash 快捷键 [完整版]

Common modules in ansible

OD-Paper【2】:Fast R-CNN
Hack The Box - Web Requests Module详细讲解中文教程

ALV program collection
C语言详解系列——函数的认识(4)函数的声明与定义,简单练习题

高分子物理试题库

No background, no education? Is it really hopeless for specialist testers to enter Internet factories?
随机推荐
Polymer physics test question bank
MongoDB 常用命令
87. Disturb string
Yolov3 preparatory work
Basic methods of realizing licensing function in C language
Okaleido launched the fusion mining mode, which is the only way for Oka to verify the current output
Hack The Box -SQL Injection Fundamentals Module详细讲解中文教程
TZC 1283: simple sort - Comparative sort
SSTI-payload和各种绕过方法
35. Search the insertion position
选电子工程被劝退,真的没前景了?
没背景、没学历?专科测试员进入互联网大厂是不是真的没希望?
FPGA question brushing sequence detection
no networks found in /etc/cni/net.d
Day011 one dimensional array
【个人总结】2022.7.24周结
Reason for pilot importerror: cannot import name 'pilot_ Version 'from' PIL ', how to install pilot < 7.0.0
高手是怎样炼成的?
ALV report flow diagram
Earth system model (cesm) practical technology