当前位置:网站首页>go+mysql+redis+vue3简单聊室,第6弹:使用vue3和element-plus调用接口
go+mysql+redis+vue3简单聊室,第6弹:使用vue3和element-plus调用接口
2022-07-26 19:05:00 【whynogome】
我们使用go实现了聊天应用的接口和数据同步后,就可以开始着手使用vue搭建前端页面,并且调用接口了。本篇文章不会详细说明vue3和相关组件的使用方法,有需求的可以直接查看官方文档接口即可
首先安装node.js,安装成功后,使用npm命令行安装vue3。安装完vue3后,在指定目录使用vue命令创建一个项目脚手架。node.js和vue的安装问题可以查看这里
vue create chat
项目结构
该命令创建了一个目录chat,并在chat中创建了项目的相关目录和文件,如下
- node_modules 存放项目依赖的各种模块和工具
- public 是项目的入口目录,访问url默认访问该路径下的资源
- src 项目的业务逻辑目录
main.ts 是入口文件调用的js文件
App.vue 是入main.ts文件中调用的组件 - package.json 项目的依赖配置文件,用于项目的编译
- vue.config.js vue应用的配置文件
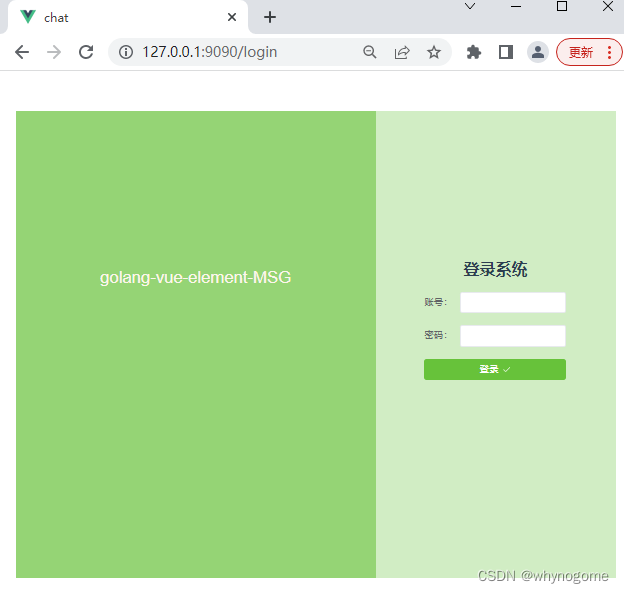
页面效果

项目初始化配置
main.ts
主要用于引入项目需要用到的组件、模块和css文件,然后实例化一个vue应用
import {
     createApp } from 'vue' // 引入vue,解构初始化方法
import App from './App.vue'     // 引入 App.vue 组件
import router from './router'	// 引入路由
import store from './store'		// 引入页面存储
import ElementPlus from 'element-plus'	// 引入element-plus
import 'element-plus/dist/index.css'	// 引入element-plus的css文件
import axios from 'axios'		// 引入 axios
// 使用App基础组件,创建一个vue应用
const app = createApp(App)
// 创建一个axios实例
const $axios = axios.create({

  // baseURL:'/api',// 设置代理后,这里填写代理的名称
  baseURL: 'http://127.0.0.1:8080/', //请求接口的host
  timeout:2000,
  withCredentials:true // 跨域请求时是否携带cookie验证
})
//把axios实例注入全局,方便之后使用
app.provide('$axios',$axios)
//vue应用加载各种组件实例,并挂载到id为app的dom上。#app的doum在public中的index.html
app.use(store).use(router).use(ElementPlus).mount('#app')
App.vue
是项目的展示页面,提供一个路由容器,供其他组件l展示即可
<template>
  <router-view></router-view>
</template>

<script setup>

import {
     onMounted } from 'vue'
import {
     useRouter } from 'vue-router'
const router = useRouter()
const goLogin = () => {

  router.push({
     name: 'login-index' })
}
// 当组件加载成功时,执行goLogin方法,跳转到login-index组件
onMounted(goLogin)
</script>

<style>
  #app {

    font-family: Avenir, Helvetica, Arial, sans-serif;
    -webkit-font-smoothing: antialiased;
    -moz-osx-font-smoothing: grayscale;
    text-align: center;
    color: #2c3e50;
    margin: 60px auto;
    width:900px;
    height:700px;
  }
</style>
router/index.js
该文件用于配置url路由,并指定路由绑定的组件
import {
     createRouter, createWebHistory, RouteRecordRaw } from 'vue-router'

// 引入用到的组件
import LoginIndex from '@/views/LoginIndex.vue'
import ChatWin from '@/views/ChatWin.vue'
// 初始化一个路由和组件的关系数组
const routes: Array<RouteRecordRaw> = [
  {
    name:'login-index',path:'/login',component:LoginIndex},
  {
    name:'chat-win',path:'/chat',component:ChatWin}
]
// 创建路由
const router = createRouter({

  history: createWebHistory(process.env.BASE_URL),
  routes
})
// 暴露路由
export default router
页面和组件
vue中,页面都是以组件的形式出现的,但是我们仍然可以把他们区分
登录注册这些复用率比较低的,占据整个网页的布局组件,我们把它们当做页面,统一存放在src/views 目录下
消息展示、轮播这些小块儿的组件,可以把它们当做组件,统一存放在src/components目录下
这样方便我们对组件和页面的管理
我们先zaiviews目录下创建登录和聊天这两个页面的组件
LoginIndex.vue
<template>
  <el-container style="height:100%;">
    <el-aside style="width:60%;height:100%;background: #95d475;text-align: center;line-height:500px;color: #fdf6ec;font-size: 25px;">
      golang-vue-element-MSG
    </el-aside>
    <el-main  style="height:100%;background: #d1edc4;padding-top:200px;">
      <el-row :gutter="1" align="middle">
        <el-col :span="4"><div class="grid-content ep-bg-purple" /></el-col>
        <el-col :span="16"><div class="grid-content ep-bg-purple" /><h1>登录系统</h1></el-col>
        <el-col :span="4"><div class="grid-content ep-bg-purple" /></el-col>
      </el-row>
      <el-row :gutter="1" align="middle">
        <el-col :span="4"><div class="grid-content ep-bg-purple" /></el-col>
        <el-col :span="16"><div class="grid-content ep-bg-purple" />
          <el-form :model="form" >
            <el-form-item label="账号:">
              <el-input v-model="form.phone" />
            </el-form-item>
            <el-form-item label="密码:">
              <el-input v-model="form.password" />
            </el-form-item>
            <el-form-item>
              <el-button style="width:100%;" type="success" @click="onSubmit">
                登录<el-icon class="el-icon--right"><Check /></el-icon>
              </el-button>
            </el-form-item>
          </el-form>
        </el-col>
        <el-col :span="4"><div class="grid-content ep-bg-purple" /></el-col>
      </el-row>

    </el-main>
  </el-container>
</template>

<script setup>
import {
     inject, reactive } from 'vue'
import {
     Check } from '@element-plus/icons-vue'
import {
     ElMessage } from 'element-plus'
import {
     useRouter } from 'vue-router'
const router = useRouter()
const form = reactive({

  phone: '',
  password: ''
})
const $axios = inject('$axios')
const onSubmit = ()=> {

  //访问登录接口
  $axios.post('/user/login', form).then((response) => {

    console.log(response.data)
    if(response.data.status == 200){

      ElMessage({
    message:'登录成功',type:'success'})
      // 登录成功,调整到chat-win组件
      router.push({
    name: 'chat-win'})
    }else{

      ElMessage.error(response.data.msg)
    }
  })
}
</script>
ChatWin.vue
<template>
  <el-container style="height:100%;">
    <el-aside >
      <el-menu
              active-text-color="#ffd04b"
              background-color="#545c64"
              class="el-menu-vertical-demo"
              default-active="2"
              text-color="#fff"
              @open="handleOpen"
              @close="handleClose"
      >
        <el-sub-menu index="1">
          <template #title>
            <span>折叠菜单1</span>
          </template>
          <el-sub-menu index="1-2">
            <template #title>折叠菜单2</template>
            <el-sub-menu index="1-2-3">
              <template #title>折叠菜单3</template>
              <el-menu-item-group title="Group One">
                <el-menu-item index="1-2-3-1">item one</el-menu-item>
                <el-menu-item index="1-2-3-2">item two</el-menu-item>
              </el-menu-item-group>
            </el-sub-menu>

          </el-sub-menu>
        </el-sub-menu>
        <el-menu-item index="2">
          <span>单聊</span>
        </el-menu-item>
        <el-menu-item index="3" disabled>
          <span>群聊</span>
        </el-menu-item>
      </el-menu>

    </el-aside>

    <el-main style="padding: 0;height:100%;border: 1px solid #A8ABB2;">
      <el-header style="height:5%;line-height:30px;border-bottom: 1px solid #C0C4CC;">当前聊天对象</el-header>
      <el-main style="background-color: #F2F6FC;height:75%;border-bottom: 1px solid #C0C4CC;">
        <chat-list
          v-for="item in contentList.arr"
          :user-id = "item.userid"
          :content="item.msg"
          :key = "item.id"
        ></chat-list>

      </el-main>
      <el-footer style="height:20%;">
        <el-form >
            <el-input
              v-model="textarea"
              type="textarea"
              placeholder=""
              :autosize="{minRows:3,maxRows:10}"
              style="height:90px;width:100%;overflow: auto;"
            />
          <el-row>
            <el-col :span=18 ></el-col>
            <el-col :span=6 >
              <el-tooltip
                v-model:visible="visible"
                placement="left"
                :auto-close=1000
                effect="light"
              >
                <template #content>
                  <span>不能发送空白内容</span>
                </template>
                <el-button  type="success" @click="onSubmit">
                  发送<el-icon class="el-icon--right"><Check /></el-icon>
                </el-button>
              </el-tooltip>
            </el-col>
          </el-row>
        </el-form>
      </el-footer>
    </el-main>
  </el-container>
</template>

<script setup>
  import {
     reactive, ref, inject, onMounted} from 'vue'
  import {
     Check } from '@element-plus/icons-vue'
  // 引入自定义ChatList组件
  import ChatList from '@/components/ChatList.vue'
  // 伸缩菜单监听事件
  const handleOpen = (key, keyPath) => {

    console.log(key, keyPath)
  }
  const handleClose = (key, keyPath) => {

    console.log(key, keyPath)
  }
  // 从全局依赖中取出axios 实例
  const $axios = inject('$axios')
  const contentList = reactive({
     arr: [] })
  let websocket
  const data = {
    username:'',userid:'0',msg:'',id:'0'}
  // 页面加载时,请求一次消息记录接口
  onMounted(() => {

     $axios.get('/index').then((response) => {

       if(response.data.status == 200){

         if(response.data.logs.length > 0){

           const msgLog = response.data.logs
           for(const step in msgLog){

             contentList.arr.push({

               id:msgLog[step].ID,
               userid:msgLog[step].UserID,
               msg:msgLog[step].Content
             })
           }
         }
         data.userid = String(response.data.userInfo.ID)
         data.username = response.data.userInfo.Name
       }
    })
    // 建立websocket链接
    websocket = new WebSocket('ws://127.0.0.1:8080/index')
    websocket.onopen = function (){

      console.log('connected')
      data.msg = '我上线了'
      websocket.send(JSON.stringify(data))
    }
    websocket.onmessage = function (e){

      console.log('接收消息', e.data)
      contentList.arr.push(JSON.parse(e.data))
      console.log(contentList.arr)
    }
    websocket.onclose = function (e){

      console.log('closed',e)
    }
  })
  const textarea = ref('')
  const visible = ref(false)
  // 发送消息
  const onSubmit = ()=>{

    if(textarea.value == ''){

      visible.value = true
      return false
    }
    visible.value = false
    data.msg = textarea.value
    // contentList.arr.push(data)
    console.log(data)
    websocket.send(JSON.stringify(data))
    textarea.value = ''
  }
</script>
<!-- Add "scoped" attribute to limit CSS to this component only -->

<style scoped>
  >>>.el-textarea__inner{
     border:0;resize: none;box-shadow:none;}
  .el-aside{

    width:30%;height:100%;background: #545c64;
  }
  .el-header{

    height:10%;background-color: #F2F6FC;
  }
  .el-menu{
    width:100%;}
</style>
上面文件中引用了ChatList组件,用于展示聊天记录
components/ChatList.vue
<template>
  <el-row :gutter="20" v-if="userId == 1">
    <el-col :span="3"><img style="width:35px;height:35px;" :src="headImg"/></el-col>
    <el-col :span="12" class="content-div">{
    {
    content}}</el-col>
  </el-row>
  <el-row :gutter="20" v-else>
    <el-col :span="9"></el-col>
    <el-col :span="12" class="content-div" style="text-align: right;">{
    {
    content}}</el-col>
    <el-col :span="3"><img style="width:35px;height:35px;" :src="headImg"/></el-col>
  </el-row>
</template>

<script lang="ts" setup>
  import {
    defineProps, ref} from 'vue'
  const props = defineProps({

    userId:{
    type:Number, required:true},
    content:{
    type:String, required:true}
  })
  const headImg = ref<string>('')
  if(props.userId == 1){

    headImg.value = 'imgs/default_head.jpg'
  }else{

    headImg.value = 'imgs/my_head.jpg'
  }
</script>

<!-- Add "scoped" attribute to limit CSS to this component only -->
<style scoped>
.content-div{

  text-align: left;
  background-color: #fff;
  line-height: 39px;
  padding: 0 3px;
}
.el-row {

  margin-bottom: 10px;
}
</style>
边栏推荐
- Summary of iPhone development data persistence (final) - Comparison of five data persistence methods
- Use of load balancing
- canvas概述
- 网络与VPC动手实验
- 【PHP】常用的header头部定义
- Redis introduction
- Openstack virtual machine network card is renamed cirename0
- [PHP] common header definitions
- Linear algebra Chapter 3 vector
- 企业数字化转型成大趋势,选对在线协作工具很重要
猜你喜欢

负载均衡的使用

计算机组成原理常见面试题目总结,含答案
How to adjust the abnormal win11 USB drive to normal?

知识管理系统是什么?你需要知道这些
2022/07/26 learning notes (day16) abstraction and interface

网络与VPC动手实验
2022/07/26 学习笔记 (day16) 抽象与接口

Household deposits increased by 10.33 trillion yuan in the first half of the year, with an average of 57.1 billion deposits pouring into banks every day

Analysis of interface testing
Leetcode daily practice - 26. Delete duplicates in an ordered array
随机推荐
客户案例|生学教育依托观测云打造可观测智慧教育新生态
Household deposits increased by 10.33 trillion yuan in the first half of the year, with an average of 57.1 billion deposits pouring into banks every day
LeetCode每日一练 —— 189. 轮转数组
Bug feedback: synchronization failed
【实习经验】异常处理与访问url结果响应数据处理
Design of intelligent weighing system based on Huawei cloud IOT (STM32) [i]
Leetcode daily practice - 26. Delete duplicates in an ordered array
银行业务分类
Scope in JS
金仓数据库 KingbaseES SQL 语言参考手册 (17. SQL语句: DISCARD 到 DROP LANGUAGE)
Linear algebra Chapter 4 linear equations
【二叉树】将二叉搜索树变平衡
Overview of canvas
【MySQL】 - 索引原理与使用
Zabbix调用api检索方法
金仓数据库 KingbaseES SQL 语言参考手册 (13. SQL语句:ALTER SYNONYM 到 COMMENT)
金仓数据库 KingbaseES SQL 语言参考手册 (12. SQL语句:ALTER LANGUAGE 到 ALTER SUBSCRIPTION)
使用三重损失和孪生神经网络训练大型类目的嵌入表示
Summary of iPhone development data persistence (final) - Comparison of five data persistence methods
Chapter 9 practical modeling technology