当前位置:网站首页>Learning Tai Chi Maker - esp8226 (II)
Learning Tai Chi Maker - esp8226 (II)
2022-06-11 02:35:00 【xuechanba】

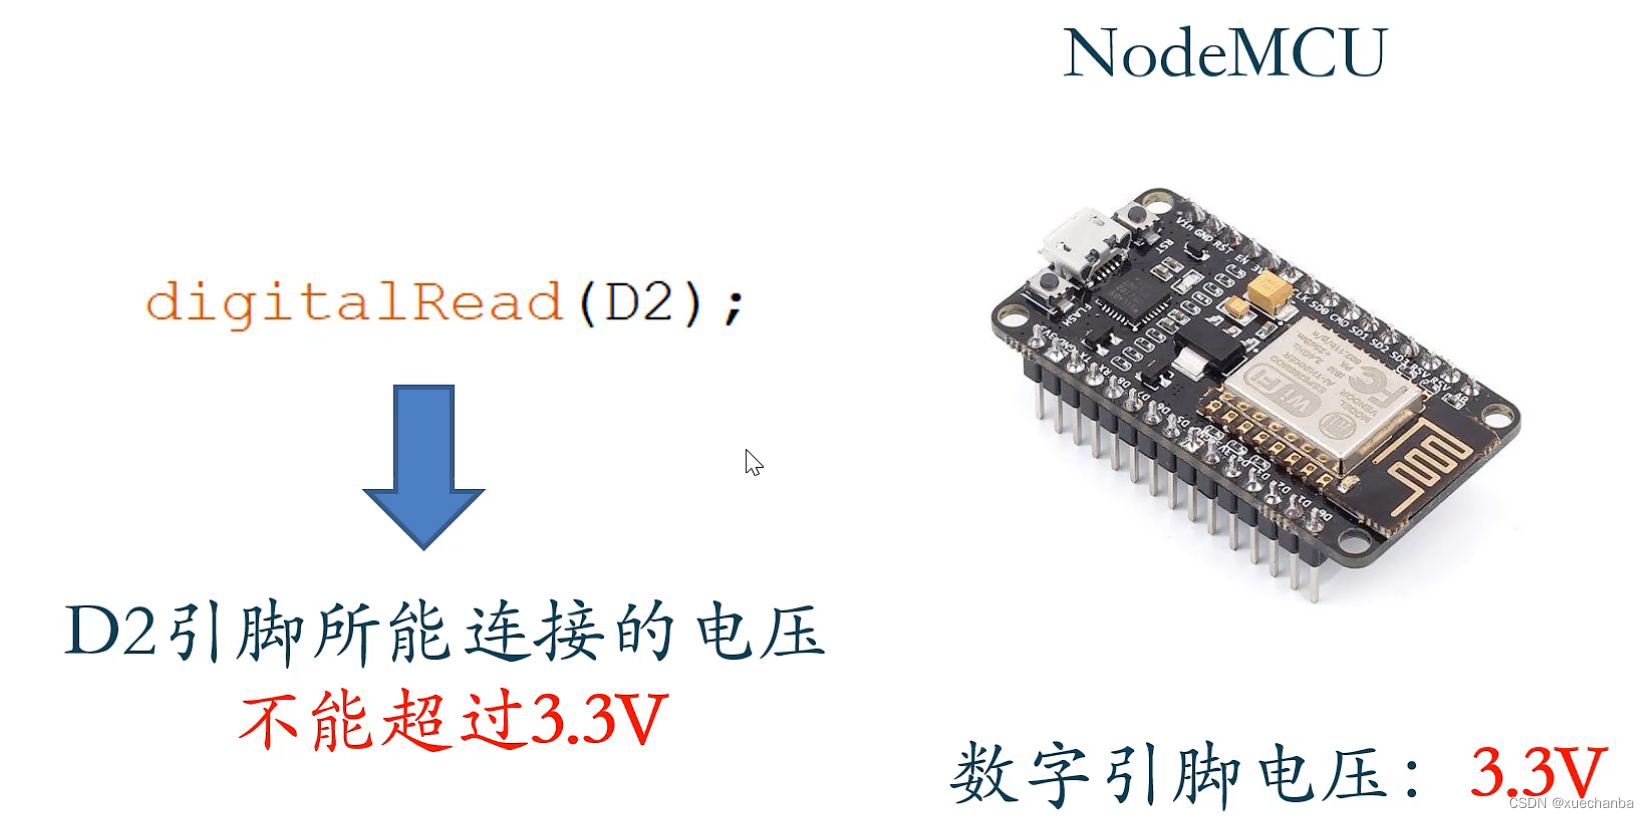
There are two buttons on the board , among RST It is used to reset the development board , and FLASH It is used in the development of brush firmware .
The light blue pin is the communication pin , Include I2C、SPI、UART etc. .
The pins with white characters on a black background are used to operate its internal storage unit .
That is to say, several pins are generally not used as ordinary pins .
4.4、 Control through web page text box ESP8266 Development board PWM Pin
Source file ( download ) link : http://www.taichi-maker.com/homepage/esp8266-nodemcu-iot/iot-c/spiffs/spiffs-web-server/text-pwm-pin-control/
We need to pay attention to , stay PWM In terms of control ,Arduino The inputable values of the development board are the same as ESP8266 Different , Arduino Input only 0 - 255, and ESP8266 You can enter 0 - 1023. however , What needs to be emphasized here is ,“ stay 3.0 In the previous version , Default range is 0 - 1023”,
Reference link : https://blog.csdn.net/qq_39209508/article/details/120844466

The library I use here is 3.0.2 edition , So the default range is 0 — 255.
And to become 0 - 1023, It's also very simple. , Only need setup Add a sentence to the function analogWriteRange(1023); that will do .
void setup(void){

  ...
  ...
  analogWriteRange(1023);
  ...
}
4.4.1 Enter... In a web page text box PWM Numerical control PWM wave form
The complete code is as follows ,
/**********************************************************************  Project name /Project :  Zero basic introduction to the Internet of things   Program name /Program name : 3_4_3_SPIFFS_Text_PWM_Server  The team /Team :  Taiji maker team  / Taichi-Maker (www.taichi-maker.com)  author /Author : CYNO Shuo   date /Date(YYYYMMDD) : 20190305  Purpose of procedure /Purpose :  Use ESP8266-NodeMCU Build a website with multiple pages . adopt LED page   The text input can be controlled on the board LED The brightness of . -----------------------------------------------------------------------  Revision history /Revision History  date /Date  author /Author  Reference number /Ref  Revision notes /Revision Description 20200211 CYNO Shuo  0.01  Consistency adjustment  -----------------------------------------------------------------------  This sample program is made by Taiji maker team 《 Zero basic introduction to the Internet of things 》 Sample program in .  This tutorial is designed and produced by friends who are interested in the development of the Internet of things . For more information about this tutorial , Please refer to the following pages : http://www.taichi-maker.com/homepage/esp8266-nodemcu-iot/ ***********************************************************************/
#include <ESP8266WiFi.h>
#include <ESP8266WiFiMulti.h>
#include <ESP8266WebServer.h>
#include <FS.h>

ESP8266WiFiMulti wifiMulti;         //  establish ESP8266WiFiMulti object

ESP8266WebServer esp8266_server(80);//  establish ESP8266WebServer object , This object is used to respond HTTP request . Listening port (80)

void setup(void){

  Serial.begin(9600);
  Serial.println("");

  pinMode(LED_BUILTIN, OUTPUT);      //  initialization NodeMCU The control board carries LED Pin for OUTPUT
  analogWriteRange(1023);

  wifiMulti.addAP("FAST_153C80", "123456798"); //  A series of... That will need to be connected WiFi ID And enter the password here
  wifiMulti.addAP("ssid_from_AP_2", "your_password_for_AP_2"); // ESP8266-NodeMCU After restart, the current network will be scanned
  wifiMulti.addAP("ssid_from_AP_3", "your_password_for_AP_3"); //  Find out if there are any... Listed here WiFi ID. If there is
  Serial.println("Connecting ...");                            //  Then try to connect with the password stored here .

  int i = 0;
  while (wifiMulti.run() != WL_CONNECTED) {
     //  Try to do wifi Connect .
    delay(1000);
    Serial.print(i++); Serial.print(' ');
  }

  // WiFi After the connection is successful, the connection success information will be output through the serial port monitor
  Serial.println('\n');
  Serial.print("Connected to ");
  Serial.println(WiFi.SSID());              //  Monitor output connected through serial port WiFi name
  Serial.print("IP address:\t");
  Serial.println(WiFi.localIP());           //  Monitor output through serial port ESP8266-NodeMCU Of IP

  if(SPIFFS.begin()){
                           //  Start the flash file system
    Serial.println("SPIFFS Started.");
  } else {

    Serial.println("SPIFFS Failed to Start.");
  }

  // Initialize the network server
  esp8266_server.on("/LED-Control", handleLEDControl); //  Tell the system how to handle /LED-Control request
  esp8266_server.onNotFound(handleUserRequest); //  Handle other network requests

  //  Start Web Services
  esp8266_server.begin();
  Serial.println("HTTP server started");
}

void loop(void){

  esp8266_server.handleClient();  // Handle network requests
}

void handleLEDControl(){

  //  Get from the information sent by the browser PWM Control value ( String format )
  String ledPwm = esp8266_server.arg("ledPwm");

  //  String format PWM Convert control values to integers
  int ledPwmVal = ledPwm.toInt();

  //  Implementation pin PWM Set up
  analogWrite(LED_BUILTIN, ledPwmVal);

  //  Establish basic web page information, display the current value and return link
  String httpBody = "Led PWM: " + ledPwm + "<p><a href=\"/LED.html\"><-LED Page</a></p>";
  esp8266_server.send(200, "text/html", httpBody);
}

//  Handle the user's browser HTTP visit
void handleUserRequest() {


  //  Get the resource requested by the user (Request Resource)
  String reqResource = esp8266_server.uri();
  Serial.print("reqResource: ");
  Serial.println(reqResource);

  //  adopt handleFileRead Function to process user requested resources
  bool fileReadOK = handleFileRead(reqResource);

  //  If in SPIFFS Unable to find the resource accessed by the user , Then reply 404 (Not Found)
  if (!fileReadOK){

    esp8266_server.send(404, "text/plain", "404 Not Found");
  }
}

bool handleFileRead(String resource) {
                // Working with browsers HTTP visit

  if (resource.endsWith("/")) {
                       //  If you visit the address with "/" For the end
    resource = "/index.html";                     //  Then change the access address to /index.html Easy SPIFFS visit
  }

  String contentType = getContentType(resource);  //  Get file type

  if (SPIFFS.exists(resource)) {
                         //  If the accessed file can be in SPIFFS Find
    File file = SPIFFS.open(resource, "r");          //  Then try to open the file
    esp8266_server.streamFile(file, contentType);//  And return the file to the browser
    file.close();                                //  And close the file
    return true;                                 //  return true
  }
  return false;                                  //  If the file is not found , Then return to false
}

//  Get file type
String getContentType(String filename){

  if(filename.endsWith(".htm")) return "text/html";
  else if(filename.endsWith(".html")) return "text/html";
  else if(filename.endsWith(".css")) return "text/css";
  else if(filename.endsWith(".js")) return "application/javascript";
  else if(filename.endsWith(".png")) return "image/png";
  else if(filename.endsWith(".gif")) return "image/gif";
  else if(filename.endsWith(".jpg")) return "image/jpeg";
  else if(filename.endsWith(".ico")) return "image/x-icon";
  else if(filename.endsWith(".xml")) return "text/xml";
  else if(filename.endsWith(".pdf")) return "application/x-pdf";
  else if(filename.endsWith(".zip")) return "application/x-zip";
  else if(filename.endsWith(".gz")) return "application/x-gzip";
  return "text/plain";
}
The operation effect is as follows ,

Click on “ Go to PWM Control page ” ,
Input 0 —— 1023 Number between , because LED The positive pole of the is connected to 3.3 V, So when the input value is larger , LED The smaller the pressure difference between the two ends of the lamp , The darker it gets .
This setup process is related to the network environment , The faster the network speed , The faster the setting is .
below , Let's focus on analyzing the code .
void handleLEDControl(){

  //  Get from the information sent by the browser PWM Control value ( String format )
  String ledPwm = esp8266_server.arg("ledPwm");

  //  String format PWM Convert control values to integers
  int ledPwmVal = ledPwm.toInt();

  //  Implementation pin PWM Set up
  analogWrite(LED_BUILTIN, ledPwmVal);

  //  Establish basic web page information, display the current value and return link
  String httpBody = "Led PWM: " + ledPwm + "<p><a href=\"/LED.html\"><-LED Page</a></p>";
  esp8266_server.send(200, "text/html", httpBody);
}
arg Parameters can be found in the address information of the browser ,
Through this address information , See if there are any and arg Information that matches the arguments in the function , If yes, the following number of the parameter will be obtained . After it is obtained, it will be assigned to in the form of return value ledPWM This string variable .
after ,httpBody Is the information in the response body , That is to say ,
among ,
<p><a href=\"/LED.html\"><-LED Page</a></p>
It means a link , You can link to LED.html This page .
Last , Re pass
esp8266_server.send(200, "text/html", httpBody);
Send the response body to the browser through the server , So the browser can display the information of the page .
Let's take care of the whole process .
At first , After the network server starts , Output the connection success information through the serial port monitor .
then , Initialize the network server , Tell the system how to handle /LED-Control request and Handle other network requests .
  // Initialize the network server
  esp8266_server.on("/LED-Control", handleLEDControl); //  Tell the system how to handle /LED-Control request
  esp8266_server.onNotFound(handleUserRequest); //  Handle other network requests
then , The user logs in to the server address , After entering , Request resources from server , Then the following page appears through the browser ,

This page is index.html The contents of this web page file .

We use notepad file to open this web page file and have a look , The contents of this web page file .

The web page file indicates , When the user clicks “ Go to PWM Control page ” After this link , It will jump to /LED.html This web page . Thus, the following web page appears .

Let's see , What is written in this web page file .

This page indicates , When you click /img/taichi-maker.jpg This picture is , I will jump to the official website of Taiji maker http://www.taichi-maker.com,
And the core part :
When the user enters the set value on this page , And then click OK after , Will execute... In the corresponding program handleLEDControl() The processing content of .
void handleLEDControl(){

  //  Get from the information sent by the browser PWM Control value ( String format )
  String ledPwm = esp8266_server.arg("ledPwm");

  //  String format PWM Convert control values to integers
  int ledPwmVal = ledPwm.toInt();

  //  Implementation pin PWM Set up
  analogWrite(LED_BUILTIN, ledPwmVal);

  //  Establish basic web page information, display the current value and return link
  String httpBody = "Led PWM: " + ledPwm + "<p><a href=\"/LED.html\"><-LED Page</a></p>";
  esp8266_server.send(200, "text/html", httpBody);
}
To jump into 
after , Click the link < - LED Page Will return /LED.html Under this catalog , Need to explain ,“text/html” It's the file type .
4.4.2 Enter... Through multiple web page text boxes PWM Numerical control PWM wave form
void handleLEDControl(){

  //  Get the control value from the information sent by the browser ( String format )
  String value1 = esp8266_server.arg("value1");
  String value2 = esp8266_server.arg("value2");

  //  The information input by the user is displayed through the serial port monitor
  Serial.print("value1 = ");Serial.println(value1);
  Serial.print("value2 = ");Serial.println(value2);

  //  Establish basic web page information, display the current value and return link
  String httpBody = "value1: " + value1 + "<br> value2: " + value2 + "<p><a href=\"/LED.html\"><-LED Page</a></p>";
  esp8266_server.send(200, "text/html", httpBody);
}
other place , Nothing has changed . The process is the same . No point , Come back when you use it .
4.5 (Ajax) control LED Pin and A0 The pin reading is displayed on the web page in real time
( I still don't understand Ajax technology , But we have understood its function .)
stay index.html In the from < script >…< / script > The content between is to use Ajax The content of technology implementation .
This paragraph Ajax The function of the code is to partially update the content of the web page , The previous trial program is to refresh all the contents of the web page .
4.6 (JavaScript) Control through web page graphical interface ESP8266 Of PWM Pin
( I still don't understand JavaScript technology , But understand its function .)
4.7 (JavaScript) Use the pointer table to display the analog input pin value
( I still don't understand JavaScript technology , But understand its function .)
4.8 Upload files to via web page ESP8266 Development board flash file system
Program and Web Download Links : http://www.taichi-maker.com/homepage/esp8266-nodemcu-iot/iot-c/spiffs/spiffs-web-server/file-upload-server/
The code is as follows ,
/**********************************************************************  Project name /Project :  Zero basic introduction to the Internet of things   Program name /Program name : 3_4_8_SPIFFS_File_Upload_Server  The team /Team :  Taiji maker team  / Taichi-Maker (www.taichi-maker.com)  author /Author : CYNO Shuo   date /Date(YYYYMMDD) : 20200211  Purpose of procedure /Purpose :  Set up a network server , Allow users to upload files to via web pages SPIFFS -----------------------------------------------------------------------  Revision history /Revision History  date /Date  author /Author  Reference number /Ref  Revision notes /Revision Description 20200218 CYNO Shuo  0.01  Consistency adjustment  -----------------------------------------------------------------------  This sample program is made by Taiji maker team 《 Zero basic introduction to the Internet of things 》 Sample program in .  This tutorial is designed and produced by friends who are interested in the development of the Internet of things . For more information about this tutorial , Please refer to the following pages : http://www.taichi-maker.com/homepage/esp8266-nodemcu-iot/ ***********************************************************************/

#include <ESP8266WiFi.h>
#include <ESP8266WiFiMulti.h>
#include <ESP8266WebServer.h>
#include <FS.h>

ESP8266WiFiMulti wifiMulti;     //  establish ESP8266WiFiMulti object , The object name is  'wifiMulti'

ESP8266WebServer esp8266_server(80);    //  Create a web server object , This object is used to respond HTTP request . Listening port (80)

File fsUploadFile;              //  Create a file object for flash file upload

void setup() {

  Serial.begin(9600);
  Serial.println("");

  wifiMulti.addAP("FAST_153C80", "123456798"); //  A series of... That will need to be connected WiFi ID And enter the password here
  wifiMulti.addAP("ssid_from_AP_2", "your_password_for_AP_2"); // ESP8266-NodeMCU After restart, the current network will be scanned
  wifiMulti.addAP("ssid_from_AP_3", "your_password_for_AP_3"); //  Find out if there are any... Listed here WiFi ID. If there is
  Serial.println("Connecting ...");                            //  Then try to connect with the password stored here .

  int i = 0;
  while (wifiMulti.run() != WL_CONNECTED) {
     //  Try to do wifi Connect .
    delay(1000);
    Serial.print(i++); Serial.print('.');
  }

  // WiFi After the connection is successful, the connection success information will be output through the serial port monitor
  Serial.println('\n');
  Serial.print("Connected to ");
  Serial.println(WiFi.SSID());              //  Monitor output connected through serial port WiFi name
  Serial.print("IP address:\t");
  Serial.println(WiFi.localIP());           //  Monitor output through serial port ESP8266-NodeMCU Of IP

  if(SPIFFS.begin()){
                           //  Start the flash file system
    Serial.println("SPIFFS Started.");
  } else {

    Serial.println("SPIFFS Failed to Start.");
  }

  esp8266_server.on("/upload.html",   //  If the client passes upload page
                    HTTP_POST,        //  Send files to the server ( Request method POST)
                    respondOK,        //  Then reply to the status code  200  To the client
                    handleFileUpload);//  And run the file upload function

  esp8266_server.onNotFound(handleUserRequest);

  esp8266_server.begin();                           //  Start Web Services
  Serial.println("HTTP server started");
}

void loop() {

  esp8266_server.handleClient();
}

//  Function for processing uploaded files
void handleFileUpload(){


  HTTPUpload& upload = esp8266_server.upload();

  if(upload.status == UPLOAD_FILE_START){
                         //  If the upload status is UPLOAD_FILE_START

    String filename = upload.filename;                        //  Create a string variable to store the uploaded file name
    if(!filename.startsWith("/")) filename = "/" + filename;  //  Add... Before the upload file name "/"
    Serial.println("File Name: " + filename);                 //  Output the name of the uploaded file through the serial port monitor

    fsUploadFile = SPIFFS.open(filename, "w");            //  stay SPIFFS A file is created in to write the file data uploaded by the user

  } else if(upload.status == UPLOAD_FILE_WRITE){
              //  If the upload status is UPLOAD_FILE_WRITE

    if(fsUploadFile)
      fsUploadFile.write(upload.buf, upload.currentSize); //  towards SPIFFS The file is written to the file data sent by the browser

  } else if(upload.status == UPLOAD_FILE_END){
                //  If the upload status is UPLOAD_FILE_END
    if(fsUploadFile) {
                                        //  If the file is successfully created
      fsUploadFile.close();                               //  Close the file
      Serial.println(" Size: "+ upload.totalSize);        //  Output file size through serial port monitor
      esp8266_server.sendHeader("Location","/success.html");  //  Jump your browser to /success.html( Successfully uploaded page )
      esp8266_server.send(303);                               //  Send the corresponding code 303( Redirect to new page )
    } else {
                                                  //  If the file is not created successfully
      Serial.println("File upload failed");               //  Output error message through serial port monitor
      esp8266_server.send(500, "text/plain", "500: couldn't create file"); //  Send the corresponding code to the browser 500( Server error )
    }
  }
}

// Reply status code  200  To the client
void respondOK(){

  esp8266_server.send(200);
}

//  Handle the user's browser HTTP visit
void handleUserRequest(){


  //  Get the URL information requested by the user
  String webAddress = esp8266_server.uri();

  //  adopt handleFileRead Function to handle user access
  bool fileReadOK = handleFileRead(webAddress);

  //  If in SPIFFS Unable to find the resource accessed by the user , Then reply 404 (Not Found)
  if (!fileReadOK){

    esp8266_server.send(404, "text/plain", "404 Not Found");
  }
}

bool handleFileRead(String path) {
                // Working with browsers HTTP visit

  if (path.endsWith("/")) {
                       //  If you visit the address with "/" For the end
    path = "/index.html";                     //  Then change the access address to /index.html Easy SPIFFS visit
  }

  String contentType = getContentType(path);  //  Get file type

  if (SPIFFS.exists(path)) {
                         //  If the accessed file can be in SPIFFS Find
    File file = SPIFFS.open(path, "r");          //  Then try to open the file
    esp8266_server.streamFile(file, contentType);//  And return the file to the browser
    file.close();                                //  And close the file
    return true;                                 //  return true
  }
  return false;                                  //  If the file is not found , Then return to false
}

//  Get file type
String getContentType(String filename){

  if(filename.endsWith(".htm")) return "text/html";
  else if(filename.endsWith(".html")) return "text/html";
  else if(filename.endsWith(".css")) return "text/css";
  else if(filename.endsWith(".js")) return "application/javascript";
  else if(filename.endsWith(".png")) return "image/png";
  else if(filename.endsWith(".gif")) return "image/gif";
  else if(filename.endsWith(".jpg")) return "image/jpeg";
  else if(filename.endsWith(".ico")) return "image/x-icon";
  else if(filename.endsWith(".xml")) return "text/xml";
  else if(filename.endsWith(".pdf")) return "application/x-pdf";
  else if(filename.endsWith(".zip")) return "application/x-zip";
  else if(filename.endsWith(".gz")) return "application/x-gzip";
  return "text/plain";
}
Run and test the program :


after , Check whether the upload is successful by reading the contents in the text ( The code is described above ), I won't try here .
There is no code analysis , Directly callable , We will analyze the code later .
边栏推荐
- 贵金属白银和现货白银之间是什么关系
- 金属有机框架MOF-Al(DIBA),MOF-Zr(DIBA),MOF-Fe(DIBA)包载姜黄素/羧苄西林/MTX甲氨蝶呤/紫杉醇PTX/阿霉素DOX/顺铂CDDP/CPT喜树碱等药物
- 10 years of domestic milk powder counter attack: post-90s nannies and dads help new domestic products counter attack foreign brands
- 421. 数组中两个数的最大异或值
- SQL | external connection
- Colab reported an error: importerror: cannot import name '_ check_ savefig_ extra_ args‘ from ‘matplotlib. backend_ bases‘
- ADVANCE. AI CEO Shoudong will share the compliance of cross-border e-commerce using AI technology at the 2022 emerging market brands online Summit
- Knowledge competition of safety production month -- how much do you know about new safety law
- app 测试 常用 adb 命令集合
- NFT insider 61:animoca brands holds US $1.5 billion of encrypted assets in 340 investments
猜你喜欢

378. 有序矩阵中第 K 小的元素
Binary tree sequence traversal

Ortele has obtained three rounds of financing nine months after its establishment, and hard discount stores have found new ways to grow?

Jetpack Compose Scaffold和BottomAppBar(底部导航)

Navicat Premium 15 工具自动被杀毒防护软件删除解决方法

如何3步精读《PMBOK指南》(经验+资料分享)

Use of CIN and cout

Find - (half find / half find)

Bingbing learning notes: find the greatest common divisor and the least common multiple. Complex version reverse string

To view the data in redis, in addition to the command line and client, you have a third option
随机推荐
Rewrite: kms activates office2016, 2019 and 2021 with error code: 0xc004f069
app 测试 常用 adb 命令集合
项目 - Redis消息队列+工作线程取出用户操作日志并入库(二)
Byte beating client R & D Intern Tiktok side
Find - (half find / half find)
贵金属白银行情走势图缘何强势?
App test_ Summary of test points
Why is the trend chart of precious metal silver strong?
Do tween record
koa2学习笔记
10007. ISBN号码
Customized redistemplate in redis
Record scroll bar position, passive, scrolltop
技术分享| 快对讲,全球对讲
【斐波那契数列】
Binary tree sequence traversal
92. actual combat of completable future
Web watermark
2022 high altitude installation, maintenance and removal of simulated examination platform of theoretical question bank
PHP starts OpenSSL and reports OpenSSL support=> disabled (install ext/openssl)