当前位置:网站首页>Farm Game
Farm Game
2022-06-22 01:41:00 【Sunny summer.】
Environment settings
stay package manager Deleting useless packages in can make the speed faster .
Find... In the material :

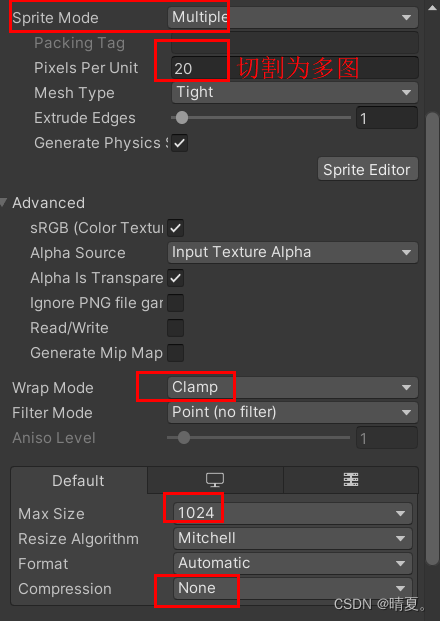
In order to make other material pictures follow this way , You can create a preset with the current settings .
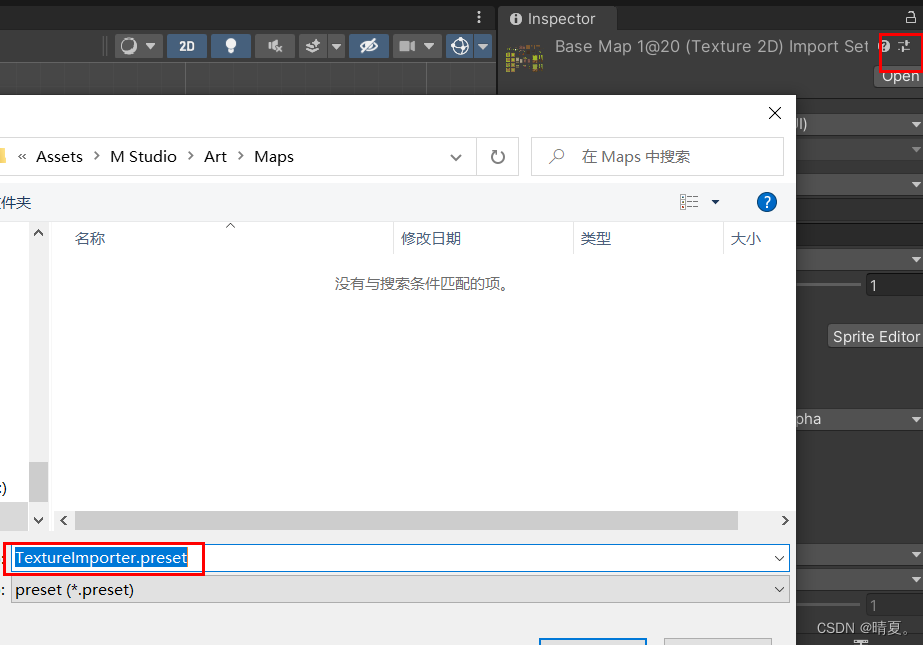
Then you can select multiple objects at the same time , Let them apply the same preset .
How to cut pictures :

Next, cut the character animation in the same way :
When cutting, because the animation is 8 frame , Select cut 8 individual , The anchor point is selected on the sole of the foot to achieve a correct occlusion effect .

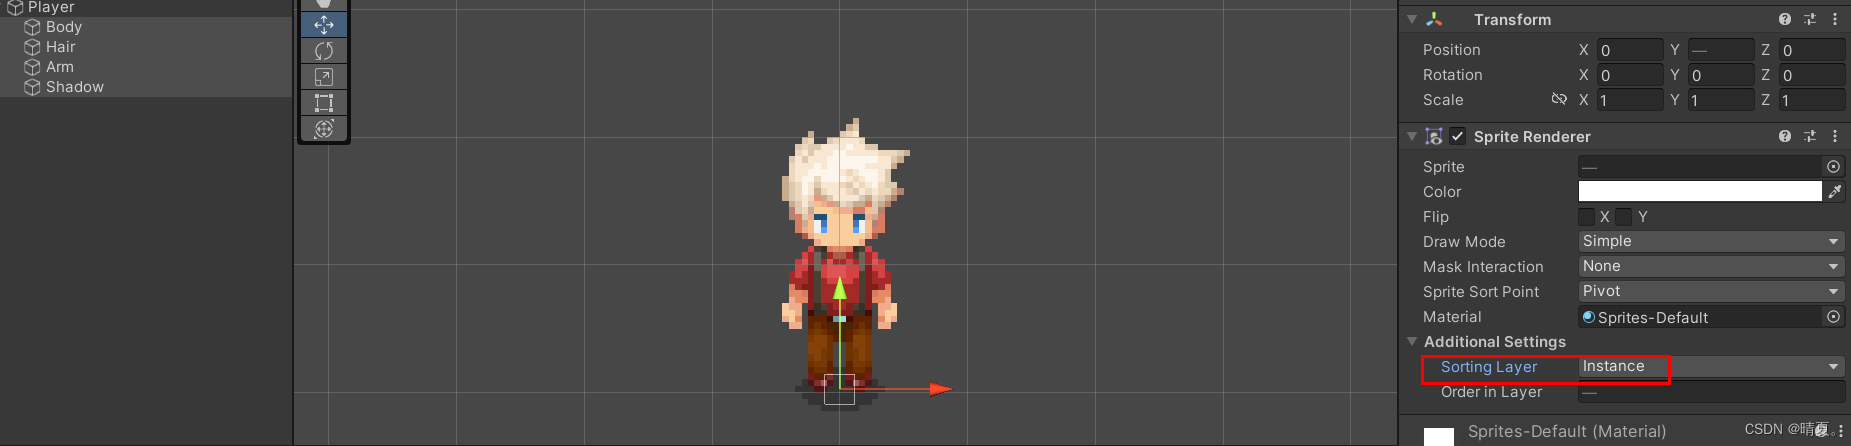
Next, create a character ,
Select the bottom of the character's anchor here

Create a character :

In order to prevent some parts of the character from blocking other objects , produce “ Separation ” The phenomenon of , Add one sorting group
Add a... To the parent object sorting group You can make parent and child objects render together

Then create a new layer , Set several sub objects to

Next, we hope to achieve this effect ( Because it's a game of looking down )( When the character walks in front of the grass, he will cover the grass ( This goes to the front and back not through z Axis , But through y Axis )):
But in 2d Under the circumstances , The occlusion relationship before and after rendering at the same level is through z Axis implementation . We hope to pass y Axis to achieve , Then modify as follows :
( Note that the anchor point of the object should be set at the bottom )

Character movement code
using System.Collections;
using System.Collections.Generic;
using UnityEngine;

public class Player : MonoBehaviour
{
    public float speed = 5;
    Rigidbody2D rb;
    private float inputX;
    private float inputY;
    private Vector2 movementInput;

    private void Awake()
    {
        rb = GetComponent<Rigidbody2D>();
    }

    // Start is called before the first frame update
    void Start()
    {

    }

    // Update is called once per frame
    void Update()
    {
        // use update Function accepts data , Instead of changing the rigid body of the object
        PlayerInput();
    }

    private void FixedUpdate()
    {
        // For changing the motion of a rigid body , Use fixupdate To achieve
        Movement();
    }

    private void PlayerInput()
    {
        inputX = Input.GetAxisRaw("Horizontal");
        inputY = Input.GetAxisRaw("Vertical");
        if (inputX != 0 && inputY != 0)
        {
            inputX *= 0.6f;
            inputY *= 0.6f;
        }
        movementInput = new Vector2(inputX, inputY);
    }


    private void Movement()
    {
        rb.MovePosition(rb.position + movementInput * speed * Time.deltaTime);
    }
}
In order to better interact with the environment , Create a series of tile maps , It is in different sorting layer On :


- Create tile information for rules

Then according to the rules you want to set , You can draw a regular map

Notice that there is such a gap between tile maps :

resolvent :
Create a Sprite Altas, This atlas will pack all the materials together , Ignore the atlas when referencing .
take Maps And other map materials that need to be packaged in this folder , That is to say .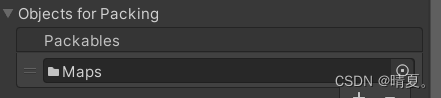
Adding this camera makes
- Collisional layer
To produce a collision effect , And the collision is a whole , Add these three components and set them as follows :

Next, draw the air wall :

You can modify the collision volume of the triangle , Manually adjust... In the following way :

The collision volume changes


Next, draw the collision body according to the map :

Create the tree and its corresponding animation :

- Add camera boundaries

Create a boundary , add to polygon coiilder And set the boundary range :

Next, we want to read different scenes , The camera will read the boundary of the scene and set the boundary :
For the... Added above polygon collider add to tag.
Then add the following code for the virtual camera :
using System.Collections;
using System.Collections.Generic;
using UnityEngine;
using Cinemachine;

public class SwitchBounds : MonoBehaviour
{

    private void Start()
    {
        SwitchConfinerShape();
    }
    private void SwitchConfinerShape()
    {
        PolygonCollider2D confinerShape = GameObject.FindGameObjectWithTag("BoundsConfiner").GetComponent<PolygonCollider2D>();

        CinemachineConfiner confiner = GetComponent<CinemachineConfiner>();

        confiner.m_BoundingShape2D = confinerShape;

        //Call this if the bounding shape's points change at runtime
        confiner.InvalidatePathCache();
    }
}
- Semi occlusion and transparency of landscape
Simply put, walk behind the tree , Trees become translucent .
The method of making the tree gradient can be triggered trigger Function using a coroutine , Let the tree α Value slowly from 1 become 0.
Use here DOTween.
Call idea : Mount a script on the tree called ItemFader, This script has fade in and fade out functions :
using UnityEngine;
using DG.Tweening;


[RequireComponent(typeof(SpriteRenderer))]
public class ItemFader : MonoBehaviour
{
    private SpriteRenderer spriteRenderer;


    private void Awake()
    {
        spriteRenderer = GetComponent<SpriteRenderer>();
    }

    public void FadeIn()
    {
        Color targetColor = new Color(1, 1, 1, 1);
        spriteRenderer.DOColor(targetColor, Settings.fadeDuration);
    }

    public void FadeOut()
    {
        Color targetColor = new Color(1, 1, 1, Settings.targetAlpha);
        spriteRenderer.DOColor(targetColor, Settings.fadeDuration);
    }

}
To facilitate the subsequent search for changed data , Build a setting Scripts are used to store constants :
using System.Collections;
using System.Collections.Generic;
using UnityEngine;

public class Settings
{
    public const float fadeDuration = 0.35f;

    public const float targetAlpha = 0.45f;

}
When the player triggers trigger Function time , Get all the sub objects of the collision body ItemFader Script , Then call the fade in and fade out functions .
The effect is as follows :

Backpack system
Backpack data initialization
use MVC The pattern of , Will control 、 data 、 Separate from the display one by one , adopt inventory manager To manage data , And call through it UI Display content of .
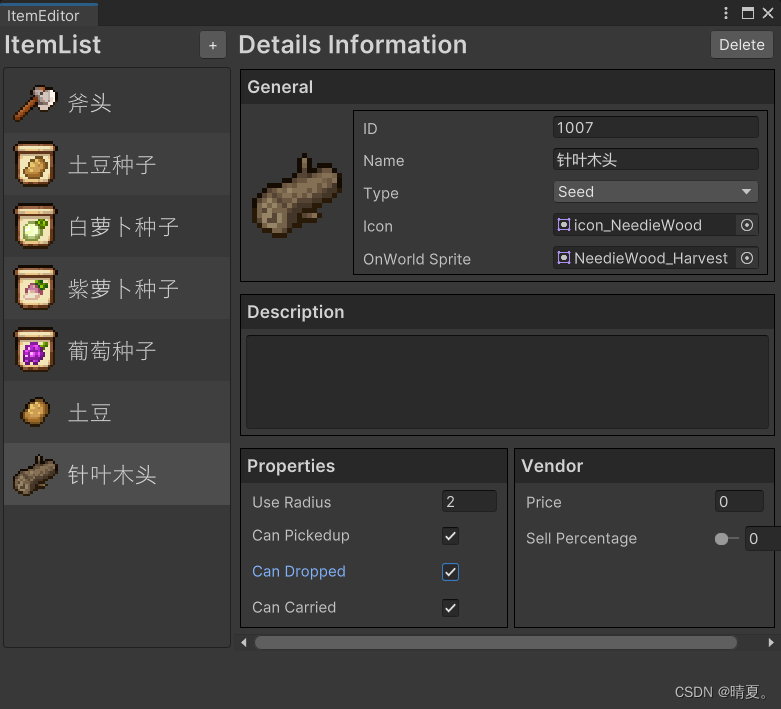
Create a DataCollection, We will put all our classes in this file , Convenient for centralized management , Find and modify .
using UnityEngine;

[System.Serializable]
// Used to store item details
public class ItemDetails
{
    public int itemID;
    public string name;

    public ItemType itemType;

    public Sprite itemIcon;
    public Sprite itemOnWorldSprite;

    public string itemDescription;
    public int itemUseRadius;

    public bool canPickedup;
    public bool canDropped;
    public bool canCarried;
    public int itemPrice;

    [Range(0, 1)]
    public float sellPercentage;
}
Enums establish ItemType Item type
public enum ItemType
{
    Seed,Commodity,Furniture,
    HoeTool,ChopTool,BreakTool,ReapTool,WaterTool,CollectTool,
    ReapableScenery
}
Generate ItemDetailsList_SO The file is used as the object management database of the whole game
Create a SO menu bar , Their corresponding SO Contains many items , So it's using List<ItemDetails> Data structure of .
using System.Collections;
using System.Collections.Generic;
using UnityEngine;


[CreateAssetMenu(fileName ="ItemDataList_SO",menuName ="Inventory/ItemDataList")]

public class ItemDataList_SO : ScriptableObject
{
    public List<ItemDetails> itemDetailsList;
}
Create a folder to manage data , And create an example SO.


(Editor) Use UI Toolkit and UI Builder Make an item editor
Write it yourself ItemDataLis_SO
The goal is to design it like this

UIToolKit You can edit it visually Customer Editor, stay runtime You can also use .
Create a Editor Folder :(Editor Folders are not packed when they are packed )

Create this

Three files will be generated :

After making the editor , Add the following items :
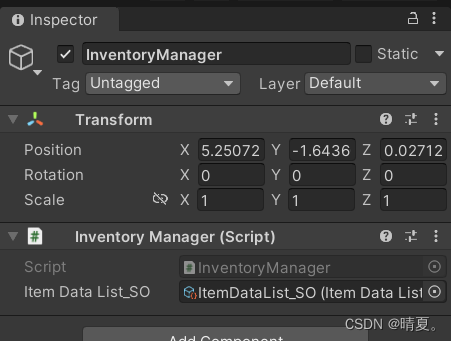
establish InventoryManager
Singleton mode code
using UnityEngine;

public class Singleton<T> : MonoBehaviour where T : Singleton<T>
{
    private static T instance;

    public static T Instance
    {
        get => instance;
    }

    protected virtual void Awake()
    {
        if (instance != null)
            Destroy(gameObject);
        else instance = (T)this;
    }


    protected virtual void OnDestroy()
    {
        if (instance != this)
            instance = null;
    }

}
by inventory manager Add namespace , Easy to manage data , Avoid the coupling of random calls to each other .
using System.Collections;
using System.Collections.Generic;
using UnityEngine;

namespace MFarm.Inventory
{
    public class InventoryManager : Singleton<InventoryManager>
    {
        public ItemDataList_SO ItemDataList_SO;
    }

}
After adding a namespace , Want to use... In other code inventoryManager, should using This namespace .
Add a pass to it ID Find the complete code after the function :
using System.Collections;
using System.Collections.Generic;
using UnityEngine;

namespace MFarm.Inventory
{
    public class InventoryManager : Singleton<InventoryManager>
    {
        public ItemDataList_SO ItemDataList_SO;


        /// <summary>
        ///
        /// adopt ID Return item information
        /// </summary>
        /// <param name="ID"></param>
        /// <returns></returns>
        public ItemDetails GetItemDetails(int ID)
        {
            // Find some itemDetails, its ID Equal to the given ID
            return ItemDataList_SO.itemDetailsList.Find(i => i.itemID == ID);
        }

    }


}
Add this in the main scene and bind SO, Because it's in the main scene , So this does not need to be changed during scene switching .
Realize the display of items in the database on the map
Create a itemBase, Its effect is , When some items are generated in the scene , For example, cutting down trees will produce wood , And fruit blossoms to produce seeds . We hope that in these cases , You can use code to inventoryManager Get... Inside ID Corresponding item details .
Add a collider to it , The function is, for example, when the player touches , Just add it to your backpack .
、
Next, the code will be used to determine the ID Show different items , The idea is simple , It is through ID Go to the database to get the corresponding pictures and display them . Different pictures have different sizes , Therefore, modify the volume of the collision body according to the size of the image .
using System.Collections;
using System.Collections.Generic;
using UnityEngine;

namespace MFarm.Inventory
{


    public class Item : MonoBehaviour
    {
        public int itemID;

        private SpriteRenderer spriteRenderer;
        private BoxCollider2D coll;
        private ItemDetails itemDetails;

        private void Awake()
        {
            spriteRenderer = GetComponentInChildren<SpriteRenderer>();
            coll = GetComponent<BoxCollider2D>();
        }

        private void Start()
        {
            if (itemID != 0)
            {
                Init(itemID);
            }
        }

        public void Init(int ID)
        {
            itemID = ID;

            //Inventory Get current data
            itemDetails = InventoryManager.Instance.GetItemDetails(itemID);

            // Because the returned result may be empty , If the picture is displayed when it is not empty
            if (itemDetails != null)
            {
                spriteRenderer.sprite = itemDetails.itemOnWorldSprite != null ? itemDetails.itemOnWorldSprite : itemDetails.itemIcon;

                // Modify the collider size , Make it correspond to different pictures one by one
                Vector2 newSize = new Vector2(spriteRenderer.sprite.bounds.size.x, spriteRenderer.sprite.bounds.size.y);
                coll.size = newSize;
                coll.offset = new Vector2(0, spriteRenderer.sprite.bounds.center.y);
            }
        }

    }

}
- Pick up items
The logic of picking up items is as follows , Add a script for players to pick up items , When triggered trigger when , Get the... Of the object item Components , And then if there is item Components , Then call the database InventoryManager Medium AddItem function , Add items to your backpack .
using System.Collections;
using System.Collections.Generic;
using UnityEngine;

namespace MFarm.Inventory
{
    public class ItemPickUp : MonoBehaviour
    {
        private void OnTriggerEnter(Collider other)
        {
            Item item = other.GetComponent<Item>();

            if (item != null)
            {
                if (item.itemDetails.canPickedup)
                {
                    InventoryManager.Instance.AddItem(item, true);
                }
            }


        }
    }
}
stay InventoryManager Add the following code to :
        /// <summary>
        ///  Add items to Player In the backpack
        /// </summary>
        /// <param name="item"></param>
        /// <param name="toDestory"> Do you want to destroy items </param>
        public void AddItem(Item item, bool toDestory)
        {
            Debug.Log(GetItemDetails(item.itemID).itemID + "Name: " + GetItemDetails(item.itemID).itemName);
            if (toDestory)
            {
                Destroy(item.gameObject);
            }
        }
Backpack system
It's a backpack SO Code :
using System.Collections;
using System.Collections.Generic;
using UnityEngine;


[CreateAssetMenu(fileName ="InventoryBag_SO",menuName ="Inventory/InventoryBag_SO")]
public class InventoryBag_SO : ScriptableObject
{
    public List<InventoryItem> itemList;
}
This backpack is suitable for everything , In addition to the player's own backpack , It can also be npc The store .
You need to think about adding an object , Whether the backpack is full , Whether there is this item , All these need to be in AddItem To implement inside .
stay InventoryManager This function can be realized by adding the following code in :
        /// <summary>
        ///  Add items to Player In the backpack
        /// </summary>
        /// <param name="item"></param>
        /// <param name="toDestory"> Do you want to destroy items </param>
        public void AddItem(Item item, bool toDestory)
        {

            var index = GetItemIndexInBag(item.itemID);
            AddItemAtIndex(item.itemID,index,1);


            // You need to think about adding an object , Whether the backpack is full , Whether there is this item
            Debug.Log(GetItemDetails(item.itemID).itemID + "Name: " + GetItemDetails(item.itemID).itemName);
            if (toDestory)
            {
                Destroy(item.gameObject);
            }
        }


        /// <summary>
        ///  Check if the backpack is empty
        /// </summary>
        /// <returns></returns>
        private bool CheckBagCapacity()
        {
            for(int i = 0; i < playerBag.itemList.Count;i++)
            {
                if (playerBag.itemList[i].itemID == 0)
                {
                    return true;
                }
            }
            return false;
        }

        /// <summary>
        ///  according to ID Find out if there is this thing in the bag
        /// </summary>
        /// <param name="ID"></param>
        /// <returns></returns>
        private int GetItemIndexInBag(int ID)
        {
            for (int i = 0; i < playerBag.itemList.Count; i++)
            {
                if (playerBag.itemList[i].itemID == ID)
                {
                    return i;
                }
            }
            return -1;
        }


        private void AddItemAtIndex(int ID,int index,int amount)
        {

            if (index == -1&&CheckBagCapacity())
            {
                var item = new InventoryItem { itemID = ID, itemAmount = amount };

                for (int i = 0; i < playerBag.itemList.Count; i++)
                {
                    if (playerBag.itemList[i].itemID == 0)
                    {
                        playerBag.itemList[i] = item;
                        break;
                    }
                }
            }
            else
            {
                int currentAmount = playerBag.itemList[index].itemAmount + amount;

                var item = new InventoryItem { itemID = ID, itemAmount = currentAmount };

                playerBag.itemList[index] = item;
            }
        }

    }
边栏推荐
- 点云配准--4PCS原理与应用
- 经费预算与调整记录与使用记录输出使用进度搭建过程记录
- Intranet learning notes (3)
- How to make your website quickly found by search engines
- 亚马逊测评系统哪个好?
- Cache consistency of arm
- Panic: permission denied problems encountered when using gomonkey mock functions and methods and Solutions
- Divide the list into boxes and draw a histogram through pyechart
- Intranet learning notes (9)
- 毕业后5年,我终于变成了月薪13000的软件测试工程师
猜你喜欢

Five years after graduation, I finally became a software testing engineer with a monthly salary of 13000

【第 20 章 基于帧间差法进行视频目标检测--MATLAB软件深度学习应用】

Show you how to distinguish several kinds of parallelism

Apache ActiveMQ Artemis简介

Rational rose 安装教程

对标Copilot,国内首个:自然语言一键生成方法级代码aiXcoder XL来了

Processing of the scenario of more or less delivery by suppliers in SAP mm import purchase business

Pyechart drawing word cloud
pyechart 绘制词云图

ROS 2 驱动程序现在可用于 ABB 的机械臂
随机推荐
【TensorRT】Video Swin-Transformer部署相关
LCP 17. 速算机器人
【CYW20189】七、HCI命令格式详解
[cyw20189] VII. Detailed explanation of HCI command format
2011. 执行操作后的变量值
PM2 learning
I just learned a cool 3D pyramid stereoscopic effect. Come and have a look
有没有亚马逊跨境电商适合用的浏览器排名
亚马逊测评浏览器,亚马逊测评风控核心知识点
twenty-one
1876. 长度为三且各字符不同的子字符串
依靠可信AI的鲁棒性有效识别深度伪造,帮助银行对抗身份欺诈
亚马逊测评系统哪个好?
ROS 2 驱动程序现在可用于 ABB 的机械臂
颜值、空间、安全、动力齐升级,新捷途X70S 8.79万元起售上市
ERROR 2002 (HY000): Can't connect to local MySQL server through socket '/tmp/mysql. sock' (2)
How to modify the dictionary
第六届世界智能大会“云”端召开在即
Intranet learning notes (9)
. Several methods of obtaining hinstance in. Net