当前位置:网站首页>Convolutional neural network -- lenet (pytorch Implementation)
Convolutional neural network -- lenet (pytorch Implementation)
2022-07-27 00:17:00 【Ap21ril】
List of articles
Preface
LeNet, It is one of the earliest Convolutional Neural Networks .LeNet It is widely used in automatic teller machines (ATM) In flight , Help identify numbers that process checks . today , Some ATMs are still running Yann LeCun And his colleagues Leon Bottou In the last century 90 Code written in the era . In this paper CIFAR10 Training and testing , I remember the first LeNet Is in MNIST Implemented on a dataset , However, the way of implementation is similar . It's just that the size of the image input is different .
One 、model
This part realizes the logic of each layer
import torch.nn as nn
import torch.nn.functional as F

class LeNet(nn.Module):
    def __init__(self):
        super(LeNet, self).__init__()
        self.conv1 = nn.Conv2d(3, 16, 5) # in_channels=3 out_channels=16 kernel=5
        self.pool1 = nn.MaxPool2d(2, 2)
        self.conv2 = nn.Conv2d(16, 32, 5)
        self.pool2 = nn.MaxPool2d(2, 2)
        self.fc1 = nn.Linear(32*5*5, 120)
        self.fc2 = nn.Linear(120, 84)
        self.fc3 = nn.Linear(84, 10)
	#  Call the function defined above
    def forward(self, x):
        x = F.relu(self.conv1(x))    # input(3, 32, 32) output(16, 28, 28)
        x = self.pool1(x)            # output(16, 14, 14)
        x = F.relu(self.conv2(x))    # output(32, 10, 10)
        x = self.pool2(x)            # output(32, 5, 5)
        x = x.view(-1, 32*5*5)       # output(32*5*5)
        x = F.relu(self.fc1(x))      # output(120)
        x = F.relu(self.fc2(x))      # output(84)
        x = self.fc3(x)              # output(10)
        return x
Two 、train
This part begins to train the model .
import torch
import torchvision
import torch.nn as nn

from model import LeNet
import torch.optim as optim
import torchvision.transforms as transforms
from torch.utils.data import DataLoader

def main():
    transform = transforms.Compose(
        [transforms.ToTensor(),
         transforms.Normalize((0.5, 0.5, 0.5), (0.5, 0.5, 0.5))])

    # 50000 Training pictures
    #  Use it for the first time download Set to True To download the dataset automatically
    train_set = torchvision.datasets.CIFAR10(root='./data', train=True,
                                             download=False, transform=transform)
    train_loader = DataLoader(train_set, batch_size=36,
                                               shuffle=True, num_workers=0)

    # 10000 Verification pictures
    #  Use it for the first time download Set to True To download the dataset automatically
    val_set = torchvision.datasets.CIFAR10(root='./data', train=False,
                                           download=False, transform=transform)
    val_loader = DataLoader(val_set, batch_size=5000,
                                             shuffle=False, num_workers=0)
    val_data_iter = iter(val_loader)
    val_image, val_label = val_data_iter.next()

    # classes = ('plane', 'car', 'bird', 'cat',
    # 'deer', 'dog', 'frog', 'horse', 'ship', 'truck')

    #  Define models and loss functions
    net = LeNet()
    loss_function = nn.CrossEntropyLoss()

    #  Define optimizer
    optimizer = optim.Adam(net.parameters(),lr=0.001)

    #  Iterate over the training set 5 Time
    epochs = 5
    for epoch in range(epochs):
        running_loss = 0
        for step,data in enumerate(train_loader,start=0): # step from start Start
            inputs,labels = data
            #  Gradient clear
            optimizer.zero_grad()

            outputs = net(inputs)
            #  Calculate the loss function
            loss = loss_function(outputs,labels)
            #  Back propagate and update parameters
            loss.backward()
            optimizer.step()

            running_loss += loss.item()
            if step%500 == 499:
                with torch.no_grad():
                    outputs = net(val_image)
                    predict_y = torch.max(outputs,dim=1)[1]
                    accuracy = (predict_y==val_label).sum().item() / val_label.size(0)
                    print('[%d %3d] train_loss: %.3f test_accuracy: %.3f' %
                          (epoch+1,step+1,running_loss/500,accuracy))
                    running_loss = 0

    print('Finished Training')
    save_path = './Lenet.pth'
    torch.save(net.state_dict(),save_path)
if __name__ == '__main__':
    main()
3、 ... and 、test
import torch
import torchvision.transforms as transforms
from PIL import Image

from model import LeNet


def main():
    transform = transforms.Compose(
        [transforms.Resize((32, 32)), #  Adjust the size of the input picture
         transforms.ToTensor(), # Convert a ``PIL Image`` or ``numpy.ndarray`` to tensor. (H x W x C)->(C x H x W)
         transforms.Normalize((0.5, 0.5, 0.5), (0.5, 0.5, 0.5))])

    classes = ('plane', 'car', 'bird', 'cat',
               'deer', 'dog', 'frog', 'horse', 'ship', 'truck')

    net = LeNet()
    net.load_state_dict(torch.load('Lenet.pth')) #  Load model

    im = Image.open('data/plane.jpg')
    im = transform(im)  # [C, H, W]
    #  Add a dimension ,batch
    im = torch.unsqueeze(im, dim=0)  # [N, C, H, W]  Add one more batch dimension

    with torch.no_grad():
        outputs = net(im)
        predict = torch.max(outputs, dim=1)[1].numpy()
    print(classes[int(predict)])

if __name__ == '__main__':
    main()
Summary of related issues
1. with torch.no_grad():
with torch.no_grad(): It is actually a context manager , Yes, yes with The statement in no longer performs the operation of the calculation graph , The so-called calculation of graph , In fact, it is necessary for back propagation .torch.no_grad() Will turn off the automatic derivation engine , Therefore, it can save video memory and speed up . It can be understood as the statement wrap The part that gets up will not track gradient .
But add it or not , The results are the same , It's just outputs One attribute is missing .
2. torch.max() function
torch.max(input, dim, keepdim=False, *, out=None)
You can click the link to view pytorch Official documents of
Input :
input yes softmax One of the outputs of the function tensor
dim yes max The dimension of the functional index 0/1,0 Is the maximum per column ,1 Is the maximum per line
Output :
The function returns two tensor, first tensor Is the maximum per line ; the second tensor Is the index of the maximum value per row .
Example : Take the output of this model as an example
Examples of output during training :
I only added output statements to the original code .
with torch.no_grad():
    outputs = net(val_image)
    print(f'outputs The size is :{
      outputs.size()}')
    print(f'outputs: {
      outputs}')
    print(f'torch.max(outputs,dim=1):{
      torch.max(outputs,dim=1)}')
    predict_y = torch.max(outputs,dim=1)[1]
    accuracy = (predict_y==val_label).sum().item() / val_label.size(0)
Output results :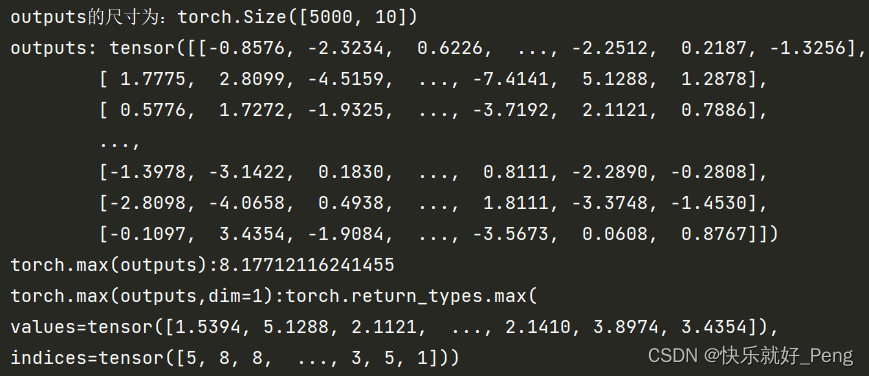
outputs In fact, it can be understood as a two-dimensional matrix , But it is not strictly a two-dimensional matrix , Because it is tensor Type of .
and torch.max(outputs,dim=1) In fact, it returns two tensor, first tensor Is the maximum per line ; the second tensor Is the index of the maximum value per row .
This index corresponds to classes = ('plane', 'car', 'bird', 'cat', 'deer', 'dog', 'frog', 'horse', 'ship', 'truck'), This order is not arbitrary , It is stipulated in official documents .
So here's the point , What we need is to give you a picture , We need to see which type this picture belongs to , So there is only the second tensor Useful to us .
So we use predict_y = torch.max(outputs,dim=1)[1], This is also [1] The origin of .
In some places we'll see torch.max(a, 1).data.numpy() Writing , It's because in the early days pytorch In the version of the ,variable Variables and tenosr It's a different data format ,variable It can be back propagated ,tensor Can not be , Need to put variable Into a tensor And then turn it into numpy. The current version will variable and tenosr Merge , So just torch.max(a,1).numpy() That's all right. .
Then let's take a look at predict Example on :
    with torch.no_grad():
        outputs = net(im)
        print(f'outputs: {
      outputs}')
        predict = torch.max(outputs, dim=1)[1].numpy()
        print(torch.max(outputs, dim=1))
        print(torch.max(outputs, dim=1)[0])
        print(torch.max(outputs, dim=1)[1])
    print(classes[int(predict)])
Output :
Because we just take out a picture when testing , therefore outputs The size is (1,10), This 10 There are several classification results , Corresponding class.
You can see torch.max(outputs, dim=1) Output , For two tensor, We just need to take out the second one .
边栏推荐
- 第1章 拦截器入门及使用技巧
- The attorney general and the director of the national security service of Ukraine were dismissed
- Codeforces d.constructing the array (priority queue)
- 20220720折腾deeplabcut2
- Tencent cloud lightweight application server purchase method steps!
- 今日份20220719折腾deeplabcut
- Oracle remote connection configuration
- 20220720 toss deeplobcut2
- Iptables prevent nmap scanning and binlog
- Add an article ----- scanf usage
猜你喜欢

Chapter 2 develop user traffic interceptors

RecBole使用1

Practice of data storage scheme in distributed system

Upload files to OSS file server

Deploy yolov5 error reporting in pycharm

Hcip day 2_ HCIA review comprehensive experiment

Chapter 1 develop the first restful application

第7章 课程总结

LeetCode——链表篇
三层架构 模拟
随机推荐
SSRF (server side request forgery) -- Principle & bypass & Defense
4-4 object lifecycle
动态sql
Design of vision protector based on 51 single chip microcomputer
LeetCode题目——数组篇
Tencent cloud lightweight application server purchase method steps!
The place where the dream begins ---- first knowing C language (2)
Geek challenge 2019 (review the loopholes)
15_ Key function and principle
MySQL数据库复杂操作:数据库约束,查询/连接表操作
在pycharm中部署yolov5报错问题
The difference between SQL join and related subinquiry
12_ Binding style
Design of electronic scale based on 51 single chip microcomputer
第2章 开发用户流量拦截器
Meeting OA project seating function and submission function
Method of setting QQ to blank ID
知识蒸馏——pytorch实现
PTA 7-1 play with binary tree
Design of intelligent humidification controller based on 51 single chip microcomputer