当前位置:网站首页>基于人脸的常见表情识别(2)——数据获取与整理
基于人脸的常见表情识别(2)——数据获取与整理
2022-07-30 19:50:00 【GodGump】
数据集的相关问题
下载地址
说明
img_type_test:放置了不同后缀名的图片,在图片格式统一 将会使用到
face_detect_model:放置了人脸检测所需要的模型,在数据清洗、提取嘴唇区域 将会使用到
face_det_img:放置了一些包含人脸的图片和不包含人人脸的图片,在数据清洗 将会使用到
mouth_det_img:放置了一些包含人脸的图片,在提取嘴唇区域 将会使用到
train_val_data:训练验证集
test_img:放置了包含 4 种表情的图片各一张,将会在下一个 Task 用到,我们就是使用这个文件夹里的图片来展示我们的成果
自己爬取数据的工具
2.1 数据爬取
由于没有直接对应的开源数据集,或者开源数据集中的数据⽐较少,可以按要求爬取百度、Bing、Google 上的图片,提供了非常人性化的 GUI 方便操作,使用方法如下:
下载爬虫工具
点我下载使用
python image_downloader_gui.py调用GUI界面,配置好参数(关键词,路径,爬取数目等),关键词可以直接在这里输入也可以选择从txt文件中选择。可以配置需要爬取的样本数目,这里一次爬了2000张,妥妥的3分钟搞定。
该项目的 GUI 界面如下,我们尝试爬取“嘟嘴”的相关表情:
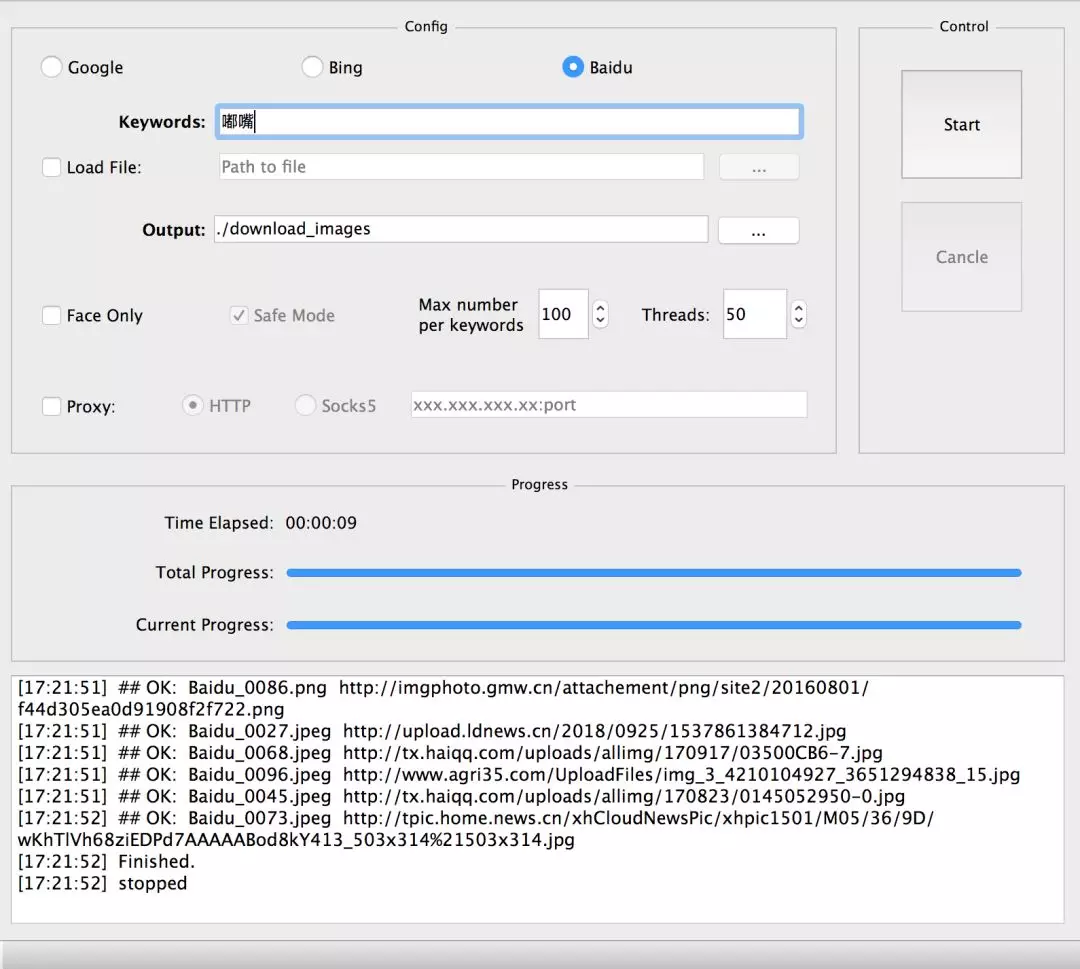
爬取图⽚结果如下:

⾃此就可以获得数千张图像,然后进⾏第⼆步,数据整理。
项目背景
对于很多初⼊深度学习计算机视觉领域的朋友来说,当前开源资料⾮常多,但有时候难以适从,其中很多资料都没有包含完整的项⽬流程,⽽只是对某个流程的部分截取,对能⼒的锻炼不够。图像分类是整个计算机视觉领域中最基础的任务,也是最重要的任务之⼀,最适合拿来进⾏学习实践。为了让新⼿们能够⼀次性体验⼀个⼯业级别的图像分类任务的完整流程,本次我们选择带领⼤家完成⼀个对图片中⼈脸进⾏表情识别的任务。
⼈脸表情识别(facial expression recognition, FER)作为⼈脸识别技术中的⼀个重要组成部分,近年来在⼈机交互、安全、机器⼈制造、⾃动化、医疗、通信和驾驶领域得到了⼴泛的关注,成为学术界和⼯业界的研究热点,是⼈脸属性分析的重点。
正式启航
数据预处理
图片格式统一
import os
import sys
import cv2
import numpy as np


def listfiles(rootDir):
    list_dirs = os.walk(rootDir)
    for root, dirs, files in list_dirs:  # 遍历文件夹下的图片
        for d in dirs:
            print((os.path.join(root, d)))
        for f in files:
            fileid = f.split('.')[0]  # 获得图片的名字,不含后缀
            filepath = os.path.join(root, f)
            print(filepath)
            try:
                src = cv2.imread(filepath, 1)  # 读取原始图片,数据会加载到内存中
                print("src=", filepath, src.shape)
                os.remove(filepath) # 移除原来的图片
                cv2.imwrite(os.path.join(root, fileid + ".jpg"), src)  # 保存经过格式转换的图片
            except:
                os.remove(filepath)
                continue

path = "./Emotion_Recognition_File/img_type_test/"  # 输入图片路径即可,可以在这个文件夹下放置各种后缀名的图片,代码会将所有图片统一成 jpg 格式
listfiles(path)
数据清洗
利⽤搜索引擎爬取得到的图⽚肯定有不符合要求的,数据清洗主要是删除不合适的图⽚,即⾮⼈脸的照⽚。
# coding:utf8
import cv2
import dlib
import numpy as np
import sys
import os
import matplotlib.pyplot as plt

# 人脸检测的接口,这个是 OpenCV 中自带的
cascade_path = './Emotion_Recognition_File/face_detect_model/haarcascade_frontalface_default.xml'
cascade = cv2.CascadeClassifier(cascade_path)

img_path = "./Emotion_Recognition_File/face_det_img/" # 测试图片路径
images = os.listdir(img_path)
for image in images:
    im = cv2.imread(os.path.join(img_path, image), 1) # 读取图片
    rects = cascade.detectMultiScale(im, 1.3, 5)  # 人脸检测函数
    print("检测到人脸的数量", len(rects))
    if len(rects) == 0:  # len(rects) 是检测人脸的数量,如果没有检测到人脸的话,会显示出图片,适合本地调试使用,在服务器上可能不会显示
# cv2.namedWindow('Result', 0)
# cv2.imshow('Result', im)
# print("没有检测到人脸")
        pass
    plt.imshow(im[:, :, ::-1])  # 显示
    plt.show()
# os.remove(os.path.join(img_path, image)) #
# k = cv2.waitKey(0)
# if k == ord('q'): # 在英文状态下,按下按键 q 会关闭显示窗口
# break
# print()
# cv2.destroyAllWindows()
提取嘴唇区域
接下来我们要将样本处理成我们真正训练所需要的图像,本任务只对嘴唇部分的表情进⾏识别,所以我们的目标就是获取人脸嘴唇区域的图像,然后进行分类。我们利⽤ Opencv+Dlib 算法提取嘴唇区域, Dlib 算法会得到⾯部的 68 个关键点,我们从中得到嘴唇区域,并适当扩⼤。
# coding:utf8

import cv2
import dlib
import numpy as np
import sys
import os
import matplotlib.pyplot as plt

# 配置 Dlib 关键点检测路径
# 文件可以从 http://dlib.net/files/ 下载
PREDICTOR_PATH = "./Emotion_Recognition_File/face_detect_model/shape_predictor_68_face_landmarks.dat"
predictor = dlib.shape_predictor(PREDICTOR_PATH)
# 配置人脸检测器路径
cascade_path = './Emotion_Recognition_File/face_detect_model/haarcascade_frontalface_default.xml'
cascade = cv2.CascadeClassifier(cascade_path)

# 调用 cascade.detectMultiScale 人脸检测器和 Dlib 的关键点检测算法 predictor 获得关键点结果
def get_landmarks(im):
    rects = cascade.detectMultiScale(im, 1.3, 5) # 人脸检测
    x, y, w, h = rects[0]  # 获取人脸的四个属性值,左上角坐标 x,y 、高宽 w、h
# print(x, y, w, h)
    rect = dlib.rectangle(int(x), int(y), int(x + w), int(y + h))
    return np.matrix([[p.x, p.y] for p in predictor(im, rect).parts()])


def annotate_landmarks(im, landmarks):
    im = im.copy()
    for idx, point in enumerate(landmarks):
        pos = (point[0, 0], point[0, 1])
        cv2.putText(im,
                    str(idx),
                    pos,
                    fontFace=cv2.FONT_HERSHEY_SCRIPT_SIMPLEX,
                    fontScale=0.4,
                    color=(0, 0, 255))
        cv2.circle(im, pos, 5, color=(0, 255, 255))
    return im


def getlipfromimage(im, landmarks):
    xmin = 10000
    xmax = 0
    ymin = 10000
    ymax = 0
    # 根据最外围的关键点获取包围嘴唇的最小矩形框
    # 68 个关键点是从
    # 左耳朵0 -下巴-右耳朵16-左眉毛(17-21)-右眉毛(22-26)-左眼睛(36-41)
    # 右眼睛(42-47)-鼻子从上到下(27-30)-鼻孔(31-35)
    # 嘴巴外轮廓(48-59)嘴巴内轮廓(60-67)
    for i in range(48, 67):
        x = landmarks[i, 0]
        y = landmarks[i, 1]
        if x < xmin:
            xmin = x
        if x > xmax:
            xmax = x
        if y < ymin:
            ymin = y
        if y > ymax:
            ymax = y

    print("xmin=", xmin)
    print("xmax=", xmax)
    print("ymin=", ymin)
    print("ymax=", ymax)

    roiwidth = xmax - xmin
    roiheight = ymax - ymin

    roi = im[ymin:ymax, xmin:xmax, 0:3]

    if roiwidth > roiheight:
        dstlen = 1.5 * roiwidth
    else:
        dstlen = 1.5 * roiheight

    diff_xlen = dstlen - roiwidth
    diff_ylen = dstlen - roiheight

    newx = xmin
    newy = ymin

    imagerows, imagecols, channel = im.shape
    if newx >= diff_xlen / 2 and newx + roiwidth + diff_xlen / 2 < imagecols:
        newx = newx - diff_xlen / 2
    elif newx < diff_xlen / 2:
        newx = 0
    else:
        newx = imagecols - dstlen

    if newy >= diff_ylen / 2 and newy + roiheight + diff_ylen / 2 < imagerows:
        newy = newy - diff_ylen / 2
    elif newy < diff_ylen / 2:
        newy = 0
    else:
        newy = imagerows - dstlen

    roi = im[int(newy):int(newy + dstlen), int(newx):int(newx + dstlen), 0:3]
    return roi


def listfiles(rootDir):
    list_dirs = os.walk(rootDir)
    for root, dirs, files in list_dirs:
        for d in dirs:
            print(os.path.join(root, d))
        for f in files:
            fileid = f.split('.')[0]

            filepath = os.path.join(root, f)
            try:
                im = cv2.imread(filepath, 1)
                landmarks = get_landmarks(im)
                roi = getlipfromimage(im, landmarks)
                roipath = filepath.replace('.jpg', '_mouth.png')
# cv2.imwrite(roipath, roi)
                plt.imshow(roi[:, :, ::-1])
                plt.show()
            except:
# print("error")
                continue


listfiles("./Emotion_Recognition_File/mouth_det_img/")
边栏推荐
猜你喜欢

MindSpore:【模型训练】【mindinsight】timeline的时间和实际用时相差很远
用jOOQ 3.17投射类型安全的嵌套表记录
mysql慢查询优化

Install MySQL tutorial under Linux
How to install and use PostgreSQL 14.4

ERROR 1045 (28000) Access denied for user ‘root‘@‘localhost‘解决方法
【无标题】多集嵌套集合使不再有MultipleBagFetchException
MySQL slow query optimization

The advanced version of the cattle brushing series (search for rotating sorted arrays, inversion of the specified range in the linked list)
The technology is very powerful, do you still need to "manage up"?
随机推荐
VS Code connects to SQL Server
Win11如何更改默认下载路径?Win11更改默认下载路径的方法
The problem of writing go run in crontab does not execute
MySQL mass production of data
ERROR 1045 (28000) Access denied for user 'root'@'localhost'Solution
Entering the applet for the first time
推荐系统:评估指标【离线评估指标:RMSE(均方根误差)、AUC、准确率、召回率、F1】【在线评估:A/B测试】【一般要求响应时间<0.5s】
Download Win11 how to change the default path?Download Win11 change the default path method
linux下mysql8安装
PHP低代码开发引擎—表单设计
LeetCode 0952. Calculate Maximum Component Size by Common Factor: Mapping / Union Search
MySQL复制表结构、表数据的方法
【MindSpore】用coco2017训练Model_zoo上的 yolov4,迭代了两千多batch_size之后报错,大佬们帮忙看看。
Mapped Statements collection does not contain value for的解决方法
Talking about Contrastive Learning (Contrastive Learning) the first bullet
055 c# print
Difference between Object and Map
centos7安装mysql8
M3SDA:用于多源域自适应的矩匹配
MySQL kills 10 questions, how many questions can you stick to?