当前位置:网站首页>ESP32C3基于Arduino框架下的 ESP32 RainMaker开发示例教程
ESP32C3基于Arduino框架下的 ESP32 RainMaker开发示例教程
2022-07-25 09:44:00 【perseverance52】
ESP32C3基于Arduino框架下的 ESP32 RainMaker开发示例教程
ESP RainMaker
ESP RainMaker 是乐鑫推出的一个端到端平台。基于该平台,用户无需管理基础设施,可直接使用乐鑫的 ESP32-S2 SoC 快速实现物联网创意与想法。
- 乐鑫官方对ESP RainMaker介绍:https://www.espressif.com.cn/zh-hans/news/ESP-RainMaker
目前通过示例,将程序烧录到ESP32C3上,只实现了通过蓝牙连接到设备,在入网过程中,总是出错,代码上可能还需要完善才行。
esp-rainmaker-基于android版的APP应用下载地址
这个基于安卓的手机端APP,在各大APP应用市场真不好找,还要好通过官网提供的github找到了。
Release v2.3.0
- https://github.com/espressif/esp-rainmaker-android/releases

- 其他版本:https://github.com/espressif/esp-rainmaker/wiki
示例代码
//This example demonstrates the ESP RainMaker with a standard Switch device.
#include "RMaker.h"
#include "WiFi.h"
#include "WiFiProv.h"

#define DEFAULT_POWER_MODE true
const char *service_name = "PROV_1234";
const char *pop = "abcd1234";

//GPIO for push button
#if CONFIG_IDF_TARGET_ESP32C3
static int gpio_0 = 9;
static int gpio_switch = 7;
#else
//GPIO for virtual device
static int gpio_0 = 0;
static int gpio_switch = 16;
#endif

/* Variable for reading pin status*/
bool switch_state = true;

//The framework provides some standard device types like switch, lightbulb, fan, temperaturesensor.
static Switch my_switch("Switch", &gpio_switch);

void sysProvEvent(arduino_event_t *sys_event)
{

    switch (sys_event->event_id) {

        case ARDUINO_EVENT_PROV_START:
#if CONFIG_IDF_TARGET_ESP32S2
        Serial.printf("\nProvisioning Started with name \"%s\" and PoP \"%s\" on SoftAP\n", service_name, pop);
        printQR(service_name, pop, "softap");
#else
        Serial.printf("\nProvisioning Started with name \"%s\" and PoP \"%s\" on BLE\n", service_name, pop);
        printQR(service_name, pop, "ble");
#endif
        break;
        default:;
    }
}

void write_callback(Device *device, Param *param, const param_val_t val, void *priv_data, write_ctx_t *ctx)
{

    const char *device_name = device->getDeviceName();
    const char *param_name = param->getParamName();

    if(strcmp(param_name, "Power") == 0) {

        Serial.printf("Received value = %s for %s - %s\n", val.val.b? "true" : "false", device_name, param_name);
        switch_state = val.val.b;
        (switch_state == false) ? digitalWrite(gpio_switch, LOW) : digitalWrite(gpio_switch, HIGH);
        param->updateAndReport(val);
    }
}

void setup()
{

    Serial.begin(115200);
    pinMode(gpio_0, INPUT);
    pinMode(gpio_switch, OUTPUT);
    digitalWrite(gpio_switch, DEFAULT_POWER_MODE);

    Node my_node;
    my_node = RMaker.initNode("ESP RainMaker Node");

    //Standard switch device
    my_switch.addCb(write_callback);

    //Add switch device to the node
    my_node.addDevice(my_switch);

    //This is optional
    RMaker.enableOTA(OTA_USING_PARAMS);
    //If you want to enable scheduling, set time zone for your region using setTimeZone().
    //The list of available values are provided here https://rainmaker.espressif.com/docs/time-service.html
    // RMaker.setTimeZone("Asia/Shanghai");
    // Alternatively, enable the Timezone service and let the phone apps set the appropriate timezone
    RMaker.enableTZService();

    RMaker.enableSchedule();

    RMaker.start();

    WiFi.onEvent(sysProvEvent);
#if CONFIG_IDF_TARGET_ESP32S2
    WiFiProv.beginProvision(WIFI_PROV_SCHEME_SOFTAP, WIFI_PROV_SCHEME_HANDLER_NONE, WIFI_PROV_SECURITY_1, pop, service_name);
#else
    WiFiProv.beginProvision(WIFI_PROV_SCHEME_BLE, WIFI_PROV_SCHEME_HANDLER_FREE_BTDM, WIFI_PROV_SECURITY_1, pop, service_name);
#endif
}

void loop()
{

    if(digitalRead(gpio_0) == LOW) {
     //Push button pressed

        // Key debounce handling
        delay(100);
        int startTime = millis();
        while(digitalRead(gpio_0) == LOW) delay(50);
        int endTime = millis();

        if ((endTime - startTime) > 10000) {

          // If key pressed for more than 10secs, reset all
          Serial.printf("Reset to factory.\n");
          RMakerFactoryReset(2);
        } else if ((endTime - startTime) > 3000) {

          Serial.printf("Reset Wi-Fi.\n");
          // If key pressed for more than 3secs, but less than 10, reset Wi-Fi
          RMakerWiFiReset(2);
        } else {

          // Toggle device state
          switch_state = !switch_state;
          Serial.printf("Toggle State to %s.\n", switch_state ? "true" : "false");
          my_switch.updateAndReportParam(ESP_RMAKER_DEF_POWER_NAME, switch_state);
          (switch_state == false) ? digitalWrite(gpio_switch, LOW) : digitalWrite(gpio_switch, HIGH);
      }
    }
    delay(100);
}
- 串口打印信息

ESP32 RainMaker手机端连接过程
- 在手机上打开
ESP32 RainMaker APP应用程序,选择Add Device
- 通过扫描或者手动扫描连接到设备。(通过扫描很难成功识别串口监视器中的二维码)

- 程序烧录到目标板上后,打开串口监视器,会打印出下面这个带二维码的信息,如果没有看到请重启设备。
- 没有通过二维码识别的,可以通过下方的按钮手工连接到设备。


- 选择蓝牙
BLE,手机一定要开启蓝牙功能,有些手机还必须开启定位功能,否则无法找到蓝牙设备。
- 可以搜索到一个带
PROV的蓝牙设备
- 点击并连接这个设备,会要求输入PIN码才能进行连接。(默认是
bcd1234,可以通过串口信息看到相关信息)

- 第二步就是连接WiFi,接入互联网。(这里你默认匹配的是手机连接的哪个WiFi信号,)

- 不过到了这一步,不知道为什么会显示发送失败的信息
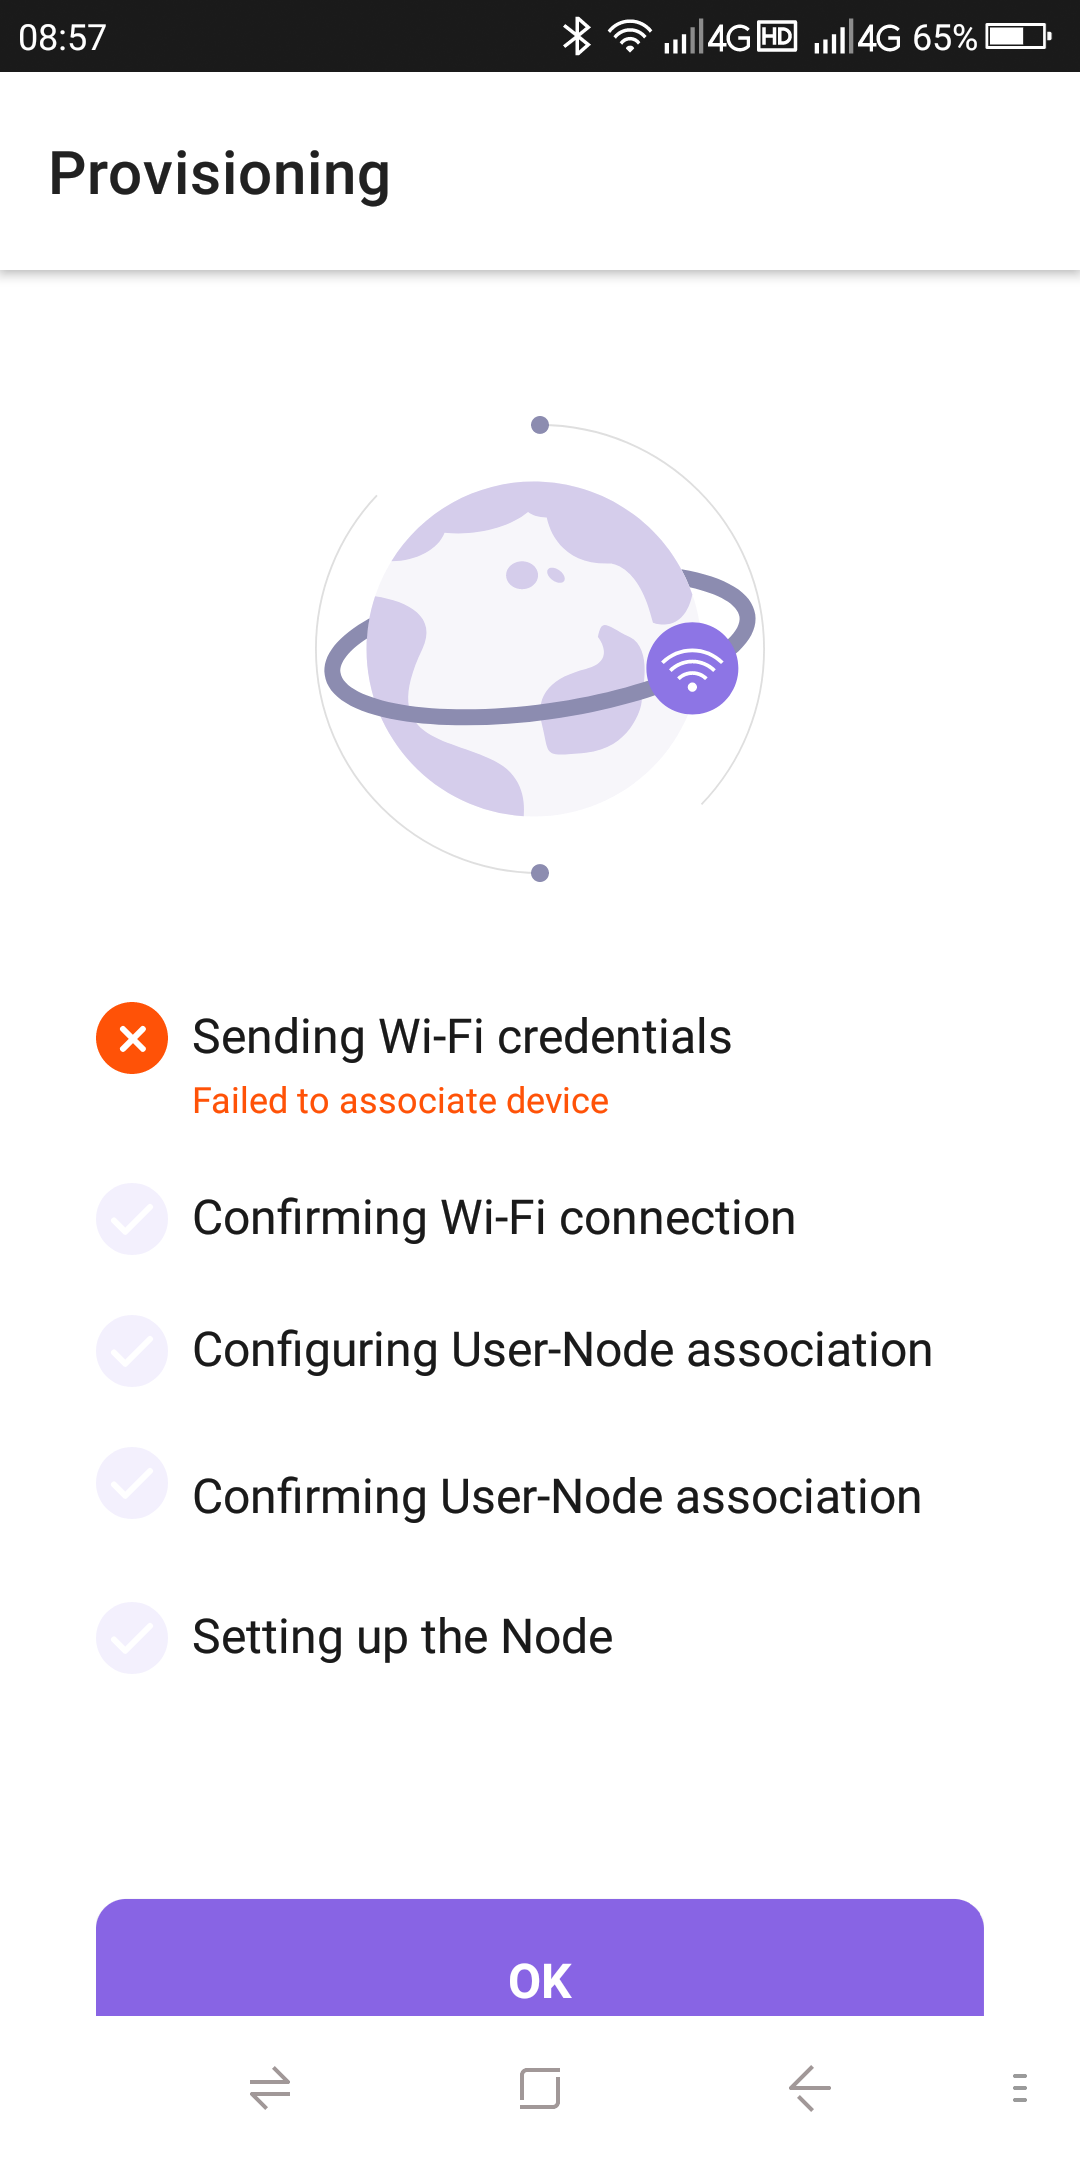
所以到这里就没有接入互联网实现手机端控制按钮开发功能。
边栏推荐
- Trojang attack on neural networks paper reading notes
- Add CONDA virtual environment env to the Jupiter kernel
- 4. Children next door will know all kinds of shell symbols {}[], etc
- 2021 牛客网笔试总结 01
- Basic concepts of testing
- Using numpy for elevation statistics and visualization
- 推荐系统-协同过滤在Spark中的实现
- 8.shell文件处理三剑客之sed
- Wechat applet wxprase contains files that cannot be solved by clicking
- Voxceleb1 dataset Download
猜你喜欢


随机推荐
微信小程序WxPrase中包含文件无法点击解决
Erlang(离线部署)
6. Regular expression of shell
Angr(二)——angr_ctf
For cycle: daffodil case
1、 The difference between unittest framework and pytest framework
Install MySQL database version 5.7.29 under ubuntu20.04 system
Angr (IV) -- angr_ ctf
10. Expect interaction free
7.shell实用的小工具cut等
Differences between redis and mongodb
MySQL solves the problem of not supporting Chinese
Pytoch separates tensor by the value of one dimension of tensor (simple)
6.shell之正则表达式
6.PXE结合Kickstart原理和配置实现无人值守自动装机
Fastdfs offline deployment (Graphic)
Detailed explanation of chrome developer tools
MySQL offline deployment
Frp反向代理部署
2. Introduce the deployment of lamp platform +discuz Forum