当前位置:网站首页>Use of tensorboard
Use of tensorboard
2022-06-23 08:06:00 【booze-J】
tensorboard Use ( Common methods and visualization )
List of articles
Preface
One 、add_scalar() Method
Brief introduction
You can see the source code for add_scalar Introduction to
    def add_scalar(
        self,
        tag,
        scalar_value,
        global_step=None,
        walltime=None,
        new_style=False,
        double_precision=False,
    ):
        """Add scalar data to summary. Args: tag (string): Data identifier scalar_value (float or string/blobname): Value to save global_step (int): Global step value to record walltime (float): Optional override default walltime (time.time()) with seconds after epoch of event new_style (boolean): Whether to use new style (tensor field) or old style (simple_value field). New style could lead to faster data loading. Examples:: from torch.utils.tensorboard import SummaryWriter writer = SummaryWriter() x = range(100) for i in x: writer.add_scalar('y=2x', i * 2, i) writer.close() Expected result: .. image:: _static/img/tensorboard/add_scalar.png :scale: 50 % """
The commonly used parameters are tag,scalar_value,global_step
tag: Equivalent to the title of the chart
scalar_value: It is equivalent to the vertical coordinate value of the chart (Y Axis )
global_step: It is equivalent to the abscissa value of the chart (X Axis )
Simple and practical
#  Import class methods
from torch.utils.tensorboard import SummaryWriter
#  Generate a writer object , And specify the directory for generating pictures
writer = SummaryWriter("logs")
for i in range(100):
	#  With y=x Title ,i Is the abscissa value ,i It is also the ordinate value , It is equivalent to drawing a y=x(0<=x<100) The straight line of
    writer.add_scalar("y=x",i,i)
writer.close()
After running the code, a directory with the specified name will be generated , And there will be an event in it , This event will use tensorboard open .
tensorboard The effect after opening is as follows :
Open build event
Click on pycharm At the bottom of the terminal window 
Input instruction tensorboard --logdir=logs, It will be automatically enabled locally 6006 port , But the problem with this is , When multiple people use the remote host for display operation at the same time , The port is occupied , So we can also specify that the port is open , Inputable instruction tensorboard --logdir=logs --port=6007 Appoint 6007 Or other free ports .
Click the link to see the effect picture :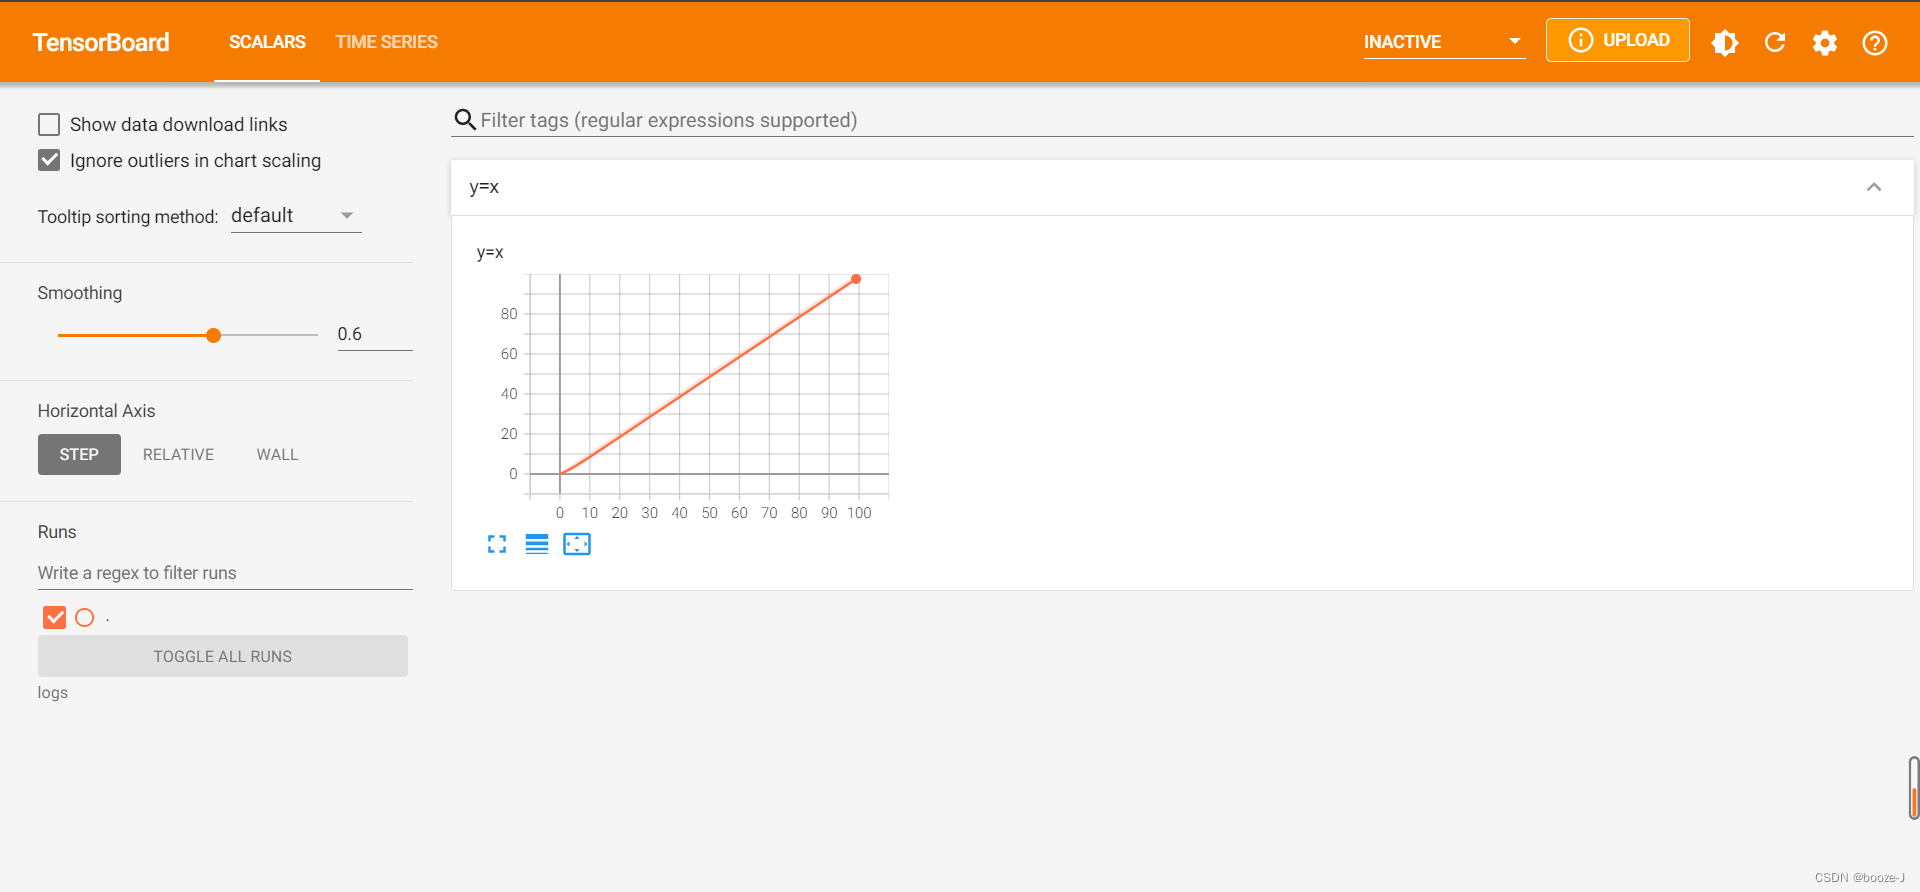
Two 、add_image() Method
Brief introduction
You can see the source code for add_image Introduction to
     def add_image(self, tag, img_tensor, global_step=None, walltime=None, dataformats='CHW'):
     """Add image data to summary. Note that this requires the ``pillow`` package. Args: tag (string): Data identifier img_tensor (torch.Tensor, numpy.array, or string/blobname): Image data global_step (int): Global step value to record walltime (float): Optional override default walltime (time.time()) seconds after epoch of event Shape: img_tensor: Default is :math:`(3, H, W)`. You can use ``torchvision.utils.make_grid()`` to convert a batch of tensor into 3xHxW format or call ``add_images`` and let us do the job. Tensor with :math:`(1, H, W)`, :math:`(H, W)`, :math:`(H, W, 3)` is also suitable as long as corresponding ``dataformats`` argument is passed, e.g. ``CHW``, ``HWC``, ``HW``. Examples:: from torch.utils.tensorboard import SummaryWriter import numpy as np img = np.zeros((3, 100, 100)) img[0] = np.arange(0, 10000).reshape(100, 100) / 10000 img[1] = 1 - np.arange(0, 10000).reshape(100, 100) / 10000 img_HWC = np.zeros((100, 100, 3)) img_HWC[:, :, 0] = np.arange(0, 10000).reshape(100, 100) / 10000 img_HWC[:, :, 1] = 1 - np.arange(0, 10000).reshape(100, 100) / 10000 writer = SummaryWriter() writer.add_image('my_image', img, 0) # If you have non-default dimension setting, set the dataformats argument. writer.add_image('my_image_HWC', img_HWC, 0, dataformats='HWC') writer.close() Expected result: .. image:: _static/img/tensorboard/add_image.png :scale: 50 % """
The commonly used parameters are tag,img_tensor,global_step
img_tensor Need to be torch.Tensor, numpy.array, or string/blobname Here we use ndarray To explain , Then convert the image to ndarray You need to use other modules opencv perhaps numpy, No students can install it
opencv Installation instructions pip install opencv-python -i https://pypi.tuna.tsinghua.edu.cn/simple
numpy Installation instructions pip install numpy -i https://pypi.tuna.tsinghua.edu.cn/simple
tag: Equivalent to the title of the chart
img_tensor: Equivalent to a picture object (torch.Tensor, numpy.array, or string/blobname)
global_step: It's the step length
Simple and practical
#  Import related modules
from torch.utils.tensorboard import SummaryWriter
from PIL import Image
import numpy as np
#  Generate a writer object
writer = SummaryWriter("logs")
image_path = r"D:\pycharm_professional\PycharmProjects\learning_pytorch\dataset\train\ants_image\0013035.jpg"
#  Read the picture
img_PIL = Image.open(image_path)
#  Convert picture to ndarray type
img_array = np.array(img_PIL)
writer.add_image("test",img_array,1, dataformats='HWC')
writer.close()
Be careful writer.add_image("test",img_array,1, dataformats='HWC') Need to add dataformats='HWC' among H Represents the height of the picture ,W Represents the width of the picture ,C Represents the number of picture channels . The default order is (C,H,W), But use np.array() After the transformation, the order becomes (H,W,C), So will dataformat The value of the set HWC. If you don't do this, you will report an error ! When it comes to how to view this property of a picture object , We can go through pycharm At the bottom of the console Console to execute line by line , View the relevant properties of the image object or directly print(img_array.shape) Check it out. .
After running the code, a directory with the specified name will be generated , And there will be an event in it , This event will use tensorboard open .
tensorboard The effect after opening is as follows :
Open build event
Click on pycharm At the bottom of the terminal window
Input instruction tensorboard --logdir=logs, It will be automatically enabled locally 6006 port , But the problem with this is , When multiple people use the remote host for display operation at the same time , The port is occupied , So we can also specify that the port is open , Inputable instruction tensorboard --logdir=logs --port=6007 Appoint 6007 Or other free ports .
Click the link to see the effect picture :
边栏推荐
- Introduction to MySQL system tables
- Location of firewalld configuration file
- domain controller
- 套接字socket编程
- C#重启应用程序
- imperva-查找正则匹配超时的方法
- 开源软件、自由软件、Copyleft、CC都是啥,傻傻分不清楚?
- Mathematical knowledge: Euler function - Euler function
- 数学知识:欧拉函数—欧拉函数
- QT project error: -1: error: cannot run compiler 'clang++' Output:mingw32-make. exe
猜你喜欢

Interview questions of a company in a certain month of a certain year (1)
11 字符串函数

Learn to draw Er graph in an article

Display proportion of sail soft accumulation diagram

Openvino series 19 Openvino and paddleocr for real-time video OCR processing
Tensorboard的使用
Using the for loop to output an alphabetic triangle

AVL树的实现
openni. utils. OpenNIError: (OniStatus.ONI_STATUS_ERROR, b‘DeviceOpen using default: no devices found‘

Acwing第 56 場周賽【完結】
随机推荐
Learn to draw Er graph in an article
@What is the difference between controller and @restcontroller?
Guava cache usage summary
深度学习------卷积(conv2D)底层
浅谈ThreadLocal和InheritableThreadLocal,源码解析
数学知识:欧拉函数—欧拉函数
ThreadPoolExecutor线程池实现原理与源码解析
Kwai 350014
@Controller和@RestController的区别?
qt 不规则图形 消除锯齿
MySQL慢查询记录
C# richTextBox控制最大行数
aquatone工具 中的2个bug修复
ArcMap batch delete points closer
Playwirght getting started
Regular expression use cases
openni. utils. OpenNIError: (OniStatus.ONI_STATUS_ERROR, b‘DeviceOpen using default: no devices found‘
快速排序 + 冒泡排序 + 插入排序 + 选择排序
[try to hack] IP address
Introduction to MySQL system tables