当前位置:网站首页>ceph的部署练习
ceph的部署练习
2022-07-30 19:57:00 【雾山雨巫】
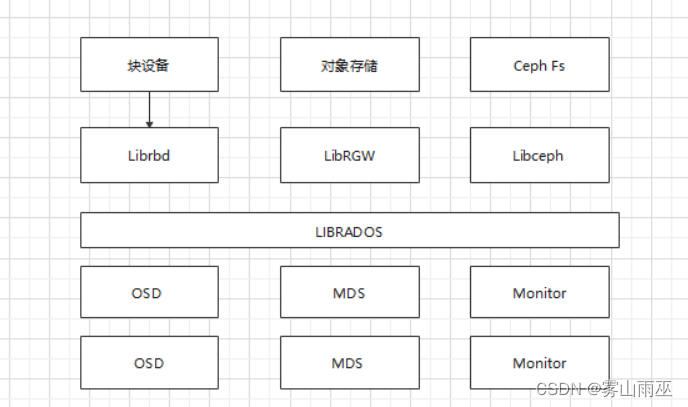
1.ceph的组件和功能
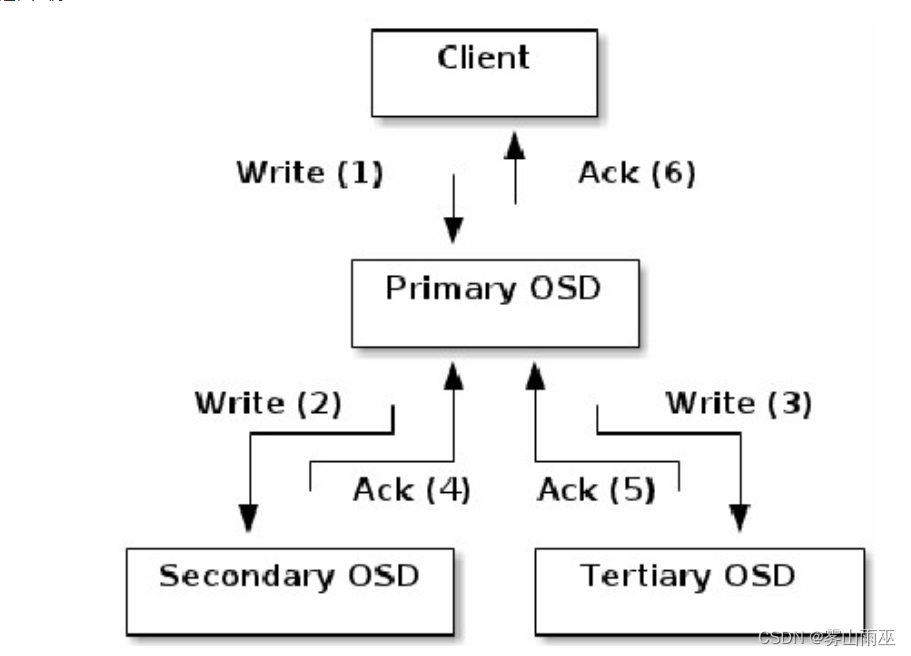
2.ceph的数据读写流程
eph的读/写操作采用Primary-Replica模型,客户端只向Object所对应OSD set的Primary OSD发起读/写请求,这保证了数据的强一致性。当Primary OSD收到Object的写请求时,它负责把数据发送给其他副本,只有这个数据被保存在所有的OSD上时,Primary OSD才应答Object的写请求,这保证了副本的一致性。
3.使用ceph-deploy安装一个最少三个节点的ceph集群 推荐3个或以上的磁盘作为专用osd
(1)创建三台虚机并分别添加三块磁盘

安装前准备
1、关闭防火墙、禁用SELinux。
# 关闭防火墙
[[email protected] ~]# systemctl stop firewalld
[[email protected] ~]# systemctl disable firewalld

# 禁用SELinux
[[email protected] ~]# sed -i '/^SELINUX=/c SELINUX=disabled' /etc/selinux/config
[[email protected] ~]# setenforce 0
2、配置主机名和IP及hosts解析。
# 分别为每台机器设置IP地址,配置主机名
[[email protected] ~]# hostnamectl set-hostname node1

# 为所有机器配置hosts解析
[[email protected] ~]# tail -4 /etc/hosts
192.168.163.141 node1
192.168.163.142 node3
192.168.163.143 node2
3、配置node1到所有节点root用户免密钥互信。
# node1上生成密钥对
[[email protected] ~]# ssh-keygen -f ~/.ssh/id_rsa -N '' -q

# 公钥分发到所有节点
[[email protected] ~]# for i in node1 node2 node3; do ssh-copy-id $i; done

# 验证免密钥互信
[[email protected] ~]# for i in node1 node2 node3; do ssh $i hostname; done
node1
node2
node3
4、配置时间同步。

# 启动chrony服务并设置开机自启动
[[email protected] ~]# systemctl enable chronyd --now

# 其他节点作为时间客户端配置
[[email protected] ~]# yum install -y chrony
# 修改配置文件 /etc/chrony.conf
[[email protected] ~]# server node1 iburst

# 重启chrony服务并设置开机自启动
[[email protected] ~]# systemctl restart chronyd
[[email protected] ~]# systemctl enable chronyd
# 检查时间同步
[[email protected] ~]# chronyc sources
210 Number of sources = 1
MS Name/IP address         Stratum Poll Reach LastRx Last sample
===============================================================================
^* node1                         3   6    77    48    -40us[-1026us] +/-   34ms
# 事先准备一台机器将,制作指定版本的ceph的yum源
[[email protected] ~]# [[email protected] ~]# cat getcephrpm.sh
#!/bin/sh
url=$1
version=$2
curl $1 |awk -F '"' '{print $4}' |egrep $2 > /home/$2-list
mkdir -p /ceph/ceph-$2-rpm
for i in `cat /home/$2-list`
do
echo "===================== Now get file: $i ======================="
wget -r -p -np -k -P /ceph/ceph-$2-rpm $url$i
done
rm -f /home/$2-list
1> 执行脚本:sh getcephrpm.sh http://mirrors.aliyun.com/ceph/rpm-nautilus/el7/x86_64/ 14.2.10-0
2> 查看下载的指定本包
[[email protected] ~]# ls /ceph/ceph-14.2.10-0-rpm/mirrors.aliyun.com/ceph/rpm-nautilus/el7/x86_64/
3> 同样,下载http://mirrors.aliyun.com/ceph/rpm-nautilus/el7/noarch/ 下面的rpm包
[[email protected] ~]# sh getcephrpm.sh http://mirrors.aliyun.com/ceph/rpm-nautilus/el7/noarch/ 14.2.10-0
3> ceph下创建目录x86_64和noarch,将下载好的x86_64和noarch下面内容分别拷贝到创建的对应目录
[[email protected] ~]# mkdir /ceph/{x86_64,noarch}
[[email protected] ~]# mv /ceph/ceph-14.2.10-0-rpm/mirrors.aliyun.com/ceph/rpm-nautilus/el7/x86_64/* /ceph/x86_64/
[[email protected] ~]# mv /ceph/ceph-14.2.10-0-rpm/mirrors.aliyun.com/ceph/rpm-nautilus/el7/noarch/* /ceph/noarch/
4> 单独下载ceph部署工具ceph-deploy至/ceph/ceph-noarch/
[[email protected] ~]# wget http://mirrors.tuna.tsinghua.edu.cn/ceph/rpm-nautilus/el7/noarch/ceph-deploy-2.0.1-0.noarch.rpm -P /ceph/noarch/
5> 使用createrepo创建仓库档案
[[email protected] ~]# yum install createrepo -y
[[email protected] ~]# createrepo -v /ceph/x86_64/
[[email protected] ~]# createrepo -v /ceph/noarch/
[[email protected] ceph-x86_64]# ls repodata/
5a5fa955b3cee577efe4d2e67ba349a8c54b59c8a254e77b7ef4d78ddf495ec0-primary.xml.gz
5c4e1d7cd386533e0cc0c858214f9a1d30be1b15a637406cc7306e71d49f6558-primary.sqlite.bz2
5f28e819152e26866b94a1145b5e2d58332d852abf1244ab056a79da984c5c44-filelists.sqlite.bz2
9684deb53c6ecbf22fa53d0a09b14fdb17f719d9c3705af94dac5697f114dea9-filelists.xml.gz
bccee03e46204de0ed9e1f7c9b36dd6ed8eb579ff58ac2b4f83c9cecb2303417-other.xml.gz
fa6f5eebbaf45b9fc63a933b02cc60bc284ef6954f5287c6fa31c9256c679cd0-other.sqlite.bz2
repomd.xml
# 其中filelists.xml.gz软件报的安装清单
primary.xml.gz软件报的基本/主要信息
other.xml.gz软件包的其他信息
repomd.xml提高.xml.gz下载和校验信息
# 目录文件制作ISO文件
[[email protected] ~]# yum install mkisofs -y
[[email protected] ~]# mkisofs -r -o /opt/ceph.iso /ceph/node1配置为yum仓库服务器,其他节点使用ftp方式使用ceph仓库
# 上传ceph.iso到node1
[[email protected] ~]# ll ceph.iso
-rw-r--r-- 1 root root 2408808448 Mar 18 09:15 ceph.iso

# 安装httpd并设置为开机自启动
[[email protected] ~]# yum install -y vsftpd
[[email protected] ~]# systemctl enable vsftpd --now

# 挂载ceph.iso到/var/ftp
[[email protected] ~]# mkdir /var/ftp/ceph
[[email protected] ~]# echo "/root/ceph.iso  /var/ftp/ceph  iso9660 defaults 0 0" >> /etc/fstab
[[email protected] ~]# mount -a

# yum文件ceph.repo由后面的ceph-deploy工具安装时自动生成。
安装ceph-deploy
[[email protected] ~]# export CEPH_DEPLOY_REPO_URL=ftp://node1/ceph/
[[email protected] ceph-cluster]# yum install /var/ftp/ceph/noarch/ceph-deploy-2.0.1-0.noarch.rpm
# 注意:安装高版本的ceph-deploy,否则后面配置会报错
[[email protected] ~]# mkdir /ceph-cluster
[[email protected] ~]# cd /ceph-cluster
创建ceph集群node1-node3添加epel源
wget -O /etc/yum.repos.d/epel.repo http://mirrors.aliyun.com/repo/epel-7.repo[[email protected] ceph-cluster]# wget -O /etc/yum.repos.d/epel.repo http://mirrors.aliyun.com/repo/epel-7.repo
[[email protected] ceph-cluster]# yum install python2-pip -y
[[email protected] ceph-cluster]# pip install distribute -i http://mirrors.aliyun.com/pypi/simple/ --trusted-host mirrors.aliyun.com
[[email protected] ceph-cluster]# ceph-deploy new node1 node2 node3
[[email protected] ceph-cluster]# ll
total 16
-rw-r--r-- 1 root root 235 Mar 18 09:19 ceph.conf
-rw-r--r-- 1 root root 4852 Mar 18 09:19 ceph-deploy-ceph.log
-rw------- 1 root root 73 Mar 18 09:19 ceph.mon.keyring给所有节点安装ceph相关软件包。
[[email protected] ceph-cluster]# ceph-deploy install node1 node2 node3添加监控节点
初始化所有节点的mon服务,也就是启动mon服务。
[[email protected] ceph-cluster]# ceph-deploy mon create-initial
# 作用是将ceph.conf配置文件拷贝到所有mon节点,并将ceph-mon服务启动并设置开机自启

[[email protected] ~]# ls /etc/ceph/
ceph.conf  rbdmap  tmpn1zEAD
[[email protected] ~]# systemctl is-active [email protected]
active
创建ceph管理节点(mgr)
[[email protected] ceph-cluster]# ceph-deploy mgr create node1 node2 node3 准备日志磁盘分区
格式化sdb
[[email protected] ceph-cluster]# for i in node{1..3}
do
 ssh $i parted /dev/sdb mklabel gpt
 ssh $i parted /dev/sdb mkpart primary 1 50%
 ssh $i parted /dev/sdb mkpart primart 50% 100%
done
磁盘分区后的默认权限无法让ceph对其进行读写操作,需要修改权限。
[[email protected] ceph-cluster]# for i in node{1..3}
do
 ssh $i chown ceph.ceph /dev/sdb1 /dev/sdb2
done
# 以上操作服务器重启后再次重值导致授权失效,所以需要把规则写到配置文件实现永久有效。
	规则1:如果设备名为/dev/sdb1,则设备文件的拥有者和拥有组为ceph
	规则2:如果设备名为/dev/sdb2,则设备文件的拥有者和拥有组为ceph
[[email protected] ceph-cluster]# vim /etc/udev/rules.d/70-sdb.rules
ENV{DEVNAME}=="/dev/sdb1",OWNER="ceph",GROUP="ceph"
ENV{DEVNAME}=="/dev/sdb2",OWNER="ceph",GROUP="ceph"

# 复制到其他osd节点
[[email protected] ceph-cluster]# for i in node{2..3}
do
 scp /etc/udev/rules.d/70-sdb.rules $i:/etc/udev/rules.d/
done
创建OSD存储空间
初始化清空磁盘数据
# 注意ceph-deploy v2.0.0开始不再使用ceph-disk命令来初始化osd磁盘,如果还使用旧的命令初始磁盘报错
[[email protected] ceph-cluster]# for i in node{1..3}
do
 ssh $i parted /dev/sdb mklabel gpt
 ssh $i parted /dev/sdc mklabel gpt
done

#清理磁盘
[[email protected] ceph-cluster]# for i in node{1..3}
do
  ssh $i ceph-volume lvm zap /dev/sdb
  ssh $i ceph-volume lvm zap /dev/sdc
done
创建OSD存储空间
[[email protected] ceph-cluster]# ceph-deploy osd create --data /dev/sdb --journal /dev/sdb1 --data /dev/sdc --journal /dev/sdb2 node1
// 创建osd存储设备,sdc提供存储空间,sdb1提供缓存
[[email protected] ceph-cluster]# ceph-deploy osd create --data /dev/sdb --journal /dev/sdb1 --data /dev/sdc --journal /dev/sdb2 node2
[[email protected] ceph-cluster]# ceph-deploy osd create --data /dev/sdb --journal /dev/sdb1 --data /dev/sdc --journal /dev/sdb2 node3
查看ceph状态,验证
[[email protected] ceph-cluster]# ceph-deploy admin node1 node2 node3
[[email protected] ceph-cluster]# ceph health
HEALTH_OK
[[email protected] ceph-cluster]# ceph -s
cluster:
id: 5943dcfc-5095-4139-943c-acf38960b008
health: HEALTH_OK
services:
mon: 3 daemons, quorum node1,node2,node3 (age 4m)
mgr: node1(active, since 3m), standbys: node2, node3
osd: 3 osds: 3 up (since 29s), 3 in (since 29s)
data:
pools: 0 pools, 0 pgs
objects: 0 objects, 0 B
usage: 3.0 GiB used, 57 GiB / 60 GiB avail
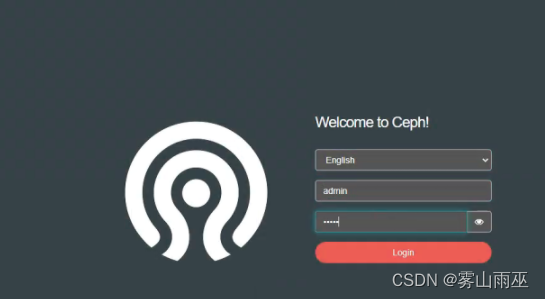
pgs:启用dashboard
# 在所有的mgr节点上单独安装
[[email protected] ceph-cluster]# for i in node{1..3}
do
 ssh $i yum install -y ceph-mgr-dashboard
done

# 启用dashboard
[[email protected] ceph-cluster]# ceph mgr module enable dashboard --force

# 默认启用SSL/TLS,所以需要创建自签名根证书
[[email protected] ceph-cluster]# ceph dashboard create-self-signed-cert

# 创建具有管理员角色的用户
[[email protected] ceph-cluster]# ceph dashboard ac-user-create admin admin administrator
{"username": "admin", "lastUpdate": 1616031372, "name": null, "roles": ["administrator"], "password": "$2b$12$4wa4pCKkDf.pvDO9LFldZuwn1GRt.W6zDXvV9QHxnjovrmpA3inWS", "email": null}

# 查看ceph-mgr服务
[[email protected] ceph-cluster]# ceph mgr services
{
    "dashboard": "https://node1:8443/"
}

边栏推荐
猜你喜欢
Typora设置标题自动标号

MySQL数据库 ---MySQL表的增删改查(进阶)
LeetCode 0952. Calculate Maximum Component Size by Common Factor: Mapping / Union Search

如何优化OpenSumi终端性能?

HCIP --- 企业网的三层架构
mysql慢查询优化
![[PyTorchVideo Tutorial 01] Quickly implement video action recognition](/img/1a/696c5722bb94fabd688a8714ae2e8c.png)
[PyTorchVideo Tutorial 01] Quickly implement video action recognition
【PyTorchVideo教程01】快速实现视频动作识别
【视频】极值理论EVT与R语言应用:GPD模型火灾损失分布分析
KEIL问题:【keil Error: failed to execute ‘C:\Keil\ARM\ARMCC‘】
随机推荐
MySQL数据库————视图和索引
halcon——轮廓线
MySQL database --- Addition, deletion, modification and query of MySQL tables (advanced)
HarmonyOS笔记-----------(三)
Day31 LeetCode
[Ask] SQL statement to calculate the sum of column 2 by deduplicating column 1?
Range.CopyFromRecordset method (Excel)
MySQL分组后取最大一条数据【最优解】
OSS简单上传图片
Day31 LeetCode
MySQL eight-part text recitation version
centos7安装mysql8
Recommender systems: overview of the characteristics of architecture: user/item engineering -- -- -- -- -- -- -- -- > recall layer > sort layer - > test/evaluation 】 【 cold start problems, real-time 】
银行数据资产转换能力弱?思迈特软件助力解决银行困境
Interviewer Ali: Describe to me the phenomenon of cache breakdown, and talk about your solution?
Weak Banks to data conversion ability?Matt software help solve bank dilemma
MySQL复制表结构、表数据的方法
The technology is very powerful, do you still need to "manage up"?
ELK log analysis system
【请教】SQL语句按列1去重来计算列2之和?