当前位置:网站首页>Teach you how to build virtual machines locally and deploy microservices
Teach you how to build virtual machines locally and deploy microservices
2022-07-02 15:50:00 【Java geek Technology】
Every day in the morning It's seven thirty , Push dry goods on time

Photo by Patrick Hendry on Unsplash
A fan used to play a lot about virtual machines , But rarely summarized , Easy to forget , Today, it's just a one-stop summary !
One 、 Introduce
Usually we develop good projects , It is usually tested locally , And then put the project war The package is handed over to the operation and maintenance department or passed jenkins And other construction tools are published to the corresponding server resources .
For production environment , We may use the server resources of the cloud manufacturer , Of course, it would be better if the company had its own computer room .
however For the test environment , Especially small businesses , It is expensive to purchase a ECS resource for testing alone , We usually use virtual software to partition a local computer into several separate resource environments , To save resources 、 Purpose of saving money .
Recently, I was just tossing about the installation and configuration of virtual machines , To be honest, I encountered many pits , The main idea is to deploy several local microservices to virtual machines , Then test , See if the service can run normally ?
This time we use VMware Software , I chose the trial version !
I won't introduce the installation step , Relatively simple , You can baidu yourself !

After the virtual machine software is installed , In order to be consistent with the real production environment , The system image selected this time is Centos 7.8, You can directly access Alibaba cloud's image site http://mirrors.aliyun.com/centos/7.8.2003/isos/x86_64/, Download will be very fast , choice CentOS-7-x86_64-Minimal-2003.iso that will do .

Two 、 Install the image
- After downloading , open
VMware Software , Click create new virtual machine .

- Select the recommended configuration

- Select the downloaded system image
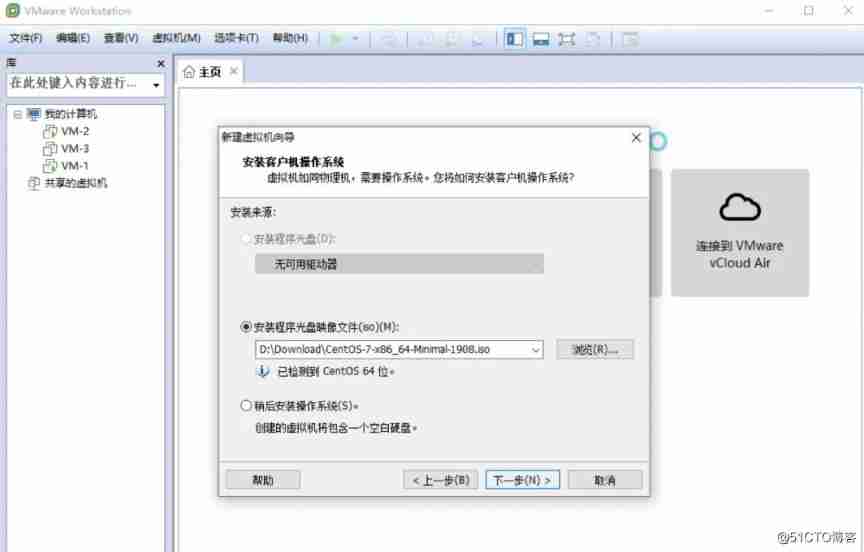
And then click next , Until completion , Wait for the virtual machine to be created and installed successfully !
The installation process is a fool's operation , I installed three on this machine , Relatively simple !
The key point is the network environment configuration , Let's take a look .
3、 ... and 、 Introduction to the Internet
After virtual machine installation , You need to configure the corresponding network to get online ,VMware It provides us with two network configuration schemes , One is : Bridging mode , The other is :NAT Pattern .
3.1、 Bridging mode ( recommend )
Bridging mode , To put it simply , Is to create a separate host in a LAN , He can access all the hosts in this lan , But you need to manually configure the subnet mask 、 gateway 、DNS etc. , And it is in the same network segment as the real host , In this model , Virtual machines and host computers can interact with each other ping through .

3.3、NAT Pattern
NAT Pattern , To put it simply , The virtual machine accesses the external network through the network of the host , Virtual network wants to access the Internet , You have to go through the host IP Address , Both host and virtual machine are external IP Address , Therefore, other machines in the LAN cannot connect to the virtual machine .

Four 、 Environment configuration
After understanding the introduction of network configuration , It is obvious that , What we need is that machines in the whole LAN can access virtual machines , Therefore, the virtual machine needs to configure the bridge mode to access the Internet .
- Click edit , Choose virtual network editor
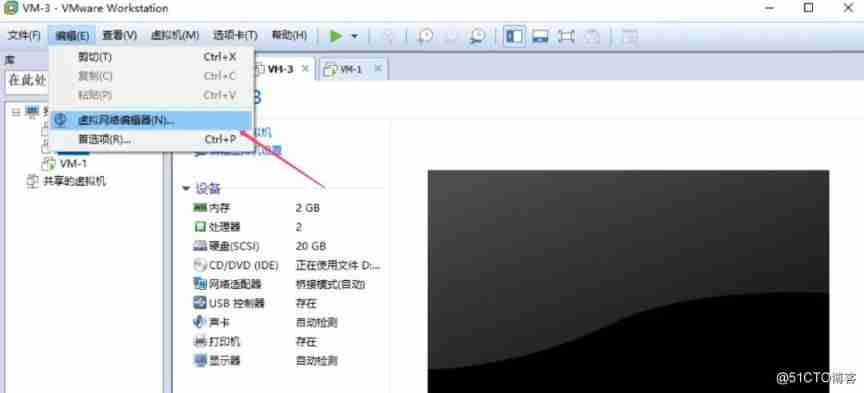
- Click change settings

- Choose VMnet0, choice Bridging mode , And choose the corresponding Host network card
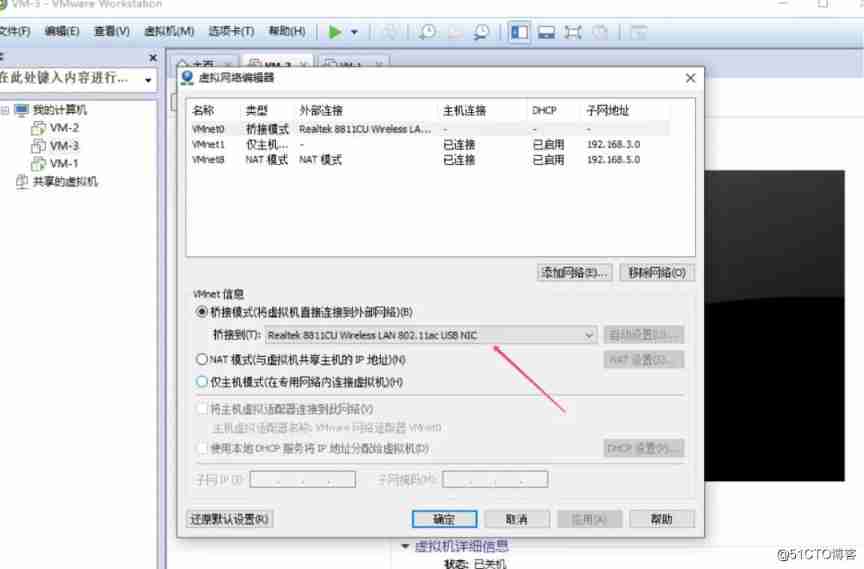
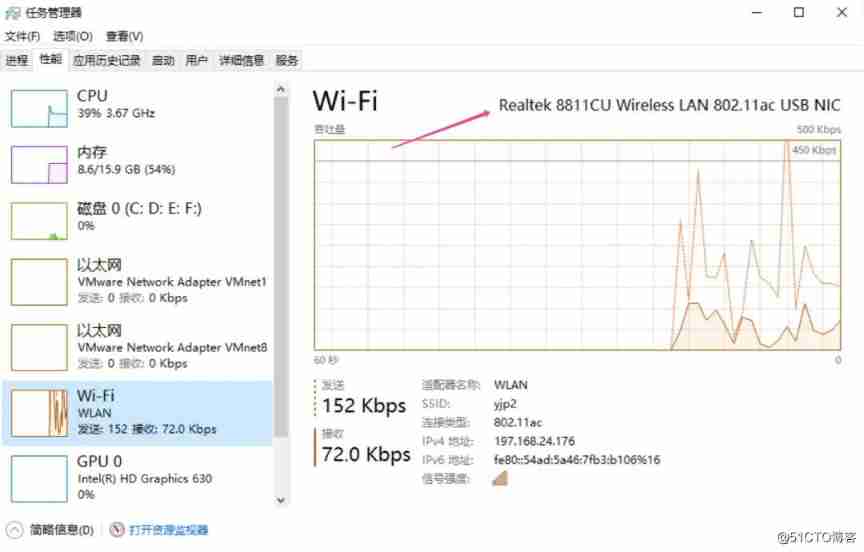
- It is very important to obtain the host network card information , If you don't know which one to choose , You can view it through the task manager
- After the virtual network editor is configured , Click a single virtual machine to set the network

- Choose bridge mode , Connect to the network

- Enter
ipconfig /all Get the subnet mask of the host 、 gateway 、DNS Etc , It is convenient for subsequent virtual machine configuration
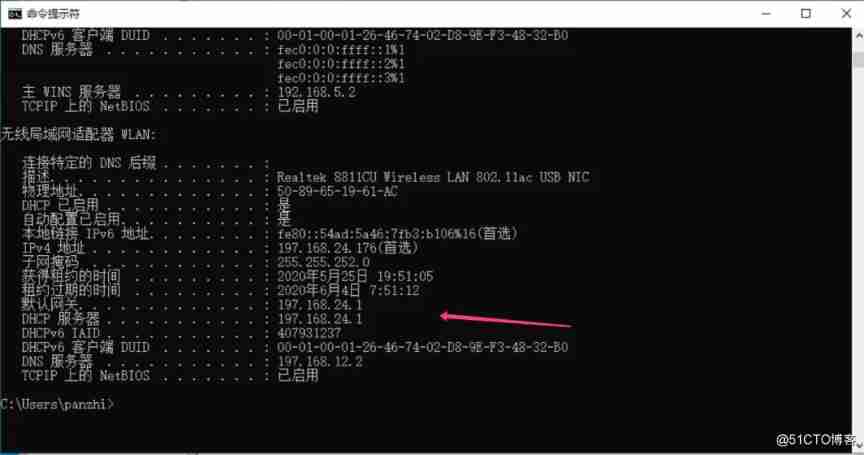
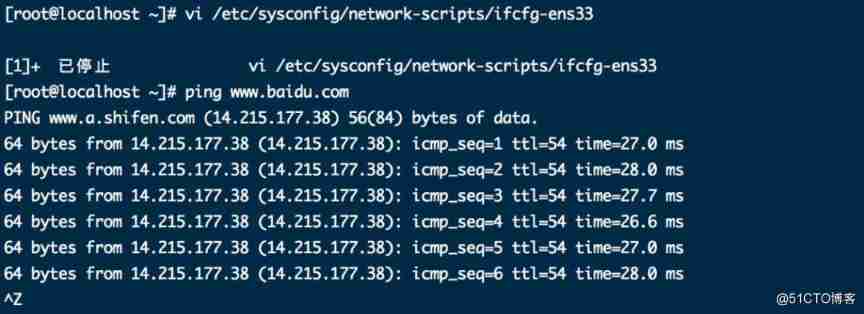
- Finally, log in to the terminal virtual machine for network configuration
        # Edit the information of the corresponding network card in the virtual machine (centos7)

vi /etc/sysconfig/network-scripts/ifcfg-ens33


# If it is centos6, Edit the file as follows

vi /etc/sysconfig/network-scripts/ifcfg-eth0
- 1.
- 2.
- 3.
- 4.
- 5.
- 6.
- Add the following information at the end of the file , The default is dynamic acquisition IP
        ONBOOT=yes     # Turn on auto enable network connection

NETMASK=255.255.252.0   # Set subnet mask ( Subnet mask in the host )

GATEWAY=197.168.24.1    # Set up the gateway ( Gateway in the host )

DNS1=197.168.12.2           # Set master DNS( In the host DNS The server )
- 1.
- 2.
- 3.
- 4.
- Of course, you can also configure static IP Address , modify
BOOTPROTO Parameters
BOOTPROTO=static # Enable static IP Address , The default is dhcp, Show dynamic
- 1.
- Set static IP Address , With the host IP In the same network segment
        IPADDR=197.168.24.201    # Set static IP Address

ONBOOT=yes       # Turn on auto enable network connection

NETMASK=255.255.252.0   # Set subnet mask ( Subnet mask in the host )

GATEWAY=197.168.24.1    # Set up the gateway ( Gateway in the host )

DNS1=197.168.12.2           # Set master DNS( In the host DNS The server )
- 1.
- 2.
- 3.
- 4.
- 5.
- After saving successfully , Restart NIC
systemctl restart network
- 1.
- Finally, test whether you can surf the Internet , If there is a return message , You can surf the Internet
ping www.baidu.com
- 1.
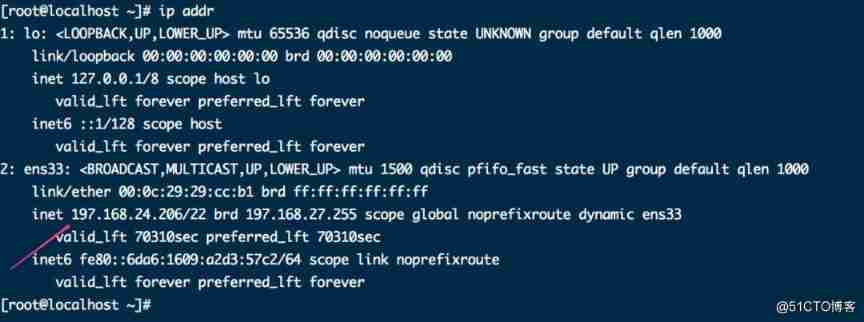
- Input
ip addr Check out the Internet
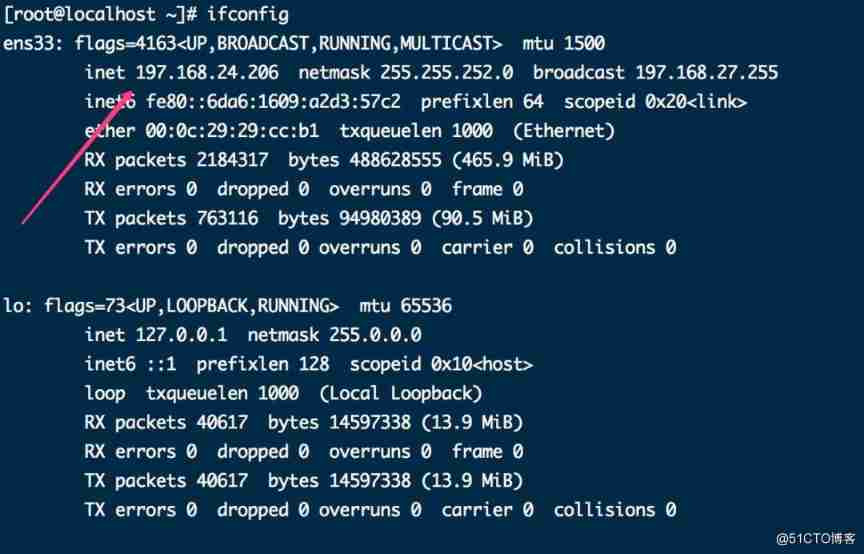
- You can also use
ifconfig command , If there is no command found , You can install it with the following commands
        # install net-tools

yum install net-tools
- 1.
- 2.
5、 ... and 、 Project deployment
After the network configuration is completed , You can install the service 、 The project has been deployed .
- Enter the following command , install JDK
yum -y install java-1.8.0-openjdk
- 1.
- Input
java -version Check whether the installation is successful

- Use
winScp Tools will jar perhaps war Upload the package to the server directory

- Use
xshell Command tools such as remote login server , Enter the command to start the service
        # Start a jar service , Print log to service.log In file

nohup java -jar service.jar > service.log 2>&1 &
- 1.
- 2.
- In case of remote inaccessibility , Check if the firewall is on , If on, turn it off
        # Check if the firewall is on

systemctl status firewalld.service


# Turn off firewall

systemctl stop firewalld.service


# It is forbidden to start the firewall automatically

systemctl disable firewalld.service
- 1.
- 2.
- 3.
- 4.
- 5.
- 6.
- 7.
- 8.
- 9.
- 10.
6、 ... and 、 summary
The whole content is more , They were all tested by themselves , In particular, there are many holes in the network configuration , When configuring the network , Be sure to check which network card of the host is surfing the Internet , Then select the network card type when configuring the bridge mode !
If there is something wrong , Hope netizens criticize and point out !
7、 ... and 、 Reference resources
1、 Autumn night rain lane - VMWare Virtual machine network configuration
边栏推荐
- Lseek error
- Make p12 certificate [easy to understand]
- Experiment collection of University "Fundamentals of circuit analysis". Experiment 6 - observation and measurement of typical signals
- 已知两种遍历序列构造二叉树
- Thoroughly understand browser strong cache and negotiation cache
- 图数据库|Nebula Graph v3.1.0 性能报告
- XPT2046 四线电阻式触摸屏
- Fastjson list to jsonarray and jsonarray to list "suggested collections"
- beforeEach
- Digital collection system development (program development) - Digital Collection 3D modeling economic model system development source code
猜你喜欢

可视化技术在 Nebula Graph 中的应用
Pattern matching extraction of specific subgraphs in graphx graph Computing Practice
Application of visualization technology in Nebula graph
![[network security] network asset collection](/img/3e/6665b5af0dedfcbc7bd548cc486878.png)
[network security] network asset collection

愛可可AI前沿推介(7.2)

Introduction to Dynamic Planning II (5.647.62)
Aiko ai Frontier promotion (7.2)

Ant group's large-scale map computing system tugraph passed the national evaluation
How to use percona tool to add fields to MySQL table after interruption

基于 Nebula Graph 构建百亿关系知识图谱实践
随机推荐
/bin/ld: 找不到 -lxml2
目标检测—利用labelimg制作自己的深度学习目标检测数据集
The outline dimension function application of small motherboard
Fiddler实现手机抓包——入门
【小白聊云】中小企业容器化改造建议
Strings and arrays
Pyinstaller打包exe附带图片的方法
【idea】推荐一个idea翻译插件:Translation「建议收藏」
[leetcode] 200 number of islands
fastjson List转JSONArray以及JSONArray转List「建议收藏」
Comment réaliser un graphique Nebula d'importation CSV hors ligne de niveau milliard
Basic knowledge of cryptography
How to import a billion level offline CSV into Nepal graph
Nebula Graph & 数仓血缘关系数据的存储与读写
locate: 无法执行 stat () `/var/lib/mlocate/mlocate.db‘: 没有那个文件或目录
已知兩種遍曆序列構造二叉樹
[leetcode] 486 predict winners
Folium, diagnosis and close contact trajectory above
PostgresSQL 流复制 主备切换 主库无读写宕机场景
[leetcode] 283 move zero