当前位置:网站首页>Redis detailed tutorial
Redis detailed tutorial
2022-06-27 00:18:00 【Lazy and naive】
List of articles
- One 、 brief introduction
- Two 、 Installation tutorial
- 3、 ... and 、redis Common operations ( Command line )
- Four 、redis Common operations (java)
- 5、 ... and 、redis Integrate springboot
- 6、 ... and 、redis Configuration file details
- 7、 ... and 、redis Persistence
- 7、 ... and 、redis Master slave copy
- 8、 ... and 、redis Sentinel mode
- Nine 、redis cluster colony
- Ten 、 Cache breakdown 、 through 、 An avalanche
One 、 brief introduction
- Redis It's popular NoSQL One of the databases , And it's single threaded ( Multithreading cpu The context switches , Time consuming ), Memory based ,cpu Not a memory bottleneck , It's the memory and network bandwidth of the machine . because redis The data is stored in memory , For memory systems , If there is no context switch , Efficiency is the highest . Reading and writing many times are written in a cpu On , In the case of memory , This is the best solution . Official statistics redis Read every second 11w, Write 8w. Yes, it is c Written , No comparison memecache Bad .
- linux By default 16 A database , Use RDM The software can see 16 Databases
- Five basic data types :list、set、String、Hash、zset
Two 、 Installation tutorial
https://blog.csdn.net/weixin_40496191/article/details/121028500
3、 ... and 、redis Common operations ( Command line )
String
1) Switch Library :select 1,2,3…
2) Set key value pairs : set key value
3) Set key value pairs ( Success comes only if it doesn't exist ):setnx key value
4) Set key value pairs ( With expiration time ):setex key 10 value
5) Set key value pairs ( Batch ):mset key1 value1 key2 value2
6) Query key values :get key
7) Query key values ( Batch ):mget key1 key2
4) Check the keys in the library :keys *
5) Check the size of the library :dbsize
6) Clear the current database :flushdb
7) Clear all databases :flushall
8) Check if the key exists :exists key
9) Delete :del key
10) Set expiration time :expire key 10( Company s)
11) Check the time remaining :ttl key
12) Additional value ,key If it doesn't exist, create a new one :append key value
13) Check the length :strlen key
14) Add 1, For example, browsing volume :incr counts
15) reduce 1:decr counts
16) Add 10:incrby key 10
17) Intercept :GETRANGE key start end(0 -1 It's all )
18) Replace :zhanzhk —》setrange key 1 555–》z555zhk
19) Take out and set , The value is the original :getset key value
20) Save for :mset zk:1 {name1:zhanzhk1,age:8}
21) Take object :mget zk:1
22) Save for ( It can be reused , such as mset Good article : article 1: Browse volume ):mset zk:1:name1 zhanzhk1 zk:1:age 8 .
23) Take object :mget zk:1:name1 zk:1:agelist( Element repeatable )
l start : The order of entry and exit of the set is the same as that of the stack , First in, then out .
r start : fifo
1) View collection elements :lrange key 0 -1
2) Insert the collection element to the first place :lpush key value
3) Insert the collection element to the last bit :rpush key value
4) Delete the first element :lpop key
5) Delete the last element :rpop key
6) Subscript lookup element :lindex key 0
7) length :llen key
8) Remove the number of specified elements :lrem key Number Elements
9) Intercept :ltrim key 0 1
10) Remove and add to other collections :rpoplpush key1 key2
11) Whether there is a collection :exists list
12) Replacement value :lset key index value
13) Insert values before and after an element :linsert key before/after Collection elements The new element
14) In fact, it is a linked list structure , Insertion into the end is the most efficient , Inserting into the middle is inefficient .set( Unordered, unrepeated sets )
1) Set add elements :sadd key value
2) View collection elements :smembers key
3) Determine whether there is an element :sismember key value
4) Look at the number of elements :scard key
5) Remove elements :srem key value
6) Random sampling :srandmember key count( Don't write default 1 individual )
7) Deletes the specified element :srem key value
8) Move the specified element to another collection :smove key key2 value
9) In the first key Based on , Look at the second key And the difference set of the first :sdiff key1 key2
10) In the first key Based on , Look at the second key Intersection with the first :sinter key1 key2( Common friends )
11) Combine :sunion key1 key2zset( Ordered non repeating sets )
1) add to :zadd key value key1
2) see :zrange key 0 -1
3) Sort by serial number :zrangebyscore key -inf 5
4) Sort by serial number ( infinity ):zrangebyscore key -inf +inf
5) Sort the parameters by sequence number :zrangebyscore key -inf +inf withscores
6) Remove elements :zrem key zzk10
7) View quantity :zcard key
8) Check the number of intervals :zcount key 0 100hash( treat as map)
1) Additive elements : hset key key1 value1 key2 value2
2) Check out the elements :hget key key1
3) View all elements :hgetall key
4) Delete collection elements :hdel key key1
5) View collection length :hlen key key1
6) Check whether an element exists :hexists key key1
7) View all key:hkeys key
8) Check all values :hvals key
9) An attribute increases by itself :hincrby key key1 1
10) key There is no creation , Does not exist to create :hsetnx key key1 valuegenpos( Map )
1) newly added :geoadd china:city precision latitude Location name
2) distance :geodist china:city Location name Location name
3) distance 1:geodist china:city Location name Location name km
4) Scanning radius :georadius china:city longitude latitude 5000 km
5) Scanning radius , Specified number of longitude and latitude :georadius china:city longitude latitude 5000 km withdist withcoord count Number
6) Find the city around a city :georadiusbymember china:city Location name 400 km
7) It can be used zset Command view :zrange china:city 0 -1hyperloglog( Allow fault tolerance )
- Additive elements :pfadd hype1 a b c pfadd hype2 a b c
- Merge Union :pfmerage hype3 hype1 hype2
- View quantity :pfcount hype1
bitmaps
- They all operate on binary bits for recording , Only 0 and 1 Two kinds of state , Only two states can be used
- Add punch in record ( One week clock out example ):setbit sign 1 0 setbit sign 2 0 setbit sign 3 1
- Get punch in :getbit sign 1
- Count clock in records :bitcount sign
Four 、redis Common operations (java)
- string
package redis.jedis;

import redis.clients.jedis.Jedis;

import java.util.Set;

/**
 * @author  The day is hot
 * @create 2021-09-25 20:47
 * @desc
 **/
public class Redis_String {
    public static void main(String[] args) {
        Jedis jedis = new Jedis("192.168.248.11", 6379);
        // Set key value pairs
        jedis.set("name", "zzk");
        // Set key value pairs ( Success comes only if it doesn't exist )
        jedis.setnx("name", "zzk");
        // Set key value pairs ( With expiration time )
        jedis.setex("name", 10, "zzk");
        // Query key values
        String name = jedis.get("name");
        // Check the keys in the library
        Set<String> all = jedis.keys("*");
        // Check the size of the library
        Long size = jedis.dbSize();
        // Clear the current database
        jedis.flushDB();
        // Clear all databases
        jedis.flushAll();
        // Check if the key exists
        Boolean exist = jedis.exists("name");
        // Remove elements
        jedis.del("name");
        // Set expiration time
        jedis.expire("name", 10);
        // Check the time remaining
        jedis.ttl("name");
        // Additional value ,key If it doesn't exist, create a new one
        jedis.append("name", "zzk");
        // Check the length
        jedis.strlen("name");
        // Add 1, For example, browsing volume
        jedis.incr("age");
        // reduce 1
        jedis.decr("age");
        // Add 10
        jedis.incrBy("age", 10);
        // Intercept
        jedis.getrange("name", 0, -1);
        // Intercept
        jedis.setrange("name", 1, "zhanzhk");
        // Take out and set , The value is the original
        jedis.getSet("name", "zahznhk");
        // Save for
        jedis.mset("zk:1", "{name1:zhanzhk1,age:8}");
        // Take object
        jedis.get("zk:1");

        jedis.close();
    }
}
- list( Element repeatable )
package redis.jedis;

import redis.clients.jedis.Jedis;
import redis.clients.jedis.ListPosition;

/**
 * @author  The day is hot
 * @create 2021-09-25 20:47
 * @desc
 **/
public class Redis_list {
    public static void main(String[] args) {
        //l start : The order of entry and exit of the set is the same as that of the stack , First in, then out .
        //r start : fifo
        // In fact, it is a linked list structure , Insertion into the end is the most efficient , Inserting into the middle is inefficient .
        Jedis jedis = new Jedis("192.168.248.11", 6379);
        // View collection elements
        jedis.lrange("name", 0, -1);
        // Insert the collection element to the first place
        jedis.lpush("name", "zzk");
        // Insert the collection element to the last bit
        jedis.rpush("name", "zzk");
        // Delete the first element
        jedis.lpop("name");
        // Subscript lookup element
        jedis.lindex("name", 1);
        // length
        jedis.llen("name");
        // Remove the number of specified elements
        jedis.lrem("name", 10, "zzk");
        // Intercept
        jedis.ltrim("name", 0, 1);
        // Remove and add to other collections
        jedis.rpoplpush("name", "name1");
        // Whether there is a collection
        jedis.exists("name");
        // Replacement value
        jedis.lset("name", 1, "zzk");
        // Insert values before and after an element
        jedis.linsert("name", ListPosition.BEFORE, "zzk", "zhanzhk");
        jedis.linsert("name", ListPosition.AFTER, "zzk", "zhanzhk");

        jedis.close();
    }
}
- set( Unordered, unrepeated sets )
package redis.jedis;

import redis.clients.jedis.Jedis;

/**
 * @author  The day is hot
 * @create 2021-09-25 20:47
 * @desc
 **/
public class Redis_set {
    public static void main(String[] args) {
        Jedis jedis = new Jedis("192.168.248.11", 6379);
        // Set add elements
        jedis.sadd("name", "zzk");
        // View collection elements
        jedis.smembers("name");
        // Determine whether there is an element
        jedis.sismember("name", "zzk");
        // Look at the number of elements
        jedis.scard("name");
        // Remove elements
        jedis.srem("name", "zzk");
        // Random sampling , Don't write default 1 individual
        jedis.srandmember("name", 2);
        // Move the specified element to another collection
        jedis.smove("name", "name1", "zzk");
        // In the first key Based on , Look at the second key And the difference set of the first
        jedis.sdiff("name", "name1");
        // In the first key Based on , Look at the second key Intersection with the first
        jedis.sinter("name", "name1");
        // Combine
        jedis.sunion("name", "name1");

        jedis.close();
    }
}
- zset( Ordered non repeating sets )
package redis.jedis;

import redis.clients.jedis.Jedis;

/**
 * @author  The day is hot
 * @create 2021-09-25 20:47
 * @desc
 **/
public class Redis_zset {
    public static void main(String[] args) {
        Jedis jedis = new Jedis("192.168.248.11", 6379);
        // add to
        jedis.zadd("name", 1, "zzk");
        // see
        jedis.zrange("name", 0, -1);
        // Sort by serial number
        jedis.zrangeByScore("name", 0, -1);
        // Sort the parameters by sequence number :zrangebyscore key -inf + inf withscores
        // View quantity
        jedis.zcard("name");
        // Check the number of intervals
        jedis.zcount("name", 0, 100);

        jedis.close();
    }
}
- hash( treat as map)
package redis.jedis;

import redis.clients.jedis.Jedis;

import java.util.List;
import java.util.Map;
import java.util.Set;

/**
 * @author  The day is hot
 * @create 2021-09-25 20:47
 * @desc
 **/
public class Redis_hash {
    public static void main(String[] args) {
        Jedis jedis = new Jedis("192.168.248.11", 6379);
        // Additive elements
        jedis.hset("name", "type1", "zzk");
        // Check out the elements
        String type1 = jedis.hget("name", "type1");
        // View all elements
        Map<String, String> all = jedis.hgetAll("name");
        // Delete collection elements
        jedis.hdel("name", "type1");
        // View collection length
        jedis.hlen("name");
        // Check whether an element exists
        jedis.hexists("name", "type1");
        // View all key
        Set<String> allkey = jedis.hkeys("name");
        // Check all values
        List<String> allvalue = jedis.hvals("name");
        // An attribute increases by itself
        jedis.hincrBy("name", "age", 1);
        //key There is no creation , Does not exist to create
        jedis.hsetnx("name", "type1", "zzk");

        jedis.close();
    }
}
- genpos
package redis.jedis;

import redis.clients.jedis.GeoUnit;
import redis.clients.jedis.Jedis;
import redis.clients.jedis.params.GeoRadiusParam;

/**
 * @author  The day is hot
 * @create 2021-09-25 20:47
 * @desc
 **/
public class Redis_genpos {
    public static void main(String[] args) {
        Jedis jedis = new Jedis("192.168.248.11", 6379);
        // newly added
        jedis.geoadd("china:city", 125.01, 95.25, "beijing");
        jedis.geoadd("china:city", 122.01, 91.25, "shanghai");
        jedis.geoadd("china:city", 120.01, 88.25, "chongqing");
        // distance
        jedis.geodist("china:city", "beijing", "shanghai");
        // The distance is specified in units
        jedis.geodist("china:city", "beijing", "shanghai", GeoUnit.KM);
        // Scanning radius
        jedis.georadius("china:city", 125.01, 95.25, 5000, GeoUnit.KM);
        // Scanning radius , Specified number of longitude and latitude
        jedis.georadius("china:city", 125.01, 95.25, 5000, GeoUnit.KM, new GeoRadiusParam().count(2));
        // Find the city around a city
        jedis.georadiusByMember("china:city", "chongqing", 5000, GeoUnit.KM);
        // It can be used zset Command view
        jedis.zrange("china:city", 0, -1);

        jedis.close();

    }
}
- hyperloglog( Allow fault tolerance )
package redis.jedis;

import redis.clients.jedis.Jedis;

/**
 * @author  The day is hot
 * @create 2021-09-25 20:47
 * @desc
 **/
public class Redis_hyperloglog {
    public static void main(String[] args) {
        Jedis jedis = new Jedis("192.168.248.11", 6379);
        // Additive elements
        jedis.pfadd("name", "zzk");
        jedis.pfadd("name", "zzk1");
        jedis.pfadd("name", "zzk2");
        jedis.pfadd("name1", "zzk2");
        jedis.pfadd("name1", "zzk3");
        jedis.pfadd("name1", "zzk4");
        // Merge Union
        jedis.pfmerge("name", "name1");
        // View quantity
        jedis.pfcount("name");

        jedis.close();
    }
}
- bitmaps
package redis.jedis;

import redis.clients.jedis.Jedis;

/**
 * @author  The day is hot
 * @create 2021-09-25 20:47
 * @desc
 **/
public class Redis_bitmaps {
    public static void main(String[] args) {
        //  They all operate on binary bits for recording , Only 0 and 1 Two kinds of state , Only two states can be used
        Jedis jedis = new Jedis("192.168.248.11", 6379);
        // Add punch in record ( One week clock out example )
        jedis.setbit("sign", 1, true);
        jedis.setbit("sign", 2, true);
        jedis.setbit("sign", 3, false);
        jedis.setbit("sign", 4, true);
        jedis.setbit("sign", 5, false);
        jedis.setbit("sign", 6, true);
        jedis.setbit("sign", 7, true);
        // Get punch in
        jedis.getbit("sign", 1);
        // Count clock in records
        jedis.bitcount("sign");

        jedis.close();
    }
}
5、 ... and 、redis Integrate springboot
pom file
 <dependencies>

        <dependency>
            <groupId>org.springframework.boot</groupId>
            <artifactId>spring-boot-starter</artifactId>
        </dependency>
        <dependency>
            <groupId>org.springframework.boot</groupId>
            <artifactId>spring-boot-starter-web</artifactId>
        </dependency>

        <dependency>
            <groupId>org.springframework.boot</groupId>
            <artifactId>spring-boot-starter-test</artifactId>
            <scope>test</scope>
        </dependency>


        <!-- lombok -->
        <dependency>
            <groupId>org.projectlombok</groupId>
            <artifactId>lombok</artifactId>
        </dependency>


        <dependency>
            <groupId>redis.clients</groupId>
            <artifactId>jedis</artifactId>
            <version>3.2.0</version>
        </dependency>


        <!-- redis -->
        <dependency>
            <groupId>org.springframework.boot</groupId>
            <artifactId>spring-boot-starter-data-redis</artifactId>
        </dependency>
    </dependencies>
The configuration file
server:
  port: 8090

spring:
  redis:
    host: 192.168.248.11
    port: 6379
Configuration class
package redis.redis.config;

import com.fasterxml.jackson.annotation.JsonAutoDetect;
import com.fasterxml.jackson.annotation.PropertyAccessor;
import com.fasterxml.jackson.databind.ObjectMapper;
import org.springframework.beans.factory.annotation.Configurable;
import org.springframework.boot.autoconfigure.condition.ConditionalOnMissingBean;
import org.springframework.context.annotation.Bean;
import org.springframework.context.annotation.Configuration;
import org.springframework.data.redis.connection.RedisConnectionFactory;
import org.springframework.data.redis.connection.StringRedisConnection;
import org.springframework.data.redis.core.RedisTemplate;
import org.springframework.data.redis.serializer.GenericJackson2JsonRedisSerializer;
import org.springframework.data.redis.serializer.Jackson2JsonRedisSerializer;
import org.springframework.data.redis.serializer.StringRedisSerializer;

import java.net.UnknownHostException;

/**
 * @author  The day is hot
 * @create 2021-09-27 21:35
 * @desc
 **/
@Configuration
public class RedisConfig {

    /**
     *  Customize RedisTemplate
     *
     * @param redisConnectionFactory
     * @return
     * @throws UnknownHostException
     */
    @Bean
    @SuppressWarnings("all")
    public RedisTemplate<String, Object> redisTemplate(RedisConnectionFactory redisConnectionFactory) throws UnknownHostException {
        // For development convenience , In general use <String, Object> type
        RedisTemplate<String, Object> template = new RedisTemplate();
        // Connection factory , Default
        template.setConnectionFactory(redisConnectionFactory);
        //Json Serialization configuration
        Jackson2JsonRedisSerializer jackson2JsonRedisSerializer = new Jackson2JsonRedisSerializer(Object.class);
        // Use ObjectMapper Transference
        ObjectMapper om = new ObjectMapper();
        om.setVisibility(PropertyAccessor.ALL, JsonAutoDetect.Visibility.ANY);
        om.enableDefaultTyping(ObjectMapper.DefaultTyping.NON_FINAL);
        jackson2JsonRedisSerializer.setObjectMapper(om);
        //String Serialization configuration
        StringRedisSerializer stringRedisSerializer = new StringRedisSerializer();
        //key use String Method serialization
        template.setKeySerializer(stringRedisSerializer);
        //hash Of key Also used String How to serialize
        template.setHashKeySerializer(stringRedisSerializer);
        //value Serialization adoption jackson
        template.setValueSerializer(jackson2JsonRedisSerializer);
        //hash Of value Serialization adoption jackson
        template.setHashValueSerializer(jackson2JsonRedisSerializer);

        template.afterPropertiesSet();

        return template;
    }

}
redis Call the tool class
package redis.redis.utils;

import org.springframework.beans.factory.annotation.Autowired;
import org.springframework.beans.factory.annotation.Qualifier;
import org.springframework.data.redis.core.*;
import org.springframework.stereotype.Component;

import javax.annotation.Resource;
import java.io.Serializable;
import java.util.Date;
import java.util.List;
import java.util.Set;
import java.util.concurrent.TimeUnit;

@Component
public class RedisUtil {
    @Autowired
    @Qualifier("redisTemplate")
    public static RedisTemplate redisTemplate;

    @Resource
    public void setRedisTemplate(RedisTemplate redisTemplate) {
        this.redisTemplate = redisTemplate;
    }


    //**********************************String type , Write tool classes as needed ***************************************
    public static void StringSetMethod() {
        ValueOperations<String, Object> valueOperations = redisTemplate.opsForValue();
        valueOperations.set("name", "zzk");
    }

    public static String StringGetMethod() {
        ValueOperations<String, Object> valueOperations = redisTemplate.opsForValue();
        return objToString(valueOperations.get("name"));
    }

    //**********************************list type , Write tool classes as needed ***************************************
    public static void listMethod() {
        ListOperations listOperations = redisTemplate.opsForList();
        listOperations.leftPush("name", "zzk");
    }

    //**********************************set type , Write tool classes as needed ***************************************
    public static void setMethod() {
        SetOperations setOperations = redisTemplate.opsForSet();
        setOperations.add("name", "zzk");
    }

    //**********************************zset type , Write tool classes as needed ***************************************
    public static void zsetMethod() {
        ZSetOperations zsetOperations = redisTemplate.opsForZSet();
        zsetOperations.add("name", 1, 1d);
    }

    //**********************************hsah type , Write tool classes as needed ***************************************
    public static void hashMethod() {
        HashOperations hashOperations = redisTemplate.opsForHash();
        hashOperations.put("name", "type1", "zzk");
    }

    public static String objToString(Object obj) {
        if (obj == null) {
            return "";
        } else {
            return obj.toString();
        }
    }
}
6、 ... and 、redis Configuration file details
# ================= Unit definition 、 Case insensitive =================
# 1k => 1000 bytes
# 1kb => 1024 bytes
# 1m => 1000000 bytes
# 1mb => 1024*1024 bytes
# 1g => 1000000000 bytes
# 1gb => 1024*1024*1024 bytes

#================= Contains other configuration files =================
# include /path/to/local.conf
# include /path/to/other.conf

#================= load so file =================
# loadmodule /path/to/my_module.so
# loadmodule /path/to/other_module.so

#================= The network configuration =================
bind 0.0.0.0 				# binding ip
protected-mode yes			# Is it protected
port 6379					# port
tcp-backlog 511
timeout 0
tcp-keepalive 300

#================= General configuration =================
daemonize yes				# Whether to start by guarding
supervised no				# Whether to specify monitoring
pidfile /var/run/redis_6379.pid  # If running as a daemon , Default Redis Write process id File path
loglevel notice				# The level of logging
logfile ""					# Specify the log file location name
databases 16				# Default redis Number of databases
always-show-logo yes		# Whether or not shown redis logo

#================= snapshot ( Without persistence, data will be lost )=================
save 900 1					# Express 900  Second if there is at least  1  individual  key  Change in value of , Save
save 300 10					# Express 300  Second if there is at least  10  individual  key  Change in value of , Save
save 60 10000				# Express 60  Second if there is at least  10000  individual  key  Change in value of , Save
stop-writes-on-bgsave-error yes		# Persistence error continue working
rdbcompression yes			# Is it compressed? rdb file , Will consume cpu resources
rdbchecksum yes				# preservation rdb When you file , Error checking
dbfilename dump.rdb			# File name of data persistence to disk
dir ./						# Set the storage path of the snapshot file

#================= Master slave copy =================
# replicaof <masterip> <masterport>			# When setting this computer as a slave server , Set up master Service IP Address and port , stay Redis Startup time , It will automatically follow master Data synchronization
# masterauth <master-password>				# When master When the service is password protected , Connect from the server master Password
replica-serve-stale-data yes				# When the master-slave connection is interrupted , Or during the establishment of master-slave replication , Whether to allow external services from the server . The default is yes, That is, it is allowed to provide external services , But it is possible to read dirty data .
replica-read-only yes						# Set the slave server to read-only mode . We need to pay attention to , The read-only mode is only for the write operation of the client , Invalid for administrative command .
repl-diskless-sync no						# Whether to use diskless copy . In order to reduce the disk overhead of the primary node ,Redis Supports diskless replication , Generated RDB The file is not saved to disk, but sent directly to the slave node through the network . Diskless replication is applicable to the scenario where the machine where the primary node is located has poor disk performance but abundant network bandwidth . It should be noted that , Diskless replication is still in the experimental stage .
repl-diskless-sync-delay 5					#master Send a message to the slave server at regular intervals PING command
# repl-ping-replica-period 10				#master Send a message to the slave server at regular intervals PING command
# repl-timeout 60							# Replication timeout .
repl-disable-tcp-nodelay no					# Set to yes, The master node will wait for some time before sending TCP Data packets , The specific waiting time depends on Linux kernel , It's usually 40 millisecond . It is suitable for the scenarios with complex master-slave network environment or tight bandwidth . The default is no.
# repl-backlog-size 1mb						# Copy backlog buffer , The replication backlog buffer is a fixed length queue stored on the primary node . For from Redis 2.8 Start introducing partial replication .
# repl-backlog-ttl 3600						# If master The slave servers on are all disconnected , And there is no connection within the specified time , be backlog Will be master Remove .repl-backlog-ttl It is used to set the duration , The default is 3600s, If set to 0, Never clear .
replica-priority 100						# Set the priority of the slave server , be used for Redis Sentinel When switching between master and slave, use , The smaller the value. , The higher the priority of being promoted to the main . It should be noted that , If set to 0, It means that the slave server does not participate in the master selection .
# replica-announce-ip 5.5.5.5				# Commonly used for port forwarding or NAT scenario , Yes Master Expose the truth IP And port information .
# replica-announce-port 1234				# Commonly used for port forwarding or NAT scenario , Yes Master Expose the truth IP And port information .

#================= Set the password =================
requirepass 123456				# password


#================= Set up the client =================
maxclients 10000				# Maximum number of clients

#================= Set memory =================
# maxmemory <bytes>				# Maximum memory capacity
# maxmemory-policy noeviction	# Memory full processing policy
# maxmemory-samples 5			# Set the number of samples ,LRU Algorithm and minimum TTL Algorithms are not exact algorithms , It's an estimate , So you can set the sample size
# replica-ignore-maxmemory yes	# Whether to ignore maxmemory Set up

#================= Free memory =================
lazyfree-lazy-eviction no
lazyfree-lazy-expire no
lazyfree-lazy-server-del no
replica-lazy-flush no

#=================AOF Configuration of =================
appendonly no					# Not on by default aof Pattern , By default rdb Persistence , because rdb Basically enough
appendfilename "appendonly.aof"	# Persistent filename

# appendfsync always			# Every change is synchronized , Consumption performance
appendfsync everysec			# Synchronize once per second , The drawback is that this second of data may be lost
# appendfsync no				# Out of sync , The operating system synchronizes itself , Highest efficiency
no-appendfsync-on-rewrite no	# Set up yes after , If a saved process is executing , Do not perform aof Of appendfsync Strategic fsync
auto-aof-rewrite-percentage 100	# Compared with last time aof If the increase percentage of file size exceeds this value , Then rewrite aof
auto-aof-rewrite-min-size 64mb	# Said to run AOF The minimum size of the file when rewriting , The default is 64MB
aof-load-truncated yes			# If AOF The file was corrupted in the middle , The server will still exit with an error . This option only applies when Redis Trying to AOF Read more data from the file , But when not enough bytes are found
aof-use-rdb-preamble yes		# Turn on mix persistence

#=================Lua Script configuration =================
lua-time-limit 5000				# Parameters limit the maximum run time of the script , The default is 5  Second

#=================REDIS CLUSTER Cluster configuration =================
# cluster-enabled yes					# Whether to enable cluster configuration . If configured yes Then turn on the cluster function , this redis Instance as a node of cluster , otherwise , It's a common single redis example
# cluster-config-file nodes-6379.conf	# Although the name of this configuration is " Cluster profile ", But this configuration file cannot be edited manually , It is a file automatically maintained by cluster nodes , It is mainly used to record which nodes in the cluster 、 Their state and some persistent parameters , It is convenient to restore these states when restarting . Usually after receiving the request, the file will be updated .
# cluster-node-timeout 15000			# This is the maximum time a node in the cluster can be disconnected , Beyond that time , The node is considered to be faulty . If the primary node exceeds this time, it is still not reachable , Then its slave node will start the failover , Upgrade to master . Be careful , If any node is not connected to most of the primary nodes at this time , Then this node will stop receiving any requests . Generally set as 15 Seconds will be enough. .
# cluster-replica-validity-factor 10	# Set copy valid ( Failover possible ) factor , Replica data is too old to be selected as a failover replica , If the last interaction time between the replica and the primary server exceeds (node-timeout * replica-validity-factor) + repl-ping-replica-period Value , There will be no failover ;( Too large a factor may make it easier to fail over with too old data , The factor is too small to select a replica for failover ,0 It is the only value that can ensure that the cluster can continue to run when all partitions are restored ,0 Value can guarantee the maximum availability of the cluster )
# cluster-migration-barrier 1			# Set up a master Minimum number of replicas required for failover , Because there is no working copy master No failover , When one master Have more than copies of this value , The redundant copies will be transferred to isolated master, In order to improve the fault resistance ;( The default value is 1, Because at least one working copy can fail over , If you want to disable it, just set a large number or set cluster-allow-replica-migration by no, Set to 0 Only for debugging , Set up... In the production environment 0 It's dangerous. )
# cluster-require-full-coverage yes		# Set whether the cluster covers all slots , Default cluster detected 16384 Not all slots are covered ( There are slots and no running node processing ), The whole cluster stops the query service , That is, the whole cluster is unavailable , When the slot is completely covered again , The cluster automatically becomes available , If it is necessary to make the covered slot support query when the slot is not fully covered , Just set to no that will do ;
# cluster-replica-no-failover no		# Set whether to fail over , If set to yes, Will prevent master Fail over in case of failure , But you can force failover manually ;( It may be used in some specific scenarios )


#=================docker colony /NAT Support =================
# cluster-announce-ip 10.1.1.5			# announce IP Address
# cluster-announce-port 6379			# Announce service port
# cluster-announce-bus-port 6380		# Announce cluster bus ports

#================= Slow query log =================
slowlog-log-slower-than 10000			# Decide how many microseconds you want the execution time to be greater than (microsecond,1 second  = 1,000,000  Microsecond ) To record the query .
slowlog-max-len 128						# It decided  slow log  How many logs can I save at most , slow log  Itself is a  FIFO  queue , When the queue size exceeds  slowlog-max-len  when , The oldest log will be deleted , And the latest log has been added to  slow log , And so on .

################################  Delay monitoring  ##############################
latency-monitor-threshold 0				# Can sample different execution paths to know redis Where is the jam . This makes it easy to debug various delay problems , Set a delay threshold in milliseconds to enable delay monitoring .

#================= Event notification =================
notify-keyspace-events ""				# Key event notification

#================= Advanced configuration =================
hash-max-ziplist-entries 512			# This parameter means ziplist The maximum number of entries allowed to be stored in , The default is 512, The suggestion is 128.
hash-max-ziplist-value 64				#ziplist Entry allowed in value Value Max bytes , The default is 64, The suggestion is 1024.
list-max-ziplist-size -2				#ziplist List maximum
list-compress-depth 0					#  One quicklist Number of nodes not compressed at both ends .0:  No compression . This is a Redis The default value of ,1:  Express quicklist There are... At both ends 1 Nodes are not compressed , Middle node compression .3:  Express quicklist There are... At both ends 3 Nodes are not compressed , Middle node compression .
set-max-intset-entries 512				# When all the elements in the set are integers , And the length shall not exceed set-max-intset-entries( The default is 512 individual ) when ,redis Will choose intset As an internal code , Greater than 512 use set.
zset-max-ziplist-entries 128			# When the elements of an ordered set are less than zset-max-ziplist-entries To configure ( The default is 128 individual ), At the same time, the value of each element is less than zset-max-ziplist-value( The default is 64 byte ) when ,Redis Will use ziplist As an internal coding implementation of an ordered set ,ziplist It can effectively reduce the use of memory .
zset-max-ziplist-value 64				# When the elements of an ordered set are less than zset-max-ziplist-entries To configure ( The default is 128 individual ), At the same time, the value of each element is less than zset-max-ziplist-value( The default is 64 byte ) when ,Redis Will use ziplist As an internal coding implementation of an ordered set ,ziplist It can effectively reduce the use of memory .
hll-sparse-max-bytes 3000				#value size   Less than or equal to hll-sparse-max-bytes Use sparse data structure (sparse), Greater than hll-sparse-max-bytes Use dense data structures (dense)
stream-node-max-bytes 4096				#Streams Number of bytes per node , And the maximum number of items that may be included before switching to a new node .
stream-node-max-entries 100				#Streams Number of bytes per node , And the maximum number of items that may be included before switching to a new node .
activerehashing yes						# Actively re hash every 100 millisecond CPU Time use 1 millisecond , To help re hash the main Redis Hash table ( Map top-level keys to values ).
client-output-buffer-limit normal 0 0 0	# Limiting client output buffering can force clients that do not read data from the server to disconnect , Used to force a slow client to shut down .
client-output-buffer-limit replica 256mb 64mb 60		# about slave client and MONITER client, If client-output-buffer Once you surpass 256mb, Or more than 64mb continued 60 second , Then the server immediately disconnects the client .
client-output-buffer-limit pubsub 32mb 8mb 60			# about pubsub client, If client-output-buffer Once you surpass 32mb, Or more than 8mb continued 60 second , Then the server immediately disconnects the client .
# client-query-buffer-limit 1gb			# Client queries buffer accumulation new command .  By default , It is limited to a fixed number , To avoid protocol slippage ( For example, due to an error in the client ) This will result in unbound memory usage in the query buffer .  however , If you have very special needs , You can configure it here , For example, we have a huge execution request .
# proto-max-bulk-len 512mb				# stay Redis Agreement , Batch request ( That is, the element representing a single string ) It's usually limited to 512 MB.  however , You can change this limit here .
hz 10									# By default ,hz Set to 10. When increasing the value , stay Redis In idle state , Will use more CPU. Range 1 To 500 Between , Most users should use the default values 10, Unless you increase this value to... Only in environments that require very low latency 100.
dynamic-hz yes							# Enable dynamic HZ when , The actual configuration is HZ Will be used as a baseline , But once more clients are connected , The configured... Will be used according to actual needs HZ Multiple of value .
aof-rewrite-incremental-fsync yes		# When a subprocess rewrites AOF When you file , If you enable the following options , Then every time a file is generated 32M Data will be synchronized .
rdb-save-incremental-fsync yes			# When redis preservation RDB When you file , If the following options are enabled , Then every generation 32 MB The data will update the file fsync.  This is useful for incrementally committing files to disk and avoiding large latency peaks .

##================= Active defragmentation =================
# activedefrag yes						# Whether to enable defragmentation
# active-defrag-ignore-bytes 100mb		# Minimum amount of fragmentation waste to start active defragmentation
# active-defrag-threshold-lower 10		# Minimum percentage of fragments to start defragmentation
# active-defrag-threshold-upper 100		# Maximum fragment percentage when using maximum consumption
# active-defrag-cycle-min 5				# stay CPU Minimum consumption of defragmentation in percentage
# active-defrag-cycle-max 75			# stay CPU When the percentage reaches the maximum , Defragment
# active-defrag-max-scan-fields 1000	# from set / hash / zset / list  Maximum number of fields scanned
7、 ... and 、redis Persistence
-----------------------------------------------------------------1. redis Persistence is RDB-----------------------------------------------------------------
Concept :RDB Full name Redis DataBase, Persisting a snapshot of a dataset in memory within a specified time interval . yes Redis Persistence scheme enabled by default , The persistence process generates a compressed binary file , The default name is dump.rdb, When the server restarts , Load the persistent file to restore the data to memory .
Workflow :
redis Will create... Separately (fork) A subprocess to persist , The data will be written to the temporary file first , When the persistence process is over , Replace the last persistent file with this temporary file . The whole process , The main process is not going to do anything IO Operation of the , This ensures extremely high performance . With bgsave For example, manually triggering persistence :
- Parent process passed fork To replicate an environment 、 Variables, and so on
- When replication is complete , The child process signals the parent process , The subprocess begins to write the data set to a temporary RDB file , When new RDB After the file is written, the original... Will be replaced RDB file .
- fork If an error occurs in the process of, it will be handled by the parent process .

The trigger condition
2.1 Meet the persistence policy , You can configure... In the configuration file . If you annotate the persistence policy , In the equivalent of closing RDB Persistence .
save 900 1					# Express 900  Second if there is at least  1  individual  key  Change in value of , Save
save 300 10					# Express 300  Second if there is at least  10  individual  key  Change in value of , Save
save 60 10000				# Express 60  Second if there is at least  10000  individual  key  Change in value of , Save
stop-writes-on-bgsave-error yes		# Persistence error continue working
rdbcompression yes			# Is it compressed? rdb file , Will consume cpu resources
rdbchecksum yes				# preservation rdb When you file , Error checking
dbfilename dump.rdb			# File name of data persistence to disk
dir ./						# Set the storage path of the snapshot file
2.2 perform flushall command
2.3 sign out redis
2.4 perform save command : Will block the main process , until RDB File creation complete , During this period, the server will no longer process any command requests .
2.5 perform bgsave command : Do not block the main process , While saving in the background, the server can continuously process client requests .( Commonly used )
see RDB Persistent file storage location ( Only need to rdb Put the files in the storage directory ,redis It will be read automatically at startup )
3.1 Get into redis:redis-cli -p 6379
3.2 View storage address : config get dir

Advantages and disadvantages
advantage :
- RDB Is a very compact single file point in time Redis The data shows , So it is very suitable for backup , It can be transmitted to remote data centers , Disaster recovery .
- RDB It maximizes Redis Performance of , because Redis The only thing the parent process needs to do is to persist Redis Subprocesses , It will do all the rest of the work . The parent process will never execute the disk I/O Or something like that .
- In addition, with AOF comparison ,RDB Allow faster restarts with large datasets .
shortcoming
because RDB What is stored is a snapshot of data at a certain time in a time interval , Therefore, it is possible to lose the data of a time interval .
RDB Regular needs fork(), To use child processes to persist on disk . If the data set is large ,fork() It may take time , If the data set is large ,CPU The performance is not very good , May lead to Redis Stop serving clients for a few milliseconds or even a second . Even if fork() Used COW Technology to optimize memory usage , But at this time, if a large number of key Modification will still require a large amount of memory consumption .
-----------------------------------------------------------------2. redis Persistence is AOF-----------------------------------------------------------------
Concept :AOF Full name Append Only File,AOF The server write operation is triggered by specific conditions to add memory data state persistence . Not on by default , You need to set enable in the configuration file . Now that we have RDB Why do we have to AOF, It has been explained above RDB What is saved is a snapshot of data at a certain time , During the saving process of the child process, the data newly received by the parent process requesting addition or modification will not be processed , It will cause some data loss ,AOF Its main function is to solve the real-time and integrity problems of data persistence .
Workflow :aof Persistence preserves appendonly.aof file , The steps are divided into : Order to append (append)、 File is written to (write) Synchronize with files (sync). When we carry out orders , It will append the executed write command to the server in protocol format aof_buf buffer . And then according to our configuration aof Strategy , take aof_buf The contents of the buffer are written AOF In file . When you need to recover data , Re execution appendonly.aof The commands in the file are OK .AOF It solves the real-time problem of data persistence , It's also the mainstream Redis Persistence mode .
The trigger condition
You need to configure... In the configuration file AOF Turn it on
appendonly no					# Not on by default aof Pattern , By default rdb Persistence , because rdb Basically enough
appendfilename "appendonly.aof"	# Persistent filename
# appendfsync always			# Every change is synchronized , Consumption performance
appendfsync everysec			# Synchronize once per second , The drawback is that this second of data may be lost
# appendfsync no				# Out of sync , The operating system synchronizes itself , Highest efficiency
no-appendfsync-on-rewrite no	# Set up yes after , If a saved process is executing , Do not perform aof Of appendfsync Strategic fsync
auto-aof-rewrite-percentage 100	# Compared with last time aof If the increase percentage of file size exceeds this value , Then rewrite aof
auto-aof-rewrite-min-size 64mb	# Said to run AOF The minimum size of the file when rewriting , The default is 64MB
aof-load-truncated yes			# If AOF The file was corrupted in the middle , The server will exit with an error . Only applicable when Redis Trying to AOF File reads more data , But when not enough bytes are found
aof-use-rdb-preamble yes		# Set up yes,redis You can start and display a log to tell this information , Set up no,redis Boot failure , Display error
AOF Repair mechanism
redis Provided by itself aof File repair tool redis-check-aof. If our latest aof The file is inadvertently misoperated, resulting in data loss, etc , Can pass redis-check-aof --fix appendonly.aof Command repair .
AOF Rewrite mechanism
Will record every write command to AOF file , As time goes on ,AOF The files will get bigger and bigger . If not controlled , Would be right Redis The server , Even the operating system , and AOF The bigger the file , The slower the data recovery . In order to solve AOF The problem of file volume expansion ,Redis Provide AOF File rewriting mechanism to AOF Document carried out “ Slimming ”, Remove invalid commands ( An invalid command is a key Set repeatedly , We don't care about the intermediate process , Only care about this key The end result of ))

4.1 Rewriting principle
Redis Provided AOF Rewriting function , The new file does not get the result by reading the write command in the old file when replacing the old file , Instead, the value is obtained by reading the latest database state in the server , So we need to care about the execution process .
4.2 Rewrite process
- The main thread fork Out child process rewrite aof journal
- After the child process rewrites the log , The main thread appends aof The log buffer
- Replace log file

4.3 AOF Will rewriting block ?
AOF The rewriting process is controlled by the background process bgrewriteaof To complete . The main thread fork Backstage bgrewriteaof Subprocesses ,fork It will copy the memory of the main thread to bgrewriteaof Subprocesses , This contains the latest data in the database . then ,bgrewriteaof The child process can be used without affecting the main thread , Write the copied data into operations one by one , Write in the rewrite log . therefore aof When rewriting , stay fork Process will block the main thread .4.4 AOF When will the log be rewritten ?
There are two configuration items that control AOF Trigger of rewrite :
auto-aof-rewrite-min-size: Said to run AOF The minimum size of the file when rewriting , The default is 64MB.
auto-aof-rewrite-percentage: This value is calculated as , At present aof File size and after the last rewrite aof The difference in file size , After the last rewrite aof file size . That is, at present aof The file was rewritten last time aof The incremental size of the file , And after the last rewrite aof The ratio of file size .4.5 When rewriting logs , There is new data written to ?
Redis The server has a built-in AOF Rewrite buffer , This buffer is used after the child process is created , The parent process will send the write command to AOF Buffers and AOF Rewrite buffer . stay bgrewriteaof After the child process finishes rewriting the log file , It will prompt that the main thread has completed the rewrite operation , The main thread will AOF The command in the rewrite buffer is appended to the new log file , These operations have no impact on the new log file .( Old log files : Log files used by the main thread , New log file :bgrewriteaof Log files used by the process ) At this time, in the case of high concurrency ,AOF Rewriting buffer accumulation can be large , This will cause congestion ,Redis Later adopted Linux Pipeline technology makes aof Playback can be performed simultaneously during rewriting , such aof After rewriting, you only need to play back a small amount of remaining data . Finally, by modifying the file name , Ensure the atomicity of file switching .stay AOF In case of downtime during log rewriting , Because the log file hasn't been switched yet , So when restoring data , I still use the old log file .

Aof Repair mechanism
Advantages and disadvantages
advantage :
- AOF Give Way Redis More reliable data , You can use different fsync Strategy always,everysec,no. At the default per second fsync Under strategy , Write performance is still good (fsync It's executed using a background thread , When there is no fsync In progress , The main thread will try to perform the write operation ), stay everysec The maximum loss under the strategy 1 Second write operation .
- AOF The log is an append only log , So there is no lookup , There is no damage in case of power failure . Even if the journal for some reason ( The disk is full or for some other reason ) Lead to AOF The document is incomplete ,redis-check-aof Tools can also easily fix it .
- AOF Include logs of all operations one by one in an easy to understand and parse format . You can even easily export AOF file . for example , Even if you use it carelessly FLUSHALL The command flushes all the data , As long as the log is not rewritten during this period , You can still stop the server , Delete the latest command , Restart Redis To save your data set .
shortcoming :
- For the same dataset ,AOF Files are usually better than the equivalent RDB The file is big .
- AOF The operating efficiency is generally higher than RDB slow , therefore redis The default is RDB Persistence .
- If there is an operation to write to the database during rewriting ( These operations are buffered in memory , And write a new... At the end AOF), AOF Will use a lot of memory . All write commands that arrive during rewrite are written to disk twice .
-----------------------------------------------------------------3. redis A mix of persistence RDB and AOF-----------------------------------------------------------------
principle
Redis 4.0 A mixed use of AOF Log and memory snapshot methods . Simply speaking , Memory snapshots are executed at a certain frequency , Between two snapshots , Use AOF Log all command operations during this period , Every time a snapshot is taken ,AOF The file will be emptied , Then re record the operation between the next two snapshots . thus , Snapshots don't have to be executed very often , This avoids frequent fork The impact on the main thread . and ,AOF The log only records the operations between two snapshots , in other words , There's no need to record all operations , therefore , There won't be too large a file , You can also avoid rewriting overhead .

advantage
- Because of AOF Logging all records between snapshots , In this way, the execution frequency of snapshots can be reduced
- Because of RDB Record all logs , therefore AOF All you need to do is record all the operations between the two snapshots , In this way, we can avoid AOF The file is too large .
Opening mode : At the same time open AOFf and RDB that will do
Mixed loading log file sequence
Due to the use of a mixed persistence mechanism , So general RDB and AOF Persistent files will exist , You need to load RDB Historical snapshot , Add the latest AOF Log operations .
- Judge whether to turn on AOF Persistence , Start and continue the follow-up process , Execution load... Is not turned on RDB The flow of documents ;
- Judge appendonly.aof Does the file exist , If the file exists, follow the procedure ;
- Judge AOF The document begins with RDB The format of , Load first RDB Content reloads the remaining AOF Content ;
- Judge AOF The beginning of the document is not RDB The format of , Directly to AOF Format to load the entire file .

7、 ... and 、redis Master slave copy
Concept
colony , As the name suggests, it is to build multiple platforms redis The server , The master-slave replication is based on the cluster , It means to put one Redis Server data , Copy to other Redis The server . The former is called the main node (master), read-write , The latter is called the slave node (slave), Only read . Data replication is one-way , From master to slave only . A master node can have multiple slaves , But a slave node can only have one master node . commonly Master Nodes are mainly written , and slave Nodes are mainly read .
ps: Each slave node can also have its own slave node , But as long as the primary node is always , This node can only act as a slave node , Can only read but not write .

Why use master-slave replication
- data redundancy : Master-slave replication realizes hot backup of data , It's a way of data redundancy beyond persistence .
- Fault recovery : When there is a problem with the master node , Can be served by a slave node , Fast fault recovery ; It's actually a redundancy of services .
- Load balancing : On the basis of master-slave replication , Cooperate with the separation of reading and writing , Write service can be provided by the master node , Read service provided by slave node ( The write Redis Connect master node when data is applied , read Redis Apply connection from node when data ), Share server load ; Especially in the situation of less writing and more reading , Sharing read load through multiple slave nodes , Can be greatly improved Redis Concurrency of servers .
- Read / write separation : Can be used to achieve read-write separation , Main library write 、 Read from library , Read write separation can not only improve the load capacity of the server , At the same time, according to the change of demand , Change the number of slave Libraries ;
- High availability cornerstone : In addition to the above functions , Master slave replication is also the foundation for sentinels and clusters to implement , So master-slave replication is Redis High availability Foundation .
Master slave replication process
Connect from the slave server to the master server , send out SYNC command ;
Received by the primary server SYNC Named after the , send out fullresync command , Notify full replication from the server
The master server starts executing BGSAVE Command to generate RDB Snapshot file ;
master server BGSAVE After the execution , Send snapshot files to all the slave servers , And continue to record the write commands executed during the send , write in replication buffer buffer ;
Empty the old data after receiving the snapshot file from the server , Load new data ;
After sending the snapshot from the master server, start sending the data in the buffer to the slave server ;
The snapshot is loaded from the server , Start receiving command requests , And execute the write command from the host server buffer ;
End of first connection , After the start of work , The subsequent synchronization is carried out in an incremental way
If the primary server key Be overdue , The slave server will not expire , The master server needs to send a delete instruction to the slave server for deletion

redis The construction of master-slave replication
------------------------------------------------------------------ Cluster building -----------------------------------------------------------------------------
With one server , Build three redis Clusters, for example
Copy three redis.conf, Named as :redis6379.conf、redis6380.conf、redis6381.conf
Modify the main configuration items in the configuration file :
With 6379 For example ,6380 And 6381 The same can be modified
daemonize yes
bind 0.0.0.0
port 6379
pidfile /var/run/redis_6379.pid
logfile "redis_6379.log"
dbfilename dump6379.rdb
start-up :/usr/local/bin/redis-server /opt/redis/redis-5.0.6/redis6379.conf, The other two are the same
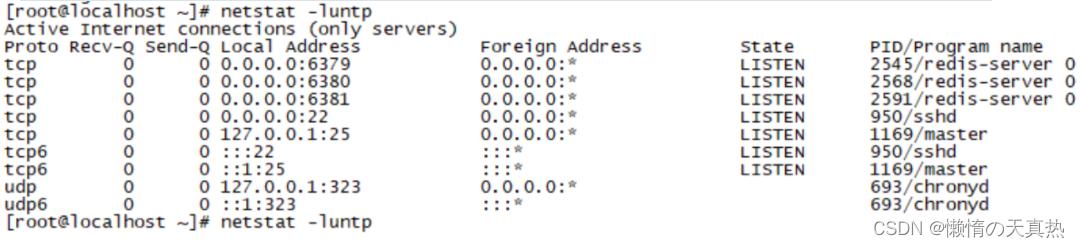
View progress :netstat -luntp
Get into 6379redis Inside : redis-cli -p 6379
View master-slave configuration , You can see each current redis All default to the primary server , Not from the service

----------------------------------------------------------------- Manually configure the master and slave servers --------------------------------------------------------------------------
- Manually configure the master-slave relationship
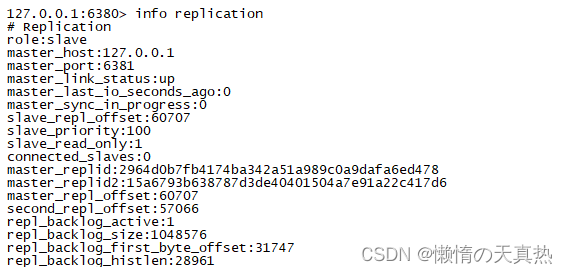
Get into 6380 and 6381 Server , Execution instruction :slaveof 127.0.0.1 6379, Review 6379 The master-slave configuration of , You can see that it has been configured successfully !

Get into 6379 in , write in name:set name zhanzhk
Get into 6380 and 6381 in , obtain name:get name

Be careful
- Because we use the command line to configure the master-slave relationship . So when we restart redis after , The master-slave relationship will be reset .
- The main server is down , Data can still be read from the server . Primary server recovery , Reinsert data , It will still be synchronized to the slave server .( No sentry deployed )
- The main server is down , The slave server still cannot write data , Unless the slave server is declared as the master server .(slaveof no none)( No sentry deployed )
.
------------------------------------------------------------- The configuration file configures the master and slave servers ----------------------------------------------------------------
- modify 6380 and 6381 The configuration file , Add a row :replicaof 127.0.0.1 6379
- restart 6380 and 6381 Port of redis, see 6379 Master slave state , Configuration is successful !

8、 ... and 、redis Sentinel mode
Concept : in front , If our redis The main server is down , Then the write operation cannot be realized , You need to manually set the primary server to write normally , More troublesome , So there is sentinel mode . Sentinels are an independent process , By sending commands , wait for redis Server response , To monitor redis The operation of the server . When the sentry finds out that the primary server is down , On the one hand, it can inform us , On the other hand, they will vote , stay slave A new... Is selected from the server master The server . Of course , Sentinels also have downtime , Therefore, multiple sentinels are usually configured to monitor redis The operation of the server . In general , The functions of sentinel mode can be summarized as the following three points : monitor 、 remind 、 Automatic failover
working principle :
Suppose the primary server goes down , sentry 1 First detect the result , But the system won't do it right away failover The process , Just sentinels 1 Subjectively think that the main server cannot be used , This phenomenon is called subjective offline , When the rear sentry also detects that the primary server is not available , And when the quantity reaches the threshold we set , Then there will be a vote between the Sentinels , The result of the vote was sponsored by a sentinel , Conduct failover Fail over operations , Finally, the slave server that gets more votes will be upgraded to the master server . After the operation transfer is successful . Publish subscribe mode , Let each sentry switch the host from the server that they monitor , Modify the host of the configuration file to point to , This process is called Objective offline . The election host mechanism is filtered according to the following sorting :- Eliminate and master The number of disconnected links is high , The slave server with long timeout
- According to the priority of the slave server , namely replica-priority To configure
- According to the subscript of data replication ( Used to evaluate slave How much do you have right now master The data of ), That is, the progress of synchronization
- According to the process ID, Choose the smallest

Sentry mode profile details
# bind 127.0.0.1 192.168.1.1					#  Use bind, Only specified ip Address to access this redis
protected-mode no								#  Protection mode is off , In this way, other services can access this platform redis
port 26379										#  The port corresponding to the sentry
daemonize yes									#  Whether sentinel mode is started in the background , Default no, Change it to yes
pidfile /var/run/redis-sentinel.pid				# id
logfile ""										#  Log files
dir /tmp										#  sentry sentinel Working directory of


#  sentry sentinel Monitored redis The master node  ip port
# master-name  You can name the master node by yourself   Only letters A-z、 Numbers 0-9 、 These three characters ".-_" form .
# quorum  How many configurations sentinel The Sentinels agreed that master Primary node lost connection   At this time, it is objectively considered that the master node is disconnected
#  Be careful : If  quorum  The given value is too large ,  Number of hosts exceeded ,  May lead to  master  After the host computer is down ,  No new  slave To replace  master
# sentinel monitor <master-name> <ip> <redis-port> <quorum>
sentinel monitor mymaster 127.0.0.1 6379 2


#  When in Redis In the example, the requirepass foobared  Authorization code   So all connections Redis The client of the instance must provide the password
#  Set up a sentry sentinel  Password to connect master and slave   Note that the same authentication password must be set for master slave
# sentinel auth-pass <master-name> <password>
# sentinel auth-pass mymaster MySUPER--secret-0123passw0rd


# sentinel down-after-milliseconds <master-name> <milliseconds>
sentinel down-after-milliseconds mymaster 30000	#  Specify how many milliseconds later   The master node didn't answer the sentry sentinel  here   Sentinels subjectively think that the primary node is offline   Default 30 second


# sentinel parallel-syncs <master-name> <numreplicas>
sentinel parallel-syncs mymaster 1				#  This configuration item specifies what is happening failover How many can there be at most during the primary / standby handover slave Simultaneously on the new master To synchronize , The smaller the number , complete failover The longer it takes , But if the number is bigger , That means the more   Much of the slave because replication And is not available . You can do this by setting this value to zero  1  To make sure there's only one at a time slave  In a state where command requests cannot be processed .


#  Timeout for failover  failover-timeout  It can be used in the following ways :
#1.  The same sentinel To the same master two failover The time between .
#2.  When one slave From a wrong one master Where the synchronized data starts to calculate the time . until slave Corrected to be correct master Where the data is synchronized .
#3. When you want to cancel an ongoing failover The time required .
#4. When doing failover when , Configure all slaves Point to the new master Maximum time required . however , Even after this timeout ,slaves It will still be correctly configured to point master, But it won't parallel-syncs Here comes the configured rule
#  Default three minutes
# sentinel failover-timeout <master-name> <milliseconds>
sentinel failover-timeout mymaster 180000


# SCRIPTS EXECUTION
#  Configure the scripts that need to be executed when an event occurs , The administrator can be notified by script , For example, when the system is not running normally, send an email to inform the relevant personnel .
#  There are the following rules for the result of the script :
#  If the script returns 1, Then the script will be executed again later , The number of repetitions currently defaults to 10
#  If the script returns 2, Or 2 A higher return value , The script will not repeat .
#  If the script is terminated during execution due to receiving a system interrupt , Then the same return value is 1 The same behavior when .
#  The maximum execution time of a script is 60s, If I exceed that time , The script will be a SIGKILL Signal termination , And then re execute .
#  Notification scripts : When sentinel When any warning level event occurs ( for instance redis Subjective failure and objective failure of examples, etc ), Will call this script , At this point the script should be sent by email ,SMS Wait for the way to inform the system administrator about the abnormal operation of the system . When the script is called , Two parameters will be passed to the script , One is the type of event , One is the description of the event . If sentinel.conf The script path is configured in the configuration file , Then you have to make sure that the script exists in this path , And it's executable , otherwise sentinel Failed to start normally successfully .
# Notification script
# sentinel notification-script <master-name> <script-path>
# sentinel notification-script mymaster /var/redis/notify.sh


#  The client reconfigures the master node parameter script
#  When one master because failover And when it changes , This script will be called , Notify related clients about master  Information that the address has changed .
#  The following parameters will be passed to the script when the script is called :
# <master-name> <role> <state> <from-ip> <from-port> <to-ip> <to-port>
#  at present <state> Always “failover”,
# <role> yes “leader” perhaps “observer” One of them .
#  Parameters  from-ip, from-port, to-ip, to-port It's for the old master And the new master( I.e. old slave) communication
#  This script should be generic , Can be called many times , It's not targeted .
# CLIENTS RECONFIGURATION SCRIPT
# sentinel client-reconfig-script <master-name> <script-path>
# sentinel client-reconfig-script mymaster /var/redis/reconfig.sh


sentinel deny-scripts-reconfig yes				#  Not allowed SENTINEL SET Set up notification-script and client-reconfig-script.
Set up sentinel mode ( One leader, two followers and three sentinels )
4.1 create profile sentine26379.conf,sentine26380.conf,sentine26381.conf,
bind 0.0.0.0
protected-mode no
port 26379
daemonize yes
pidfile /var/run/redis-sentinel26379.pid
logfile "sentinel26379.log"
dir /tmp
sentinel monitor mymaster 127.0.0.1 6379 2
sentinel down-after-milliseconds mymaster 30000
sentinel parallel-syncs mymaster 1
sentinel failover-timeout mymaster 180000
sentinel deny-scripts-reconfig yes
4.2 Activate the sentry : redis-sentinel /opt/redis/redis-5.0.6/sentine26380.conf
4.3 Check the startup process :netstat -luntp

4.4 kill 6379 Of linux process , wait for 30s, Look again 6380 The master-slave situation of , It is found that the primary node has been migrated , Indicating successful configuration !
4.5 Advantages and disadvantages
advantage :
- Sentinel mode is based on the master-slave model , All the advantages of master-slave , Sentinel mode has
- Master and slave can switch automatically , More robust system , Higher availability
- Sentinel Will keep checking master server and From the server Is it working . When someone is being monitored Redis Server problem ,Sentinel adopt API Scripts send notifications to administrators or other applications .
shortcoming :
- Redis Difficult to support online capacity expansion , For clusters , When the capacity reaches the upper limit, online expansion becomes very complicated .
- The cost of operation and maintenance and technology has increased
Nine 、redis cluster colony
-----------------------------------------------------------------Redis cluster Cluster introduction ---------------------------------------------------------------------------
evolution
1.1 Single service , The bottleneck of reading and writing pressure is obvious
1.2 Master slave copy , Separate reading from writing , Reduce the pressure
1.3 Sentinel mode , The problem of master-slave switching is solved . But only one service is writing , There is still redis The bottleneck of single machine write . And when master When I hang up ,sentinel Will elect one master, There is no way to visit during the election Redis Of , There will be an access transient break ; When e-commerce websites are promoted master Hang up , Lose a lot of order data in a few seconds ;
1.4 cluster colony , It belongs to a decentralized architecture , Each node can play a read-write role , And it can be dynamically extended , The overall reading and writing pressure is reduced .
characteristic
- all Redis Node usage (PING Mechanism ) interconnection
- Failure of a node in the cluster , It is only when more than half of the nodes in the whole cluster fail to monitor that the real failure occurs
- Client does not need proxy You can connect directly to redis, The application needs to write all redis The server IP.
- redis cluster Altogether 0-16383 etc. 16384 Slots , After building the cluster , Assign slots to different redis The server . When need is in redis Write a key -value When , Will use CRC16(key) mod 16384 To determine the following values key Which slot to write to and the corresponding slot redis node . So how many reids A node is equivalent to redis How many times has concurrency been extended .
- redis cluster The stand-alone version of 16 A default database , have only 0 database , select The command is disabled
- Every master There may be 1 One or more slave node , These nodes will try to replace in case of network partition or failure master node , At the same time these slave Nodes can also be used to support large-scale read operations
advantage
- Redis There are multiple clusters master, It can reduce the impact of access transient interruption problem ;
- Redis There are multiple clusters master, It can provide higher concurrency ;
- Redis Clusters can store data in slices , In this way, more data can be stored ;
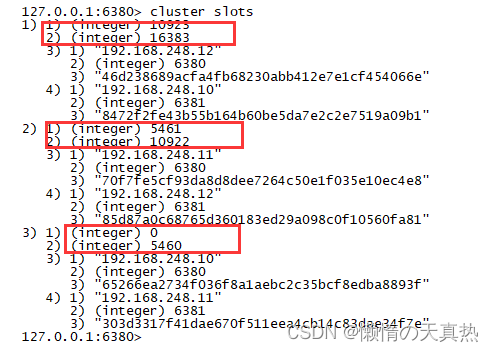
principle : Suppose three redis The primary nodes are :A, B, C Three nodes , Using the Hashimoto trough (hash slot) How to allocate 16384 individual slot Words , The three nodes are responsible for slot The interval is
 Use  CRC16(key) mod 16384  The following values match the following three nodes , If it falls in which range , Then the actual key Where is the access to redis Node operation
 node A Cover  0-5460
 node B Cover  5461-10922
 node C Cover  10923-16383
-----------------------------------------------------------------Redis cluster Cluster building --------------------------------------------------------------------------
Open three virtual machines , Respectively 192.168.248.10,192.168.248.11,192.168.248.12
Three virtual machines are started respectively 6380、6381 port .
ps1: If the master-slave configuration has been set , Need to be commented out
ps2: If redis Password set , The passwords of each node must be consistent .
daemonize yes
bind 0.0.0.0
port 6380
pidfile /var/run/redis_6380.pid
logfile "redis_6380.log"
dbfilename dump6380.rdb
cluster-enabled yes
cluster-config-file nodes-6380.conf
start-up 6 individual redis:/usr/local/bin/redis-server /opt/redis/redis-5.0.6/redis6380.conf
start-up cluster colony ( The first three are master, The last three are slave)
ps1: If historical data already exists , You need to delete dump.rdb file . If it still doesn't work , Directly enter the database , Clear data :flushdb.
redis-cli --cluster create 192.168.248.10:6380 192.168.248.11:6380 192.168.248.12:6380 192.168.248.10:6381 192.168.248.11:6381 192.168.248.12:6381 --cluster-replicas 1

- Get into redis View the cluster status (-c Indicates login in cluster mode ):redis-cli -c -p 6380 --> CLUSTER INFO

View the cluster slot allocation :cluster slots
View the cluster master-slave configuration :cluster nodes

Insert the test , success

New node
9.1 Start two redis New node , Port is 6382,6383
9.2 Add nodes to the cluster , You can log in to any cluster node to operate :cluster meet 192.168.248.12 6382、cluster meet 192.168.248.12 6383
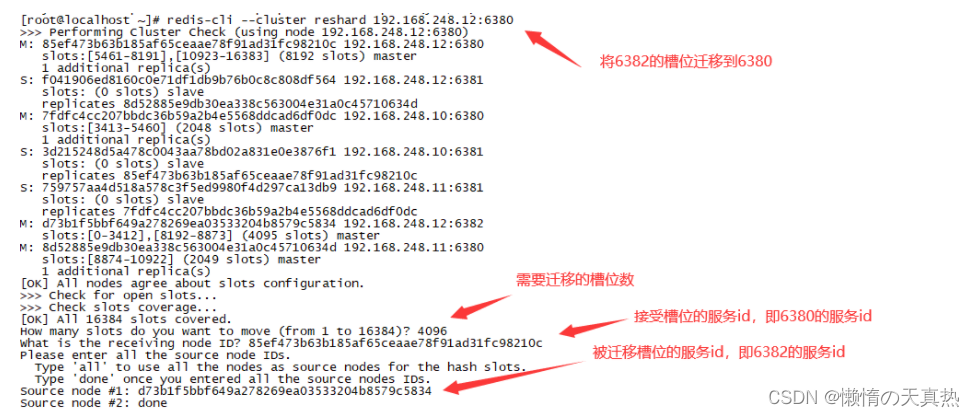
9.3 Assign slots , Fill in according to the prompts :redis-cli --cluster reshard 192.168.248.12:6382
- Figure out each master Number of slots :4096( Originally three master, Add one to four maste,16384/4=4096).
- Fill in the node of the receiving slot ID:36efcd23eecc5c4238711c4e680026fea1a71e6d
- Fill in the slot source node Source node by all, Means from all others master Node migration slot .
9.4 View slot

9.5 take 6383 Set to slave node
1.  Sign in 6383:redis-cli -c -p 6383
2.  adopt id Specify master :cluster replicate cf4c1e949793cb30c284061ee83c6d767967a0dd
3.  see  cluster node

Delete node
10.1 Delete from node :redis-cli --cluster del-node 192.168.248.12:6383 11408eaf11a25b8f4913dc26975b7ad4e3427b4e
10.2 Remove the slot :redis-cli --cluster reshard 192.168.248.12:6382
10.3 Delete master :redis-cli --cluster del-node 192.168.248.12:6382 d73b1f5bbf649a278269ea03533204b8579c5834
Related issues
How does the cluster determine whether a node is down
The first thing to say is this , Each node holds the information of all the master nodes and slave nodes of the cluster . They pass through each other ping-pong Determine whether the node can be connected . If more than half of the nodes go ping There is no response when a node , The cluster thinks that this node is down , Then connect its spare nodes .
The condition for the whole cluster to hang up
1. If the cluster is arbitrary master Hang up , And the current master No, slave Or the slave node hangs up . At this point, the cluster enters fail state , It can also be understood as a cluster slot mapping [0-16383] Enter when incomplete fail state .
2. If more than half of the clusters master Hang up , Whether or not slave, Cluster into fail stateHow to recover after a cluster hangs up
Restart each node , The cluster relationship does not need to be re create,node-xxx.conf The relevant node relationships are recorded
How to add a node
Start a new redis node , Access cluster , Just allocate slots .
Ten 、 Cache breakdown 、 through 、 An avalanche
Cache breakdown
1.1 Concept : Hot data cache expired , This causes these requests to access the database , Cause database crash , This is cache breakdown .
1.2 Treatment scheme
Hotspot data settings do not expire
Set the distributed mutex , Ensure that there is only one request to build the cache at the same time
When a business thread is processing a user request , If you find that the accessed data is not in Redis in , Just add a mutex , Ensure that there is only one request to build the cache at the same time ( Reading data from a database , Then update the data to Redis in ), When the cache is built , Release the lock again . Failed to get request for mutex , Or wait for the lock to be released and reread the cache , Either return a null value or a default value .
Cache penetration
2.1 Concept : When a client makes a large number of requests , These request data are not in the cache , It's not in the database . If a hacker writes a script to call a large number of malicious calls at this time , Will cause the database to crash .
2.2 Treatment scheme
- Set empty cache
- Use bloom filter to quickly determine whether the data exists , Avoid querying the database to determine whether the data exists ;
Cache avalanche
3.1 Concept : Cache expires at the same time or redis The crash of , A large number of requests are concentrated in the database processing , Cause database crash , Thus creating a series of vicious circles , And even cause the app to crash .
3.2 Treatment scheme
Set the expiration time evenly , Prevent expiration at the same time
Set the distributed mutex
Design Double key Strategy
We can use two key, One is the Lord key, The expiration time will be set , One is preparation key, No expiration will be set , When the Lord key Be overdue , Then use the secondary key Value , And vice versa key The value of is assigned to the master key. At the same time, go to the database to query the data , Refresh the main... Again key And vice key Value .
Service failure
If you find that redis It's down. , The error prompt is returned directly .
Cluster configuration
Build highly available redis colony , Try to prevent downtime .
边栏推荐
猜你喜欢

国内外最好的12款项目管理系统优劣势分析

PHP代码审计系列(一) 基础:方法、思路、流程

Installation of xshell and xftp

根据文件名批量生成文件夹

泰国安全又划算的支付方式

Common techniques of email attachment phishing

Service discovery, storage engine and static website of go language

Implement the queue through two stacks

My advanced learning notes of C language ----- keywords

On cap theorem in distributed system development technology
随机推荐
Can I open an account for stock trading on my mobile phone? Is it safe to open an account for stock trading on the Internet
Kubernetes visual interface dashboard
Let agile return to its original source -- Some Thoughts on reading the way of agile neatness
Special topic II on mathematical physics of the sprint strong foundation program
国内外最好的12款项目管理系统优劣势分析
Would you like to buy stocks? Where do you open an account in a securities company? The Commission is lower and safer
How to open an account on the mobile phone? Is it safe to open an account online and speculate in stocks
kubeadm创建kubernetes集群
Which securities dealers recommend? Is it safe to open an account online now?
Ten thousand words explanation - mindarmour Xiaobai tutorial!
[微服务]认识微服务
目标追踪拍摄?目标遮挡拍摄?拥有19亿安装量的花瓣app,究竟有什么别出心裁的功能如此吸引用户?
How to use Pinia (I) introduce Pinia into the project
Cve-2022-30190 follina office rce analysis [attached with customized word template POC]
當Transformer遇見偏微分方程求解
Technical dry goods | top speed, top intelligence and minimalist mindspore Lite: help Huawei watch become more intelligent
Unity初学者肯定能用得上的50个小技巧
在手机开户买股票安全吗 网上开户炒股安全吗
12色彩环三原色
【leetcode】275. H index II