当前位置:网站首页>Build etcd distributed storage system +web management interface from scratch
Build etcd distributed storage system +web management interface from scratch
2022-07-26 20:41:00 【Brother Xing plays with the clouds】
What is? ETCD
With CoreOS and Kubernetes And other projects are increasingly popular in the open source community , They're all used in projects etcd Component as a highly available 、 Highly consistent service discovery repository , Gradually become the focus of developers .
In the era of cloud computing , How to make services access computing quickly and transparently colony in , How to share configuration information quickly colony All machines found in , more importantly , How to build such a set of high availability 、 Security 、 Easy to deploy and fast response service cluster , Has become an urgent problem to be solved .
etcd It's good news to solve these problems , It is a highly available Key/Value The storage system , Internal use raft Protocol as a consistency algorithm . are you ready? , Dry goods are coming ,are you ok ?
Introduction to this flying pig course
- 1.etcd Installation
- 2. Build stand-alone version
- 3. Build cluster version
- 4. Use monitoring function watch( Service discovery )
- 5. Use rest api
- 6. build WEB Interface and use
One . install
Download address :https://github.com/coreos/etcd/releases/
mkdir -p /home/chenqionghe/test/etcd/
cd !$
#  download
wget https://github.com/etcd-io/etcd/releases/download/v3.3.12/etcd-v3.3.12-linux-amd64.tar.gz
#  Unpack the installation
tar zxvf etcd-v3.3.12-linux-amd64.tar.gz
cd etcd-v3.3.12-linux-amd64
##  Copy the startup file and command management file to  PATH In the path found
cp etcd /usr/local/bin
cp etcdctl /usr/local/bin
cp -r etcd-v3.2.5-linux-amd64 /usr/local/etcd # Put the software in a common directory Start parameter interpretation
--name
etcd The node name in the cluster , It's free here , It can be distinguished without repetition
--listen-peer-urls
 Used for communication between nodes url, Can monitor multiple , The cluster will pass through these url Data interaction ( Like elections , Data synchronization, etc )
--initial-advertise-peer-urls
 Recommended for communication between nodes url, Nodes will communicate with this value .
--listen-client-urls
 Used for client communication url, You can also monitor multiple .
--advertise-client-urls
 Recommended client communication url, This value is used for etcd Agent or etcd Members and etcd Node communication .
--initial-cluster-token etcd-cluster-1
 Node token value , When this value is set, the cluster will generate unique id, And generate unique for each node id, When starting another cluster with the same profile , As long as token Values are not the same ,etcd Clusters don't interact with each other .
--initial-cluster
 That's all in the cluster initial-advertise-peer-urls  A collection of
--initial-cluster-state new
New cluster logo Two . Build stand-alone version
Direct start
etcdetcd The default monitor is localhost Of 2379 port , It's just monitoring lo equipment , This will cause other machines in the cluster to be inaccessible after startup So we can default to localhost Change to 0.0.0.0, Make sure etcd Monitor all network cards .
etcd -listen-client-urls="http://0.0.0.0:2379" --advertise-client-urls="http://0.0.0.0:2379"Be careful :etcd There are requirements , If --listen-client-urls Has been set up , Then it must be set at the same time --advertise-client-urls, So even if the settings are the same as the default , You must also explicitly set Let's use curl Let's test it , Can I access it remotely , Here's my machine IP yes 10.211.55.25
*  ~ curl -L  http://10.211.55.25:2379/version
{"etcdserver":"3.3.12","etcdcluster":"3.3.0"}Of course , We can also pass docker function , Here is the startup script
#!/usr/bin/env bash
ETCD_NAME="etcd"
ETCD_VERSION="v3.3.1"
ETCD_PORT_CLIENT=2379
ETCD_PORT_NODE=2380
docker run -d \
  -p ${ETCD_PORT_CLIENT}:2379 \
  -p ${ETCD_PORT_NODE}:2380 \
  --name ${ETCD_NAME} quay.io/coreos/etcd:${ETCD_VERSION} \
  /usr/local/bin/etcd \
  --data-dir=/etcd-data --name node1 \
  --initial-advertise-peer-urls http://0.0.0.0:2380 --listen-peer-urls http://0.0.0.0:2380 \
  --advertise-client-urls http://0.0.0.0:2379 --listen-client-urls http://0.0.0.0:2379 \
--initial-cluster node1=http://0.0.0.0:23803、 ... and . Build cluster version
Etcd There are three main forms of cluster for building self height :
- Static discovery : Know in advance Etcd Which nodes in the cluster , Specify directly at startup Etcd Each of them node Node address
- Etcd Dynamic discovery : Through existing Etcd Cluster as data interaction point , Then when expanding the new cluster, we can realize the mechanism of service discovery through the existing cluster
- DNS Dynamic discovery : adopt DNS Query the address information of other nodes
Here we use Static The way , Prepare three machines ,ip as follows ( It's all installed etcd)
node1 10.211.55.2
node2 10.211.55.25
node3 10.211.55.26Get into node1, Create and run run.sh, The script is as follows
#!/usr/bin/env bash
# The name of the node
ETCD_NAME=node-1
# This machine IP Address
LOCAL_IP=10.211.55.2
#ETCD Storage directory
ETCD_DATA_DIR=/usr/local/etcd/data
# Initialization name
INITIAL_CLUSTER_TOKEN=cqh-test-cluster
# Initialize cluster list
INITIAL_CLUSTER="node-1=http://10.211.55.2:2380,node-2=http://10.211.55.25:2380,node-3=http://10.211.55.26:2380"
# Initialization status
INITIAL_CLUSTER_STATE=new

# Began to run
etcd --name ${ETCD_NAME} --data-dir ${ETCD_DATA_DIR} \
    --initial-advertise-peer-urls http://${LOCAL_IP}:2380 \
    --listen-peer-urls http://${LOCAL_IP}:2380 \
    --listen-client-urls http://${LOCAL_IP}:2379,http://127.0.0.1:2379 \
    --advertise-client-urls http://${LOCAL_IP}:2379 \
    --initial-cluster-token ${INITIAL_CLUSTER_TOKEN} \
    --initial-cluster ${INITIAL_CLUSTER} \
--initial-cluster-state ${INITIAL_CLUSTER_STATE}Get into node2, Create and run run.sh, Script content and node1 almost ( Only modified ETCD_NAME and LOCAL_IP)
#!/usr/bin/env bash
# The name of the node
ETCD_NAME=node-2
# This machine IP Address
LOCAL_IP=10.211.55.25
#ETCD Storage directory
ETCD_DATA_DIR=/usr/local/etcd/data
# Initialization name
INITIAL_CLUSTER_TOKEN=cqh-test-cluster
# Initialize cluster list
INITIAL_CLUSTER="node-1=http://10.211.55.2:2380,node-2=http://10.211.55.25:2380,node-3=http://10.211.55.26:2380"
# Initialization status
INITIAL_CLUSTER_STATE=new

# Began to run
etcd --name ${ETCD_NAME} --data-dir ${ETCD_DATA_DIR} \
    --initial-advertise-peer-urls http://${LOCAL_IP}:2380 \
    --listen-peer-urls http://${LOCAL_IP}:2380 \
    --listen-client-urls http://${LOCAL_IP}:2379,http://127.0.0.1:2379 \
    --advertise-client-urls http://${LOCAL_IP}:2379 \
    --initial-cluster-token ${INITIAL_CLUSTER_TOKEN} \
    --initial-cluster ${INITIAL_CLUSTER} \
--initial-cluster-state ${INITIAL_CLUSTER_STATE}Get into node3, Create and run run.sh
#!/usr/bin/env bash
# The name of the node
ETCD_NAME=node-3
# This machine IP Address
LOCAL_IP=10.211.55.26
#ETCD Storage directory
ETCD_DATA_DIR=/usr/local/etcd/data
# Initialization name
INITIAL_CLUSTER_TOKEN=cqh-test-cluster
# Initialize cluster list
INITIAL_CLUSTER="node-1=http://10.211.55.2:2380,node-2=http://10.211.55.25:2380,node-3=http://10.211.55.26:2380"
# Initialization status
INITIAL_CLUSTER_STATE=new

# Began to run
etcd --name ${ETCD_NAME} --data-dir ${ETCD_DATA_DIR} \
    --initial-advertise-peer-urls http://${LOCAL_IP}:2380 \
    --listen-peer-urls http://${LOCAL_IP}:2380 \
    --listen-client-urls http://${LOCAL_IP}:2379,http://127.0.0.1:2379 \
    --advertise-client-urls http://${LOCAL_IP}:2379 \
    --initial-cluster-token ${INITIAL_CLUSTER_TOKEN} \
    --initial-cluster ${INITIAL_CLUSTER} \
--initial-cluster-state ${INITIAL_CLUSTER_STATE}We see 3 It's all started successfully
And then we were in node2 Do the above
[email protected]:~# etcdctl member list
2033c1336b929ca7: name=node-3 peerURLs=http://10.211.55.26:2380 clientURLs=http://10.211.55.26:2379 isLeader=true
edc51d36208cfbcf: name=node-2 peerURLs=http://10.211.55.25:2380 clientURLs=http://10.211.55.25:2379 isLeader=false
f09a9dba19a725e2: name=node-1 peerURLs=http://10.211.55.2:2380 clientURLs=http://10.211.55.2:2379 isLeader=falseYou can see that the cluster has taken effect , Let's test it again , stay ndoe2 Perform operation on
etcdctl set /cqh musclehave a look node1 and node3 Can we keep the data consistent
You can see in the node1 and node3 All of them can get /cqh Value
Four . Monitor function watch demonstration
- etcdctl watch key Observe a change in value , After observing the change , Print values and watch sign out
- etcdctl watch key -f Changes in permanent Observations , After observing the change , Print until Ctrl+C sign out
- etcdctl exec-watch key -- sh -c 'pwd' Monitor for changes in value , Just execute the specified order ( And do not exit the execution can be shell command )
5、 ... and . Use rest api
- Create key values
*  ~ curl http://10.211.55.25:2379/v2/keys/cqh -XPUT -d value=" Chen qionghe 1"
{"action":"set","node":{"key":"/cqh","value":" Chen qionghe ","modifiedIndex":14,"createdIndex":14},"prevNode":{"key":"/cqh","value":" Chen qionghe ","modifiedIndex":13,"createdIndex":13}}- Create directory
*  ~ curl http://10.211.55.25:2379/v2/keys/gym -XPUT -d dir=true
{"action":"set","node":{"key":"/gym","dir":true,"modifiedIndex":12,"createdIndex":12}}- Get key value
*  ~ curl http://10.211.55.25:2379/v2/keys/cqh
{"action":"get","node":{"key":"/cqh","value":" Chen qionghe ","modifiedIndex":14,"createdIndex":14}}- Create a key value band ttl
* ~ curl http://10.211.55.25:2379/v2/keys/hero -XPUT -d value=" superman " -d ttl=5- Create ordered key values
curl http://10.211.55.25:2379/v2/keys/fitness -XPOST -d value="bench_press"
curl http://10.211.55.25:2379/v2/keys/fitness -XPOST -d value="dead_lift"
curl http://10.211.55.25:2379/v2/keys/fitness -XPOST -d value="deep_squat"Get the fitness
curl http://10.211.55.25:2379/v2/keys/fitness
{"action":"create","node":{"key":"/fitness/00000000000000000020","value":"bench_press","modifiedIndex":20,"createdIndex":20}}
{"action":"create","node":{"key":"/fitness/00000000000000000021","value":"dead_lift","modifiedIndex":21,"createdIndex":21}}
{"action":"create","node":{"key":"/fitness/00000000000000000022","value":"deep_squat","modifiedIndex":22,"createdIndex":22}}
{"action":"get","node":{"key":"/fitness","dir":true,"nodes":[{"key":"/fitness/00000000000000000022","value":"deep_squat","modifiedIndex":22,"createdIndex":22},{"key":"/fitness/00000000000000000020","value":"bench_press","modifiedIndex":20,"createdIndex":20},{"key":"/fitness/00000000000000000021","value":"dead_lift","modifiedIndex":21,"createdIndex":21}],"modifiedIndex":20,"createdIndex":20}}- Delete key
curl http://10.211.55.25:2379/v2/keys/cqh -XDELETE- List all cluster members
curl http://10.211.55.25:2379/v2/members- Statistics - see leader
curl http://10.211.55.25:2379/v2/stats/leader- Information of the node itself
curl http://10.211.55.26:2379/v2/stats/self- Check the running status of the cluster
curl http://10.211.55.26:2379/v2/stats/store6、 ... and . build WEB Interface and use
Here respectively demonstrate the construction etcd-browser and etcdkeeper, The two functions are similar and slightly different , The difference is etcdkeeper Support v3 Of api
1. build etcd-browser
docker run --rm  -d --name etcd-browser \
-p 8000:8000 \
--env ETCD_HOST=10.211.55.25 \
--env ETCD_PORT=2379 \
buddho/etcd-browserPost run access http://10.211.55.25:8000/ You can see the following interface , You can see all the data added above , Here I use the interface to add Marvel DC The hero of
2. build etcdkeeper
docker run -it -d --name etcdkeeper \
-p 8080:8080 \
deltaprojects/etcdkeepervisit http://10.211.55.25:8080/etcdkeeper/, Input etcd The address of , You can see the following interface
Come here ,etcd Build a stand-alone version of 、 Cluster version 、 Client side usage 、rest api web Management interface and other functions are introduced , What are you waiting for , hurriedly high get up
边栏推荐
- Shell script basic programming commands
- MPLS multi protocol label switching technology
- Do employees have to compensate the company for losses when they resign? The 34 year old captain resigned and was claimed 10.66 million yuan by the company
- Vs how to read data in MySQL (by the way, the problem of Chinese garbled code is solved through code)
- [基础服务] [数据库] ClickHouse的安装和配置
- hello 你好吗
- Auto.js 旋转图标
- BGP的基本配置和聚合
- When there are many query fields, you can add ordinary query and advanced query
- 软件测试-开发提测内容规范(项目提测模板)
猜你喜欢

第二章:遇到阻难!绕过WAF过滤!【SQL注入攻击】

Basic configuration and aggregation of BGP

Fitting the new direction of curriculum standards, ape guidance, creating a characteristic new concept content system
![[wechat applet] zero basics | applet syntax](/img/3d/fb999fde6f61af62337464ea8e32bd.png)
[wechat applet] zero basics | applet syntax

任务二 kaggle糖尿病检测
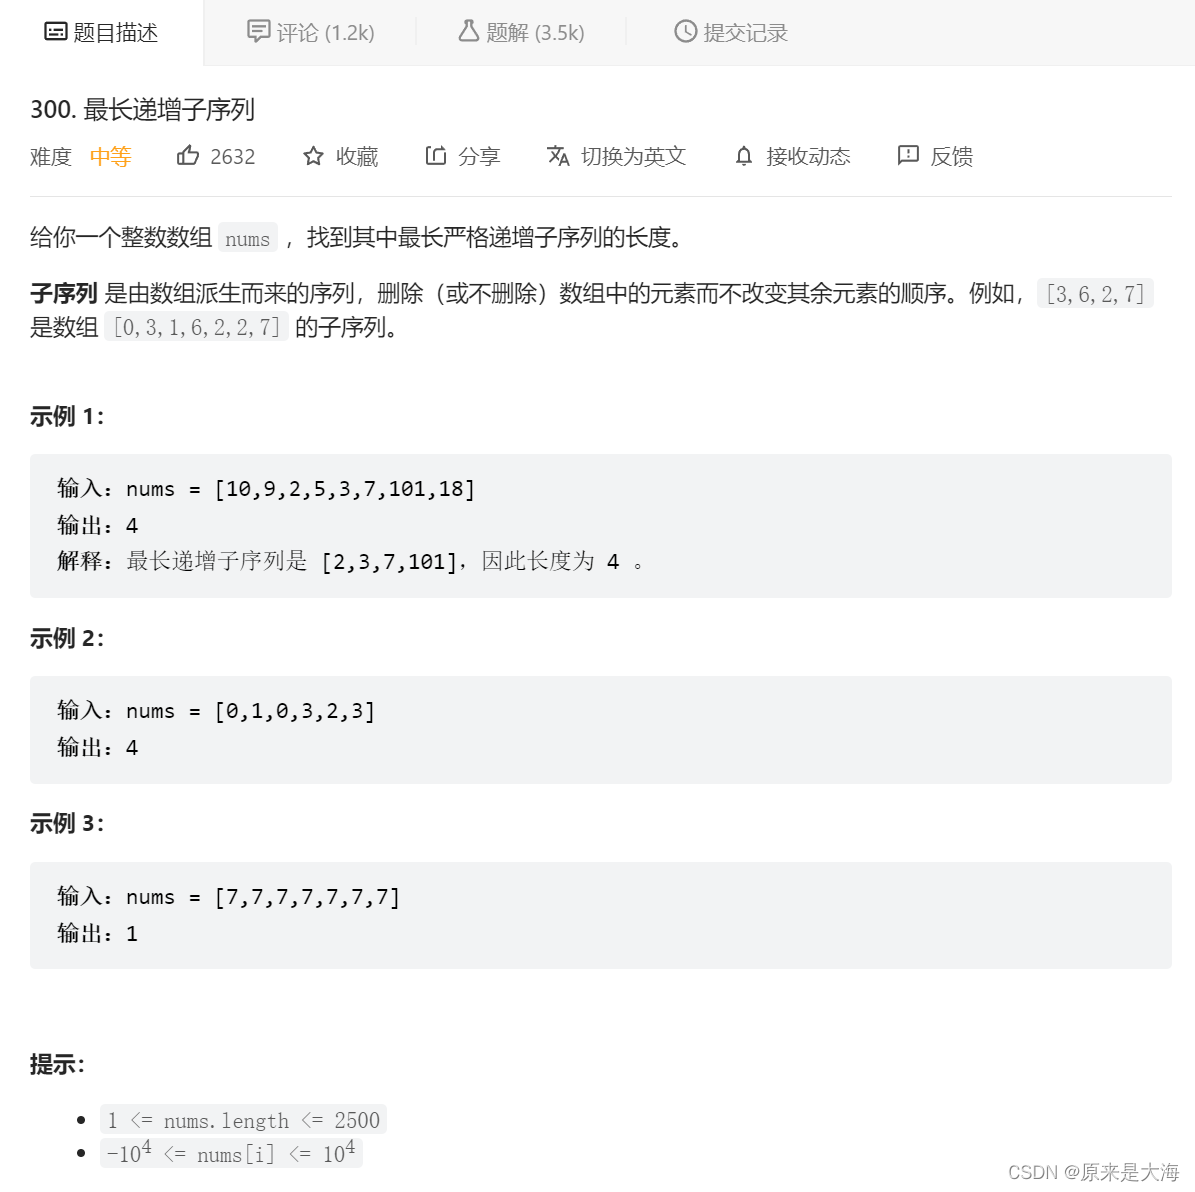
Leetcode-300 最长递增子序列

ST表、带权并查集

连接池快速入门

EtherCAT synchronization mode

What are the key technologies of digital factory
随机推荐
Summary of message queue knowledge points
Usage of Smoothscroll Polyfill plug-in
Kotlin - 协程构建器 CoroutineBuilder
BUU刷题记-网鼎杯专栏2
【【实验分享】CCIE—BGP路由黑洞实验】
Leetcode-300 最长递增子序列
Single core A7 plays with face recognition, and NXP "crossover processor" plays a new trick!
How to implement an asynchronous task queue system that can handle massive data (supreme Collection Edition)
Solve attributeerror: module 'win32com.gen_ py. 00020813-0000-0000-C000-000000000046x0x1x9‘ has no attribu
Ape tutoring's technological hard power: let AI start from reading children's homework
一层节点训练5个坐标的超简单神经网络代码
Task 1 report
81. (cesium home) cesium modifies the gray background (default blue)
BGP的基本配置和聚合
7.25模拟赛总结
打字比赛圆满结束!
Robin Lee was "poured cold water" enthusiasm! Baidu allied with Huawei Kirin to release "Honghu" chip
QT signal and slot connection (loose coupling)
smoothscroll-polyfill插件的用法
李彦宏遭“泼冷水”热情不减!百度结盟华为麒麟,发布“鸿鹄”芯片