当前位置:网站首页>Oblique document scanning and character recognition (opencv, coordinate transformation analysis)
Oblique document scanning and character recognition (opencv, coordinate transformation analysis)
2022-07-30 20:19:00 【csp_】
目录
项目源码
可在github下载:
https://github.com/chenshunpeng/Doc-scan
图像预处理
首先导入工具包
import numpy as np
import argparse
import cv2
设置命令行参数
# Structural parameters and parse
# we instantiate the ArgumentParser object as ap(实例化)
ap = argparse.ArgumentParser()
ap.add_argument("-i", "--image", default='./images/pic.jpg'
				, required = False, help = "Path to the image to be scanned")
args = vars(ap.parse_args())
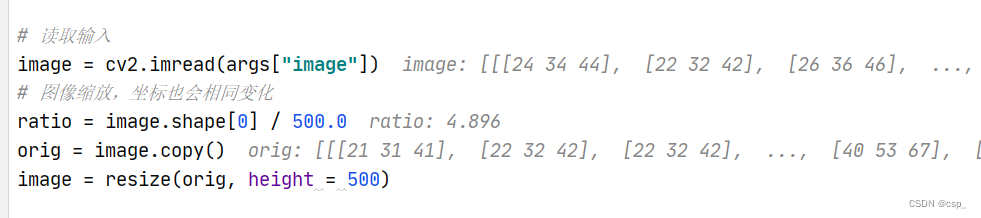
读取输入,对图像进行缩放
图像:

# 读取输入
image = cv2.imread(args["image"])
# 图像缩放,坐标也会相同变化
ratio = image.shape[0] / 500.0
orig = image.copy()
image = resize(orig, height = 500)
这里的ratio是4.896
在此给出resize函数定义:
def resize(image, width=None, height=None, inter=cv2.INTER_AREA):
	dim = None
	(h, w) = image.shape[:2]
	if width is None and height is None:
		return image
	if width is None:
		r = height / float(h)
		dim = (int(w * r), height)
	else:
		r = width / float(w)
		dim = (width, int(h * r))
	resized = cv2.resize(image, dim, interpolation=inter)
	return resized
对图像进行预处理,And show preprocessing results
# 转灰度图
gray = cv2.cvtColor(image, cv2.COLOR_BGR2GRAY)
# 高斯滤波,去除噪音点
gray = cv2.GaussianBlur(gray, (5, 5), 0)
# 边缘检测
edged = cv2.Canny(gray, 75, 200)

# 展示预处理结果
print("STEP 1: 边缘检测")
cv2.imshow("Image", image)
cv2.imshow("Edged", edged)
cv2.waitKey(0)
cv2.destroyAllWindows()
结果:

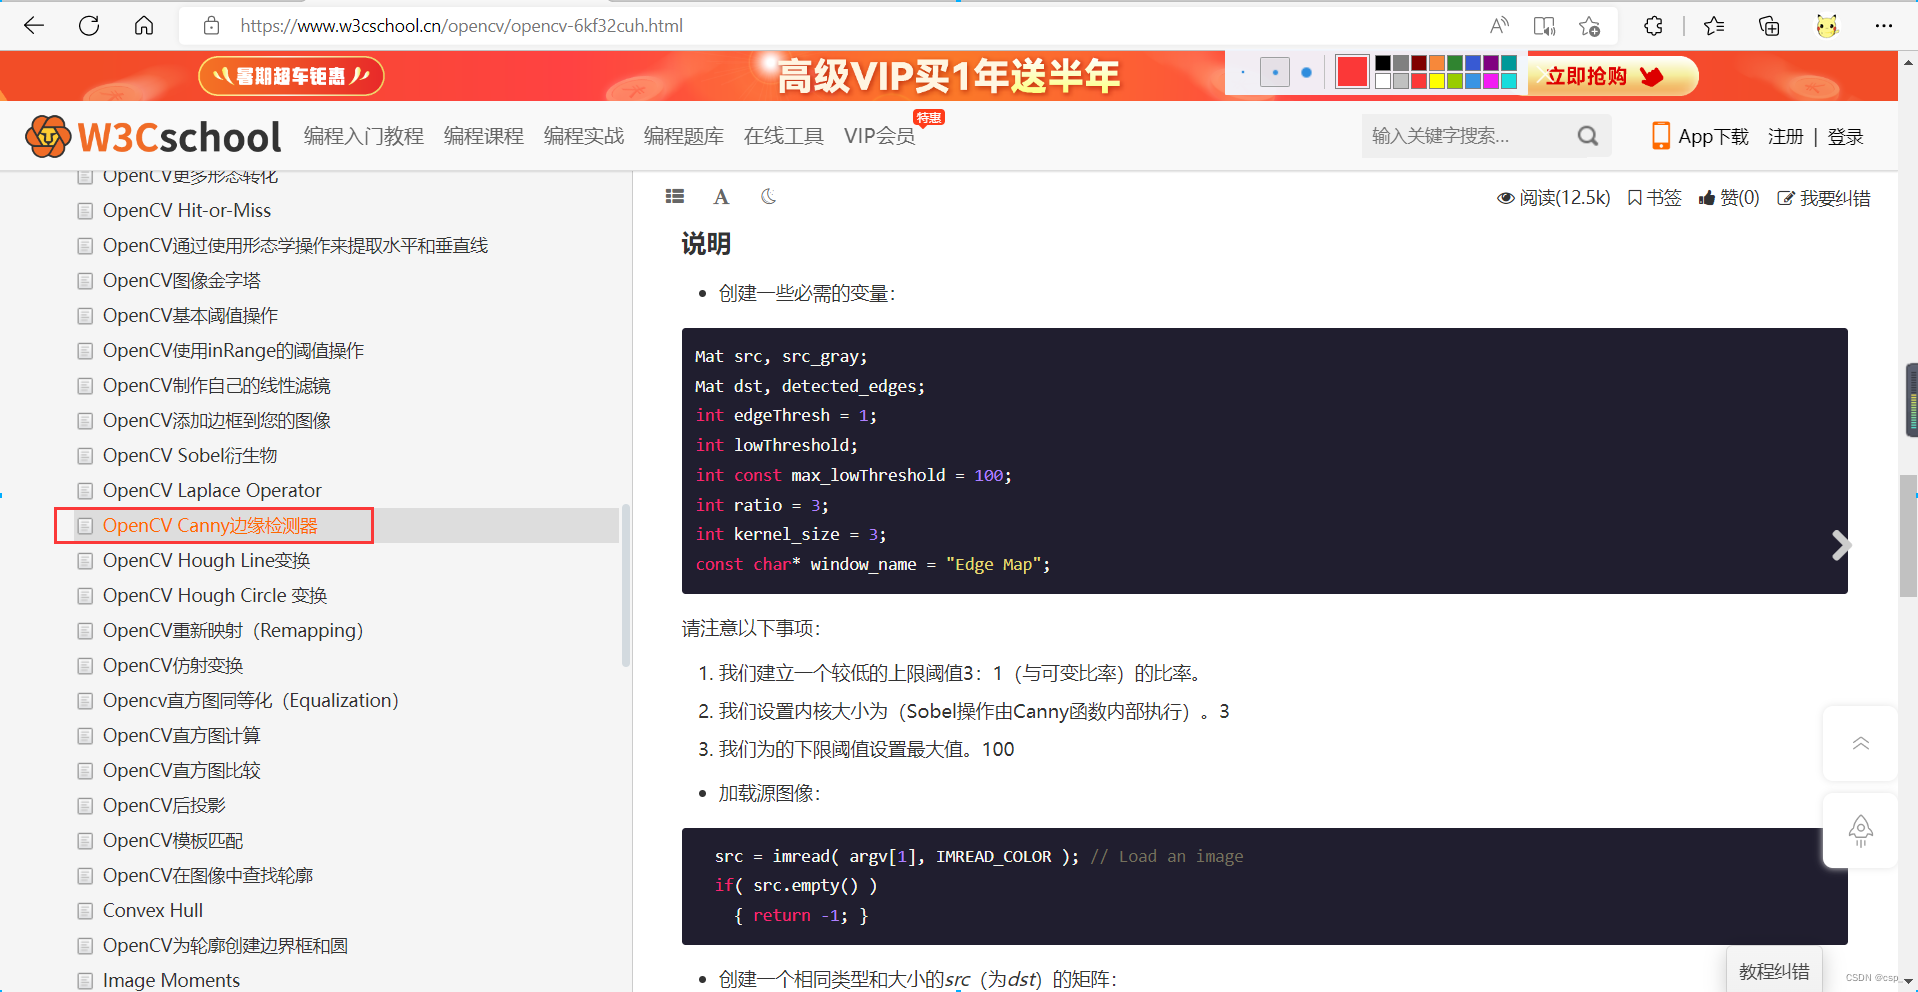
对于一些陌生的知识(如Canny边缘检测),可以在w3cschool看OpenCVDocument translation study(https://www.w3cschool.cn/opencv)
Recommend a certain English level directly to seeOpenCV官方文档(https://docs.opencv.org/3.4/index.html):

To obtain the optimal profile
轮廓提取
# cv.findContours()函数中有三个参数,第一个是源图像,第二个是轮廓检索模式,第三个是轮廓近似方法.
# 它输出轮廓和层次结构.Contours是图像中所有轮廓的Python列表.The outline of each individual are object boundary point (x,y) 坐标的 Numpy 数组
cnts = cv2.findContours(edged.copy(), cv2.RETR_LIST, cv2.CHAIN_APPROX_SIMPLE)[0]
# To outline according to the area from big to small order,取前5个(先从小到大排序,之后取reverse翻转)
cnts = sorted(cnts, key = cv2.contourArea, reverse = True)[:5]
在 Opencv4中,cv2.findContour()仅返回 2 个值:contours, hierachy,所以在这里用[0]得到第一个值
Specific reading this web site:https://docs.opencv.org/4.x/d4/d73/tutorial_py_contours_begin.html
Before ordering493个轮廓:

排序后取面积最大的5个轮廓(The outside area of the framework of a certain maximum,So the circumference also larger,Or more points):

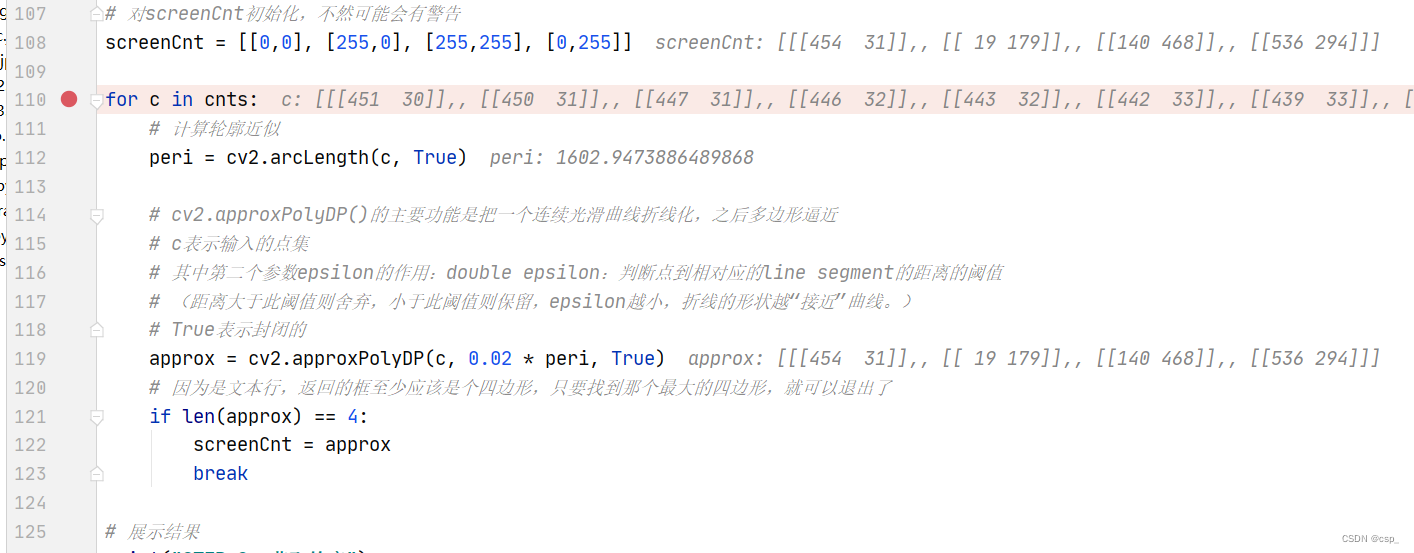
筛选轮廓
To traverse the outline,To find the optimal profile
# 对screenCnt初始化,不然可能会有警告
screenCnt = [[0,0], [255,0], [255,255], [0,255]]

for c in cnts:
	# 计算轮廓近似
	peri = cv2.arcLength(c, True)

	# cv2.approxPolyDP()Main function is to put a continuous smooth curve line is changed,After the polygon approximation
	# c表示输入的点集
	# 其中第二个参数epsilon的作用:double epsilon:判断点到相对应的line segment的距离的阈值
	# (距离大于此阈值则舍弃,小于此阈值则保留,epsilon越小,折线的形状越“接近”曲线.)
	# True表示封闭的
	approx = cv2.approxPolyDP(c, 0.02 * peri, True)
	# Because is the text line,Returns the box should be at least a quadrilateral,As long as find the biggest quadrilateral,就可以退出了
	if len(approx) == 4:
		screenCnt = approx
		break
v2.approxPolyDPFunction to understand to see:
Google:Contour Features(OpenCV官网教程)

总之,This function class knowledge recommended Google 搜索,可以直接搜索到官方文档,权威一些
The optimal profile is as follows:

We found the optimal profile is the outline of the largest,But the most is not the most points(1009<1042)
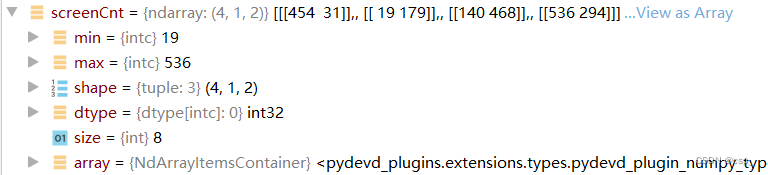
screenCnt的值:
The original and transform coordinates calculation
通过screenCnt.reshape(4, 2)将其变为4x2的矩阵,之后* ratio得到的pts矩阵为:

即:
{ t 1 ( 2222.784 , 151.776 ) t 1 ( 93.024 , 876.384 ) t 1 ( 685.44 , 2291.328 ) t 1 ( 2624.256 , 1439.424 ) \begin{cases}t_{1}\left( 2222.784,151.776\right) \\ t_{1}\left( 93.024, 876.384\right) \\ t_{1}\left(685.44,2291.328\right) \\ t_{1}(2624.256,1439.424) \end{cases} ⎩⎨⎧t1(2222.784,151.776)t1(93.024,876.384)t1(685.44,2291.328)t1(2624.256,1439.424)
这里4个点用 t 1 − 4 t_{1-4} t1−4 表示是因为这4A sequence of points which cannot represent the relative position relations,两者没有任何关联
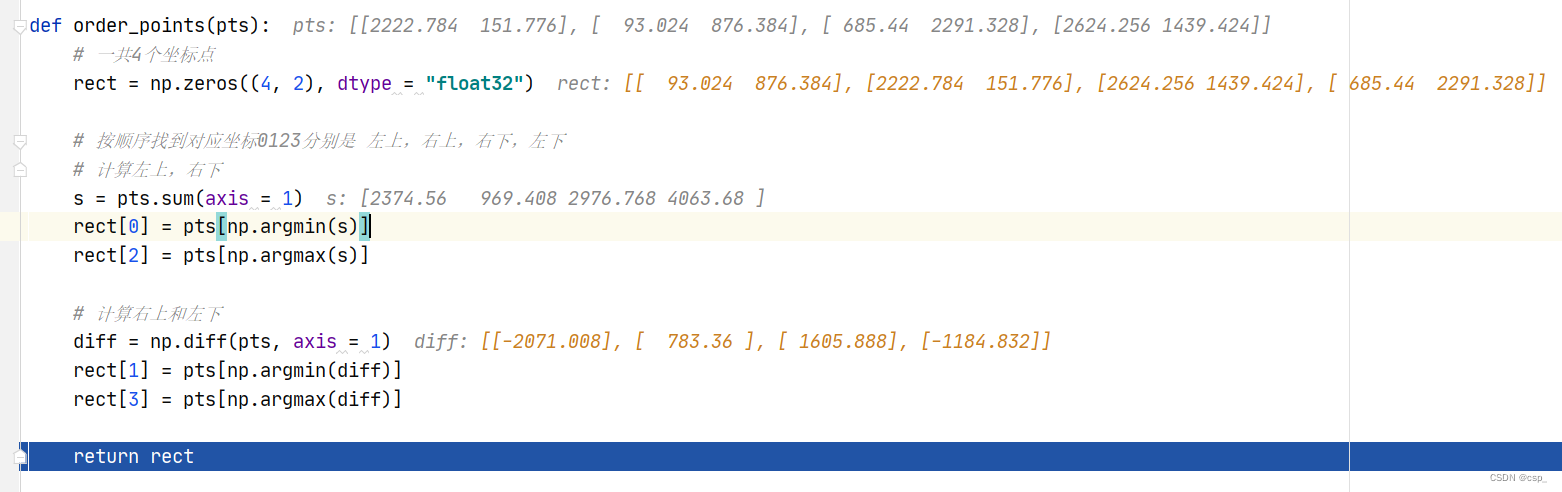
之后通过order_pointsFunction to obtain input coordinates of point
def order_points(pts):
	# 一共4个坐标点
	rect = np.zeros((4, 2), dtype = "float32")

	# 按顺序找到对应坐标0123分别是 左上,右上,右下,左下
	# 计算左上,右下
	s = pts.sum(axis = 1)
	rect[0] = pts[np.argmin(s)]
	rect[2] = pts[np.argmax(s)]

	# 计算右上和左下
	diff = np.diff(pts, axis = 1)
	rect[1] = pts[np.argmin(diff)]
	rect[3] = pts[np.argmax(diff)]

	return rect
过程如下:
After the transformations,给出函数four_point_transform:
def four_point_transform(image, pts):
	# 获取输入坐标点
	rect = order_points(pts)
	(tl, tr, br, bl) = rect

	# 计算输入的w和h值
	widthA = np.sqrt(((br[0] - bl[0]) ** 2) + ((br[1] - bl[1]) ** 2))
	widthB = np.sqrt(((tr[0] - tl[0]) ** 2) + ((tr[1] - tl[1]) ** 2))
	maxWidth = max(int(widthA), int(widthB))

	heightA = np.sqrt(((tr[0] - br[0]) ** 2) + ((tr[1] - br[1]) ** 2))
	heightB = np.sqrt(((tl[0] - bl[0]) ** 2) + ((tl[1] - bl[1]) ** 2))
	maxHeight = max(int(heightA), int(heightB))

	# 变换后对应坐标位置
	dst = np.array([
		[0, 0],
		[maxWidth - 1, 0],
		[maxWidth - 1, maxHeight - 1],
		[0, maxHeight - 1]], dtype = "float32")

	# 计算变换矩阵
	M = cv2.getPerspectiveTransform(rect, dst)
	warped = cv2.warpPerspective(image, M, (maxWidth, maxHeight))

	# 返回变换后结果
	return warped
Intermediate variable as follows:

给出(tl, tr, br, bl)(变换前)的表达:
{ A t l ( 93.024 , 876.384 ) B t r ( 2222.784 , 151.776 ) C b r ( 2624.256 , 1439.424 ) D b l ( 685.44 , 2291.328 ) \begin{cases}A_{tl}\left( 93.024, 876.384\right) \\ B_{tr}\left( 2222.784,151.776\right) \\ C_{br}\left(2624.256,1439.424\right) \\ D_{bl}(685.44,2291.328) \end{cases} ⎩⎨⎧Atl(93.024,876.384)Btr(2222.784,151.776)Cbr(2624.256,1439.424)Dbl(685.44,2291.328)
给出dst(变换后)的表达:
{ A ( 0. , 0. ) B ( 2248. , 0. ) C ( 2248. , 1532. ) D ( 0. , 1532. ) \begin{cases}A\left(0.,0.\right) \\ B\left( 2248. , 0.\right) \\ C\left(2248. ,1532.\right) \\ D(0. ,1532.) \end{cases} ⎩⎨⎧A(0.,0.)B(2248.,0.)C(2248.,1532.)D(0.,1532.)
Draw a figure something like this: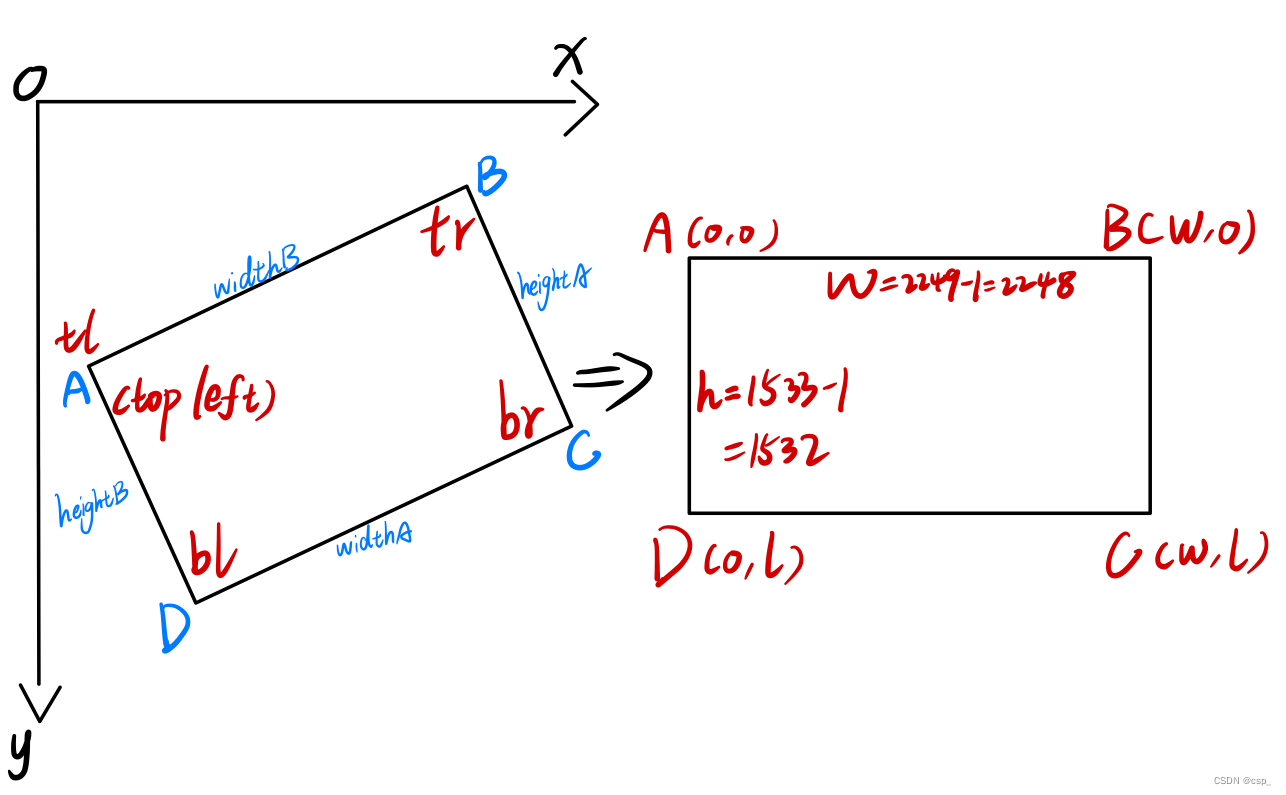
其中通过cv2.getPerspectiveTransform(rect, dst)Function to solve the transformation matrix
原理可看b站视频:The perspective transformation matrix solution is derived(通俗易懂)
显示识别结果
图像处理
After the gray level change in turn,二值化处理:
# 灰度,二值处理
warped = cv2.cvtColor(warped, cv2.COLOR_BGR2GRAY)
ref = cv2.threshold(warped, 100, 255, cv2.THRESH_BINARY)[1]

# 把ref写入scan.jpg
cv2.imwrite('scan.jpg', ref)
修改图片大小,并逆时针旋转90度
借鉴博客:
# 修改图片大小,At the same time image counterclockwise90度

# 获取图片,Change the size of the picture
img = cv2.imread("scan.jpg")
# Pay attention to the need for the return value asimg2,Can't not return a value
img2 = cv2.resize(img, (900, 600))
cv2.imshow("temp", img2)
cv2.waitKey(0)
# 对图片进行旋转
# 方法一
# img90 = np.rot90(img2)
# 方法二
# 绕任意点旋转
# 第一个参数旋转中心,第二个参数旋转角度,第三个参数:缩放比例
M = cv2.getRotationMatrix2D((450, 450), 90, 1)
# 仿射变化
# 第三个参数:输入图像的大小
img90 = cv2.warpAffine(img2, M, img2.shape[:2])
# (600, 900)与img2.shape[:2]等价
# img90 = cv2.warpAffine(img2, M, (600, 900))
cv2.imwrite('scan.jpg', img90)
# cv2.imshow("rotate", img90)
# cv2.waitKey(0)
# cv2.destroyAllWindows()
显示图像
print("STEP 3: 变换")
# cv2.imshow("Original", resize(orig, height = 650))
cv2.imshow("Scanned", resize(img90, height = 650))
cv2.waitKey(0)
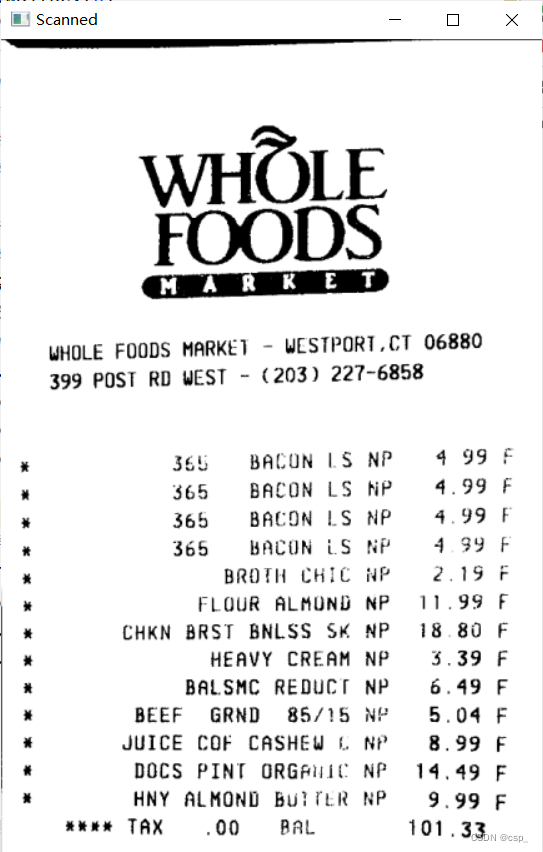
旋转前:
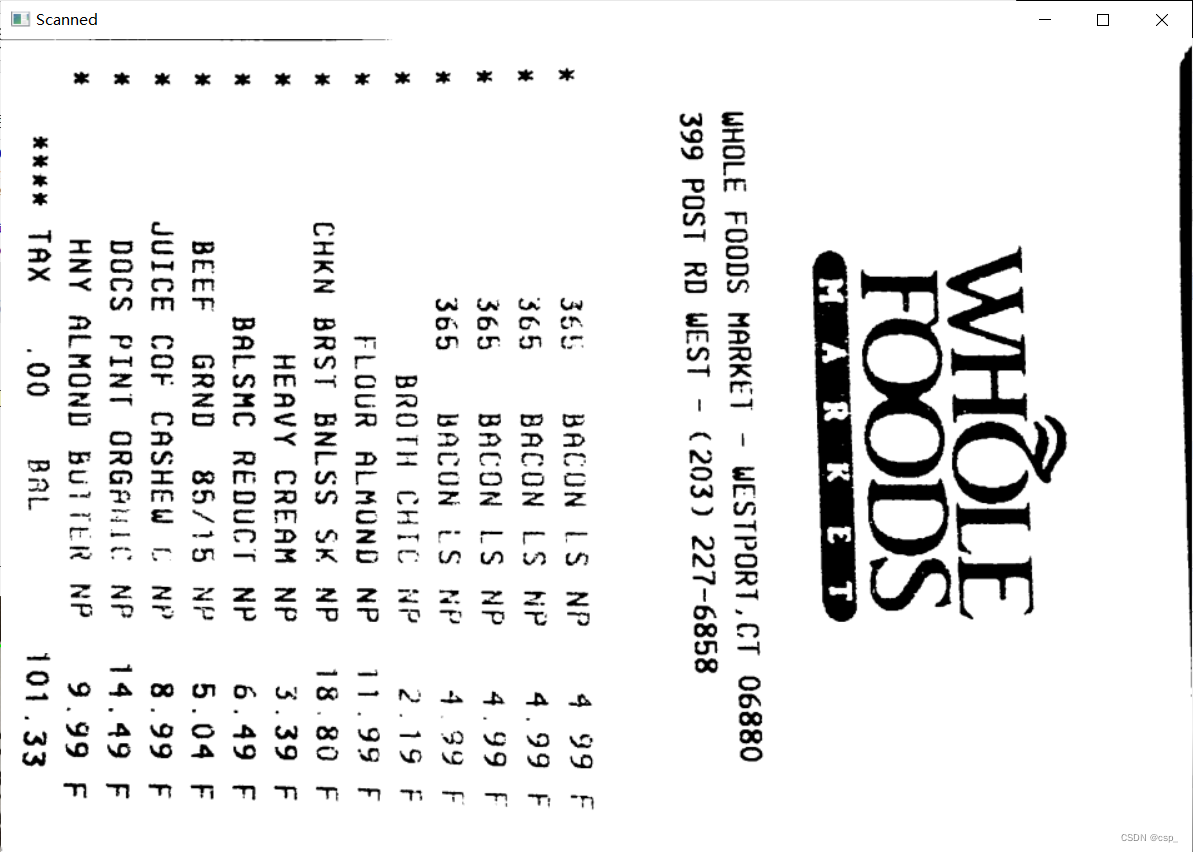
旋转后:
OCR识别
在这里用github开源OCR软件tesseract,可看:
https://github.com/tesseract-ocr/tesseract
下载地址:
https://digi.bib.uni-mannheim.de/tesseract/
我的安装路径是:F:\soft_f\Tesseract-OCR,Installed remember with my environment variables(I only match the user variables),之后输入tesseract -v有(Version can be high to low,I install is high version):

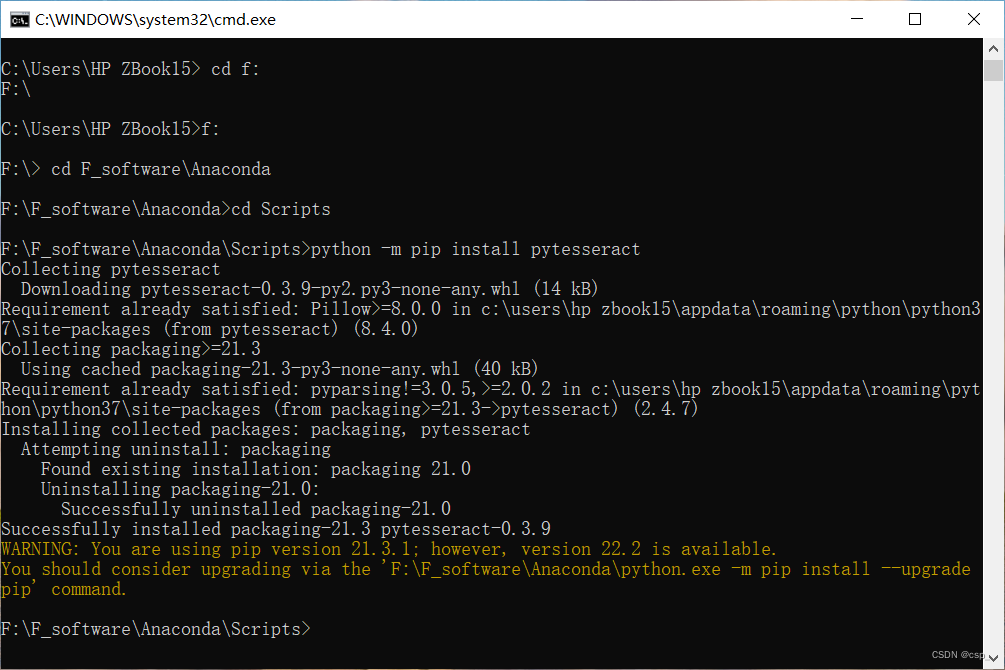
在python中pytesseractAnd installation at the localtesseract-ocr.exeFile is used with,因此需要pip install pytesseract,我的python环境在F:\F_software\Anaconda,安装如下:
在执行text = pytesseract.image_to_string(Image.open(filename))时发生了报错:
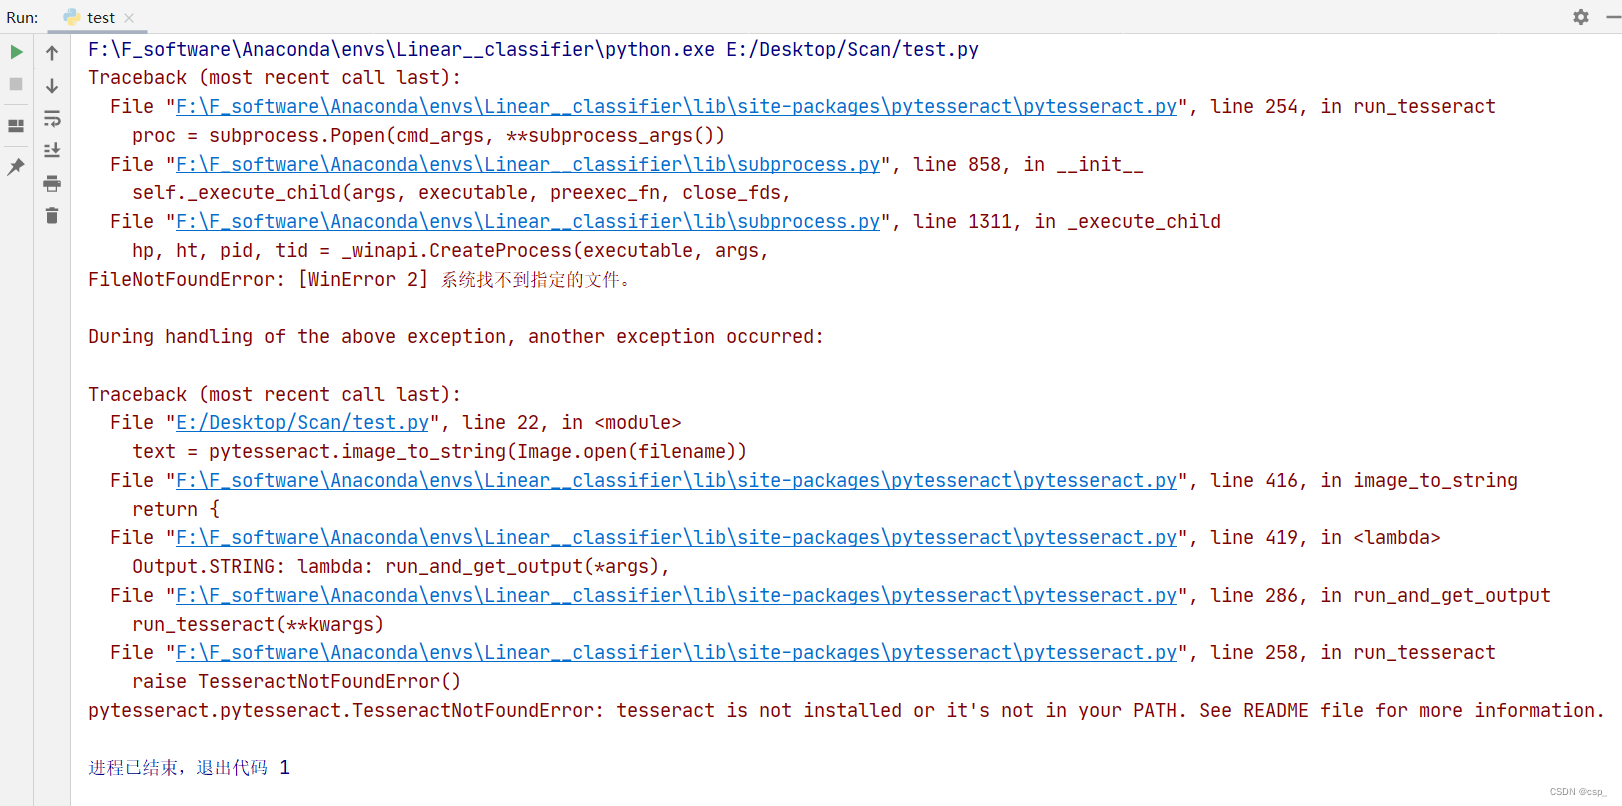
Found that even if is to configure the environment variables,也找不到tesseract的路径(原因未知QAQ),解决办法:打开F:\F_software\Anaconda\Lib\site-packages\pytesseract

修改一下tesseract_cmd = 'F:/soft_f/Tesseract-OCR/tesseract.exe':
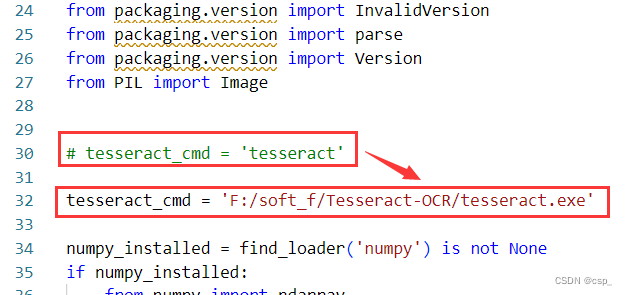
If it's an error to restart the computer(Sometimes the need to restart the computer to work)
这样就可以识别了,代码如下:
from PIL import Image
import pytesseract
import cv2
import os

preprocess = 'blur' #thresh

# 读入scan.pyThe output of the image:scan.jpg
image = cv2.imread('scan.jpg')
# 转灰度图
gray = cv2.cvtColor(image, cv2.COLOR_BGR2GRAY)

# A grayscale image binarization
if preprocess == "thresh":
    gray = cv2.threshold(gray, 0, 255,cv2.THRESH_BINARY | cv2.THRESH_OTSU)[1]
# 实现中值滤波
if preprocess == "blur":
    gray = cv2.medianBlur(gray, 3)

filename = "{}.png".format(os.getpid())
cv2.imwrite(filename, gray)

text = pytesseract.image_to_string(Image.open(filename))
print(text)
os.remove(filename)

cv2.imshow("Image", image)
cv2.imshow("Output", gray)
cv2.waitKey(0)
识别结果:
=

Ce ee ee ee ee

WHOLE FOODS MARKE)
399 POST RD WEST - (203) 227-6858

WHOLE
FOODS
(mM AR KE T)

WESTPORT.CT 06880

Seb BALUN LS NP 4
$65 BACUN LS NP 499

$65 BREON LS NP 4

305 BACUN iS fi 4
BROTH CHIL ae é 19
HLQUR ALMUND NP ol 99

CHKN BRST BNLSS SK 8 18 80
HEAVY CREAM $.39
BALSMC REODUCT 6.49

BEEF GRND 85/15 5.04

JUICE COF CASHEW 8
DOCS PINI ORGAile NP 14.49
HNY ALMOND bulithk NP 9

eee TAX 00 Rat 101.33
边栏推荐
- [Ask] SQL statement to calculate the sum of column 2 by deduplicating column 1?
- el-input 只能输入整数(包括正数、负数、0)或者只能输入整数(包括正数、负数、0)和小数
- MySQL的Replace用法详解
- Recommendation System - Sorting Layer: Sorting Layer Architecture [User and Item Feature Processing Steps]
- Can't find the distributed lock of Redisson?
- Recommendation system: evaluation index [offline evaluation index: RMSE (root mean square error), AUC, precision, recall, F1] [online evaluation: A/B test] [generally required response time <0.5s]
- ELK log analysis system
- Swift简介
- el-input can only input integers (including positive numbers, negative numbers, 0) or only integers (including positive numbers, negative numbers, 0) and decimals
- WPS表格怎么自动1234排下去?wps表格怎么自动生成序号?
猜你喜欢

MySQL database --- Addition, deletion, modification and query of MySQL tables (advanced)

Snowflake vs. Redshift的2022战报:两个数据平台谁更适合你?

对int变量赋值的操作是原子的吗?
![After MySQL grouping, take the largest piece of data [optimal solution]](/img/ff/b8218cb010b8be7d0564e45d4efa70.png)
After MySQL grouping, take the largest piece of data [optimal solution]
MySQL的DATE_FORMAT()函数将Date转为字符串

Android studio连接MySQL并完成简单的登录注册功能

4年测试经验去面试10分钟就被赶出来了,面试官说我还不如应届生?都这么卷吗...
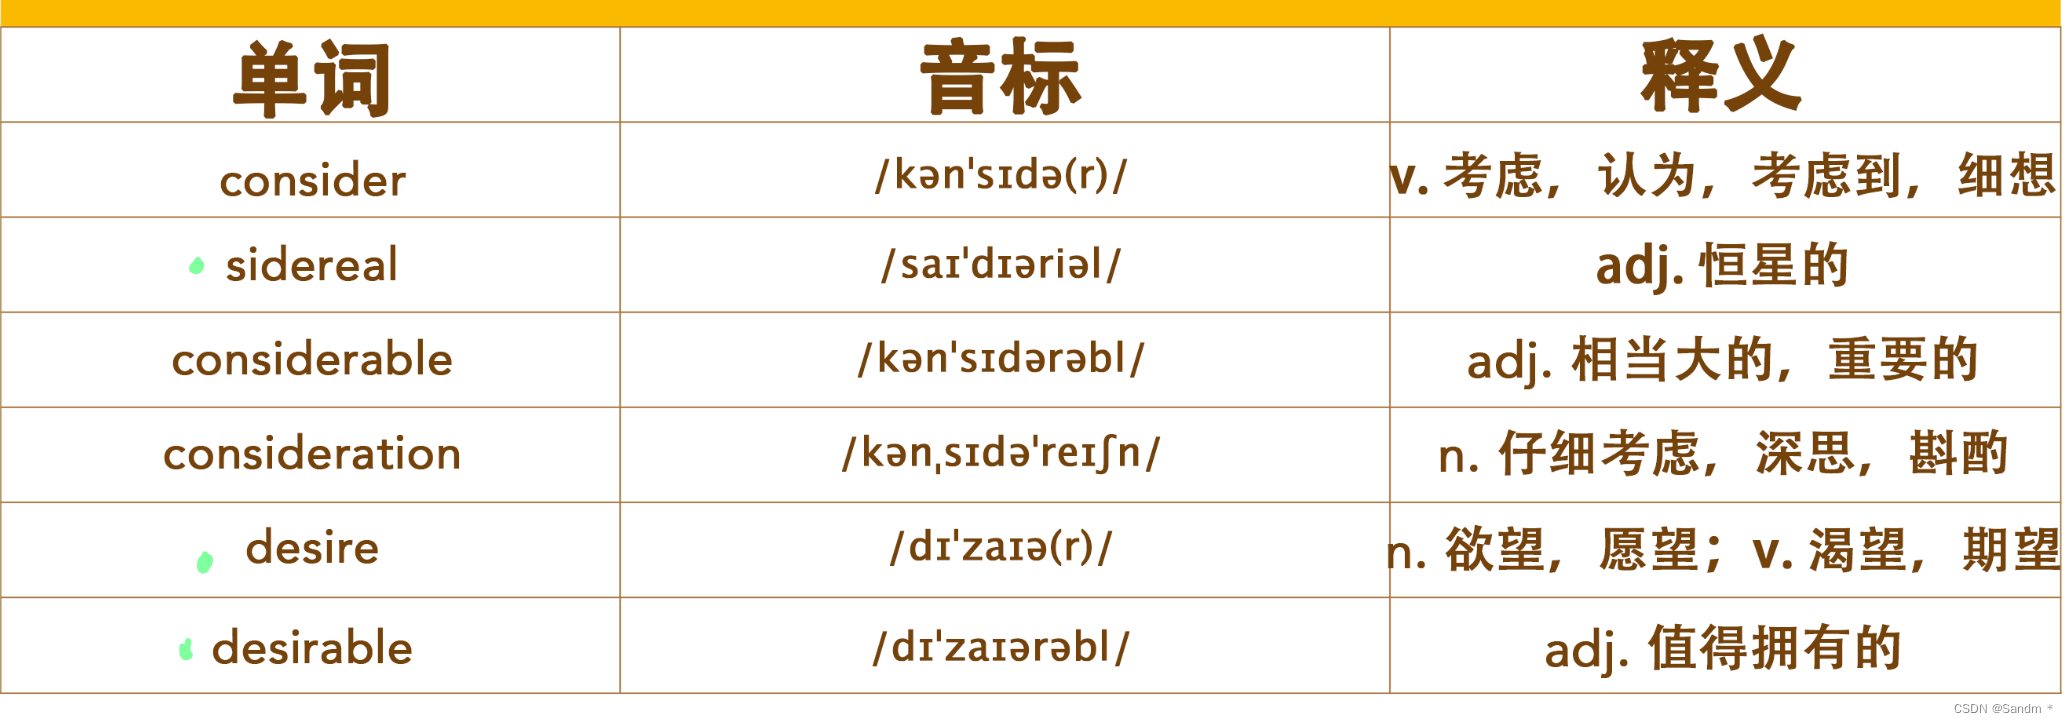
【考研词汇训练营】Day18 —— amount,max,consider,account,actual,eliminate,letter,significant,embarrass,collapse
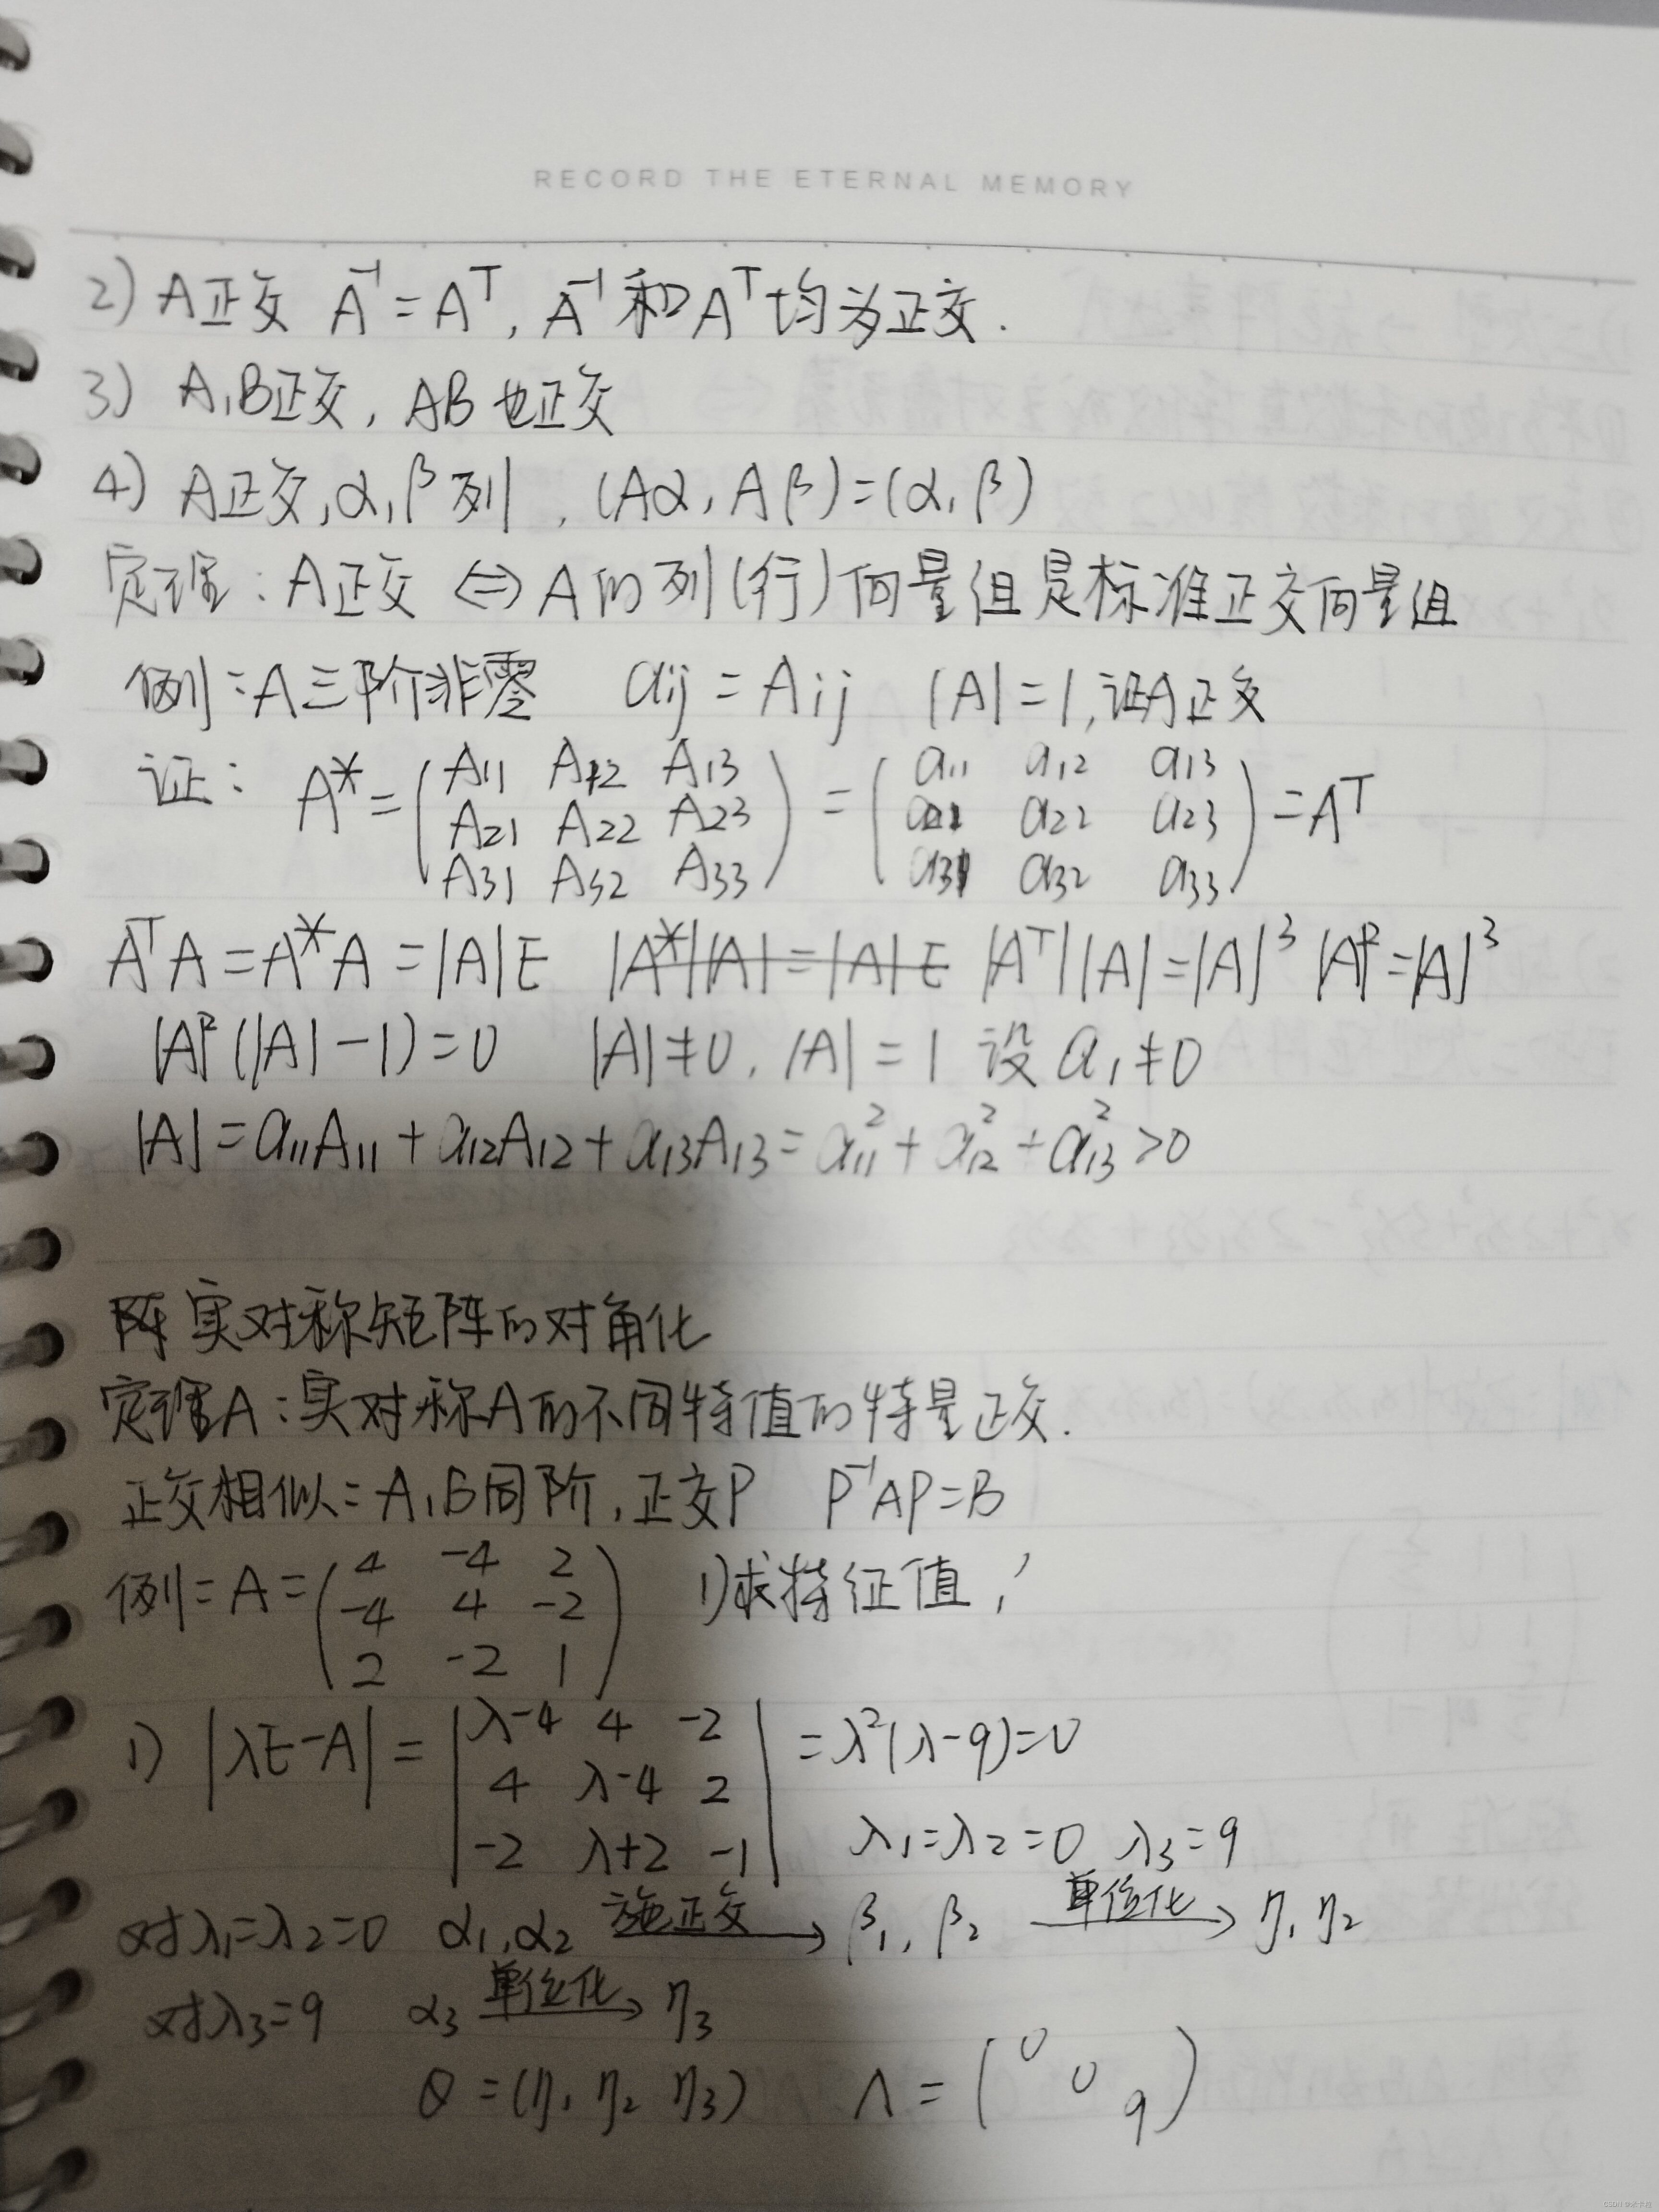
是对称矩阵的对角化
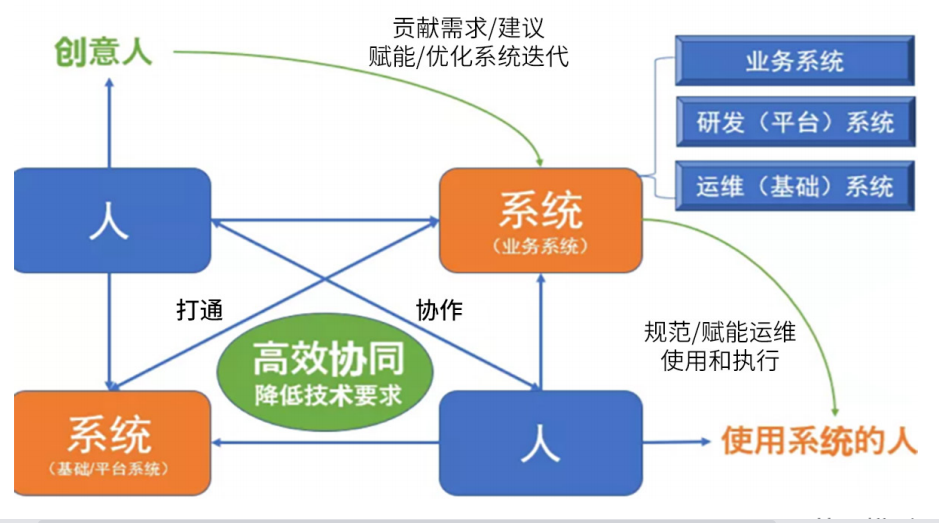
“数字化重构系统,搞定 CEO 是第一步”
随机推荐
对int变量赋值的操作是原子的吗?
Different lower_case_table_names settings for server (‘1‘) and data dictionary (‘0‘) 解决方案
M3SDA: Moment matching for multi-source domain adaptation
vlookup函数匹配不出来只显示公式的解决方法
使用MULTISET来比较数据集的实例介绍
Flex布局详解
推荐系统:概述【架构:用户/物品特征工程---->召回层---->排序层---->测试/评估】【冷启动问题、实时性问题】
“数字化重构系统,搞定 CEO 是第一步”
如何解决gedit 深色模式下高亮文本不可见?
SQLyog注释 添加 撤销 快捷键
FFmpeg —— 裁剪视频(含音视频),不需编解码(附完整源码)
Recommendation System - Sorting Layer: Sorting Layer Architecture [User and Item Feature Processing Steps]
mysql8 installation under linux
Weak Banks to data conversion ability?Matt software help solve bank dilemma
【luogu P8031】Kućice(计算几何)
These services can't ali interview?Then don't go to, the basic notification, etc
PR视频剪辑软件教程
为单行查询设置JDBC Statement.setFetchSize()为1的方法指南
【无标题】多集嵌套集合使不再有MultipleBagFetchException
el-input 只能输入整数(包括正数、负数、0)或者只能输入整数(包括正数、负数、0)和小数