当前位置:网站首页>並發編程JUC的AQS底層源碼
並發編程JUC的AQS底層源碼
2022-06-27 08:13:00 【小月亮6】
AQS是JUC的核心,明白AQS基本上JUC下的工具類就會使用:
AQS其實就是CLH隊列(很想雙向鏈錶+state狀態)
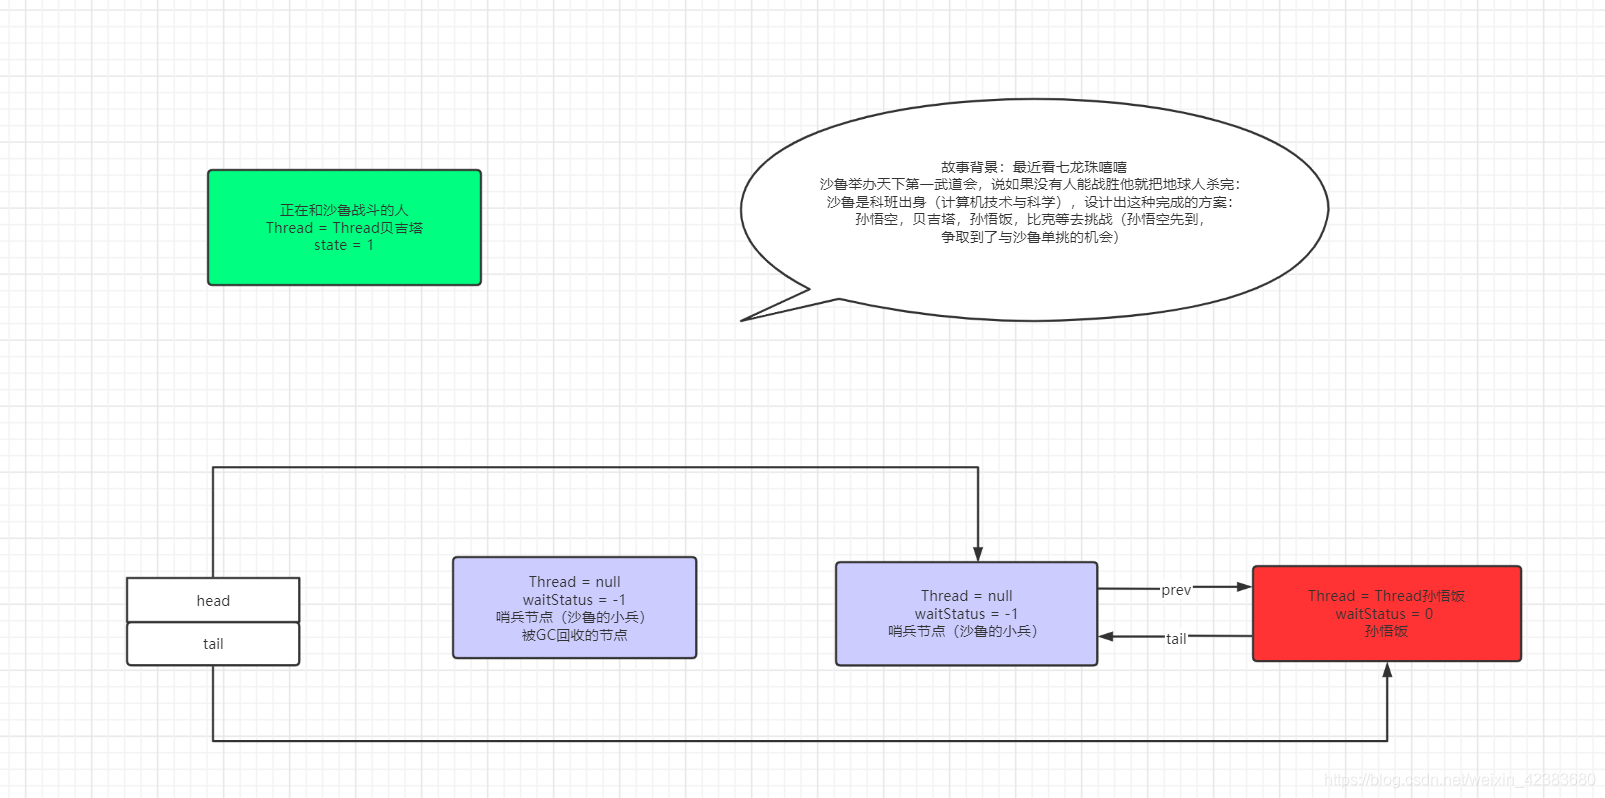
故事背景:最近看七龍珠

以ReentrantLock為例
package JUC;


import java.util.concurrent.TimeUnit;
import java.util.concurrent.locks.ReentrantLock;

public class test {

    public static void main(String[] args) {


        ReentrantLock lock = new ReentrantLock();
        new Thread(() -> {
            lock.lock();
            try {
                System.out.println("沙魯與孫悟空");
                //戰鬥的時間,
                try { TimeUnit.MINUTES.sleep(1); } catch (InterruptedException e) { e.printStackTrace(); }
            }finally {
                lock.unlock();
            }
        },"Thread孫悟空").start();


        new Thread(() -> {
            lock.lock();
            try {
                System.out.println("沙魯與貝吉塔");
                //戰鬥的時間,
                try { TimeUnit.MINUTES.sleep(1); } catch (InterruptedException e) { e.printStackTrace(); }
            }finally {
                lock.unlock();
            }
        },"Thread貝吉塔").start();


        new Thread(() -> {
            lock.lock();
            try {
                System.out.println("沙魯與孫悟飯");
                //戰鬥的時間,
                try { TimeUnit.MINUTES.sleep(1); } catch (InterruptedException e) { e.printStackTrace(); }
            }finally {
                lock.unlock();
            }
        },"Thread孫悟飯").start();

    }
}
簡單說一下:ReentrantLock

//下面 删掉
簡單說一下:AbstractQueuedSynchronizer
public abstract class AbstractQueuedSynchronizer
    extends AbstractOwnableSynchronizer
    implements java.io.Serializable {
    //AbstractOwnableSynchronizer是一個抽象類其實就一個地方用到,後面會有
    private static final long serialVersionUID = 7373984972572414691L;

    /**
     * Creates a new {@code AbstractQueuedSynchronizer} instance
     * with initial synchronization state of zero.
     */
    protected AbstractQueuedSynchronizer() { }

    /**
     * Wait queue node class.
     *

     * <pre>
     *      +------+  prev +-----+       +-----+
     * head |      | <---- |     | <---- |     |  tail
     *      +------+       +-----+       +-----+
     * </pre>


     */


    //這個Node類相當於鏈錶中的節點


    //volatile Node prev; 前指針
    //volatile Node next; 後指針
    //volatile int waitStatus; 節點的狀態
    //後面是删减版


    static final class Node {

        static final Node SHARED = new Node();

        static final Node EXCLUSIVE = null;


        volatile int waitStatus;


        volatile Node prev;


        volatile Node next;

        volatile Thread thread;


        Node nextWaiter;

        final boolean isShared() {
            return nextWaiter == SHARED;
        }


        Node() {    // Used to establish initial head or SHARED marker
        }

        Node(Thread thread, Node mode) {     // Used by addWaiter
            this.nextWaiter = mode;
            this.thread = thread;
        }

        Node(Thread thread, int waitStatus) { // Used by Condition
            this.waitStatus = waitStatus;
            this.thread = thread;
        }
    }

    //這個不屬於鏈錶的,這個算是上下 鏈錶屬於左右,看圖就能明白
    private transient volatile Node head;

    private transient volatile Node tail;
    //這個狀態是   是否有線程占用lock鎖,沒線程占用就可以直接獲得,不需要進入隊列(雙向鏈錶)中等待
    private volatile int state;
a.步驟如下:
Thread孫悟空剛剛來到其他人還沒有來,發現state = 0,可以直接占用

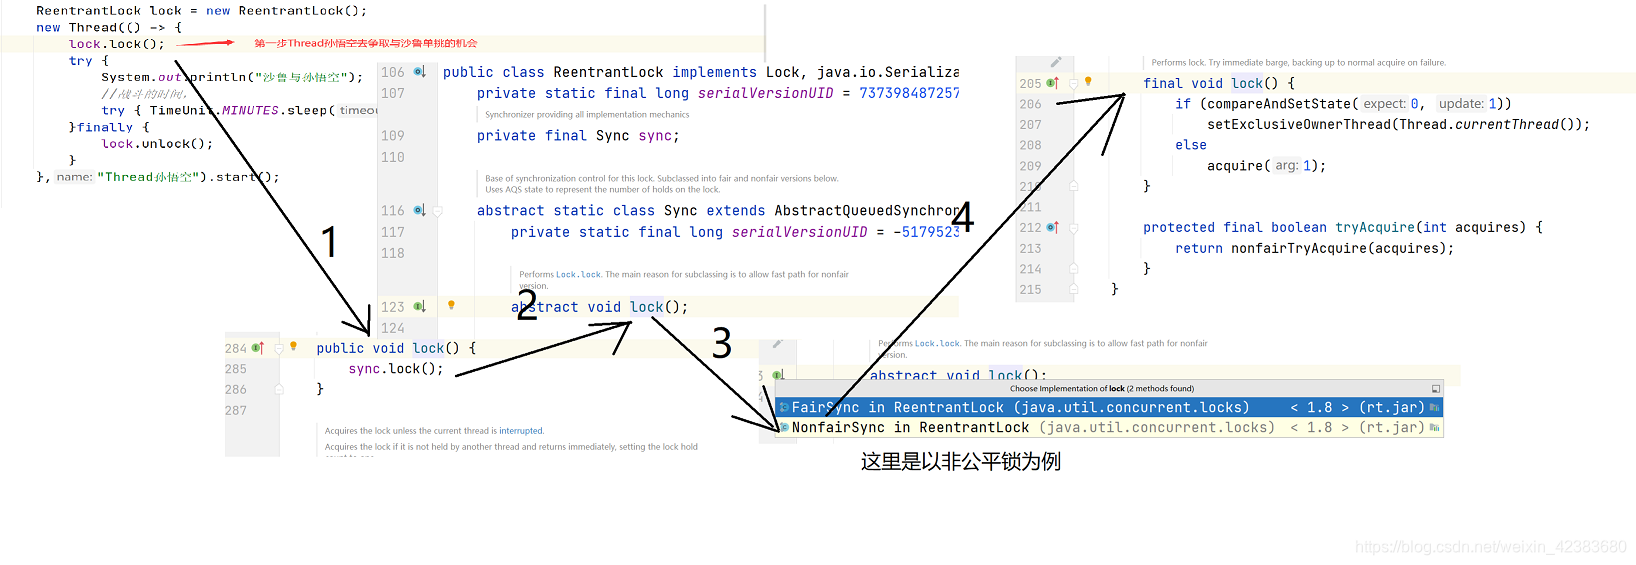
步驟1:lock.lock(),調用ReentrantLock類的lock()方法
步驟2:lock()方法內調用的Sync類的lock方法() 是一個抽象方法 //這個Sync繼承了AbstractQueuedSynchronizer(AQS)
步驟3:lock是抽象方法,有兩個實現方法 一個是公平鎖FairSync(true)一個是非公平鎖NonfairSync(默認是非公平鎖,false 為非公平鎖)
步驟4:非公平鎖的實現,AQS 就是 state + CLH ,當代碼第一次走到這裏時,state = 0
compareAndSetState(0,1) CAS操作,期待state = 0 ,如果為0 把state比較並交換為1 ,設置獨占線程set Exclusive Owner Thread為Thread孫悟空
    protected final void setExclusiveOwnerThread(Thread thread) {
        exclusiveOwnerThread = thread;  //獨占線程 為 Thread 孫悟空
    }
b.步驟如下:
Thread貝吉塔為第二個來到的人,發現沙魯正在和Thread孫悟空正在戰鬥(state = 1),也就是說Thread貝吉塔嘗試獲取lock(沙魯)失敗,進入阻塞隊列中


前三步和Thread孫悟空一樣,第四部CAS失敗if(false) 走 else {
acquire(1); // 這個1 錶示 重複次數,重入鎖與這個數值有關
}裏面,進入第五步

步驟5 acquire方法是AQS內方法,傳參arg為1
步驟6 tryAcquire屬於設計模式中模板設計模式是一個鉤子方法,子類必須實現否則會拋出异常
步驟7 NonfairSync非公平鎖實現,其實就是ReentrantLock(子類)去實現了tryAcquire方法
步驟8 return NonfairTryAcquire(1),方法在ReentrantLock有具體實現過程
步驟9 詳細介紹如下
        final boolean nonfairTryAcquire(int acquires) {

            //獲取當前線程  即Thread貝吉塔
            final Thread current = Thread.currentThread();
            //獲取state的值,現在為1,因為被Thread孫悟空占用
            int c = getState();
            //判斷state 是否為0  當然有可能為0只要在這一時刻Thread孫悟空釋放lock鎖,就可以重啟搶到lock鎖,就是是state的狀態為0時,當然這樣的概率 和中彩票一樣的
            if (c == 0) {
                if (compareAndSetState(0, acquires)) {
                    setExclusiveOwnerThread(current);  //在中彩票的情况下,把獨占線程設置為Thread貝吉塔
                    return true;
                }
            }
            //這裏判斷自己是否是占用lock,如果是自己 state++(加一錶示重入一次),也是ReentrantLock具有可重入性的原因
            else if (current == getExclusiveOwnerThread()) {
                int nextc = c + acquires; //acquires為已經重入多少次
                if (nextc < 0) // overflow
                    throw new Error("Maximum lock count exceeded");

                setState(nextc);
                return true;
            }
            //一般以false結束
            return false;
        }

步驟10:return false的返回結果,!tryAcquire(arg)為true,執行&&acquireQueued(addWaiter(Node.EXCLUSIVE),arg) 當然先執 addWaiter(Node.EXCLUSIVE)
步驟11:執行addWaiter
    private Node addWaiter(Node mode) {
        //這個node為當前線程,第一次執行為node為Thread貝吉塔
        Node node = new Node(Thread.currentThread(), mode);
        // Try the fast path of enq; backup to full enq on failure
        //第一次執行時,tail為null ,因為現在CLH還沒有真正連接,所以CLH的tail指向為null
        Node pred = tail;
        if (pred != null) {
            node.prev = pred;
            if (compareAndSetTail(pred, node)) {
                pred.next = node;
                return node;
            }
        }
        //第一次執行直接會跳到這裏
        enq(node);
        return node;
    }
步驟12: enq入隊操作
這個就是很優雅的代碼,是形成CLH隊列的代碼
    private Node enq(final Node node) {
        for (;;) {


            //第一次執行tail為null,所以t為null


            //::::第二次 t = head = tail
            Node t = tail;
            if (t == null) { // Must initialize
                //compareAndSetHead(new Node())
                //new Node()為哨兵節點
                if (compareAndSetHead(new Node()))   // 這裏就是設置一個new Node() 為Head,


              //下面這三行代碼是我截取的compareAndSetHead 下面的代碼
              /*
              private final boolean compareAndSetHead(Node update) {
              return unsafe.compareAndSwapObject(this, headOffset, null, update);
              }

              */
                    //第一次執行是tail的地址和head的地址完全相等

                    tail = head;

            } else {
                //::::node.prev = head 就是node的前指針指向head (Thread貝吉塔 的prev 的前指針指向 head(head 為一個哨兵節點))
                node.prev = t;  //只有第一次head == tail (當只存在哨兵節點時),後面tail隊列中最後一比特Node節點
                //::::設置tail為node地址,這裏和第一次不一樣
                if (compareAndSetTail(t, node)) { /* cas 一定為比較並交換 這裏我猜是發生了

                 完全看不懂下面的代碼,只有tail.next = node 這樣才能形成 CLH 隊列
                 private final boolean compareAndSetTail(Node expect, Node update) {
                 return unsafe.compareAndSwapObject(this, tailOffset, expect, update);
                 }

                                     */
                    //::::t.next = tail
                    t.next = node;  //tail 指向 node 節點
                    return t;
                }
            }
        }
    }
步驟13:
acquireQueued(final Node node, int arg) {} final boolean acquireQueued(final Node node, int arg) {
boolean failed = true;
try {
boolean interrupted = false;
for (;;) {
//取Thread貝吉塔的前置Node(這裏是哨兵節點)
final Node p = node.predecessor();
//tryAcquire(arg)再次嘗試獲取lock,這裏
if (p == head && tryAcquire(arg)) {
setHead(node); //這個在unpark下執行 他寫的代碼是真的優雅,這個如果線程貝吉塔獲得 lock 那麼讓哨兵節點的next指向 null
p.next = null; // help GC
failed = false;
return interrupted;
}
if (shouldParkAfterFailedAcquire(p, node) &&
parkAndCheckInterrupt())
interrupted = true;
}
} finally {
if (failed)
cancelAcquire(node);
}
}
步驟14:
       //獲取node前一個節點,Thread貝吉塔的前一個節點為哨兵節點
       final Node predecessor() throws NullPointerException {
            Node p = prev;
            //不存在會拋出异常
            if (p == null)
                throw new NullPointerException();
            else
                return p;
        }
步驟15: 第一次,把ws的值變成了-1
    private static boolean shouldParkAfterFailedAcquire(Node pred, Node node) {
        //::::錶示第二次,看步驟13就知道在for循環內

        //第一次ws = 0;
        int ws = pred.waitStatus;
        if (ws == Node.SIGNAL)  //Node.SIGNAL 為-1
            //::::第二次返回true
            /*
             * This node has already set status asking a release
             * to signal it, so it can safely park.
             */
            return true;
        if (ws > 0) {
            /*
             * Predecessor was cancelled. Skip over predecessors and
             * indicate retry.
             */
            do {
                node.prev = pred = pred.prev;
            } while (pred.waitStatus > 0);
            pred.next = node;
        } else {
            /*
             * waitStatus must be 0 or PROPAGATE.  Indicate that we
             * need a signal, but don't park yet.  Caller will need to
             * retry to make sure it cannot acquire before parking.
             */
            //第一次,把ws的值變成了-1
            compareAndSetWaitStatus(pred, ws, Node.SIGNAL);
        }
        return false;
    }
步驟16: 阻塞Thread線程
    private final boolean parkAndCheckInterrupt() {
        //Thread貝吉塔被park阻塞,休眠中(這個是關鍵點,後面怎樣喚醒Thread貝吉塔線程才是關鍵)
        LockSupport.park(this);
        return Thread.interrupted();
    }
同理:Thread孫悟飯也會加入阻塞隊列中
接下來就是lock.unlock()階段,當Thread孫悟空釋放lock(不在於沙魯戰鬥時),Thread貝吉塔和Thread孫悟飯線程獲得lock的呢
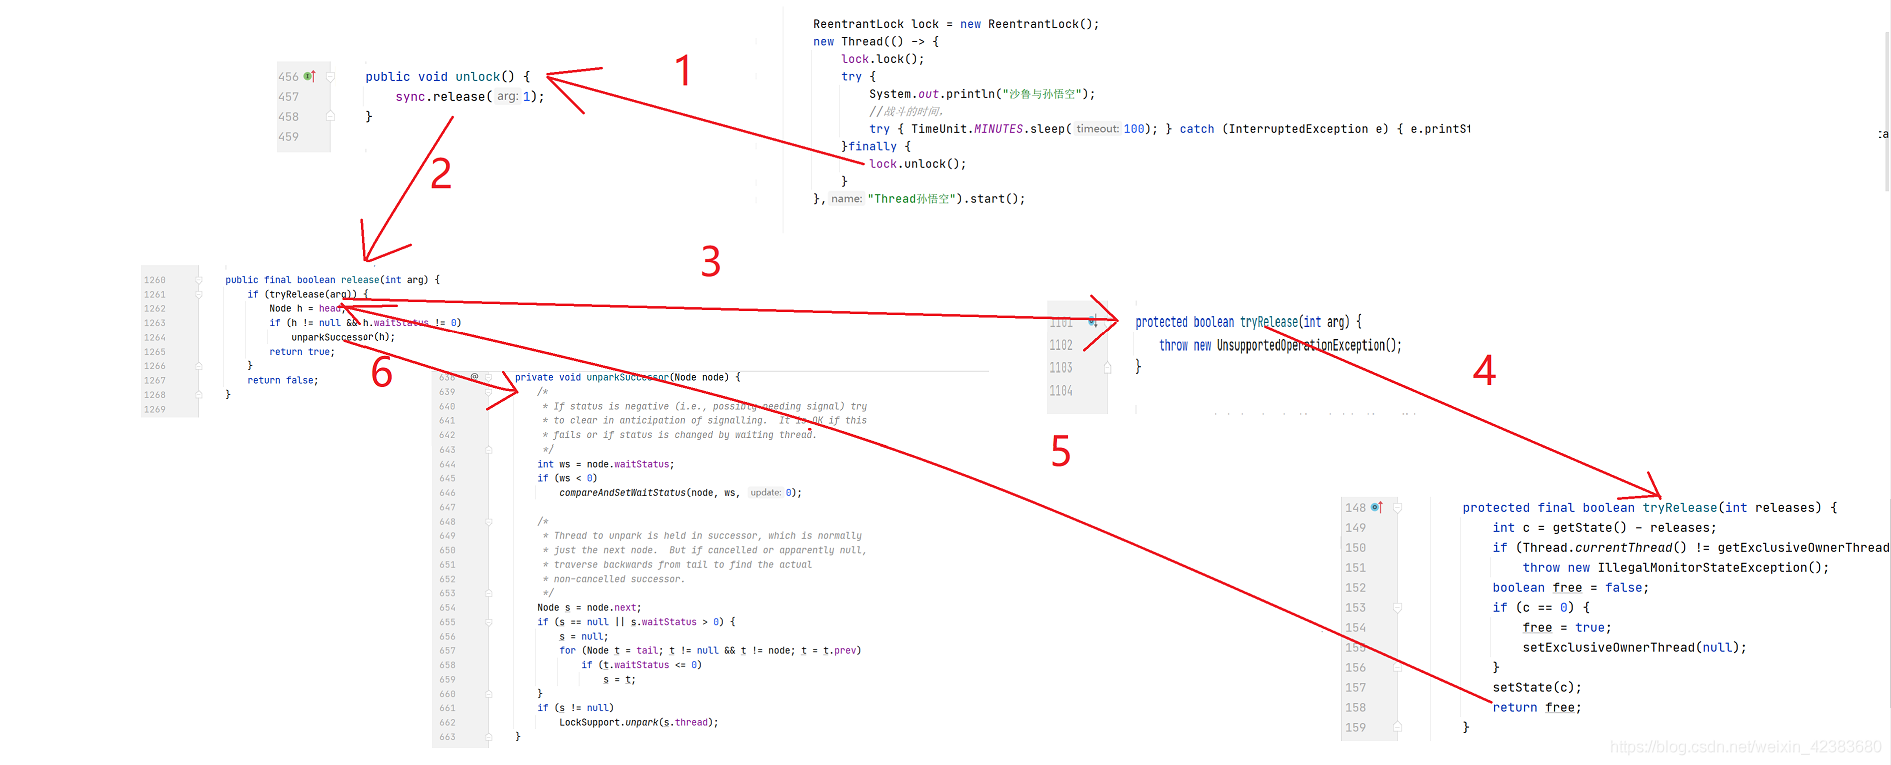
步驟1:調用sync.release(1)
步驟2: 調用tryRelease(1)
步驟3: 調用
UnsupportedOperationException(); 這個是模板方法,必須在子類中實現
步驟4 :tryRelease
        protected final boolean tryRelease(int releases) {
            //getState就是與state的值,releases = 1 所以c等於0
            int c = getState() - releases;
            if (Thread.currentThread() != getExclusiveOwnerThread())
                throw new IllegalMonitorStateException();
            boolean free = false;
            if (c == 0) {
                free = true;
                //設置占用Lock為null state = 0,這樣就可以有其他線程獲得鎖了(與沙魯戰鬥的資格)
                setExclusiveOwnerThread(null);
            }
            //設置state為0
            setState(c);
            return free; //返回true
        }
步驟5返回true
    public final boolean release(int arg) {
        if (tryRelease(arg)) { //返回true
            //h為哨兵節點
            Node h = head;
            if (h != null && h.waitStatus != 0)
                //上面條件都成立
                unparkSuccessor(h);
            return true;
        }
        return false;
    }
步驟6:
    private void unparkSuccessor(Node node) {
        /*
         * If status is negative (i.e., possibly needing signal) try
         * to clear in anticipation of signalling.  It is OK if this
         * fails or if status is changed by waiting thread.
         */
        int ws = node.waitStatus;
        if (ws < 0)
            //這裏哨兵節點status變成了0
            compareAndSetWaitStatus(node, ws, 0);

        /*
         * Thread to unpark is held in successor, which is normally
         * just the next node.  But if cancelled or apparently null,
         * traverse backwards from tail to find the actual
         * non-cancelled successor.
         */
        //s 為Thread貝吉塔
        Node s = node.next;
        if (s == null || s.waitStatus > 0) {
            s = null;
            for (Node t = tail; t != null && t != node; t = t.prev)
                if (t.waitStatus <= 0)
                    s = t;
        }
        //這個if成立,unpark(Thread貝吉塔)
        if (s != null)
            LockSupport.unpark(s.thread);
    }
回到lock的 步驟16:Thread貝吉塔成功被喚醒

步驟17:
    final boolean acquireQueued(final Node node, int arg) {
        boolean failed = true;
        try {
            boolean interrupted = false;
            for (;;) {
                final Node p = node.predecessor();
                //lock步驟6、7、8、9 先看一下下面的解析
                if (p == head && tryAcquire(arg)) {
                    //設置head指向node
            /*
                    這裏直接吧setHead方法複制過來了

                    private void setHead(Node node) {
                    //設置head為node(說指向也可以,感覺都能理解,head指向node就是Thread貝吉塔(之前用用過的)地址變成了哨兵節點,當然真正的Thread貝吉塔已經搶到了lock(正在和沙魯戰鬥))
                    head = node;
                    //徹底變為null
                    node.thread = null;
                    node.prev = null;
                    }

            */
                   setHead(node);
                    //p為以前的哨兵節點.next說明被斷開,這個哨兵已經不合任何節點相連
                    p.next = null; // help GC  GC垃圾回收  斷開哨兵節點的next為null ,GC root 為空,在GC時會被回收
                    failed = false;
                    return interrupted;
                }
                if (shouldParkAfterFailedAcquire(p, node) &&
                    parkAndCheckInterrupt())
                    interrupted = true;
            }
        } finally {
            if (failed)
                cancelAcquire(node);
        }
    }
步驟17會用到lock步驟6、7、8、9,這裏不粘貼圖了
        final boolean nonfairTryAcquire(int acquires) {
            final Thread current = Thread.currentThread();
            int c = getState();
            if (c == 0) {
                //設置state =1
                if (compareAndSetState(0, acquires)) {
                    //lock的占用線程為Thread貝吉塔
                    setExclusiveOwnerThread(current);
                    return true;
                }
            }
            else if (current == getExclusiveOwnerThread()) {
                int nextc = c + acquires;
                if (nextc < 0) // overflow
                    throw new Error("Maximum lock count exceeded");
                setState(nextc);
                return true;
            }
            return false;
        }
整個故事就是這樣
為什麼是非公平鎖,似乎是公平的呀,因為後面來的線程有可能比先來的tryAcquire獲得鎖,我理解是這樣,存在問題請指出
边栏推荐
- c的时间函数算效率
- 【每日一练】产品卡片动画效果的实现
- lvgl使用demo及说明2
- js用switch输出成绩是否合格
- The 6th Blue Bridge Cup
- lvgl 说明3关于lvgl guider的使用
- Helix QAC更新至2022.1版本,将持续提供高标准合规覆盖率
- Time function calculation efficiency of C
- 【10. 差分】
- After working in a large factory for ten years with an annual salary of 400000 yuan, I was suddenly laid off. If the company wanted to abandon you, it wouldn't leave any kindness
猜你喜欢

All tutor information on one page

野風藥業IPO被終止:曾擬募資5.4億 實控人俞蘠曾進行P2P投資

索引+sql练习优化
![[batch dos-cmd command - summary and summary] - map folder to virtual disk - subst](/img/09/cd12c276392d3465dce1909d0f86a6.png)
[batch dos-cmd command - summary and summary] - map folder to virtual disk - subst

Recognize the ordering of O (nlogn)

Refer to | the computer cannot access the Internet after the hotspot is turned on in win11

Common operation and Principle Exploration of stream
How to view program running time (timer) in JS
![[12. maximum continuous non repeating subsequence]](/img/eb/230cd6062e28374c86863f2122e43b.png)
[12. maximum continuous non repeating subsequence]

Mysql事务中MVCC理解超简单
随机推荐
Etcd教程 — 第五章 Etcd之etcdctl的使用
JS performance reward and punishment examples
Cookie encryption 6
win10-如何管理开机启动项?
c的时间函数算效率
Time function calculation efficiency of C
js用switch输出成绩是否合格
Game asset reuse: a new way to find required game assets faster
Lvgl description 3 about the use of lvgl Guide
Cookie encryption 7 fidder analysis phase
L'introduction en bourse de Wild Wind Pharmaceutical a pris fin: Yu pinzeng, qui avait l'intention de lever 540 millions de RMB, a effectué un investissement P2P.
(原创)自定义Drawable
MySQL环境变量配置的教程
2022爱分析· IT运维厂商全景报告
js成绩奖惩例题
JS to determine whether the number entered by the user is a prime number (multiple methods)
【批处理DOS-CMD命令-汇总和小结】-将文件夹映射成虚拟磁盘——subst
JS EventListener
【每日一练】产品卡片动画效果的实现
认识O(NlogN)的排序