当前位置:网站首页>Servlet knowledge explanation (2)
Servlet knowledge explanation (2)
2022-06-12 15:24:00 【xiaoweiwei99】
List of articles
- One 、Cookie and Session
- Two 、 Upload files (Part class )
- 3、 ... and 、 template engine
- 1. Experience the way of string splicing
- 2. use Thymeleaf To achieve a simple page
- 3. Realization web Guessing numbers in version
- 4. Summary of specific code for implementing template engine
- 5. Thymeleaf Template syntax and core classes
- 6. be based on th:each Realize the display of telephone number
- 7. Template engine fixed routine
- 8. ServletContext
- 9. Realize online photo album
One 、Cookie and Session
1. Cookie and Session Introduction to
Cookie yes HTTP An important field in the protocol , At the same time, it is also a relatively old way for browsers and clients to save data .
Cookie Come from ? Server generated , adopt HTTP Respond to Of set-Cookie Field to set , Back to browser .
Cookie How to save ? Store... On the browser side , The browser will be based on the domain name / Address , To store... Separately Cookie.
Cookie Where to ? Will be automatically added to the request in the next request , To the server .
Cookie What's in it ? It's a string , Is a string of key value pair structures , The key value pairs here are customized by programmers .
Session be called “ conversation ”,HTTP agreement , Itself is stateless .
Stateless means : A user A, Made two requests to the server , First request and second request , For servers , You can't perceive the relationship . But it's actually being developed , And need to be in a state , After the user logs in , When you visit this website later , You need to know the user's identity information .
Session Is stored in the server , You can simply put Session Think of it as a hash surface ,key Namely sessionId,value Is the data defined by the programmer ( It can store the user's identity information ), The following will implement a Session, Feel it for yourself .
Cookie and Session They need to cooperate with each other .
2. Browser and server usage Cookie and Session Interaction logic of

The key point of this picture is : The server can know which user sent the second request , And update the data according to the user information .
Detailed process :
Such as : First, after the user logs in , Because the corresponding... Is not stored in the server sessionId, So assign it sessionId,value Save its user name, password and other information in , There are... In the response Set-Cookie Field to tell the browser , The user's session Why what . When the user clicks on the shopping cart , The browser is holding Cookie( contain sessionId) To server , The server will be based on the sessionId Go find , Find the corresponding sessionId after , Take out value Inside userId, According to userId Go to the database to find , Find out the designation userId Shopping cart data for .
The above is just a typical login process , Except that the server is Set-Cookie put sessionId Outside , In fact, you can not let go sessionId, Instead, you can serialize user information directly , adopt Set-Cookie Back to the browser , It's also possible .
Just connect the two requests of the browser , It doesn't have to be sessionId, It can also be userId, It could be something else ID, It's all right .
Use sessionId It's just a common practice , The advantage of this is , It's easy to implement “ logout “. Put... On the server side session Delete the corresponding key value pair in the hash table . return sessionId It also helps protect users' privacy .
Here say cookie and session The linkage of , It is mainly implemented for mainstream web pages . If it is a more recent page , The implementation can be completely independent of cookie,cookie The purpose of existence is to store... Locally on the browser side . You can also use localStorage and indexDB Instead of cookie .
3. Yes Cookie and Session Operation of the API
The above is all about some theoretical knowledge , But with the previous theory , understand Cookie and Session Interaction process of , We can better reflect in the code .
Servlet Most of the above processes have been encapsulated in , In fact, the process of our operation is not very much , Just a few simple API Call .
The core approach :
HttpServletRequest Related methods in class ( Commonly used )
Method
describe
HttpSession getSession()
Get the session in the server . If the parameter is true, Create a new session when there is no session ; If the parameter is false, Returns... When there is no session null
Cookie[] getCookies()
Returns an array , Contains all of the Cookie object . Will automatically Cookie The format in is parsed into key value pairs
HttpServletResponse Related methods in class
Method
describe
void addCookie(Cookie cookie)
The specified cookie Add to response
HttpSession Related methods in class ( Commonly used )
One HttpSession Object contains multiple key value pairs . We can go to HttpSession Store any information we need .
Method
describe
Object getAttribute(String name)
The method returns the value in the session The object with the specified name in the session , If there is no object with the specified name , Then return to null
void setAttribute(String name, Object value)
This method binds an object to the object with the specified name session conversation
boolean isNew()
Determine whether the current session is a newly created session
Originally sessionId and value It's a key value pair , And one of the value Namely HttpSession ,HttpSession The key value pairs are stored in the , In this class key and value It's all defined by the programmer himself , The reason why we use key value pairs to represent HttpSession, Is to facilitate programmers to customize data .
4. Simple user login
front end :
    <form action="login" method="POST">
         user name :<input type="text" name="username">
        <br>
         password :<input type="text" name="password">
        <br>
        <input type="submit" value=" Sign in ">
    </form>
page :
Back end :
Realization LoginServlet class
@WebServlet("/login")
public class LoginServlet extends HttpServlet {
    @Override
    protected void doPost(HttpServletRequest req, HttpServletResponse resp) throws ServletException, IOException {
        resp.setContentType("text/html; charset=utf-8");
        // 1.  Start with the requested  body  Read from   user name   and   password
        String username = req.getParameter("username");
        String password = req.getParameter("password");
        // 2.  Determine whether the user name and password are correct ( Don't read the database here ,  Direct fixed user name and password ,  Namely  zhangsan 123
        if (!"zhangsan".equals(username) || !"123".equals(password)) {
            //  Login failed !!
            resp.getWriter().write(" Login failed !");
            return;
        }
        System.out.println(" Login successful ");
        // 3.  Login successful ,  Then create a session to ~,  If the session does not exist, create
        //     The session is based on... In the request  sessionId  Here we are . sessionId  yes   stay  Cookie  Medium .
        //     But this is your first login ,  At this time, there is no... In the request  Cookie (Cookie  Is returned by the server )
        //     This will trigger  " Create if you can't find it "  This process ~
        //     At the same time, the operation here :  First create a  HttpSession  object ( As  value)
        //     Regenerate into a random string ,  As  sessionId ( As  key)
        //     Put this  key  and  value  Insert into  hash  In the table ~~
        //     At the same time, this generated  sessionId  adopt  Set-Cookie  Field is returned to the browser
        HttpSession httpSession = req.getSession(true);
        //     You can also store customized data in the program ,  Can store identity information ( User name and login times )
        httpSession.setAttribute("username", "zhangsan");
        httpSession.setAttribute("loginCount", 0);
        // After successful login , It was created. HttpSession object , At the same time sessionId
        // 4.  Let the page Jump to the home page ,  It can be realized by redirection
        resp.sendRedirect("index");
    }
}
Realization IndexServlet class :
@WebServlet("/index")
public class IndexServlet extends HttpServlet {
    @Override
    protected void doGet(HttpServletRequest req, HttpServletResponse resp) throws ServletException, IOException {
        //  According to... In the current user request  sessionId,  Get user information ,  And display it on the page .
        resp.setContentType("text/html; charset=utf-8");
        // 1.  Determine whether the current user has logged in . ( Is there any... In the request  sessionId,  as well as  sessionId  Is it legal )
        //     If the session does not exist ,  You can't create it ~  Just search ,  Not sign in
        HttpSession httpSession = req.getSession(false);
        if (httpSession == null) {
            //  Currently no legal session found ,  The current user is not logged in ,  Redirect to  login.html,  Let users log in
            resp.sendRedirect("login.html");
            return;
        }
        // 2.  If the user is already logged in ,  You can start from  HttpSession  Got the user information in .
        String username = (String) httpSession.getAttribute("username");
        Integer loginCount = (Integer) httpSession.getAttribute("loginCount");
        loginCount = loginCount + 1;
        httpSession.setAttribute("loginCount", loginCount);
        // 3.  Return to one  HTML  page
        StringBuilder html = new StringBuilder();
        html.append("<div> user : " + username + "</div>");
        html.append("<div> Number of visits : " + loginCount + "</div>");
        resp.getWriter().write(html.toString());
    }
}
When you log in for the first time , Back on the page is ( The user name and password entered must be correct ):
The above code needs to pay attention to :
The first interaction between the client and the server , It's a login request :
request :
Respond to :
There is also an important header Field :
It's this redirection , Triggered a second interaction between the browser and the server .
The second interaction : It's a request to visit the home page .
request :Cookie Inside value With the first interaction Set-Cookie Of value It's the same value .
Respond to :
First line and body:
Two 、 Upload files (Part class )
Uploading files is also a common requirement in daily development . stay Servlet Also supported in .
The core approach :
HttpServletRequest Class method
Method
describe
Part getPart(String name)
Gets the value given in the request name The file of
Collection< Part> getParts()
Get all the files
Part Class method
Method
describe
String getSubmittedFileName()
Get the submitted file name
String getContentType()
Get the file type submitted
long getSize()
Get file size
void write(String path)
Write the submitted file data to the disk file
The front end : Simply set up a selection file , And submit .( Write a upload Code , contain form Forms , Users can choose files )
notes :action Medium upload Is with the Java In code @WebServlet The notes are the same ( Get rid of / ),method Is the method of pressing the submit button ,enctype It is an important attribute to be set for uploading files , Because this is uploaded as a file , select multipart/form-data .input Inside the label type The attribute is file , Is to find the address to choose the file ;name Properties and Java In code getPart Method The parameter names in the are consistent .
    <form action="upload" method="POST" enctype="multipart/form-data">
        <input type="file" name="MyImage">
        <input type="submit" value=" Submit pictures ">
    </form>

Back end code :( Create a UploadServlet, To handle the page submission just now form Forms )
notes : Use to Servlet To handle uploaded files , You need to add... At the beginning @MultipartConfig This note , Add this note ,Servlet To correctly read the contents of the file in the request .Part It is the key class to process and obtain file information , There are many methods to process and obtain the information of files .
@MultipartConfig
@WebServlet("/upload")
public class UploadServlet extends HttpServlet {
    @Override
    protected void doPost(HttpServletRequest req, HttpServletResponse resp) throws ServletException, IOException {
        Part part = req.getPart("MyImage");// Parameters and html in input Of file Type of name Match
        System.out.println(part.getSubmittedFileName());// Get the real file name
        System.out.println(part.getContentType());// Get file format type
        System.out.println(part.getSize());// Get file size
        part.write("c:/tmp/image.jpg");// Where to put the incoming file , And rename to image.jpg
        resp.getWriter().write("upload ok");// Response returned
    }
}
The response result processed by the server :
without @MultipartConfig notes , Submit the document at this time , An exception will appear :
Under normal circumstances , Let's grab the bag , To view the POST In bag body, Is the content of the picture , You can see that it is converted to binary , We can't understand .
Download the file , Just read the file from the disk , Put it in body Then you can ,Content-Type It can also be set according to the type of file , If it is a picture type , Set it to jpg Format ; If it is audio type , Set it to mp3 Format .
3、 ... and 、 template engine
Servlet It's just front and back-end interaction API ,Servlet Not care , What is the page returned by the server . for example : We query different query words in the browser , The results returned by the page are also different , It shows that this page is dynamic .
So many times , You need to return a to the front end html page , At the same time, I hope ,html Some of the contents are calculated ( This HTML It's not a static page , But dynamically variable )
Using a template engine , Can complete this dynamic work . If there is no template engine , To return a html , String splicing is usually used for .
1. Experience the way of string splicing
When accessing the server's page from the client ,query string There should be name=? The key/value pair .
@WebServlet("/html")
public class HtmlServlet extends HttpServlet {
    @Override
    protected void doGet(HttpServletRequest req, HttpServletResponse resp) throws ServletException, IOException {
        //  A request came from  query string,  Here's a parameter ,  be called name.
        //  In the returned page ,  Including this  name  Value
        //  In the user's request  name  Different ,  The returned page is different
        String name = req.getParameter("name");
        resp.setContentType("text/html; charset=utf-8");
        StringBuilder html = new StringBuilder();
        html.append("<html>");
        html.append("<head><title> title </title></head>");
        html.append("<body>");
        html.append("<h3>" + name + "</h3>");
        html.append("</body>");
        html.append("</html>");
        resp.getWriter().write(html.toString());
    }
}
If the address of the access server is :127.0.0.1:8080/20220413/html?name=lisi, Then the page returned by the server is :
Go to the source code , You will find that it is closer to the standard format html 了 .
2. use Thymeleaf To achieve a simple page
front end :
<!DOCTYPE html>
<html lang="en">
<head>
<meta charset="UTF-8">
<meta http-equiv="X-UA-Compatible" content="IE=edge">
<meta name="viewport" content="width=device-width, initial-scale=1.0">
<title>thymeleaf Example </title>
</head>
<body>
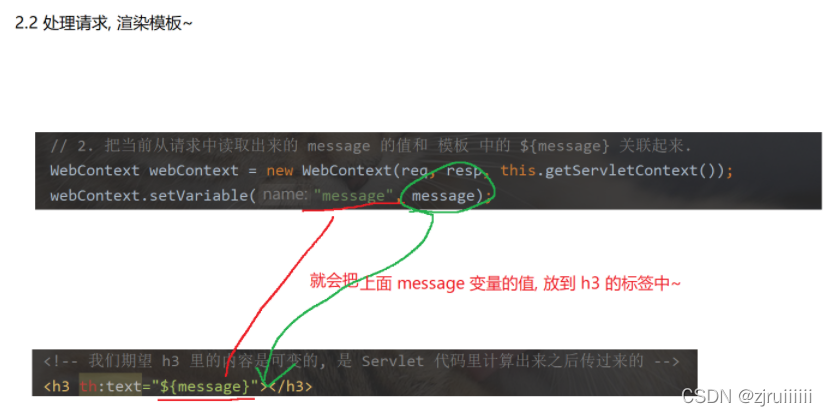
<!-- We expect h3 The content in is variable , yes Servlet It was calculated in the code and then transmitted -->
<h3 th:text="${message}"></h3>
</body>
</html>
Back end :
@WebServlet("/helloThymeleaf")
public class HelloThymeleafServlet extends HttpServlet {
    private TemplateEngine engine = new TemplateEngine();

    @Override
    public void init() throws ServletException {
        //  complete  Thymeleaf  Initialization of

        //  Create a   Template parser   object
        ServletContextTemplateResolver resolver = new ServletContextTemplateResolver(this.getServletContext());
        //  Let the template parser ,  To load the template file .  The prefix here indicates the directory where the template file is located .  Because of that ,  The template file must be placed in  WEB-INF  Directory
        //  The prefix and suffix set here ,  Is to tell the template engine ,  Which files to load into memory ,  For later use .
        resolver.setPrefix("/WEB-INF/template/");
        resolver.setSuffix(".html");
        resolver.setCharacterEncoding("utf-8");
        //  Put the parser object ,  Set to  engine  In the object .
        engine.setTemplateResolver(resolver);
    }

    @Override
    protected void doGet(HttpServletRequest req, HttpServletResponse resp) throws ServletException, IOException {
        // 0.  When performing template rendering ( Put the template just written html In the code  message  Variable to replace ) Before ,  You need to initialize first ~
        //     The initialization operation only needs to be performed once .  Put it in  init  Method
        // 1.  First, read out the data to be transmitted by the user from the parameters  message  Value . ( from  query string  Read from )
        String message = req.getParameter("message");
        // 2.  The current read from the request  message  The value of and   Templates   Medium  ${message}  Connect .
        WebContext webContext = new WebContext(req, resp, this.getServletContext());
        webContext.setVariable("message", message);
        // 3.  Make the final rendering .
        String html = engine.process("hello", webContext);
        System.out.println(html);
        resp.getWriter().write(html);
    }
}
Just bring it when accessing the server query string,query string by message= what , then getParameter To get message Value after . Then you can return to the front end message value (webContext.setVariable("message", message);),String html = engine.process("hello", webContext); Rendering . Therefore, the page will be based on the time of accessing the server , Take with you query string The variables in the message, According to message To return different pages .
Last call process Is to perform variable replacement , The first parameter inside is html Page prefix , No suffix , And the second variable is webContext, There can also be a third variable , If you don't want to print the last html, You can pass the third variable as resp.getWriter().write() .

Printed in the server console html, Original html Compare :
3. Realization web Guessing numbers in version
1. Agree on the way of front-end and back-end interaction :
GET( Method ) /guessNum( route ) .
Through this request , To get a page ( The page contains the basic interface of numbers , The server is initialized at the same time ( Let the server generate a 1-100 Between the numbers to guess )).
The response content is a page .
POST( Method ) /guessNum( route )
The process of dealing with a guess , There is one on the page Input box , There's also a submit button , Click Submit button , Will give the input data to the server . After the server receives this data , Judge whether the current figure is right , Return to a page , The returned page contains Guess big / Guess small / Guess right .
2. Create a GuessNumServlet class .
a) Implement one first doGet Method , To handle the first interaction interface .
b) One more doPost Method , To handle the second interaction interface .
The above uses string splicing , It's very troublesome , If there are more labels , It's going to be messy . When something goes wrong , It's also hard to find mistakes . Therefore, using string splicing is very bad for development .
At this point, a template engine ——Thymeleaf, This is Spring It specifies the template engine to be used , Although he is not the best , Even some trouble , But in order to learn it first , Go back and learn Spring It'll be much simpler when .
template engine , Let's write a separate html file , A fixed place can remain the same , And some special symbols are used to occupy places that are not fixed , When the program is running , Just replace the placeholder .
a) First , First import... In the central warehouse Thymeleaf This package , You can choose a less new version , take jar Package is copied to the pom.xml in .
b) First write a template file ( It's just one. HTML , But I just gave some variable data separately ), The format is as follows :th:text=“${ Variable }” ,th Namely thymeleaf Abbreviation , This attribute is thmeleaf Provided by the ,text Indicates that the type inside is a string . Inside the brackets is a specific variable , You can go to Java In the code , Fill in the value of this variable .
c) stay webapp Of WEB-INF In the folder of , Create another template Folder , Create the following in the folder html .
The front-end code :
<body>
    <form action="guessNum" method="POST">
        <input type="text" name="num">
        <input type="submit" value=" Guess the number ">
    </form>

    <!--  This  th:if  It is a logic of conditional display . if  The following expression is   really   Just show the label inside .  If the expression is   false   Do not show  -->
    <div th:if="${!newGame}">
        <!--  These two codes ,  You have to guess before it appears ,  When starting a new game, it doesn't show . -->
        <div th:text="${result}"></div>
        <div th:text="${count}"></div>
    </div>
</body>
Back end code :
a) To write Servlet Code , Create a HelloThymeleafServlet , stay doGet In the method , Just return the template just now .
b) TemplateEngine yes Thymeleaf The core class in ,Template Is a template ,Engine It's the engine .
c) Create a template parser object , collocation ServletContext To use .
Context Translate into “ Context ”, Such as Context Path . every last webapp There's one in each Context, One webapp There can be more than one Servlet, these Servlet share Context object . This Context The object is Tomcat load webapps The object created when .Tomcat stay webapps There are more than one in the catalog webapp, Every webapp Will create a corresponding Context object .ServletContext The meaning of being is Let the same webapp The multiple Servlet Can share data between .
In a webapp There's nothing in it Servlet Class , Both can pass getServletContext Get this Context object .
@WebServlet("/guessNum")
public class GuessNumServlet extends HttpServlet {
    private TemplateEngine engine = new TemplateEngine();

    // toGuess  The number to guess
    private int toGuess = 0;
    // count  Indicates the number of times to guess
    private int count = 0;

    @Override
    public void init() throws ServletException {
        //  Initialize the template engine
        ServletContextTemplateResolver resolver = new ServletContextTemplateResolver(this.getServletContext());
        resolver.setPrefix("/WEB-INF/template/");
        resolver.setSuffix(".html");
        resolver.setCharacterEncoding("utf-8");
        engine.setTemplateResolver(resolver);
    }

    //  Get the initial situation of the page ,  And initialize ,  Generate a number to guess
    @Override
    protected void doGet(HttpServletRequest req, HttpServletResponse resp) throws ServletException, IOException {
        resp.setContentType("text/html; charset=utf-8");
        // 1.  Sir, it's a number to be guessed
        Random random = new Random();
        // [0, 100) + 1 => [1, 100]
        toGuess = random.nextInt(100) + 1;
        count = 0;
        // 2.  Return to a page .
        //     Here is to start a new game
        WebContext webContext = new WebContext(req, resp, getServletContext());
        webContext.setVariable("newGame", true);
        engine.process("guessNum", webContext, resp.getWriter());
    }

    //  The process of dealing with a guess
    @Override
    protected void doPost(HttpServletRequest req, HttpServletResponse resp) throws ServletException, IOException {
        resp.setContentType("text/html; charset=utf-8");
        // 1.  From the request ,  Read the content of the number submitted by the user
        String parameter = req.getParameter("num");
        int num = Integer.parseInt(parameter);
        String result = "";
        // 2.  and  toGuess  Compare
        if (num < toGuess) {
            result = " Guess low ";
        } else if (num > toGuess) {
            result = " Guess high ";
        } else {
            result = " Guessed it ";
        }
        // 3.  Increase the number of guesses
        count++;
        // 4.  Construct a result page ,  Can display the current guess result .
        WebContext webContext = new WebContext(req, resp, getServletContext());
        webContext.setVariable("newGame", false);
        webContext.setVariable("result", result);
        webContext.setVariable("count", count);
        engine.process("guessNum", webContext, resp.getWriter());
    }
}
One of the details is , Guess the number hint Guess big, guess small, guess right and Number of guesses Not from the beginning , But only after guessing for the first time . Because... Is set in the front end th:if=${"newGame"}, yes Thymeleaf Judgment grammar in . And in the Java In the code , Because accessing the server is GET Method , So in doGet Method will be newGame Property is set to true, The user inputs the guessed number to the server for processing , yes POST Method , So in doPost method newGame Attribute is set to false, To enter the display of right and wrong guesses and times .
4. Summary of specific code for implementing template engine
Thymeleaf Important classes in / Concept :
1.TemplateEngine Ontology of template engine , The function is to render templates .
2.WebContext Is a key value pair structure ,(Thymeleaf Is represented by a special class , Many other template engines just take one directly hash surface To express ). In the template ${message} and Java The variables in the .
3.ServletContextTemplateResolver Analog parser . The function is to load the template file , Then tell TemplateEngine What are the template files .
Approximate process : The soup does not change the dressing 
The biggest advantage of template engine , Is to make Java Code and Interface HTML The code is separated .
5. Thymeleaf Template syntax and core classes
Common grammar :
command
function
th:text
Display the text content of the expression evaluation result in the label body
th:[HTML Tag attributes ]
Set up any HTML The value of the tag property
th:if
When the result of the expression is true, the content is displayed , Otherwise it doesn't show
th:each
Loop through elements
th:text and th:if We've all used it , and th:[HTML Tag attributes ] Usage of : If it is img label , There's a src attribute , If we want to pass Thymeleaf Java Code to set src Value , You can write in the template :th:src=${url} , Similarly , Common image a In the label href attribute 、input Labeled value Properties, etc .
th:each It's loop rendering , sometimes , The data provided on the server side may be a set of ( In array /List And so on ), When the page is displayed , You need to be able to render every element in this group , The way of the final cycle is shown . Here is a direct example .

6. be based on th:each Realize the display of telephone number
front end :
persons What you get is the array passed by the server ,person Namely persons One of the elements .person.name and person.phone Will follow person Change according to different .
<body>
    <ul>
        <li th:each="person : ${persons}">
            <span th:text="${person.name}"></span>
            <span th:text="${person.phone}"></span>
        </li>
    </ul>
</body>
Back end :
class Person {
    public String name;
    public String phone;

    public Person(String name, String phone) {
        this.name = name;
        this.phone = phone;
    }
}
@WebServlet("/each")
public class EachServlet extends HttpServlet {
    private TemplateEngine engine = new TemplateEngine();

    @Override
    public void init() throws ServletException {
        ServletContextTemplateResolver resolver = new ServletContextTemplateResolver(this.getServletContext());
        resolver.setPrefix("/WEB-INF/template/");
        resolver.setSuffix(".html");
        resolver.setCharacterEncoding("utf-8");
        engine.setTemplateResolver(resolver);
    }

    @Override
    protected void doGet(HttpServletRequest req, HttpServletResponse resp) throws ServletException, IOException {
        resp.setContentType("text/html;charset=utf-8");
        List<Person> persons = new ArrayList<>();
        persons.add(new Person(" Zhu Junrui ","110"));
        persons.add(new Person(" Zhang San ","112"));
        persons.add(new Person(" Li Si ","985"));
        WebContext webContext = new WebContext(req,resp,this.getServletContext());
        webContext.setVariable("persons",persons);
        engine.process("thymeleafEach",webContext, resp.getWriter());
    }
}
7. Template engine fixed routine

8. ServletContext
As we have learned before , Create in the template engine ServletContextTemplateResolver class and WebContext The parameters in the class contain ServletContext, But it doesn't need to be instantiated , Because in Tomcat Has been instantiated for us in , We use it directly this.getServletContext You can get the instance .
Tomcat And webapp、ServletContext、Servlet The relationship between :
Every webapp It's the same Context Path Under the webapp, there webapp And the file name is webapp It's not the same thing . In the same Context Path in , You can create many Servlet, So many Servlet But you can use the same Servlet Context Of .
But normally , Load different templates HTML , Usually use different ServletContext, Because it is a key value pair structure . So in the template , When the parameters are different , Use the same ServletContext There is no problem , But it's best not to use it in work development .
Tomcat For each webapp Automatically created ServletContext object , Every webapp There is an example , The meaning of existence is to make the same webapp The multiple Servlet Can share data between . Its sharing will be used below .
It said ,TemplateEngine In the same webapp Only one of them , But you can't instantiate with singleton mode , Because if you use singleton mode , So it's the whole Tomcat There is only one process TemplateEngine An example of , But what we want is a webapp One TemplateEngine example , therefore ServletContext Be able to make TemplateEngine In a webapp There is only one instance in .
webapp Namely tomcat Of webapps A subdirectory under a directory .
8.1 understand ServletContext Use
Its existence means : Can make the same wabapp In the multiple Servlet Can share data between . therefore ServletContext Provides a set of get/set Interface .
ServletContext An important method of object :
Method
describe
void setAttribute(String name, Object obj)
Set properties ( Key value pair )
Object getAttribute(String name)
Get the property value according to the property name , If name non-existent , return return null
void removeAttribute(String name)
Delete the corresponding attribute
You can see ServletContext and HttpSession The methods in the class are very similar , It also internally organizes several key value pair structures , Equivalent to a hash table .
8.2 Code example : Multiple Servlet Shared data
Purpose : understand Servlet Use of shared data in
establish WriterServlet class :
When the client accesses the server, it is :127.0.0.1:8080/20220413/writermessage=hello
@WebServlet("/writer")
public class WriterServlet extends HttpServlet {
    @Override
    protected void doGet(HttpServletRequest req, HttpServletResponse resp) throws ServletException, IOException {
        String message = req.getParameter("message");// Get it first query string
        ServletContext servletContext = this.getServletContext();// Direct use this To get ServletContext object
        servletContext.setAttribute("message",message);// Set key value pairs
        resp.setContentType("text/html;charset=utf-8");
        resp.getWriter().write("<h3>  Storage  message  success  </h3>");
    }
}
establish ReaderServlet class :
@WebServlet("/reader")
public class ReaderServlet extends HttpServlet {
    @Override
    protected void doGet(HttpServletRequest req, HttpServletResponse resp) throws ServletException, IOException {
        resp.setContentType("text/html;charset=utf-8");
        ServletContext servletContext = this.getServletContext();
        String message = (String) servletContext.getAttribute("message");// To get in WriterServlet Values stored in
        resp.getWriter().write("message: "+message);
    }
}
The first access path is writer Of Servlet, Yes :127.0.0.1:8080/20220413/writer?message=hello, The page displays :
At this time, the access path is reader Of Servlet, Yes :127.0.0.1:8080/20220413/reader, The... Is displayed on the page :
Code details :
8.3 What is a monitor (Listener)
Because we need to use ServletContext To store a TemplateEngine Example , Therefore, it is necessary to put TemplateEngine OK , Put it at the same time ServletContext In the object of , hinder Servlet You don't have to initialize it anymore , Directly take out the stored engine that will do .
In order to ensure The rest of the Servlet Can get an initialized... At the first time TemplateEngine example , The decision can be made in ServletContext After being created , For the first time TemplateEngine instantiate / initialization / preservation .
But just now ,ServletContext yes Tomcat self-created , How to make ServletContext Once you've created it , Execute your own custom code at the first time ?Servlet Provides a mechanism ,Listener( Monitor ) Interface , So you can use Listener To listen to ServletContext The initialization of is completed . stay JS Medium onclick It's also the effect of the listener .
Such as : Fixed routine :
step :
1. Create a new class implementation ServletContextListener Interface , Rewrite one of contextinitialized Method , This method is automatically called after initialization .
2. Give this new class , add @WebListener Notes , Add this comment before it can be Tomcat Identify and load .
3. Get... In the method ServletContext It's through Method ServletContextEven To get it .
@WebListener
public class ThymeleafConfig implements ServletContextListener {
    @Override
    public void contextInitialized(ServletContextEvent servletContextEvent) {
        ServletContext servletContext = servletContextEvent.getServletContext();
        TemplateEngine engine = new TemplateEngine();
        ServletContextTemplateResolver resolver = new ServletContextTemplateResolver(servletContext);
        resolver.setPrefix("/WEB-INF/template/");
        resolver.setSuffix(".html");
        resolver.setCharacterEncoding("utf-8");
        engine.setTemplateResolver(resolver);
        servletContext.setAttribute("engine",engine);
        System.out.println("engine  Initialization done ");
    }

    @Override
    public void contextDestroyed(ServletContextEvent servletContextEvent) {

    }
}
The above code is not necessarily just used to initialize TemplateEngine Of , It may also be used to initialize other contents .
9. Realize online photo album
front end :
The original code : This code is placed in webapp Under the document .CSS It's the same thing .
<head>
    <meta charset="UTF-8">
    <title> Photo album </title>
    <link rel="stylesheet" href="./style.css">
</head>
<body>
<!--  First group of pictures  -->
<figure class="sample">
    <img src="image/1.jpg" alt="sample1" />
    <figcaption>
        <div>
            <h2>Deconovo</h2>
            <h4>Classic Sculptures</h4>
        </div>
    </figcaption>
    <a href="image/1.jpg"></a>
</figure>
<figure class="sample">
    <img src="image/2.jpg" alt="sample2" />
    <figcaption>
        <div>
            <h2>Deconovo</h2>
            <h4>Classic Sculptures</h4>
        </div>
    </figcaption>
    <a href="image/2.jpg"></a>
</figure>
<figure class="sample">
    <img src="image/3.jpg" alt="sample3" />
    <figcaption>
        <div>
            <h2>Deconovo</h2>
            <h4>Classic Sculptures</h4>
        </div>
    </figcaption>
    <a href="image/3.jpg"></a>
</figure>
</body>
But the way we use the template engine , It will save a lot of space :
Key points :
1. Use th:each Construct multiple figure label .
2. expect Java From the code came a images label , Each element of an array is a image object , There are two properties ,url and name
3. hold image Of url and name Put it in html In the right place .
notes : Because this code is engine code , Put it in template File directory .
<body>
    <!--  adopt  th:each  Loop to generate multiple  figure  label ,  Each label corresponds to a picture  -->
    <figure class="sample" th:each="image : ${images}">
        <img th:src="${image.url}" alt="sample1" />
        <figcaption>
            <div>
                <h2 th:text="${image.name}"></h2>
            </div>
        </figcaption>
        <a th:href="${image.url}"></a>
    </figure>
</body>
Not introduced here CSS 了 , Mainly experience the role of template engine .
In order to introduce pictures , stay webapp Under the table of contents , Create a image Folder , Put three more in it jpg picture .
Back end code :
similarly , First create ThymeleafConfig Class to initialize TemplateEngine :
@WebListener
public class ThymeleafConfig implements ServletContextListener {
    @Override
    public void contextInitialized(ServletContextEvent servletContextEvent) {
        ServletContext servletContext = servletContextEvent.getServletContext();
        TemplateEngine engine = new TemplateEngine();
        ServletContextTemplateResolver resolver = new ServletContextTemplateResolver(servletContext);
        resolver.setPrefix("/WEB-INF/template/");
        resolver.setSuffix(".html");
        resolver.setCharacterEncoding("utf-8");
        engine.setTemplateResolver(resolver);
        servletContext.setAttribute("engine",engine);
        System.out.println("engine  Initialization done ");
    }

    @Override
    public void contextDestroyed(ServletContextEvent servletContextEvent) {

    }
}
establish ImageServlet class :
In this class, we need to generate a image An array of objects , Pass to web page template , And back to . This Image The array of objects should be given a specified path to find , Just look in the directory where the pictures are located , Look at the pictures , According to the information of the picture image Array . For finding the absolute path of the file , have access to ServletContext Of getRealPath Method to get .
class Image {
    public String name;
    public String url;
}

@WebServlet("/image")
public class ImageServlet extends HttpServlet {
    @Override
    protected void doGet(HttpServletRequest req, HttpServletResponse resp) throws ServletException, IOException {
        resp.setContentType("text/html; charset=utf-8");
        // 1.  Scan the specified path  /webapp/image  route ,  See how many pictures there are ,  Constructed as  List<Image>
        List<Image> images = loadImage();
        // 2.  hold  images  To construct into the template page .
        ServletContext context = this.getServletContext();
        TemplateEngine engine = (TemplateEngine) context.getAttribute("engine");
        WebContext webContext = new WebContext(req, resp, context);
        webContext.setVariable("images", images);
        String html = engine.process("images", webContext);
        resp.getWriter().write(html);
    }

    private List<Image> loadImage() {
        //  scanning  /webapp/image  Catalog
        List<Image> images = new ArrayList<>();
        //  Need to get to  /webapp/image  The absolute path of this directory on disk
        ServletContext context = this.getServletContext();
        String path = context.getRealPath("/image");
        System.out.println(path);
        //  According to this path, you can see which picture files are in it .
        File imageRoot = new File(path);
        File[] files = imageRoot.listFiles();
        for (File f : files) {
            Image image = new Image();
            image.name = f.getName();
            image.url = "image/" + f.getName();
            images.add(image);
        }
        return images;
    }
}
At this point, we directly access the server , The server will display the picture , And the effect is the same as the code without template engine .
design sketch :
At this time, we can also set the form of submitting pictures , Then show it in the effect picture above .
Therefore, the front-end part should provide a page for submitting files to realize :
notes : Don't forget to submit documents enctype attribute .
<body>
    <form action="upload" method="POST" enctype="multipart/form-data">
        <input type="file" name="MyImage">
        <input type="submit" value=" Upload files ">
    </form>
</body>
establish UploadServlet class :
//  This annotation is necessary in the function of uploading files
@MultipartConfig
@WebServlet("/upload")
public class UploadServlet extends HttpServlet {
    @Override
    protected void doPost(HttpServletRequest req, HttpServletResponse resp) throws ServletException, IOException {
        String path = getServletContext().getRealPath("/image");
        Part part = req.getPart("MyImage");
        part.write(path + "/" + part.getSubmittedFileName());
        resp.sendRedirect("image");// In order to be able to display the page
    }
}
Catalog display :
边栏推荐
猜你喜欢

UDP summary (tcp/ip details volume 1/2)

增加mysql的最大连接数
![[jvm learning] virtual machine stack](/img/64/4942c572f1ae4e4c6e2a6b657660e3.jpg)
[jvm learning] virtual machine stack

C语言 分割bin文件程序
![[LDA] rough version notes of EM variational reasoning [to be improved](/img/de/4b028e77694297db05a2d6b6589276.png)
[LDA] rough version notes of EM variational reasoning [to be improved

Function recursion example

IGMP报文(TCP/IP详解卷1/卷2)

Deepin20.6 RTX3080 安装显卡驱动510.60.02、CUDA11.6、PyTorch1.11
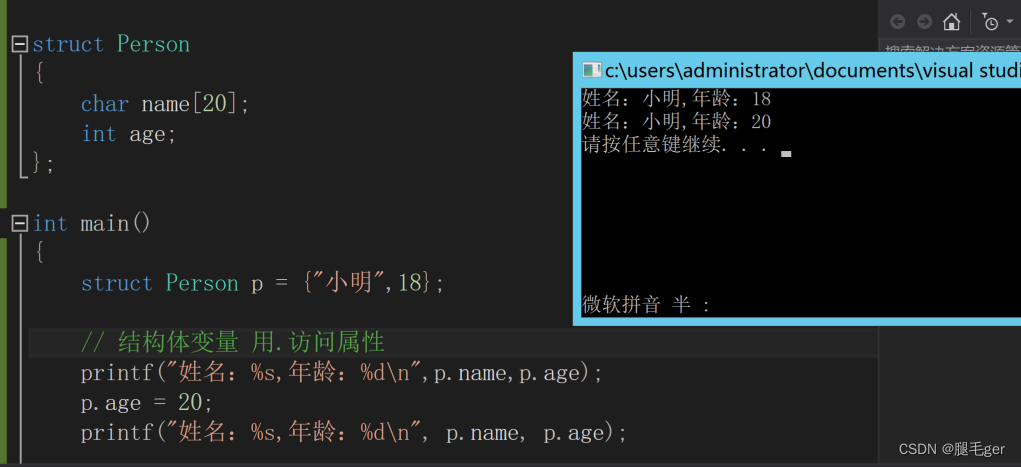
Structure example

远程操控其它电脑--详细教程
随机推荐
5G新方案!升级现有的基站和UE模拟器至5G毫米波频段
Preparation of service for robot moving forward and rotating
Distributed concurrent repeated submission
Find the number of cells (connectivity map, wide search, deep search)
[LDA] LDA theme model notes - mainly Dirichlet
Kinect2.0+ORBSLAM2_with_pointcloud_map
Ngork implements intranet penetration -- free
The difference between TCP and UDP, the three handshakes of TCP and the four waves of TCP
Points chocolate (two points answer) Blue Bridge Cup provincial competition
What is reflection-- The soul of frame design
Deepin20.6 rtx3080 installer le lecteur de carte graphique 510.60.02, cuda 11.6, pytorch1.11
[jvm learning] local method stack and heap
Qiming Zhixian shares the application scheme of 2.8-inch handheld central control screen
解决log4j2漏洞遭到挖矿、僵尸进程病毒攻击
Servlet连接数据库实现用户登录功能
Using the CSDN markdown editor
Deepin20.6 rtx3080 installing graphics card drivers 510.60.02, cuda11.6, pytorch1.11
Function related matters
Socket原理讲解(在哪、是什么、怎么用)
2021-06-27