当前位置:网站首页>Infinite horizontal marble game
Infinite horizontal marble game
2022-07-01 05:53:00 【acktomas】
Infinite level marble game : Joystick control :(Tinkercad)
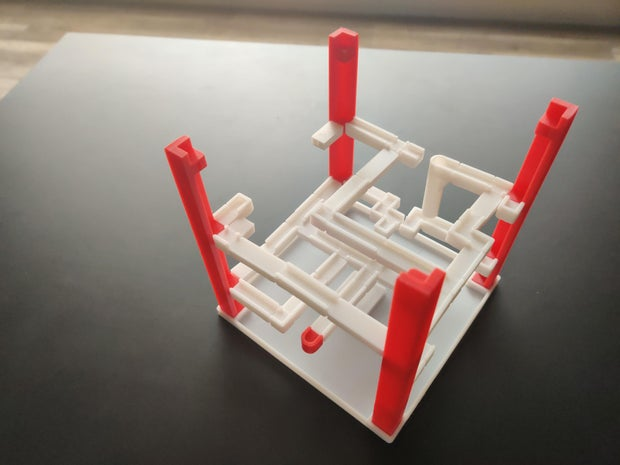
This maze game is not your usual paper maze .. .
Each track consists of three levels , One on top of the other . Complete the first maze / After level , The marble will fall from the pipe to the next level . Complete the second level , Down to the third level .
Infinite level ?
At least build as many as possible !
Each level consists of 1cm x 1cm The track unit of , These track units can be easily connected together .
The build area for each level is 12 centimeter x 12 centimeter , Give you enough areas to create any level you want !
I designed many different track types to create more challenging gameplay .
All design steps are optional , Because I will provide STL file . Design steps are only used to show that everything is in Tinkercad Designed in . A simple but useful design program .
material
- Tinkercad( free 3D Design a website )
- 3D The printer
- 3D Print parts
- 24 individual 6mm x 2mm Disk magnet
- seccotine
- 1/4’’ Metal ball
step 1: Design Track


First , I use a combination of cube and cylinder to create a 10cmx10cmx9cm The orbit of .
Then I use the hole to create a sloped edge at the bottom . In this way, the tracks can be close to each other .( When 3D When printing , The first few layers droop outward , The track is not clean ). I used another hole , One on each side , Create holes for connectors .
step 2: Design Connectors


The connectors are used to connect each rail together . They are also the most difficult to do right , But I found a great design .
First , I use a combination of cube and cylinder to make beveled edges . The beveled edges help it slide easily into the holes in the rail .
Next , I added two very thin cubes at the top of the connector , This helps it fit closer , But only in small areas , So it's easier to pull out . I tested it , It's still hard to get away , So I used a hole to create a groove in the connector . You can use the groove to fix the connector better with your nails .
step 3: Design Other Track Types


These tracks provide turns and lengths for each level . Some have only one side , Not even one side , To create more challenges !** You can make many different tracks !** As long as they have a hole for the connector , They should fit perfectly .
I first copied the previously made track and ungrouped the objects . I deleted some walls and added some walls to 90 Turn around 、4 road 、3 Road and dead end .
Then I lengthened each track , So they are not all 10 mm x 10 mm . They can be almost any length , But I only made 20mm x 10mm and 30mm x 10mm.
I even made a special 4 Road track , There is a hole in it that you need to bypass . Again , You can make a lot of special tracks !
Last , I use one. 10 mm x 10 Mm track 、 Cylinder 、 The wedge and several holes make a descent track . This track is used to pull down to the next level .
step 4: Design Pillars


Columns can basically do whatever they want . They are used to support each layer and separate them evenly .
I use the cube to create the height of the column , And use the cylinder to give it an inclined plane .
Then I use three orbital units ( Start with the first step ) To create the corner where the level will be connected . No walls , Because the columns provide for the walls 90 Turn of degrees .
Last , I use two holes to create holes for the disk magnet at the bottom .
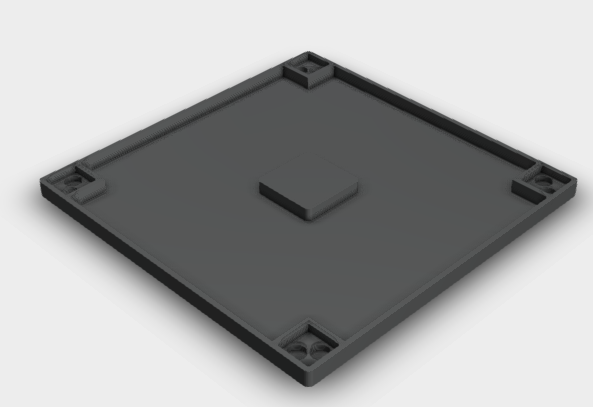
step 5: Design Track Base


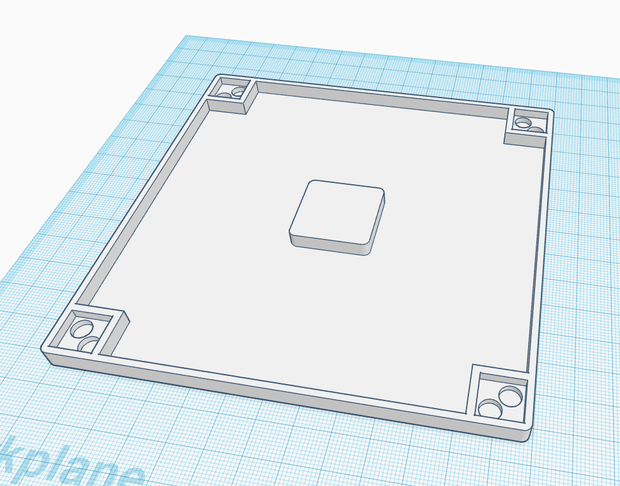
The track base is used to support the column and catch the marble falling from the track .
I use cubes and cylinders to create overall shapes . Then I made walls with holes to prevent the ball from falling . I also used four holes to make holes suitable for the column .
Next , I used eight holes to punch the disk magnet , These magnets should be perfectly mounted on the magnets of the posts .
At the bottom of the base , I use holes to create a notch , The arm will fit in . I used another four holes to create holes for the disk magnet .
step 6: Design Joystick Rotation Point


This work provides left-right movement when using the joystick . You need two .
First , I use cubes and cylinders to create the main shape . I used a hole to create the hole in which the spinner will rotate .
Next , I use more cubes and cylinders in “ leg ” Create a nice slope on . I use another hole to create a continuous curve along the bottom .
step 7: Design Joystick Base


The joystick base will maintain the stability and rigidity of the joystick mechanism .
First , I use cubes 、 Cylinder and a hole to make the inclined wall . These should fit perfectly with the rotation points made in the last step “ leg ”.
Then I used more cubes and cylinders to make the rest of the base . I will slope the wall ( Previously made ) Three times , Then place them like this .
step 8: Design Joystick


Joystick for game control .
I used a bunch of cubes and cylinders to create the body . Each half of the joystick has two protruding cylinders , Combine the two halves .
Next , I use a sphere and a hole to create a flat bottom .
then , I used another hole to create a hole for the joystick .
These fragments should be combined like this .. .
step 9: Design Arm


The arm is connected to the rail base with a magnet . It also mimics the motion of the joystick .
I first use a bunch of cubes and cylinders to create the main shape . Again, I used two protruding cylinders on each half of the arm to assemble the two halves .
Then I used four holes to punch the disk magnet .
step 10: Design Rotators and Lever


The rotator is connected to the joystick and arm . They are installed in the rotation point to provide left-right movement . leverage ( I don't know what to call it ) Connect the joystick to the arm and provide forward and backward movement .
I first use cubes 、 The cylinder and the hole are combined to make two parts of the rotator .
then , I use a hole to make a hole , So they can be well combined .
For leverage , I only used a cube and a cylinder to make the main shape , And use the two holes to make the pivot point .
step 11: 3D Print Parts

Place each section like this , They can be printed !
I designed each part so that it doesn't need support , Because they are difficult to print correctly on such an accurate print .
This is all you need STL file .. .


step 12: Glue in Magnets

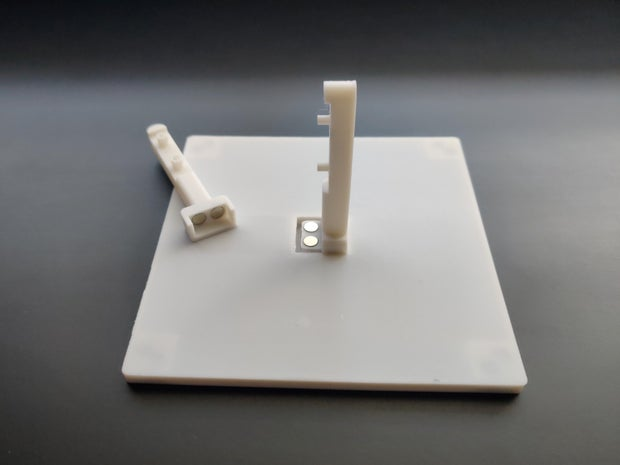
For this step , You need four pillars 、 Track base 、 Two half arms 、22 A disk magnet 、 Super glue and toothpicks for applying glue .
First , Stick the magnet to the post , So they can be connected to the magnet on the base .
Next , Stick a magnet to your arm , In this way, each half will be connected to the magnet on the base .
step 13: Glue Joystick Base Together


For this step , You need the joystick base 、 Two rotating points and super glue .
Paste the rotation point into the hole on the base of the lever . Make sure that the protrusions on the rotation points are opposite to each other .
step 14: Glue and Connect Joystick


Collect the joystick 、 Joystick ball 、 leverage 、 Half rotator and lever base , Form the last step .
First , Connect the rotator and lever to one of the lever halves .( As shown in the figure ).
Next , Stick the other half on the lever , And stick the joystick ball to the top .( As shown in the figure ).
Last , Stick the two halves of the rotator together .
step 15: Glue and Connect Arm


Put the two halves of the arm 、 The two halves of the rotator 、 Put the joystick made in the last step away .
First , Connect the other side of the lever to one half arm . Connect the rotor as shown in the figure .
Last , Stick the arms together , And stick the two halves of the rotator together .
Let it stand for about a day to dry , The joystick is finished !
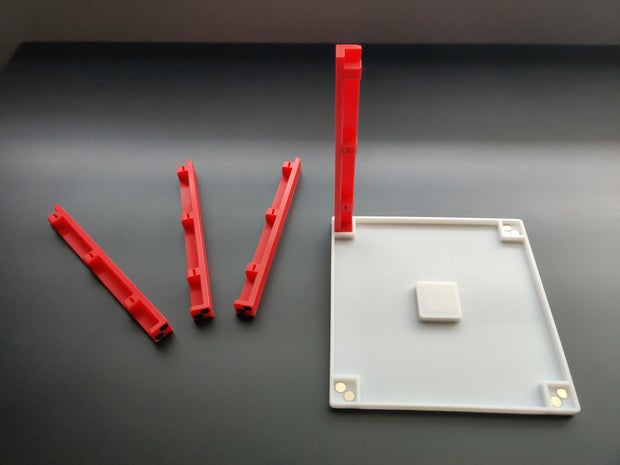
step 16: Build Marble Tracks - BE CREATIVE!


This is your most free step . Use your 3D The printed part builds any track you want .
- First , Attach each strut to the rail base . Then start building each level from the bottom up !
The two parts can be connected together by using the middle connector .
Connect the descent track at the end of each level , In order to be able to descend to the next level .
The red track piece is the starting point and the ending point .
step 17: Play Handheld or Joystick

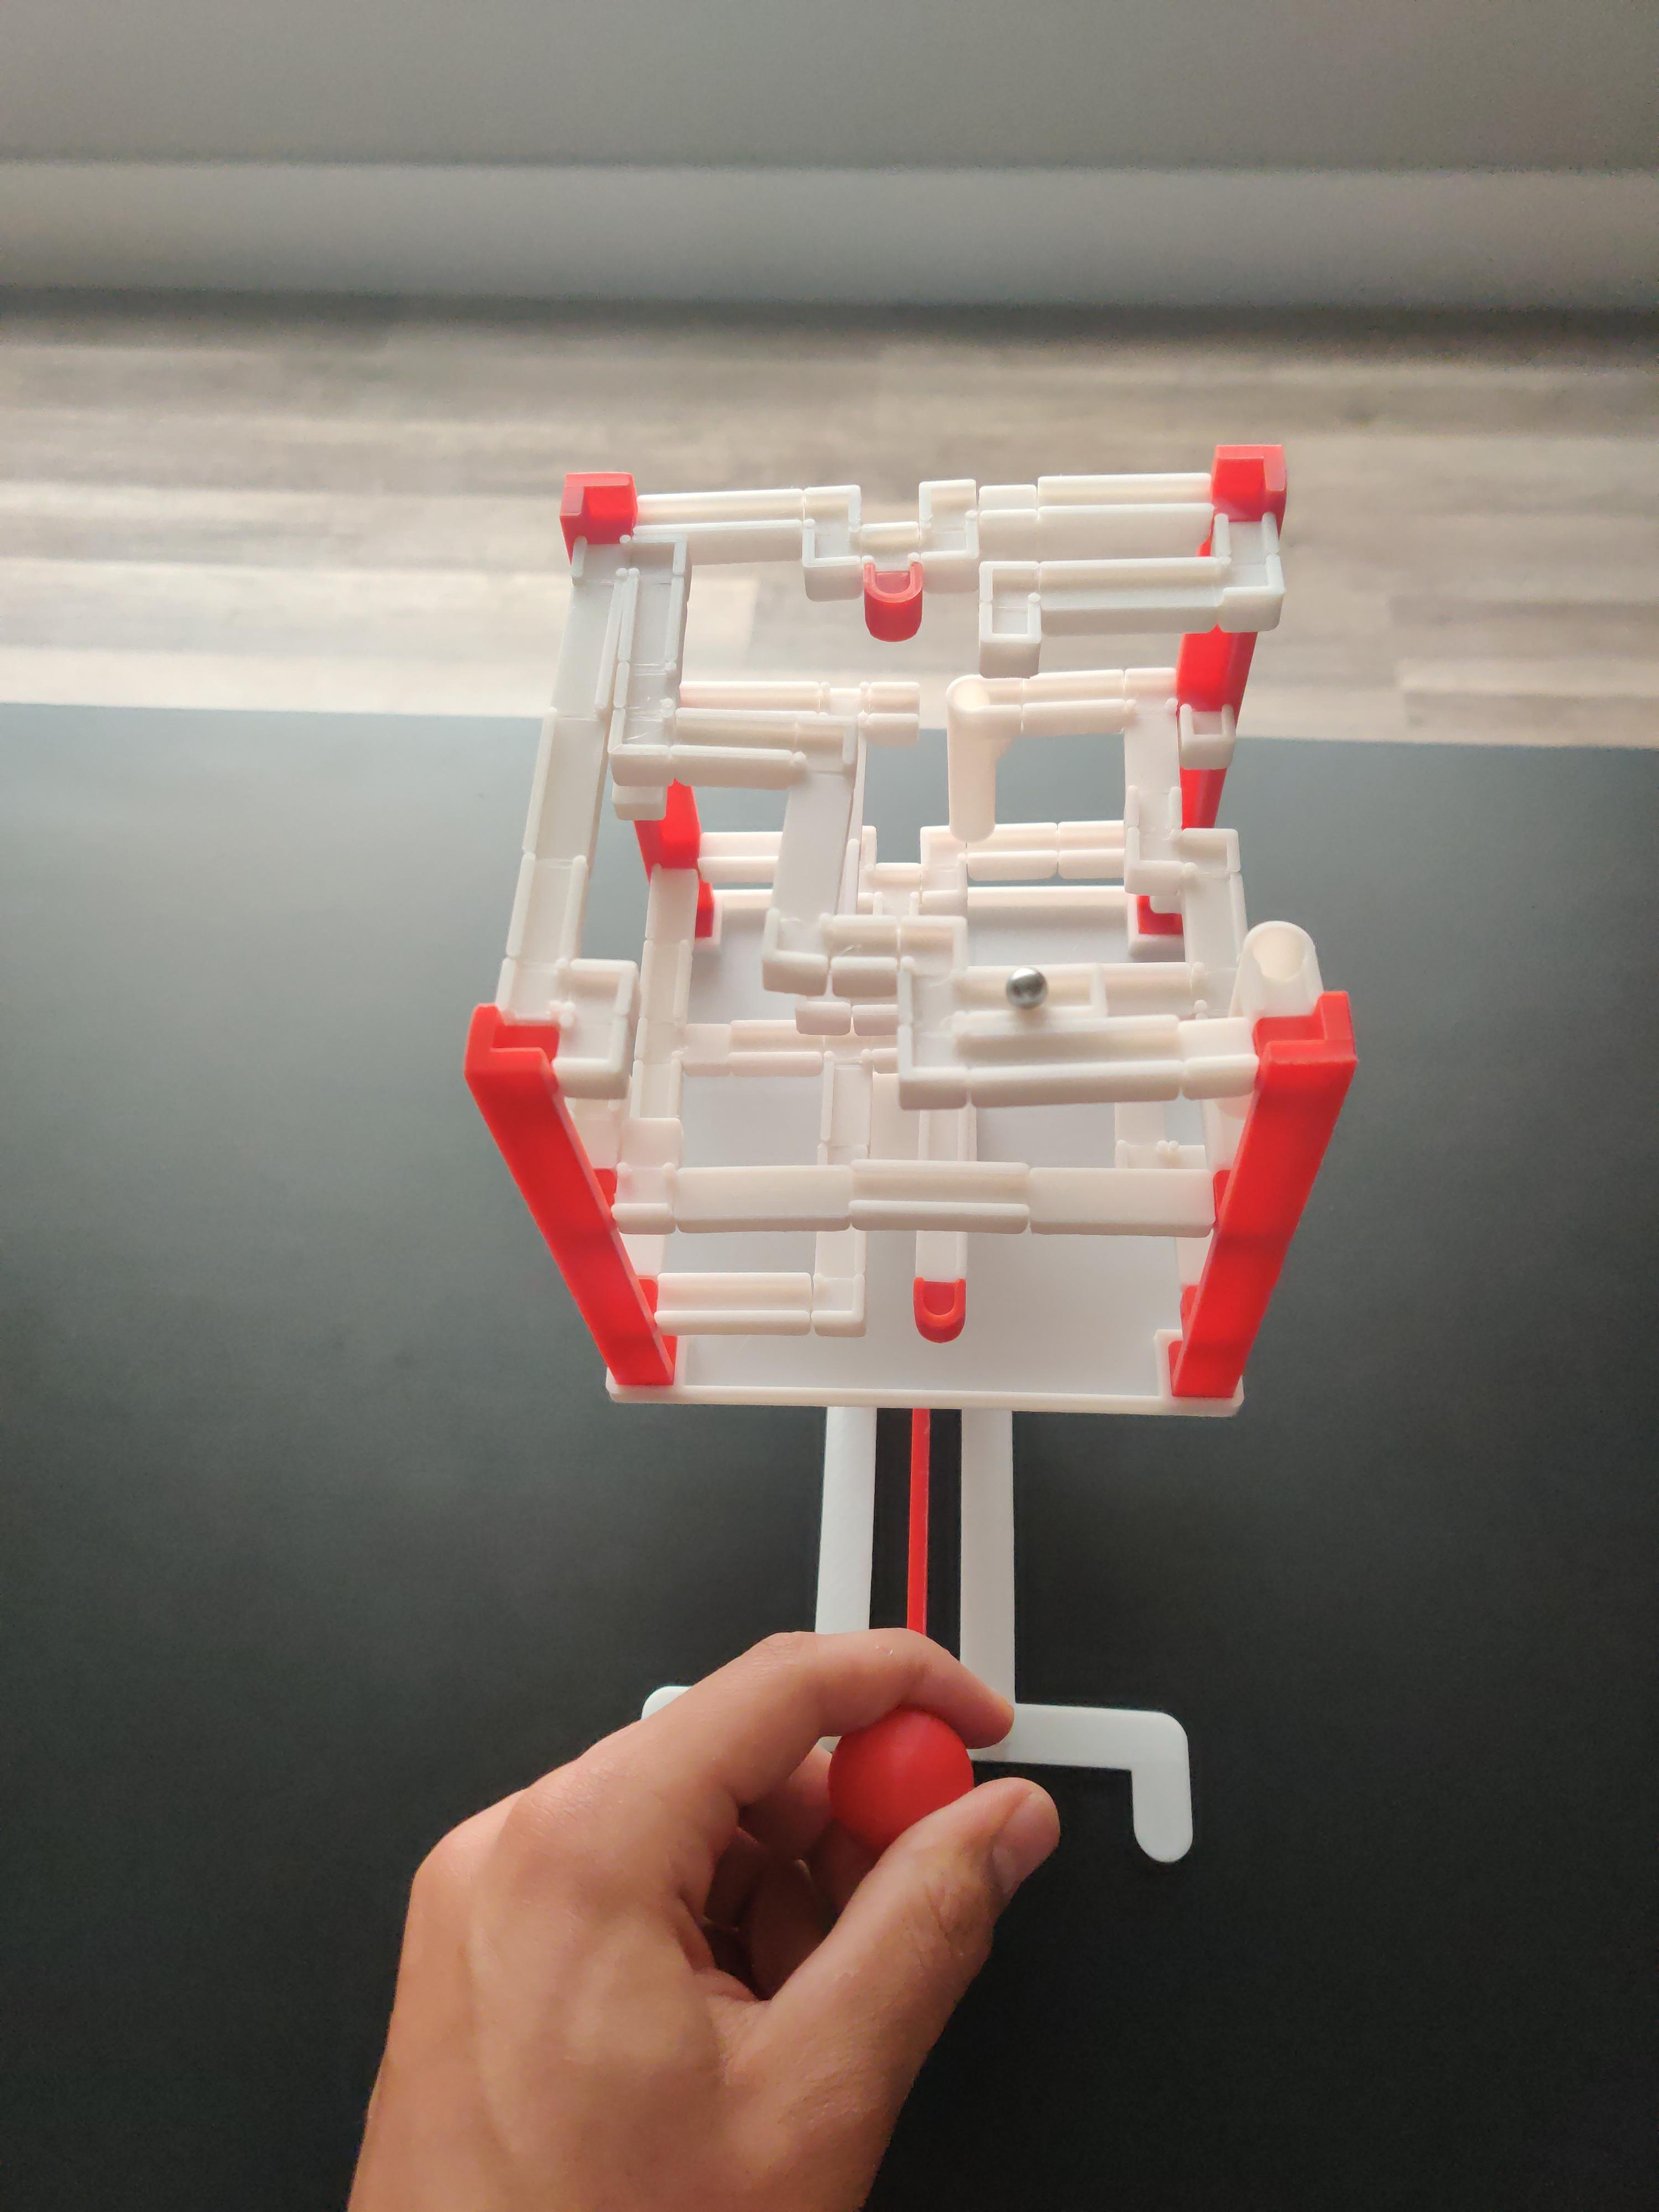
Last , You can play with what you create !
You can play hand-held games by holding only the track base , You can also connect the track base to the joystick and use the joystick to play . Because of the magnet , They should be perfectly stuck together .
In my opinion, handheld play is the simplest , But the feeling of using the rocker is very unique , Very satisfied .
step 18: BUILD & GAMEPLAY
in general , This project is very interesting to build . Sometimes it's a little challenging , I have many failures 3D Print . without Tinkercad, I can't do that , Because it is very easy to learn . I hope I've proved that you can make amazing things with simple shapes .
You need precise 3D Print to make it work , But once handled , The end result will be incredible .
边栏推荐
- 穿越派与贸大合作,为大学生增添效率
- FPGA - 7系列 FPGA内部结构之Clocking -01- 时钟架构概述
- Boot + jsp University Community Management System (with source Download Link)
- 这才是大学生必备软件 | 知识管理
- Advanced cross platform application development (III): online resource upgrade / hot update with uni app
- 亲爱的派盘用户,我要向您表白!
- Code shoe set - mt3114 · interesting balance - explain it with examples
- Know the future of "edge computing" from the Nobel prize!
- 论文学习记录随笔 多标签之LIFT
- Debug details under pycharm
猜你喜欢

HCM 初学 ( 二 ) - 信息类型

Send you through the data cloud

C语言初阶——实现扫雷游戏

我从技术到产品经理的几点体会

Educational administration management system (free source code)

Chip, an empire built on sand!

What is the at instruction set often used in the development of IOT devices?

论文学习记录随笔 多标签之GLOCAL

Build 2022 上开发者最应关注的七大方向主要技术更新

如何添加葫芦儿派盘
随机推荐
Call us special providers of personal cloud services for College Students
excel动态图表
Know the future of "edge computing" from the Nobel prize!
Looking for high school student developers with similar interests
boot+jsp的高校社團管理系統(附源碼下載鏈接)
Data governance: data governance framework (Part I)
无限水平大理石游戏
C语言初阶——实现扫雷游戏
从MLPerf谈起:如何引领AI加速器的下一波浪潮
My experience from technology to product manager
Chip, an empire built on sand!
基于LabVIEW的计时器
Scope data export mat
喊我们大学生个人云服务特供商
葫芦儿 APP 使用帮助
Ssm+mysql second-hand trading website (thesis + source code access link)
穿越派 你的数据云行
Oracle 序列+触发器
Code shoe set - mt3149 · and - the data is not very strong. Violent pruning can deceive AC
OpenGL ES: (3) EGL、EGL绘图的基本步骤、EGLSurface、ANativeWindow