当前位置:网站首页>Unity Shader入门精要学习——透明效果
Unity Shader入门精要学习——透明效果
2022-07-31 14:09:00 【番茄猿】
透明效果
1 实现透明效果的两种方法
透明度测试(Alpha Test)
要么完全透明,要么完全不透明。
实现简单,实质上是一种剔除机制,通过将不满足条件(通常使用小于某个阈值来判定,一般使用clip方法)的片元舍弃的方法来达到完全透明效果。这些被舍弃的片元不会再进行任何的处理,也不会对颜色缓冲产生任何影响,其余满足条件的片元则会继续按普通的不透明物体的处理方式继续处理
透明度混合(Alpha Blending)
可以得到真正的透明效果,通过将当前片元的透明度作为混合因子与已经存储在颜色缓冲中的颜色值进行混合来得到新的颜色,以实现透明效果。
!!!但是,如果需要混合,就需要关闭深度写入(如果不关闭需要透明效果的片元的深度写入,则会直接覆盖掉颜色缓冲中已存储的颜色,无法实现透明效果),由此渲染顺序变得非常重要。

2 透明度测试
使用了透明度测试的Shader都应该在SubShader中设置如下三个标签
SubShader
{

	Tags{
     "Queue" = "AlphaTest"  "IgnoreProjector" = "true"    "RenderType" = "TransparentCutout" }

	Pass
	{

		........
	}
}
示例代码
Shader "Shader Learning/08 Alpha Effect/01 Alpha Test"
{

	Properties
	{

		_Color("Color", Color) = (1, 1, 1, 1)
		_MainTex("Main Tex", 2D) = "white"{
    }
		_Cutoff("Alpha Cutoff", Range(0, 1)) = 0.5
	}

	SubShader
	{

		//通常使用了透明度测试的Shader都应该在SubShader中设置这三个标签
		Tags{
     "Queue" = "AlphaTest" "IgnoreProjector" = "true" "RenderType" = "TransparentCutout" }

		pass
		{

			Tags{
     "LightMode" = "ForwardBase" }

			CGPROGRAM

			#pragma vertex vert
			#pragma fragment frag

			#include "Lighting.cginc"

			fixed4 _Color;
			sampler2D _MainTex;
			float4 _MainTex_ST;
			fixed _Cutoff;

			struct a2v
			{

				float4 vertex : POSITION;
				float3 normal : NORMAL;
				float4 texcoord : TEXCOORD0;
			};

			struct v2f
			{

				float4 pos : SV_POSITION;
				float3 worldNormal : TEXCOORD0;
				float3 worldPos : TEXCOORD1;
				float2 uv : TEXCOORD2;
			};

			v2f vert(a2v v)
			{

				v2f o;

				o.pos = mul(UNITY_MATRIX_MVP, v.vertex);

				o.worldPos = mul(_Object2World, v.vertex).xyz;

				o.worldNormal = UnityObjectToWorldNormal(v.normal);

				o.uv = TRANSFORM_TEX(v.texcoord, _MainTex);

				return o;
			}

			fixed4 frag(v2f i) : SV_Target
			{

				fixed3 worldNormal = normalize(i.worldNormal);
				fixed3 worldLightDir = normalize(UnityWorldSpaceLightDir(i.worldPos));

				fixed4 texColor = tex2D(_MainTex, i.uv);

				//进行透明度测试
				clip(texColor.a - _Cutoff);   //如果小于设定的_Cutoff透明度阈值,则会抛弃当前的片元
				/* //等同于 if((texColor.a - _Cutoff) < 0.0) { discard } */

				fixed3 albedo = texColor.rgb * _Color.rgb;

				fixed3 ambient = UNITY_LIGHTMODEL_AMBIENT.xyz * albedo;

				fixed3 diffuse = _LightColor0.rgb * albedo * max(0, dot(worldNormal, worldLightDir));

				return fixed4(ambient + diffuse, 1.0);
			}

			ENDCG
		}
	}

	FallBack "Transparent/Cutout/VertexLit"

}
3 透明度混合
使用了透明度混合的Shader都应该在SubShader中设置如下三个标签,同时关闭深度写入,并设置混合模式
SubShader
{

	Tags {
     "Queue" = "Transparent" "IgnoreProjector" = "true" "RenderType" = "Transparent" }

	Pass
	{

		........
		ZWrite Off
		Blend SrcAlpha OneMinusSrcAlpha
		........
	}

}
示例代码
Shader "Shader Learning/08 Alpha Effect/02 Alpha Blend"
{

	Properties
	{

		_Color("Color", Color) = (1, 1, 1, 1)
		_MainTex("Main Tex", 2D) = "white"{
    }
		_AlphaScale("Alpha Scale", Range(0, 1)) = 1
	}

	SubShader
	{

		//通常使用了透明度混合的Shader都应在SubShader中设置这三个标签
		Tags{
     "Queue" = "Transparent" "IgnoreProjector" = "true" "RenderType" = "Transparent" }

		Pass
		{

			Tags{
     "LightMode" = "ForwardBase" }

			ZWrite Off  //关闭深度写入,透明度混合中都应关闭深度写入
			Blend SrcAlpha OneMinusSrcAlpha   //设置该Pass的混合模式,我们将源颜色(该片元着色器产生的颜色)的混合因子设为SrcAlpha,把目标颜色(已经存在于颜色缓冲中的颜色)的混合因子设为OneMinusSrcAlpha

			CGPROGRAM

			#pragma vertex vert
			#pragma fragment frag

			#include "Lighting.cginc"

			fixed4 _Color;
			sampler2D _MainTex;
			float4 _MainTex_ST;
			fixed _AlphaScale;

			struct a2v
			{

				float4 vertex : POSITION;
				float3 normal : NORMAL;
				float4 texcoord : TEXCOORD0;
			};

			struct v2f
			{

				float4 pos : SV_POSITION;
				float3 worldNormal : TEXCOORD0;
				float3 worldPos : TEXCOORD1;
				float2 uv : TEXCOORD2;
			};

			v2f vert(a2v v)
			{

				v2f o;

				o.pos = mul(UNITY_MATRIX_MVP, v.vertex);

				o.worldPos = mul(_Object2World, v.vertex).xyz;

				o.worldNormal = UnityObjectToWorldNormal(v.normal);

				o.uv = TRANSFORM_TEX(v.texcoord, _MainTex);

				return o;
			}

			fixed4 frag(v2f i) : SV_Target
			{

				fixed3 worldNormal = normalize(i.worldNormal);
				fixed3 worldLightDir = normalize(UnityWorldSpaceLightDir(i.worldPos));

				fixed4 texColor = tex2D(_MainTex, i.uv);

				fixed3 albedo = texColor.rgb * _Color.rgb;

				fixed3 ambient = UNITY_LIGHTMODEL_AMBIENT.xyz * albedo;

				fixed3 diffuse = _LightColor0.rgb * albedo * max(0, dot(worldNormal, worldLightDir));

				return fixed4(ambient + diffuse, texColor.a * _AlphaScale);  //返回需要设置透明通道值,只有使用Blend命令打开混合后,这里的设置才有意义,否则这些透明度并不会对片元的透明效果有任何影响
			}

			ENDCG
		}
	}

	//FallBack "Transparent/VertexLit"
}
解决模型网格之间有互相交叉时引起的错误透明效果

使用两个Pass来渲染模型,第一个Pass开启深度写入,但不输出颜色,仅仅是为了把该模型的深度值写入深度缓冲中;第二个Pass进行正常的透明度混合,由于上一个Pass已经得到了逐像素的正确的深度信息,该Pass就可以按照像素级别的深度排序进行透明渲染。
缺点:多使用一个Pass更消耗性能
Shader "Shader Learning/08 Alpha Effect/03 Alpha Blend Zwrite"
{

	Properties
	{

		_Color("Color", Color) = (1, 1, 1, 1)
		_MainTex("Main Tex", 2D) = "white"{
    }
		_AlphaScale("Alpha Scale", Range(0, 1)) = 1
	}

	SubShader
	{

		Tags{
     "Queue" = "Transparent" "IgnoreProjector" = "true" "RenderType" = "Transparent" }

		Pass  //增加一个Pass,开启深度写入,但不输出颜色,目的仅仅是为了把该模型的深度值写入深度缓冲中
		{

			ZWrite On
			ColorMask 0   //ColorMask用于设置颜色通道的写掩码(write mask),如果设为0,则该Pass不写入任何颜色通道,即不会输出任何颜色。
		}

		Pass
		{

			Tags{
     "LightMode" = "ForwardBase" }

			ZWrite Off  //关闭深度写入,透明度混合中都应关闭深度写入
			Blend SrcAlpha OneMinusSrcAlpha   //设置该Pass的混合模式,我们将源颜色(该片元着色器产生的颜色)的混合因子设为SrcAlpha,把目标颜色(已经存在于颜色缓冲中的颜色)的混合因子设为OneMinusSrcAlpha

			CGPROGRAM

			#pragma vertex vert
			#pragma fragment frag

			#include "Lighting.cginc"

			fixed4 _Color;
			sampler2D _MainTex;
			float4 _MainTex_ST;
			fixed _AlphaScale;

			struct a2v
			{

				float4 vertex : POSITION;
				float3 normal : NORMAL;
				float4 texcoord : TEXCOORD0;
			};

			struct v2f
			{

				float4 pos : SV_POSITION;
				float3 worldNormal : TEXCOORD0;
				float3 worldPos : TEXCOORD1;
				float2 uv : TEXCOORD2;
			};

			v2f vert(a2v v)
			{

				v2f o;

				o.pos = mul(UNITY_MATRIX_MVP, v.vertex);

				o.worldPos = mul(_Object2World, v.vertex).xyz;

				o.worldNormal = UnityObjectToWorldNormal(v.normal);

				o.uv = TRANSFORM_TEX(v.texcoord, _MainTex);

				return o;
			}

			fixed4 frag(v2f i) : SV_Target
			{

				fixed3 worldNormal = normalize(i.worldNormal);
				fixed3 worldLightDir = normalize(UnityWorldSpaceLightDir(i.worldPos));

				fixed4 texColor = tex2D(_MainTex, i.uv);

				fixed3 albedo = texColor.rgb * _Color.rgb;

				fixed3 ambient = UNITY_LIGHTMODEL_AMBIENT.xyz * albedo;

				fixed3 diffuse = _LightColor0.rgb * albedo * max(0, dot(worldNormal, worldLightDir));

				return fixed4(ambient + diffuse, texColor.a * _AlphaScale);  //返回需要设置透明通道值,只有使用Blend命令打开混合后,这里的设置才有意义,否则这些透明度并不会对片元的透明效果有任何影响
			}

			ENDCG
		}
	}

	//FallBack "Transparent/VertexLit"
}
4 双面渲染
使用Cull命令来达到双面渲染的效果
4.1 透明度测试的双面渲染
在Pass块中直接使用Cull Off命令关闭渲染剔除即可,这时候就会对正面和背面都渲染
Shader "Shader Learning/08 Alpha Effect/04 Alpha Test Both Sided"
{

	Properties
	{

		_Color("Color", Color) = (1, 1, 1, 1)
		_MainTex("Main Tex", 2D) = "white"{
    }
		_Cutoff("Alpha Cutoff", Range(0, 1)) = 0.5
	}

	SubShader
	{

		Tags{
     "Queue" = "AlphaTest" "IgnoreProjector" = "true" "RenderType" = "TransparentCutout" }

		pass
		{

			Tags{
     "LightMode" = "ForwardBase" }

			Cull Off  //关闭剔除

			CGPROGRAM

			#pragma vertex vert
			#pragma fragment frag

			#include "Lighting.cginc"

			fixed4 _Color;
			sampler2D _MainTex;
			float4 _MainTex_ST;
			fixed _Cutoff;

			struct a2v
			{

				float4 vertex : POSITION;
				float3 normal : NORMAL;
				float4 texcoord : TEXCOORD0;
			};

			struct v2f
			{

				float4 pos : SV_POSITION;
				float3 worldNormal : TEXCOORD0;
				float3 worldPos : TEXCOORD1;
				float2 uv : TEXCOORD2;
			};

			v2f vert(a2v v)
			{

				v2f o;

				o.pos = mul(UNITY_MATRIX_MVP, v.vertex);

				o.worldPos = mul(_Object2World, v.vertex).xyz;

				o.worldNormal = UnityObjectToWorldNormal(v.normal);

				o.uv = TRANSFORM_TEX(v.texcoord, _MainTex);

				return o;
			}

			fixed4 frag(v2f i) : SV_Target
			{

				fixed3 worldNormal = normalize(i.worldNormal);
				fixed3 worldLightDir = normalize(UnityWorldSpaceLightDir(i.worldPos));

				fixed4 texColor = tex2D(_MainTex, i.uv);

				//进行透明度测试
				clip(texColor.a - _Cutoff);   //如果小于设定的_Cutoff透明度阈值,则会抛弃当前的片元
				/* //等同于 if((texColor.a - _Cutoff) < 0.0) { discard } */

				fixed3 albedo = texColor.rgb * _Color.rgb;

				fixed3 ambient = UNITY_LIGHTMODEL_AMBIENT.xyz * albedo;

				fixed3 diffuse = _LightColor0.rgb * albedo * max(0, dot(worldNormal, worldLightDir));

				return fixed4(ambient + diffuse, 1.0);
			}

			ENDCG
		}
	}

	FallBack "Transparent/Cutout/VertexLit"

}
4.2 透明度混合的双面渲染
透明度混合的双面渲染要更复杂,因为透明度混合要关闭深度写入,这个时候我们无法保证同一个物体的正面和背面图元的渲染顺序,就有可能得到错误的半透明效果。
解决方法:使用两个Pass,一个Pass只渲染背面(Cull Front),第二个Pass只渲染正面(Cull Back),由于Unity是按顺序执行各个Pass的,因此我们可以得到正确的渲染。
Shader "Shader Learning/08 Alpha Effect/05 Alpha Blend Both Sided"
{

	Properties
	{

		_Color("Color", Color) = (1, 1, 1, 1)
		_MainTex("Main Tex", 2D) = "white"{
    }
		_AlphaScale("Alpha Scale", Range(0, 1)) = 1
	}

	SubShader
	{

		Tags{
     "Queue" = "Transparent" "IgnoreProjector" = "true" "RenderType" = "Transparent" }

		Pass
		{

			Tags{
     "LightMode" = "ForwardBase" }

			Cull Front   //剔除正面来先渲染背面

			ZWrite Off  //关闭深度写入,透明度混合中都应关闭深度写入
			Blend SrcAlpha OneMinusSrcAlpha   //设置该Pass的混合模式,我们将源颜色(该片元着色器产生的颜色)的混合因子设为SrcAlpha,把目标颜色(已经存在于颜色缓冲中的颜色)的混合因子设为OneMinusSrcAlpha

			CGPROGRAM

			#pragma vertex vert
			#pragma fragment frag

			#include "Lighting.cginc"

			fixed4 _Color;
			sampler2D _MainTex;
			float4 _MainTex_ST;
			fixed _AlphaScale;

			struct a2v
			{

				float4 vertex : POSITION;
				float3 normal : NORMAL;
				float4 texcoord : TEXCOORD0;
			};

			struct v2f
			{

				float4 pos : SV_POSITION;
				float3 worldNormal : TEXCOORD0;
				float3 worldPos : TEXCOORD1;
				float2 uv : TEXCOORD2;
			};

			v2f vert(a2v v)
			{

				v2f o;

				o.pos = mul(UNITY_MATRIX_MVP, v.vertex);

				o.worldPos = mul(_Object2World, v.vertex).xyz;

				o.worldNormal = UnityObjectToWorldNormal(v.normal);

				o.uv = TRANSFORM_TEX(v.texcoord, _MainTex);

				return o;
			}

			fixed4 frag(v2f i) : SV_Target
			{

				fixed3 worldNormal = normalize(i.worldNormal);
				fixed3 worldLightDir = normalize(UnityWorldSpaceLightDir(i.worldPos));

				fixed4 texColor = tex2D(_MainTex, i.uv);

				fixed3 albedo = texColor.rgb * _Color.rgb;

				fixed3 ambient = UNITY_LIGHTMODEL_AMBIENT.xyz * albedo;

				fixed3 diffuse = _LightColor0.rgb * albedo * max(0, dot(worldNormal, worldLightDir));

				return fixed4(ambient + diffuse, texColor.a * _AlphaScale);  //返回需要设置透明通道值,只有使用Blend命令打开混合后,这里的设置才有意义,否则这些透明度并不会对片元的透明效果有任何影响
			}

			ENDCG
		}

		Pass
		{

			Tags{
     "LightMode" = "ForwardBase" }

			Cull Back   //剔除背面,渲染正面

			ZWrite Off  //关闭深度写入,透明度混合中都应关闭深度写入
			Blend SrcAlpha OneMinusSrcAlpha   //设置该Pass的混合模式,我们将源颜色(该片元着色器产生的颜色)的混合因子设为SrcAlpha,把目标颜色(已经存在于颜色缓冲中的颜色)的混合因子设为OneMinusSrcAlpha

			CGPROGRAM

			#pragma vertex vert
			#pragma fragment frag

			#include "Lighting.cginc"

			fixed4 _Color;
			sampler2D _MainTex;
			float4 _MainTex_ST;
			fixed _AlphaScale;

			struct a2v
			{

				float4 vertex : POSITION;
				float3 normal : NORMAL;
				float4 texcoord : TEXCOORD0;
			};

			struct v2f
			{

				float4 pos : SV_POSITION;
				float3 worldNormal : TEXCOORD0;
				float3 worldPos : TEXCOORD1;
				float2 uv : TEXCOORD2;
			};

			v2f vert(a2v v)
			{

				v2f o;

				o.pos = mul(UNITY_MATRIX_MVP, v.vertex);

				o.worldPos = mul(_Object2World, v.vertex).xyz;

				o.worldNormal = UnityObjectToWorldNormal(v.normal);

				o.uv = TRANSFORM_TEX(v.texcoord, _MainTex);

				return o;
			}

			fixed4 frag(v2f i) : SV_Target
			{

				fixed3 worldNormal = normalize(i.worldNormal);
				fixed3 worldLightDir = normalize(UnityWorldSpaceLightDir(i.worldPos));

				fixed4 texColor = tex2D(_MainTex, i.uv);

				fixed3 albedo = texColor.rgb * _Color.rgb;

				fixed3 ambient = UNITY_LIGHTMODEL_AMBIENT.xyz * albedo;

				fixed3 diffuse = _LightColor0.rgb * albedo * max(0, dot(worldNormal, worldLightDir));

				return fixed4(ambient + diffuse, texColor.a * _AlphaScale);  //返回需要设置透明通道值,只有使用Blend命令打开混合后,这里的设置才有意义,否则这些透明度并不会对片元的透明效果有任何影响
			}

			ENDCG
		}
	}

	//FallBack "Transparent/VertexLit"
}
边栏推荐
- csdn发文助手问题
- ML、DL、CV常见的问题整理
- [QNX Hypervisor 2.2用户手册]9.14 safety
- 页面整屏滚动效果
- 纸质说明书秒变3D动画,斯坦福大学吴佳俊最新研究,入选ECCV 2022
- Resolved (pymysqL connect to the database error) pymysqL. Err. ProgrammingError: (1146, "Table" test. Students' doesn 't exist ")
- 一篇文章讲清楚!数据库和数据仓库到底有什么区别和联系?
- Tortoise speed by "template"
- VU 非父子组件通信
- Shell项目实战1.系统性能分析
猜你喜欢

Five dimensions to start MySQL optimization
VU 非父子组件通信
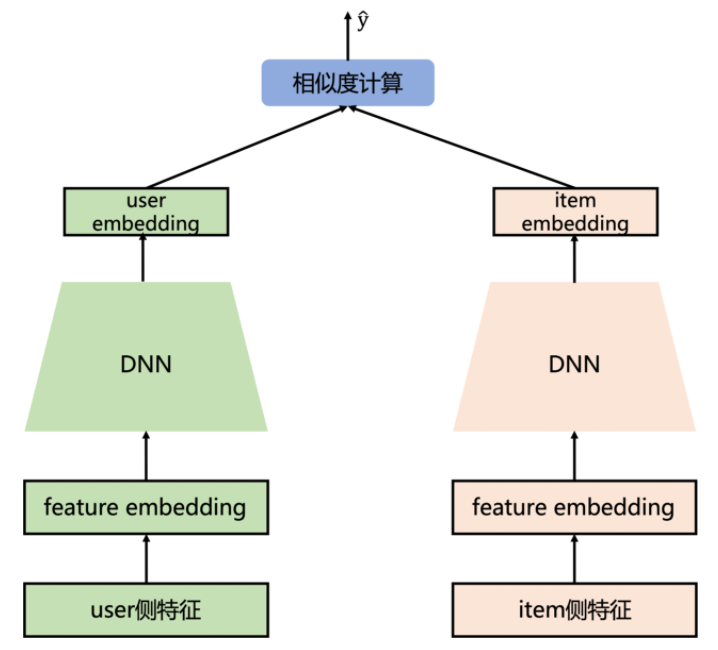
推荐系统-召回阶段-2013:DSSM(双塔模型)【Embedding(语义向量)召回】【微软】

Redis与分布式:哨兵模式

使用CompletableFuture进行异步处理业务

I summed up the bad MySQL interview questions

Comparison of Optical Motion Capture and UWB Positioning Technology in Multi-agent Cooperative Control Research
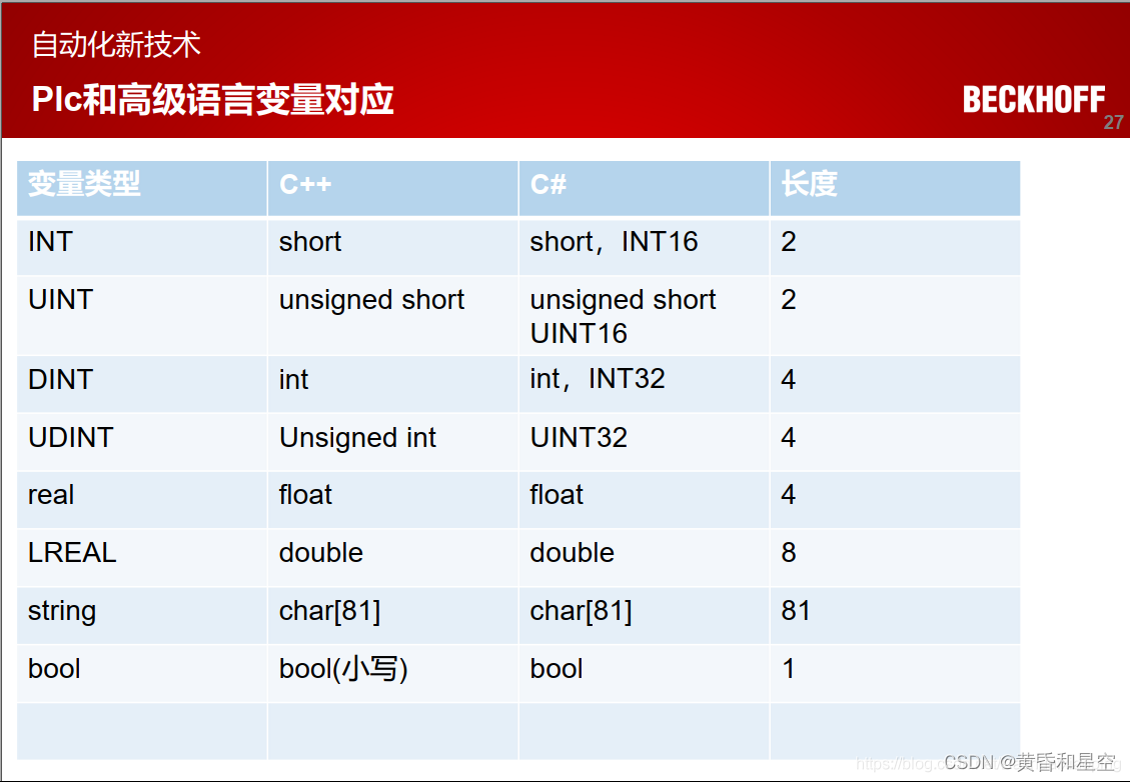
ADS communicate with c #
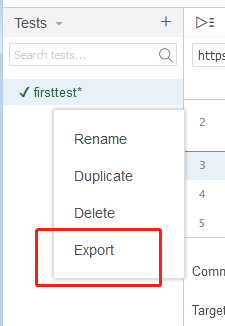
The Selenium IDE of the Selenium test automation

机器学习模型验证:被低估的重要一环
随机推荐
49. The copy constructor and overloaded 】
CodeIgniter 打开错误日志
Combination series - there are combinations when there are arrangements
以后面试官问你 为啥不建议使用Select *,请你大声回答他!
Analysis of the startup source code of hyperf (2) - how the request reaches the controller
Shell脚本经典案例:文件的备份
【Pytorch】torch.argmax()用法
In the future, the interviewer asks you why it is not recommended to use Select *, please answer him out loud!
Comparison of Optical Motion Capture and UWB Positioning Technology in Multi-agent Cooperative Control Research
C# Get network card information NetworkInterface IPInterfaceProperties
【蓝桥杯选拔赛真题46】Scratch磁铁游戏 少儿编程scratch蓝桥杯选拔赛真题讲解
“听我说谢谢你”还能用古诗来说?清华搞了个“据意查句”神器,一键搜索你想要的名言警句...
机器学习模型验证:被低估的重要一环
Node version switching management using NVM
Detailed guide to compare two tables using natural full join in SQL
The Selenium IDE of the Selenium test automation
1-hour live broadcast recruitment order: industry leaders share dry goods, and enterprise registration is open丨qubit · point of view
技能大赛训练题:MS15_034漏洞验证与安全加固
Numbers that appear only once in LeetCode
新款现代帕里斯帝预售开启,安全、舒适一个不落