当前位置:网站首页>Build an Internet of things infrared temperature measuring punch in machine with esp32 / rush to work after the Spring Festival? Baa, no matter how hard you work, you must take your temperature first
Build an Internet of things infrared temperature measuring punch in machine with esp32 / rush to work after the Spring Festival? Baa, no matter how hard you work, you must take your temperature first
2022-07-04 05:17:00 【Haas technology community】
The second week after the Spring Festival, everyone should have reworked , We must pay attention to the epidemic risk when coming and going during the Spring Festival transportation !
The human body infrared temperature measurement system is a set of real-time monitoring of the temperature of visitors , When abnormal body temperature is detected , The equipment will send out buzzer alarm and corresponding nail pushing , The monitor can quickly understand the situation of the visitors .
This case introduces how to build a human body temperature measurement system against the background of COVID-19 .
According to the skin temperature of various parts of the human body, there will be some differences , It is suggested to take a unified temperature measurement with one part of the forehead or the back of the hand , This ensures that the measurement of reference temperature is more effective and accurate , And the distance should not exceed 1m, It is not suitable to measure the temperature immediately after staying in a muggy environment for too long , You can wait 15 Minutes to half an hour before measurement :
- Temperature of back of hand :33~35 degree
- Measuring distance : Less than 1m
Get ready
This case needs the following hardware :
- ESP32 a
- MLX90614 A human body infrared temperature sensor
- SSD1306 There's a screen
- A buzzer
- There are several DuPont lines
- Micro-USB A data line
Hardware wiring diagram
The hardware wiring diagram is shown in the figure below :

according to ESP32 Hardware wiring diagram , It can be learned that oled And the human body infrared temperature module is I2C Bus connection , Buzzer i/o And muc adopt pwm Connect .
Internet of things platform development
Open public instance
For readers who use the Internet of things platform for the first time , You need to open an instance to use the functions of the Internet of things platform . Here you can use free public instances for development .
stay Internet of things platform in , In the upper left corner, choose “ East China 2- Shanghai ”, Click on “ Public examples ”, It can be opened .
After opening the function of Internet of things platform , You need to complete the following 3 Complete the setting of cloud devices in three steps :
- Create cloud products
- Create product attributes ( Models of things )
- Create cloud devices ( Get triples )
Create cloud products
Click on the image above “ Public examples ”, You can enter Console Create products . then , Click the create product button , As shown in the figure below .

On the new product setting page, follow the figure below , Set up “ The product name ”, Select the “ Custom category ”( If the created product category is a standard category , You can choose a standard category ), Node type selection “ Direct connect device ”, Networking mode selection “Wi-Fi”, Data format selection “ICA Standard data format ”, Select the default settings for inspection type and certification method . It can also be created according to the developer's own needs “ Product description ” Add a description of this product to the page .

After selection , Click on “ confirm ” Button , Product creation can be completed . return “ product ” After the page, you can see that the newly created... Will appear in the product class table “ thermometer ” Products , As shown in the figure below .

Create product attributes ( Models of things )
Click on the image above “ see ” Button , You can see the product information ,Topic list , Function definition , Setting of product related functions such as data analysis . It opens at “ Function definition ” TAB , You can see the definition of equipment object model , Click on “ Add custom features ”, The function name is 、 identifier 、 The data types and definitions are as follows .

The identifier is the identifier to be used in the message that the device side reports the device attribute status , And only when the attribute content reported by the equipment meets “ Data definition ” The data value range in the will be recorded by the Internet of things platform , Otherwise, it will be filtered out by the Internet of things platform as an illegal attribute .
After the product and its object model are created, the equipment of the product can be created .
Create cloud devices ( Get triples )
On the product list page , Click on “ Manage devices ”, It will go to the device management page .

stay “ equipment ” Page hits “ Add equipment ” Button , As shown in the figure below .

stay “ Add equipment ” Set... In the page “deviceName”, Here, developers can fill in the device name they want to set , You can also let the system automatically generate the equipment name without filling in anything , As shown in the figure below .

After adding the device , Click on “ Go to check ” Button , You can see the details of this device .

There are two pieces of equipment information that need to be matched with the development of the equipment side :
- A triple
- Object model attribute information

Get device triples
As shown in the figure above , Click on “ see ” Button , You can see the triple information of the device , Triples are unique identifiers associated with IOT devices and IOT cloud devices , When the device is connected to the cloud, triple information will be used for authentication with the cloud , After authentication, the cloud will think that the device has been activated and online .

View device attribute information
On the device details page “ Model data ” All attribute information of the device can be seen in the tab 、 Equipment time reporting and equipment service call , As shown in the figure below . When the IOT device reports the device attribute according to the identifier corresponding to the device attribute , In this picture “ Human body temperature “ And other attribute values will display the latest attribute information of the device .
The process of creating products and devices is designed according to the idea of object-oriented , Creating a product can be regarded as creating a new class , The object model is the object of the class , To create a device is to instantiate a class .
Device side development
development environment
Before proceeding to the next step, please make sure that ESP32 The development environment has been built . Please refer to esp32 development environment Explanation .
Create solutions
Click " Quick start " Key (

) Will pop up HaaS Studio Welcome page of , Please click on “ Create project ” Button .
In the following pop-up box , Set the project name (“ir_temperature”) And after the workspace path , Hardware type selection ESP32, Click on “ Create... Now ”, Create a Python Solutions for light applications .

take The scripts directory Overwrite after copying all files in ir_temperature Original documents under the project directory . among main.py The content of the script is shown in the following figure :
#########
#########
from aliyunIoT import Device     # iot Components are components that connect Alibaba cloud's Internet of things platform
import network                   # Wi-Fi The library where the function is located
import ujson
##################
from driver import I2C,PWM,TIMER
import utime
from ssd1306 import SSD1306_I2C
import buzzer
import mlx90614
import time
INVALUDE_TEMP = 1037 #  Failure measurement
LOWER_LEVEL = 30 #  Minimum effective temperature measurement threshold  【30 60】
HIGH_LEVEL = 60 #  Maximum effective temperature measurement threshold
ABNORMAL_TEMP = 35 #  Abnormal temperature setting threshold   【30 ... 60】
E_CAL_TEMP_INVALID = 1
E_CAL_TEMP_FINISH = 2
E_CAL_TEMP_HIGH = 3
E_CAL_TEMPING = 4
E_CAL_TEMP_START = 5
timer_interval_100ms = 100 #ms
cal_temp_timer = 100  #15s = (150*timer_interval_100ms)
high_timer = 50  #10s = (100*timer_interval_100ms)
TEMP_CAL_TIMER = (cal_temp_timer) # Effective measurement time
TEMP_CAL_TIMER_HIGH = (high_timer) # Abnormal temperature , Effective measurement time
timer_interval_1000ms = 1000
stay_long = 5  # 5s (5*timer_interval_1000ms)
DISPLAY_STAY_LONG = (stay_long) #  After measuring the effective temperature   Screen duration
mlx90614Dev = 0
oled = 0
object_temp = 0.00
ambient_temp = 0.00
cal_hightemp_cnt = 0
cal_temp_cnt = 0
last_temp = 0
valid_temp = 0
blink = 0
display_time_cnt = 0
event_display = 0
start_cal_temp = 1
time_is_start = 0
displaytime_flag = 0
obj_buzzer = 0
pwmObj = 0
temptimerObj = 0
oledtimerObj = 0
displaytimerObj = 0
#########
#  IOT platform connection flag bit
iot_connected = False
wlan = None
#  Triple information
productKey = " Product key " # You need to fill in the application of the Internet of things cloud platform productKey Information
deviceName = " Equipment name " # You need to fill in the application of the Internet of things cloud platform deviceName Information
deviceSecret = " Device key " # You need to fill in the application of the Internet of things cloud platform deviceSecret Information
#  Examples of Internet of things devices
device = None
# Wi-Fi SSID and Password Set up
wifiSsid = " Please fill in your router name "
wifiPassword = " Please fill in your router password "
...
if __name__ == '__main__' :
    mlx9061_init()
    oled_init()
    ##########
    wlan = network.WLAN(network.STA_IF)   # establish WLAN object
    get_wifi_status()
    connect_lk(productKey, deviceName, deviceSecret)
    ##########
    buzzer_init()
    timer_init()
Then on main.py After the content inside, you need to complete the following three code modifications .
Python For a detailed description of the script, please refer to the text notes embedded in the script
- Modify the router name and password modify ir_temperature In Engineering main.py in wifiSsid and wifiPassword The value of is the name and password of the router to which the reader actually wants to connect ( Please note that the name and password need to be placed in "" Symbol in the middle ).
# Wi-Fi SSID and Password Set up
wifiSsid = " Please fill in your router name "
wifiPassword = " Please fill in your router password "
After the modification is completed get_wifi_status Function wlan.connect(wifiSsid, wifiPassword) The statement will connect to the router set by the reader .
- Modify device side triples
modify ir_temperature In Engineering main.py in productKey、deviceName and deviceSecret The value of is the triple information of the IOT device created by the reader , As shown in the figure below :
#  Triple information
productKey = " Product key "
deviceName = " Equipment name "
deviceSecret = " Device key "- Modify the identifier used by the equipment to report the temperature and humidity information
humiture In Engineering main.py The following code in realizes the function of uploading temperature and humidity values to the cloud . among object_temp Identifier used when reporting abnormal human body temperature .
#  Upload the abnormal temperature information of the human body to the Internet of things platform
def report_event():
    upload_data = {'params': ujson.dumps({
        'object_temp': object_temp,
    })
    }
    device.postProps(upload_data)
Make sure object_temp The identifier is the same as the attribute identifier in the thing model of Internet of things products , As shown in the figure below :

The following are the key code paragraphs added in this section :
- Parameter setting of infrared temperature measurement process of human body
ABNORMAL_TEMP = 35 #  Abnormal temperature setting threshold   【30 ... 60】
TEMP_CAL_TIMER = (cal_temp_timer) # Effective measurement time
TEMP_CAL_TIMER_HIGH = (high_timer) # Abnormal temperature , Effective measurement time
- New functions are added to process cloud information and control GPIO The interface of
def is_abnormal(obj_temp):
    global cal_hightemp_cnt,cal_temp_cnt,last_temp,valid_temp
    i_obj_temp = int(obj_temp)
    if i_obj_temp == INVALUDE_TEMP :
        return
    if i_obj_temp >= HIGH_LEVEL or i_obj_temp <= LOWER_LEVEL:
        last_temp = i_obj_temp
        cal_hightemp_cnt = 0
        cal_temp_cnt = 0
        return E_CAL_TEMP_INVALID
    else:
        if last_temp >= HIGH_LEVEL or last_temp <= LOWER_LEVEL:
            last_temp = i_obj_temp
            cal_temp_cnt = 1
            cal_hightemp_cnt = 1
            return E_CAL_TEMP_START # Start the temperature measurement
        if i_obj_temp >= ABNORMAL_TEMP:
            if last_temp < ABNORMAL_TEMP:
                cal_hightemp_cnt = 1 # Restart the test , High temperature is measured for the first time
            else:
                cal_hightemp_cnt += 1 # Continuous high temperature measurement
        else:
            cal_hightemp_cnt = 0  # Normal temperature is measured
    cal_temp_cnt += 1
    last_temp = i_obj_temp
    if cal_hightemp_cnt >= TEMP_CAL_TIMER_HIGH:
        cal_hightemp_cnt = 0   # Continuous measurement TEMP_CAL_TIMER_HIGH It's all high temperature , Then it is determined that the high temperature
        valid_temp = obj_temp
        return E_CAL_TEMP_HIGH
    if cal_temp_cnt >= TEMP_CAL_TIMER:
        cal_temp_cnt = 0
        valid_temp = obj_temp
        return E_CAL_TEMP_FINISH # Continuous at most TEMP_CAL_TIMER, Then end the temperature measurement
    return E_CAL_TEMPING
Running results
Push this script to ESP32 after , Run this script ,ESP32 The serial port will periodically print the following logs . among :
- “ Internet of things platform connected successfully ” Represents a successful connection to the Internet of things platform
- “start” It indicates that effective temperature measurement begins
- "high" Followed by the ambient temperature collected by the device and the measured human body temperature ,“23.63C | 35.39C”, Set the temperature threshold 35, Greater than threshold , Report the abnormal temperature , At the same time, the buzzer gives an alarm .
- "finish" Followed by the ambient temperature collected by the device and the measured human body temperature ,23.61C | 32.09C, Set the temperature threshold 35, Less than threshold , It means that the temperature is normal .
==== python file check /data/pyamp/main.py ====
 ==== python execute from /data/pyamp/main.py ====
mlx90614 inited!
ssd1306 inited!
wifi_connected: False
wifi_connected: False
wifi_connected: False
wifi_connected: False
('192.168.0.204', '255.255.255.0', '192.168.0.1', '192.168.0.1')
establish tcp connection with server(host='a1I8HyYFD6K.iot-as-mqtt.cn-shanghai.aliyuncs.com', port=[443])
sleep for 1 s
tcp_connect: can only connect from state CLOSED
success to establish tcp, fd=54
 Internet of things platform connected successfully
sleep for 2s
buzzer inited!
>>> display  1 0
display ivalid enent
time stop:
------------------
reload time: 0
start
display  4 0
display  4 0
high
23.63C | 35.39C
------------------
reload time: 0
start
display  4 0
display  4 0
display  4 0
finish
23.61C | 32.09C
Internet of things platform end device information viewing
After the system of the Internet of things device is started successfully and connected to the Internet of things platform , The corresponding device status on the Internet of things platform will change from ” Inactive state “ Turn into ” go online “, The attribute values reported by the device to the IOT platform will be displayed on the data tab of the IOT model .

At this time, if the device detects abnormal body temperature , The object model data of the Internet of things platform will be updated to the latest attribute value reported by the device .
Nailing message reminder
Add a nail robot
Create a group on the pin and enter the group settings -> Intelligent group assistant -> Add robots -> Customize . First choose “ Intelligent group assistant ”:

Then enter “ Robot Management ”, Choose to click “ Customize ”

Start configuring robots , As shown in the figure below :

Click finish , In the next interface , It will show a webhook Address , Copy this address , We'll use that later .

IoT Studio Set up
First, from the function page of the Internet of things platform , Click on related products , Get into IoT Studio Product page , After opening the service ( First Visit ) Choose application development -> Business services -> Create a new business service for testing

Name the service , If the following items have no content , You can create a new project from the link

If the following items have no content , Click on the top “ New projects ” Button , Create as follows :

After entering the development interface , Click on the section in the red box below , Enter the drag and drop development interface

Drag a device trigger node to the canvas on the right

Drag another nail robot up

Click on the small square in the red box , You can pull out a line , Connect to the small square in the red box on the right , Connect the two blocks , So data flows from the left to the right

Then start configuring the device trigger and nailing robot information , Be careful ( Configuration information exists when the above IOT platform creates products and devices , When you use it for the first time, you need to add associations )

When using it for the first time, you need to add the following product equipment associations :


Nail robot configuration
Click the nail robot node , And put your nailing robot webhook Fill in the address , Other options can be configured as shown in the figure below , Note that the key word for configuring the robot is “ equipment ”, Because the notification message here contains “ equipment ” Two words .

When you get here , You've done all the configuration , Ready to deploy and run , Click deployment and release in the figure below .

After operation , By powering on and off the device , Trigger message , Realize your nailing message notification !
边栏推荐
- Electronic components mall and data manual download website summary
- 2022g2 power station boiler stoker special operation certificate examination question bank and answers
- Encryption and decryption
- Capturing and sorting out external Fiddler -- Conversation bar and filter
- Notepad++--显示相关的配置
- Remote desktop client RDP
- With the advent of the IP era, how can E-sports hotels take advantage of the "east wind" of games?
- 中科磐云—模块A 基础设施设置与安全加固 评分标准
- The data mark is a piece of fat meat, and it is not only China Manfu technology that focuses on this meat
- Analysis of classical pointer and array written test questions in C language
猜你喜欢

LM小型可编程控制器软件(基于CoDeSys)笔记二十一:错误3703
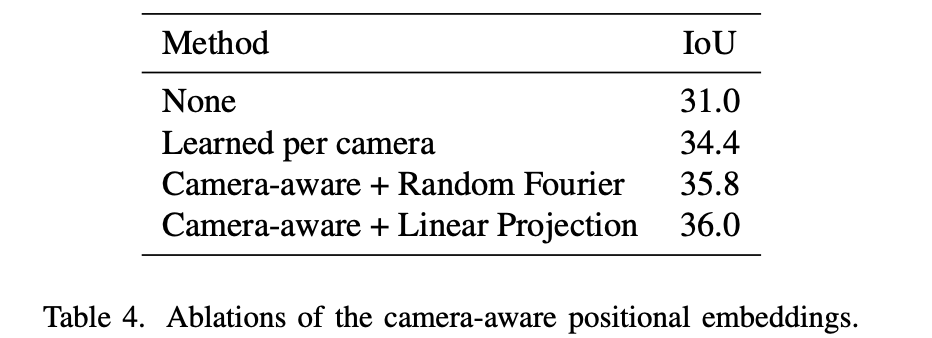
《Cross-view Transformers for real-time Map-view Semantic Segmentation》论文笔记

Flask
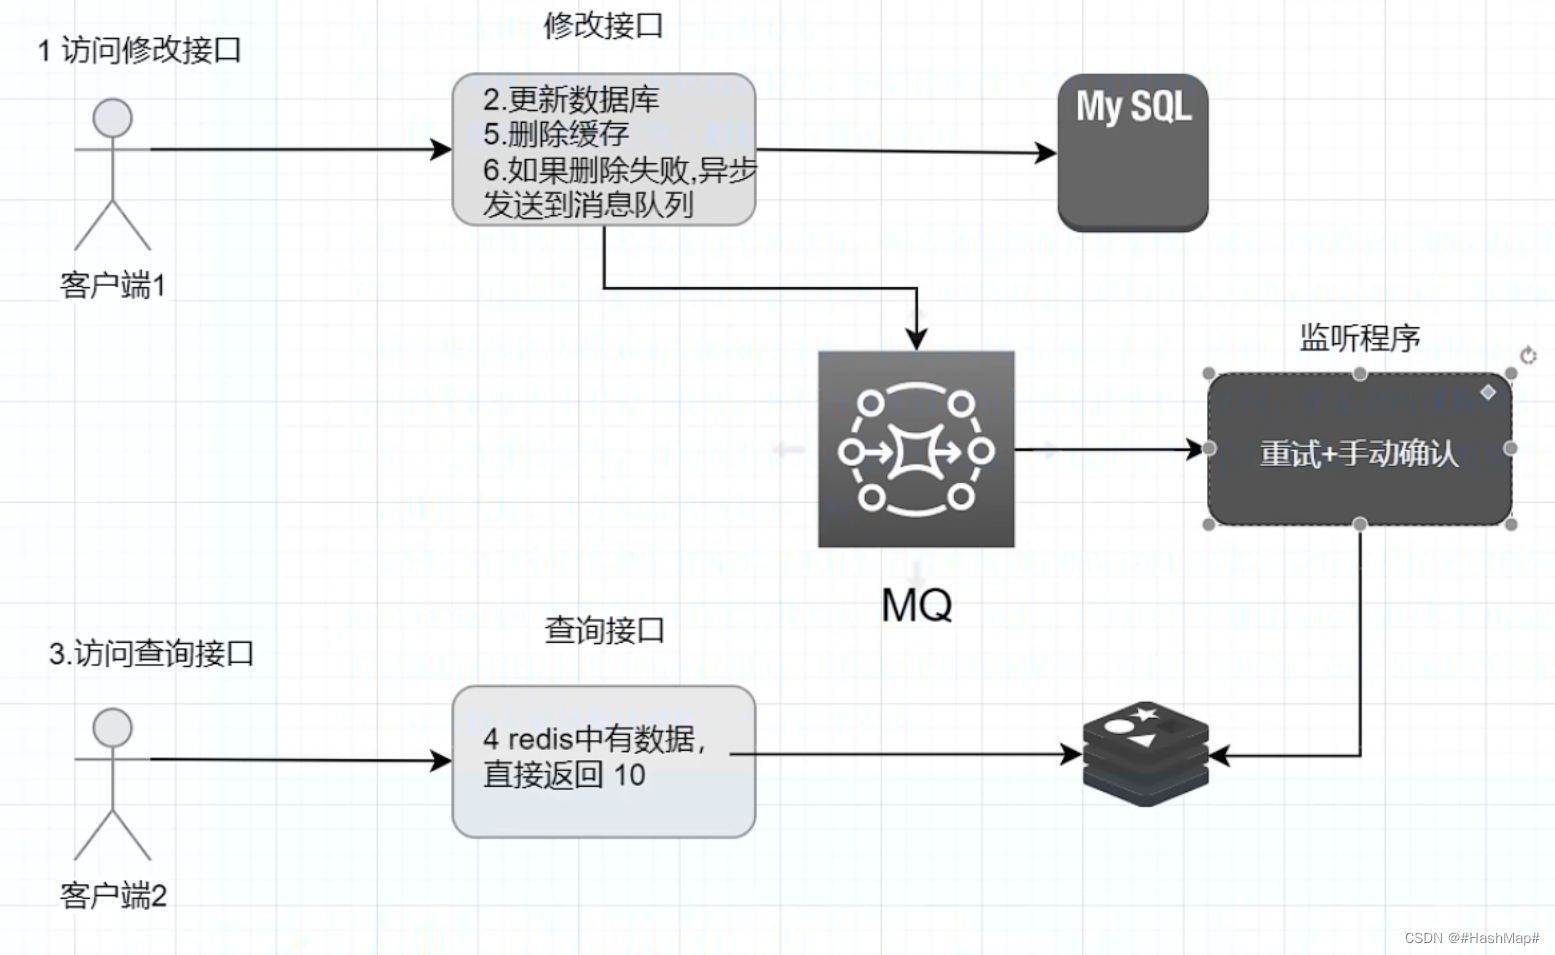
令人头痛的延时双删

How to build your own knowledge engine? Community open application

小程序毕业设计---美食、菜谱小程序
![[paper summary] zero shot semantic segmentation](/img/78/ee64118d86a7e43ec4d1cb97191fbe.jpg)
[paper summary] zero shot semantic segmentation

Topological sorting and graphical display of critical path

企业级日志分析系统ELK(如果事与愿违那一定另有安排)

2022 t elevator repair operation certificate examination question bank and simulation examination
随机推荐
Simple g++ and GDB debugging
TCP状态转换图
PostgreSQL has officially surpassed mysql. Is this guy too strong!
C basic (VII) document operation
Li Kou's 300th weekly match
[matlab] matlab simulates digital baseband transmission system eye diagram of bipolar baseband signal (class I part response waveform)
LabVIEW错误对话框的出现
Notes on the paper "cross view transformers for real time map view semantic segmentation"
中科磐云—模块A 基础设施设置与安全加固 评分标准
[matlab] general function of communication signal modulation Fourier transform
[matlab] matlab simulates digital bandpass transmission system ask, PSK, FSK system
Flink1.13 SQL basic syntax (I) DDL, DML
Several smart watch related chips Bluetooth chip low power consumption
[matlab] matlab simulation - narrow band Gaussian white noise
Using jsts in esmodule environment
【QT】定时器
June 2022 summary
【兴趣阅读】Adversarial Filtering Modeling on Long-term User Behavior Sequences for Click-Through Rate Pre
Simulink与Arduino串口通信
《Cross-view Transformers for real-time Map-view Semantic Segmentation》论文笔记