当前位置:网站首页>Flink1.15源码阅读——PER_JOB vs APPLICATION执行流程
Flink1.15源码阅读——PER_JOB vs APPLICATION执行流程
2022-07-31 08:56:00 【京河小蚁】
文章目录
背景
根据官网和源码中可知,目前PER_JOB模式已经被官悬弃用,后面可能会被完全剔除,替代的是APPLICATION模式
两种模式好处都是资源隔离,APPLICATION模式把main方法的初始化放到了集群组件的jobmanager,这样有对于客户端来说,从性能上有了很大的优化。
官网已经声明

源码中已经被标记弃用注解

通过比较看两者的源码,才更能体会到APPLICATION模式替代PER_JOB的优点。
PER_JOB
从execute方法开始读源码。如果想读StreamExecutionEnvironment#execute之前的部分,请参照另一篇Flink1.15源码阅读flink-clients客户端执行流程(阅读较枯燥)
用户代码
package com.flink.datastream;

import org.apache.flink.api.common.functions.RichFlatMapFunction;
import org.apache.flink.api.common.state.StateTtlConfig;
import org.apache.flink.api.common.state.ValueState;
import org.apache.flink.api.common.state.ValueStateDescriptor;
import org.apache.flink.api.common.time.Time;
import org.apache.flink.api.common.typeinfo.TypeHint;
import org.apache.flink.api.common.typeinfo.TypeInformation;
import org.apache.flink.api.java.tuple.Tuple2;
import org.apache.flink.configuration.Configuration;
import org.apache.flink.streaming.api.environment.StreamExecutionEnvironment;
import org.apache.flink.util.Collector;

/** * @author happy * @since 2022/5/24 */
public class CountWindowAverage extends RichFlatMapFunction<Tuple2<Long, Long>, Tuple2<Long, Long>> {


    /** * The ValueState handle. The first field is the count, the second field a running sum. */
    private transient ValueState<Tuple2<Long, Long>> sum;

    @Override
    public void flatMap(Tuple2<Long, Long> input, Collector<Tuple2<Long, Long>> out) throws Exception {


        // access the state value
        Tuple2<Long, Long> currentSum = sum.value();

        // update the count
        currentSum.f0 += 1;

        // add the second field of the input value
        currentSum.f1 += input.f1;

        // update the state
        sum.update(currentSum);

        // if the count reaches 2, emit the average and clear the state
        if (currentSum.f0 >= 2) {

            out.collect(new Tuple2<>(input.f0, currentSum.f1 / currentSum.f0));
            sum.clear();
        }
    }

    @Override
    public void open(Configuration config) {

        StateTtlConfig ttlConfig = StateTtlConfig
                .newBuilder(Time.seconds(1))
                .setUpdateType(StateTtlConfig.UpdateType.OnCreateAndWrite)
                .setStateVisibility(StateTtlConfig.StateVisibility.NeverReturnExpired)
                .build();

        ValueStateDescriptor<Tuple2<Long, Long>> descriptor =
                new ValueStateDescriptor<>(
                        "average", // the state name
                        TypeInformation.of(new TypeHint<>() {

                        }), // type information
                        Tuple2.of(0L, 0L)); // default value of the state, if nothing was set

        //设置每条独立keyed dataStream状态的生存时间
        descriptor.enableTimeToLive(ttlConfig);
        sum = getRuntimeContext().getState(descriptor);
    }

    public static void main(String[] args) throws Exception {

        StreamExecutionEnvironment env = StreamExecutionEnvironment.getExecutionEnvironment();

        // this can be used in a streaming program like this (assuming we have a StreamExecutionEnvironment env)
        env.fromElements(Tuple2.of(1L, 3L), Tuple2.of(1L, 5L), Tuple2.of(1L, 7L), Tuple2.of(1L, 4L), Tuple2.of(1L, 2L))
                .keyBy(value -> value.f0)
                .flatMap(new CountWindowAverage())
                .print();

        // the printed output will be (1,4) and (1,5)
        env.execute();
    }
}
env.execute()
从上面看到env.execute(), 通过idea一键下载源码包可以看全部源码,也可以通过github下载源码
public JobExecutionResult execute() throws Exception {

        // 获取流图 并将流图传入execute
        // 流图非常重要,暂时先不看 如果要看请关注本专栏,接下来会详细介绍四种图的依次转换
        return execute(getStreamGraph());
    }
execute(getStreamGraph())
反正flink源码运用设计模式,只有真正静下心来看,才能真正的体会,来吧,下一步
@Internal
    public JobExecutionResult execute(StreamGraph streamGraph) throws Exception {

        // 又封装了一层,点击异步执行execute
        final JobClient jobClient = executeAsync(streamGraph);

        // 下面是jobClient返回的结果,不用细看
        try {

            final JobExecutionResult jobExecutionResult;
			// 判断是否是附件模式,如果是附加模式,可以直接通过jobClient.getJobExecutionResult获取
            if (configuration.getBoolean(DeploymentOptions.ATTACHED)) {

                jobExecutionResult = jobClient.getJobExecutionResult().get();
            } else {

            //反之,new DetachedJobExecutionResult需要传入jobID
                jobExecutionResult = new DetachedJobExecutionResult(jobClient.getJobID());
            }

            jobListeners.forEach(
                    jobListener -> jobListener.onJobExecuted(jobExecutionResult, null));

            return jobExecutionResult;
        } catch (Throwable t) {

            // get() on the JobExecutionResult Future will throw an ExecutionException. This
            // behaviour was largely not there in Flink versions before the PipelineExecutor
            // refactoring so we should strip that exception.
            Throwable strippedException = ExceptionUtils.stripExecutionException(t);

            jobListeners.forEach(
                    jobListener -> {

                        jobListener.onJobExecuted(null, strippedException);
                    });
            ExceptionUtils.rethrowException(strippedException);

            // never reached, only make javac happy
            return null;
        }
    }
粘贴的源码为了保持源码的完整性,所以全部会粘出来,其实像try catch代码块不用关注。
executeAsync(streamGraph)
@Internal
    public JobClient executeAsync(StreamGraph streamGraph) throws Exception {

        // 检查 流图不能为空
        checkNotNull(streamGraph, "StreamGraph cannot be null.");
        checkNotNull(
                configuration.get(DeploymentOptions.TARGET),
                "No execution.target specified in your configuration file.");

        // 封装的PipelineExecutorFactory工厂方法
        final PipelineExecutorFactory executorFactory =
                executorServiceLoader.getExecutorFactory(configuration);

        // 检查
        checkNotNull(
                executorFactory,
                "Cannot find compatible factory for specified execution.target (=%s)",
                configuration.get(DeploymentOptions.TARGET));

        // 将流图、configuration、userClassloader三个参数传入并异步调用执行方法
        CompletableFuture<JobClient> jobClientFuture =
                executorFactory
                        .getExecutor(configuration)
                        .execute(streamGraph, configuration, userClassloader);

        // 获取jobClient执行结果
        try {

            JobClient jobClient = jobClientFuture.get();
            jobListeners.forEach(jobListener -> jobListener.onJobSubmitted(jobClient, null));
            return jobClient;
        } catch (ExecutionException executionException) {

            final Throwable strippedException =
                    ExceptionUtils.stripExecutionException(executionException);
            jobListeners.forEach(
                    jobListener -> jobListener.onJobSubmitted(null, strippedException));

            throw new FlinkException(
                    String.format("Failed to execute job '%s'.", streamGraph.getJobName()),
                    strippedException);
        }
    }
executorFactory.getExecutor(configuration).execute(streamGraph, configuration, userClassloader)
这里优点骚,展开说一下。
executorFactory.getExecutor(configuration)
executorFactory怎么获取的呢?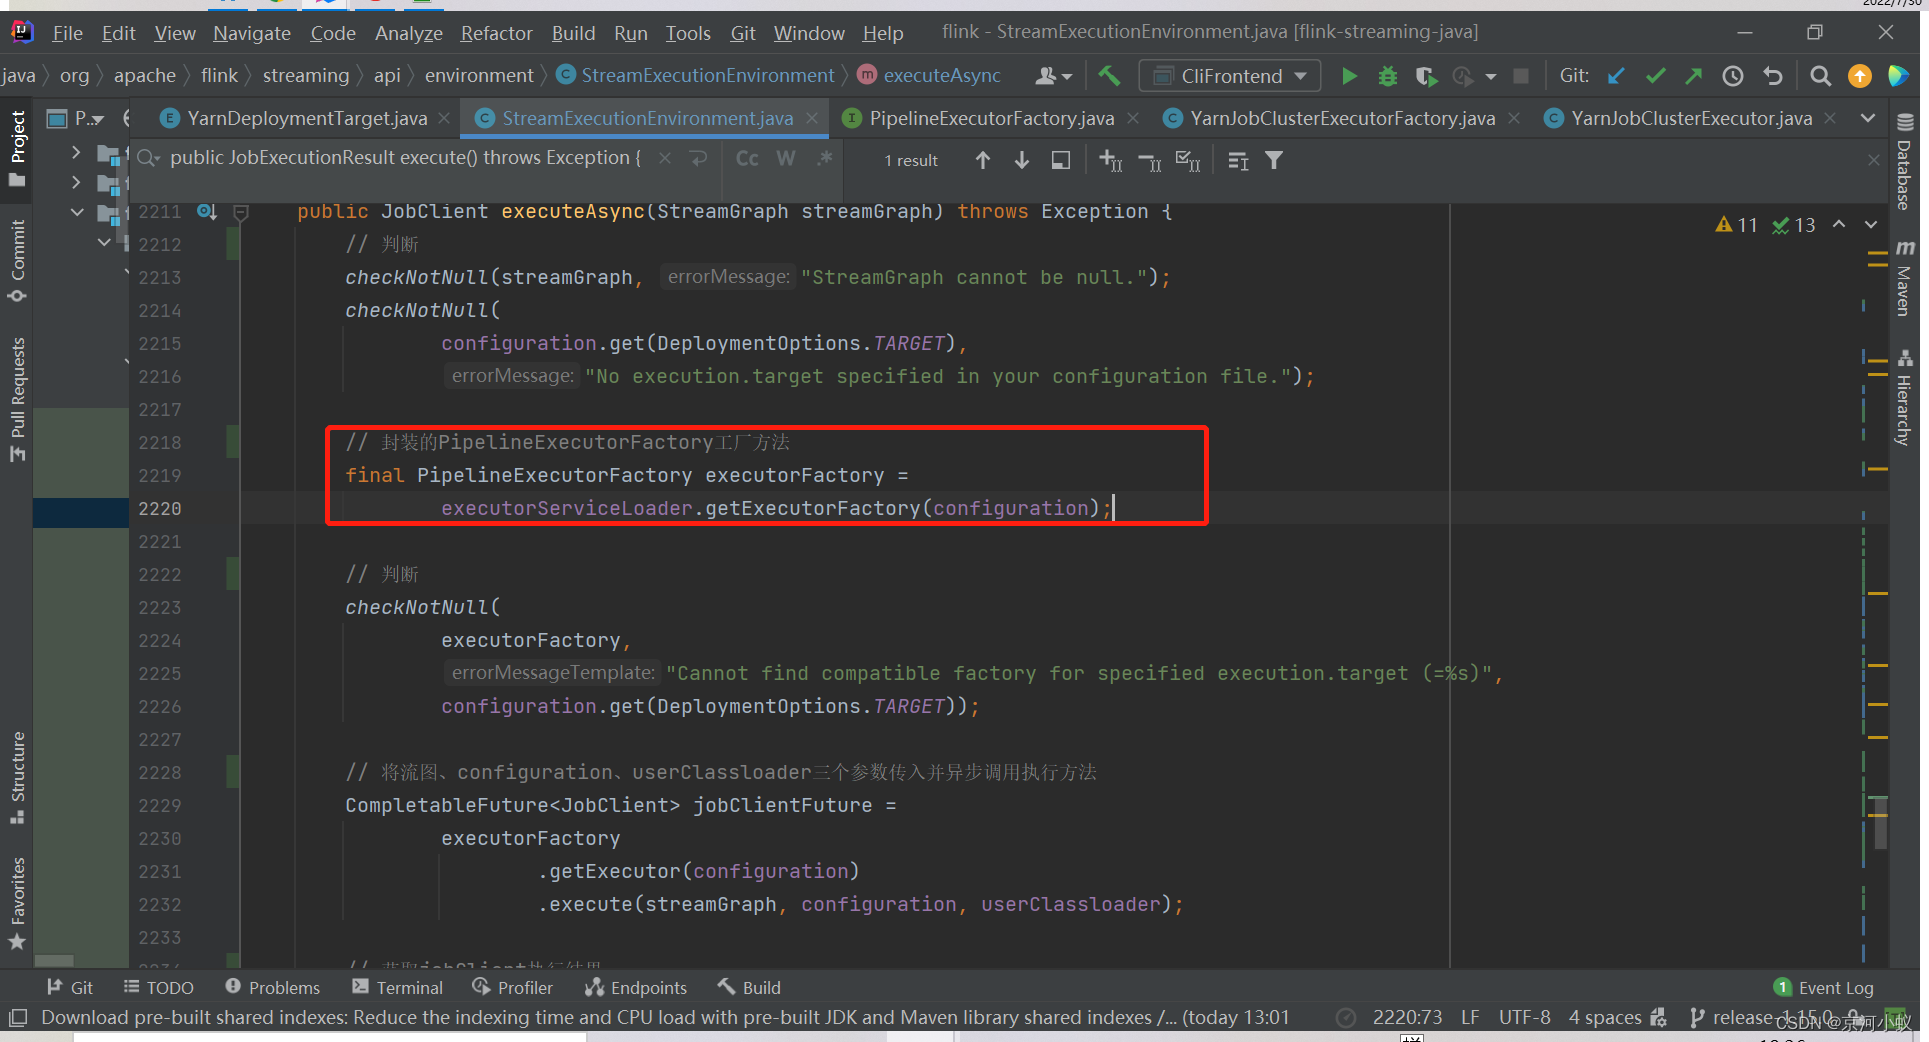
这是一个执行器工厂类,圈住的实现类就是返回的PER_JOB的执行器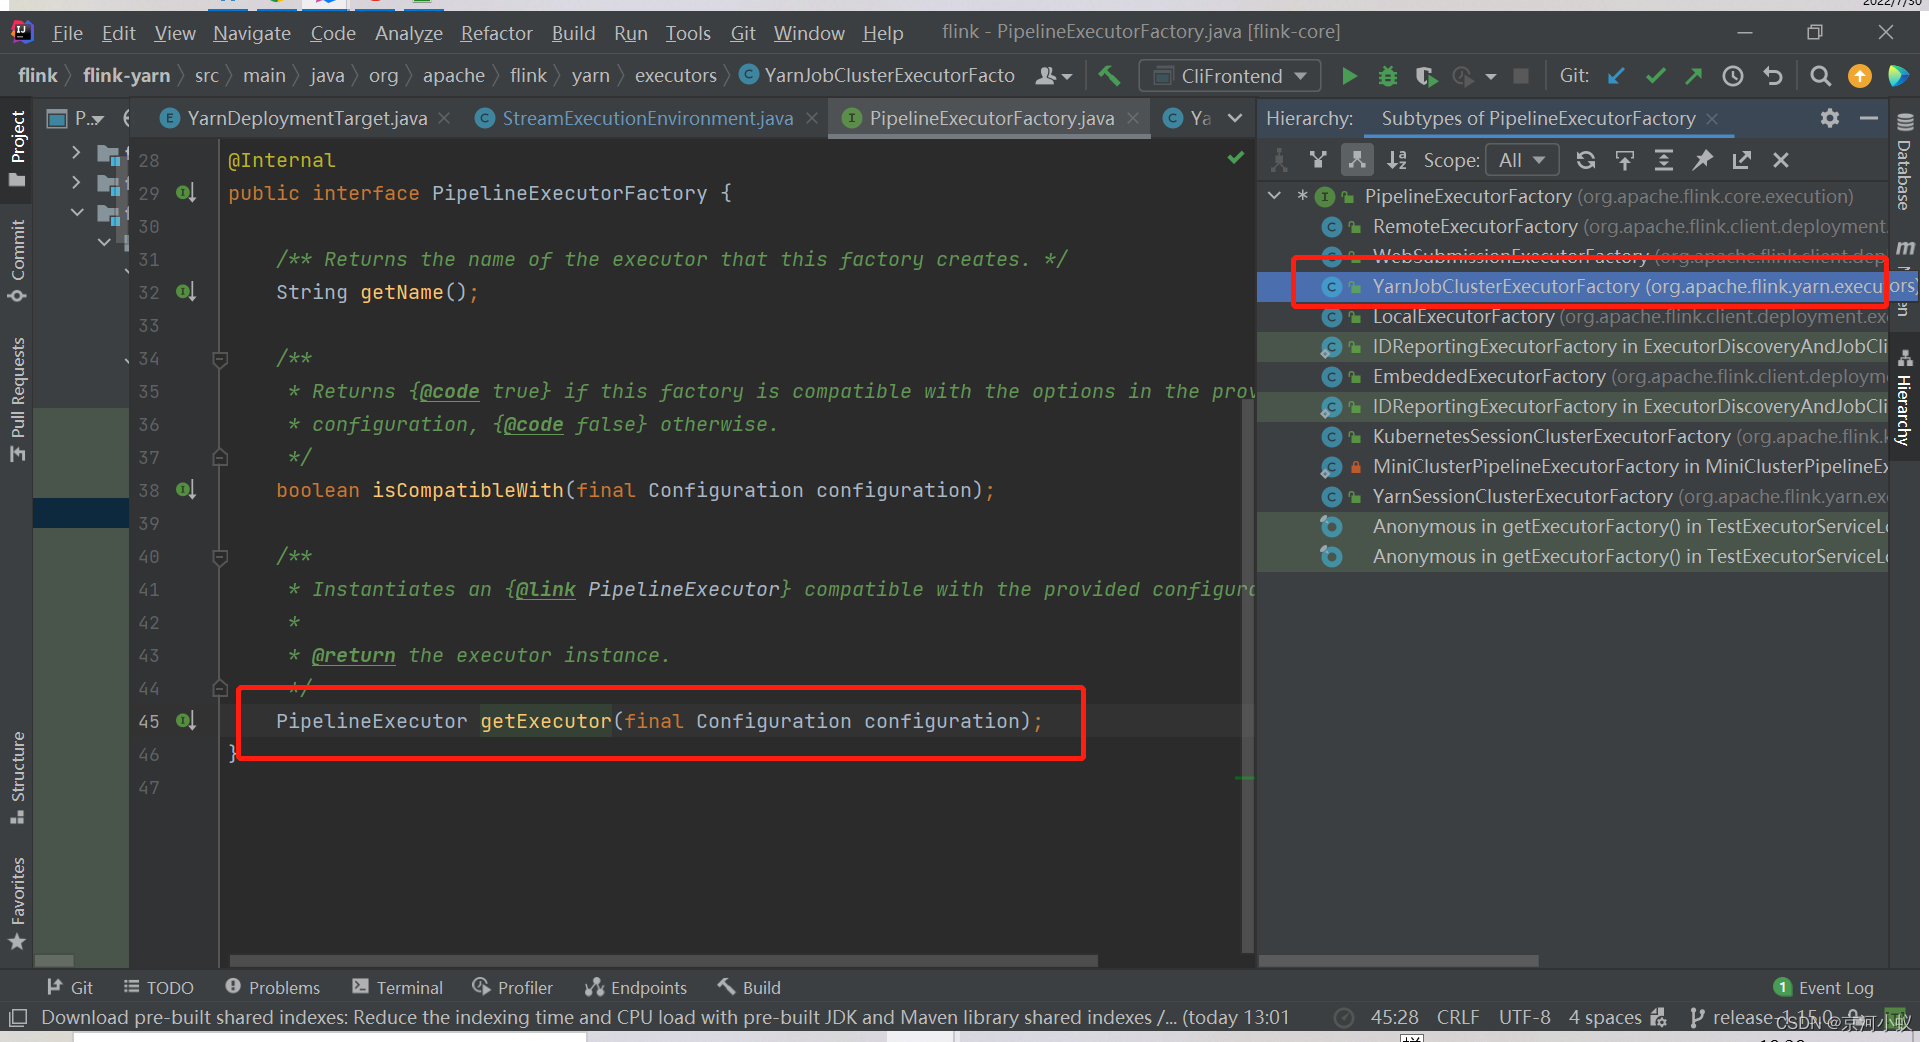
然后点进去,可以看到具体的实现方法
再点击YarnJobClusterExecutor(),进到这个类里面,可以看到下面内容
@Internal
@Deprecated
public class YarnJobClusterExecutor
        extends AbstractJobClusterExecutor<ApplicationId, YarnClusterClientFactory> {


    public static final String NAME = YarnDeploymentTarget.PER_JOB.getName();

    public YarnJobClusterExecutor() {

        super(new YarnClusterClientFactory());
    }
}
可以看到该类已经加上被弃用注解了,然后采用了一个设计模式——代理模式,super(new YarnClusterClientFactory()),另外你可以看到yarn-session最终也是调用的这个类。
从上面代码中,看到 getExecutor方法返回PipelineExecutor对象,然后接下来,再调用execute。
executorFactory.getExecutor(configuration).execute(streamGraph, configuration, userClassloader)

点击YarnJobClusterExecutor对象,如下所示
@Internal
@Deprecated
public class YarnJobClusterExecutor
        extends AbstractJobClusterExecutor<ApplicationId, YarnClusterClientFactory> {


    public static final String NAME = YarnDeploymentTarget.PER_JOB.getName();

    public YarnJobClusterExecutor() {

        super(new YarnClusterClientFactory());
    }
}
继承AbstractJobClusterExecutor<ApplicationId, YarnClusterClientFactory>,点到父类里查看execute方法
@Override
    public CompletableFuture<JobClient> execute(
            @Nonnull final Pipeline pipeline,
            @Nonnull final Configuration configuration,
            @Nonnull final ClassLoader userCodeClassloader)
            throws Exception {

        /* 将流图 转化为 作业图*/
        final JobGraph jobGraph = PipelineExecutorUtils.getJobGraph(pipeline, configuration);

        // 获取集群描述器: 创建、启动了YarnClient,包含了一些yarn、flink的配置和环境信息
        try (final ClusterDescriptor<ClusterID> clusterDescriptor =
                clusterClientFactory.createClusterDescriptor(configuration)) {

            final ExecutionConfigAccessor configAccessor =
                    ExecutionConfigAccessor.fromConfiguration(configuration);

            // 特有资源配置: JOBManager内存、TaskManager内存、每个tm的slot数量
            final ClusterSpecification clusterSpecification =
                    clusterClientFactory.getClusterSpecification(configuration);
			// 部署集群
            final ClusterClientProvider<ClusterID> clusterClientProvider =
                    clusterDescriptor.deployJobCluster(
                            clusterSpecification, jobGraph, configAccessor.getDetachedMode());
            LOG.info("Job has been submitted with JobID " + jobGraph.getJobID());

			// 异步返回结果
            return CompletableFuture.completedFuture(
                    new ClusterClientJobClientAdapter<>(
                            clusterClientProvider, jobGraph.getJobID(), userCodeClassloader));
        }
    }
部署PER_JOB集群
final ClusterClientProvider<ClusterID> clusterClientProvider =
                    clusterDescriptor.deployJobCluster(
                            clusterSpecification, jobGraph, configAccessor.getDetachedMode());

点进去YarnClusterDescriptor对象,看到如下代码
@Override
    public ClusterClientProvider<ApplicationId> deployJobCluster(
            ClusterSpecification clusterSpecification, JobGraph jobGraph, boolean detached)
            throws ClusterDeploymentException {


//再次提示,该api过期,请使用Cluster/Application模式代替
        LOG.warn(
                "Job Clusters are deprecated since Flink 1.15. Please use an Application Cluster/Application Mode instead.");
        try {

            return deployInternal(
                    clusterSpecification,
                    "Flink per-job cluster",
                    getYarnJobClusterEntrypoint(),
                    jobGraph,
                    detached);
        } catch (Exception e) {

            throw new ClusterDeploymentException("Could not deploy Yarn job cluster.", e);
        }
    }
阅读源码到这里算是一个小结了,下节该看启动AppMaster的源码了。下面接着看yarn-application模式的执行流程源码。
APPLICATION
从run-application开始读源码。
先到CliFrontend.java#main ,直接跳到下行代码
retCode = SecurityUtils.getInstalledContext().runSecured(() -> cli.parseAndRun(args));
cli.parseAndRun(args)
直接跳到 下行代码
case ACTION_RUN_APPLICATION:
   runApplication(params);
   return 0;
runApplication
protected void runApplication(String[] args) throws Exception {

        LOG.info("Running 'run-application' command.");

        // 获取命令行
        final Options commandOptions = CliFrontendParser.getRunCommandOptions();
        final CommandLine commandLine = getCommandLine(commandOptions, args, true);

        // 打印帮助命令
        if (commandLine.hasOption(HELP_OPTION.getOpt())) {

            CliFrontendParser.printHelpForRunApplication(customCommandLines);
            return;
        }

        // 获取活跃的命令行 ,详细代码介绍请阅读前面几节文章
        final CustomCommandLine activeCommandLine =
                validateAndGetActiveCommandLine(checkNotNull(commandLine));

        final ApplicationDeployer deployer =
                new ApplicationClusterDeployer(clusterClientServiceLoader);

        final ProgramOptions programOptions;
        final Configuration effectiveConfiguration;

        // No need to set a jarFile path for Pyflink job.
        if (ProgramOptionsUtils.isPythonEntryPoint(commandLine)) {

            programOptions = ProgramOptionsUtils.createPythonProgramOptions(commandLine);
            effectiveConfiguration =
                    getEffectiveConfiguration(
                            activeCommandLine,
                            commandLine,
                            programOptions,
                            Collections.emptyList());
        } else {

            programOptions = new ProgramOptions(commandLine);
            programOptions.validate();
            final URI uri = PackagedProgramUtils.resolveURI(programOptions.getJarFilePath());
            // 获取有效配置,一般是file:// 所有节点都能访问的路径
            effectiveConfiguration =
                    getEffectiveConfiguration(
                            activeCommandLine,
                            commandLine,
                            programOptions,
                            Collections.singletonList(uri.toString()));
        }

        final ApplicationConfiguration applicationConfiguration =
                new ApplicationConfiguration(
                        programOptions.getProgramArgs(), programOptions.getEntryPointClassName());
        // 开始部署
        deployer.run(effectiveConfiguration, applicationConfiguration);
    }
deployer.run(effectiveConfiguration, applicationConfiguration)

目前该接口只有一个实现类。
public <ClusterID> void run(
            final Configuration configuration,
            final ApplicationConfiguration applicationConfiguration)
            throws Exception {

        // 检查
        checkNotNull(configuration);
        checkNotNull(applicationConfiguration);

        LOG.info("Submitting application in 'Application Mode'.");

        // 获取集群客户端工厂类
        final ClusterClientFactory<ClusterID> clientFactory =
                clientServiceLoader.getClusterClientFactory(configuration);
        // 创建集群描述器 可以点进去细看
        try (final ClusterDescriptor<ClusterID> clusterDescriptor =
                clientFactory.createClusterDescriptor(configuration)) {

            // 获取集群特定配置
            final ClusterSpecification clusterSpecification =
                    clientFactory.getClusterSpecification(configuration);

            // 部署application集群
            clusterDescriptor.deployApplicationCluster(
                    clusterSpecification, applicationConfiguration);
        }
    }
点deployApplicationCluster 方法进去,是一个接口,看下实现类是怎么样的
@Override
    public ClusterClientProvider<ApplicationId> deployApplicationCluster(
            final ClusterSpecification clusterSpecification,
            final ApplicationConfiguration applicationConfiguration)
            throws ClusterDeploymentException {

        // 检查
        checkNotNull(clusterSpecification);
        checkNotNull(applicationConfiguration);

        final YarnDeploymentTarget deploymentTarget =
                YarnDeploymentTarget.fromConfig(flinkConfiguration);
        // 校验
        if (YarnDeploymentTarget.APPLICATION != deploymentTarget) {

            throw new ClusterDeploymentException(
                    "Couldn't deploy Yarn Application Cluster."
                            + " Expected deployment.target="
                            + YarnDeploymentTarget.APPLICATION.getName()
                            + " but actual one was \""
                            + deploymentTarget.getName()
                            + "\"");
        }

        applicationConfiguration.applyToConfiguration(flinkConfiguration);

        // No need to do pipelineJars validation if it is a PyFlink job.
        if (!(PackagedProgramUtils.isPython(applicationConfiguration.getApplicationClassName())
                || PackagedProgramUtils.isPython(applicationConfiguration.getProgramArguments()))) {

            final List<String> pipelineJars =
                    flinkConfiguration
                            .getOptional(PipelineOptions.JARS)
                            .orElse(Collections.emptyList());
            Preconditions.checkArgument(pipelineJars.size() == 1, "Should only have one jar");
        }

        try {

            // 部署flink yarn application 集群
            return deployInternal(
                    clusterSpecification,
                    "Flink Application Cluster",
                    YarnApplicationClusterEntryPoint.class.getName(),
                    null,
                    false);
        } catch (Exception e) {

            throw new ClusterDeploymentException("Couldn't deploy Yarn Application Cluster", e);
        }
    }
上面代码需要细看 默认集群名不一样,分离模式总是false,作业图总是为null,进去入口类不一样。yarn application、 yarn per job 、 yarn session三个模式deployInternal调用一样,就是传参不一样。
通过这两天的flink源码阅读,感觉源码真虐心,跳来跳去的,越看越能印证实际工作中的一些操作和八股,而且看到真实的代码感觉很踏实。
接下来,要看启动AppMaster源码了,有兴趣的小伙伴,可以一键三连。
欢迎指正批评。
边栏推荐
- 普通函数的参数校验
- 编译器R8问题Multidex
- UE4插件软链接(关联)
- 【小程序专栏】总结uniapp开发小程序的开发规范
- 7. JS ES6新增语法 new Map详讲,还有一道代码实战案例帮你快上手new Map
- 安装gnome-screenshot截图工具
- 2019 NeurIPS | Graph Convolutional Policy Network for Goal-Directed Molecular Graph Generation
- 0730~Mysql optimization
- Hematemesis summarizes thirteen experiences to help you create more suitable MySQL indexes
- skynet中一条消息从取出到处理完整流程(源码刨析)
猜你喜欢


![mysql 数据去重的三种方式[实战]](/img/37/ad4007a32d9eb563a303756785e72f.png)
随机推荐
mysql 数据去重的三种方式[实战]
[Mini Program Project Development--Jingdong Mall] Custom Search Component of uni-app (Middle)--Search Suggestions
哆啦a梦教你页面的转发与重定向
0730~Mysql optimization
SQL连接表(内连接、左连接、右连接、交叉连接、全外连接)
蚂蚁核心科技产品亮相数字中国建设峰会 持续助力企业数字化转型
TypeError The view function did not return a valid response. The function either returned None 的解决
[MySQL exercises] Chapter 4 · Explore operators in MySQL with kiko
SQL join table (inner join, left join, right join, cross join, full outer join)
【黄啊码】MySQL入门—3、我用select ,老板直接赶我坐火车回家去,买的还是站票
2022杭电杯超级联赛3
2022/7/30 考试总结
Ubuntu22.04安装mysql
7. JS ES6新增语法 new Map详讲,还有一道代码实战案例帮你快上手new Map
mysql安装教程【安装版】
Andoird开发--指南针(基于手机传感器)
C# 正则表达式汇总
JSP session的生命周期简介说明
文件的逻辑结构与物理结构的对比与区别
Ubuntu安装Mysql5.7