当前位置:网站首页>Flutter Paystack 所有选项实现
Flutter Paystack 所有选项实现
2022-07-31 07:47:00 【程序员小何SS】
前言
在撰写本文时,Android 和移动 SDK 的 paystack 集成仅支持卡支付和银行(仅 Zenith 作为选项)。
在本文中,您将学习如何在 Flutter 应用程序中包含其他支付选项。
PS: I'm assuming you are familiar with flutter and
paystack with all the necessary keys and how to get them
from your paystack dashboard.
在我们继续之前,请快速浏览一下 Paystack 的这篇文章,这就是我从那里得到想法的地方。如果你愿意,你可以使用那篇文章,或者继续阅读。
所需的 Paystack 详细信息和端点
在向paystack initialize api发出 POST 请求时,您将需要您的 paystack secret_key(使用 test 密钥进行测试,使用 live 密钥进行 prod)作为 Authorization 标头中的 Bearer 令牌。
检查下面的图像以获得更好的理解。
使用 secret_key 设置您的授权标头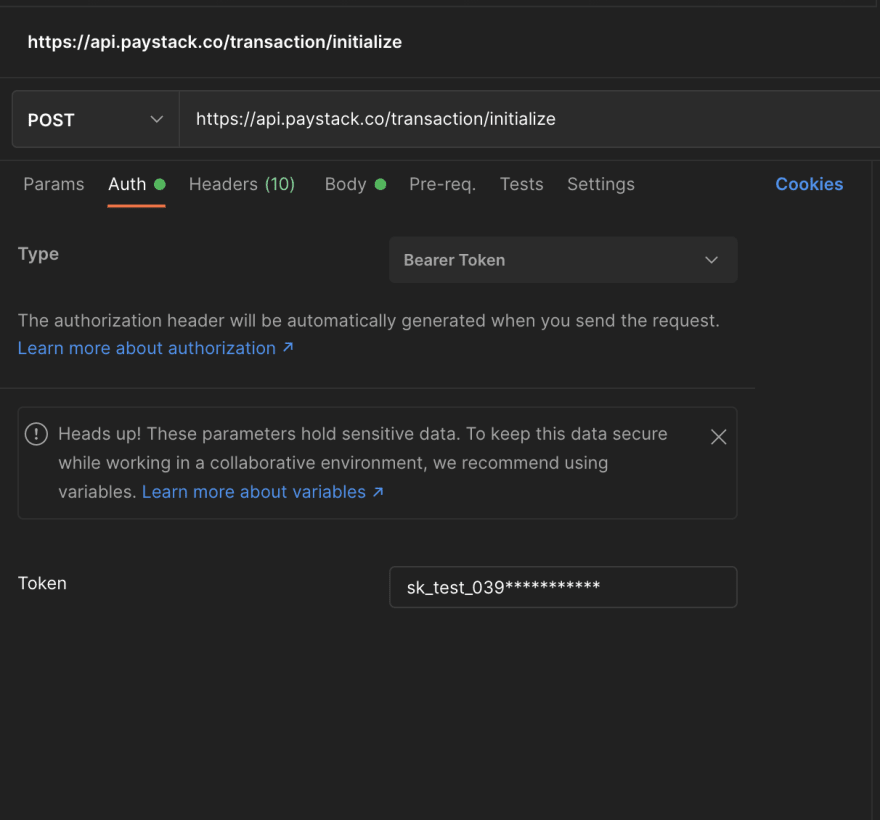
发布正文详细信息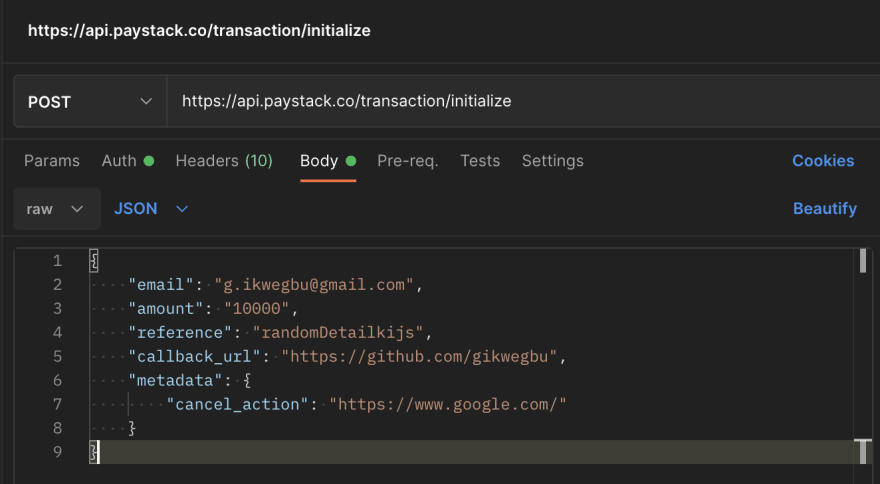
email: This is the payers email.

amount: This is the amount to be paid, please multiply by
        100, to remove the kobo value

reference: This should be randomly generated as it should
           be a unique value for each payment.

callback_url: This is the most important part. If you
              already have a callback url, setup from your
              paystack dashboard, you don't need this
              parameter. If you still go ahead to include
              it, it'll override that of the dashboard.
              This callback_url is what we will be
              listening for from our webview.

cancel_action: This will be used to listen for when the
               user wants to cancel payment, we then pop
               the webview screen.
来自 paystack API 的响应
authorization_url: This is the most important data we will
                   be needing for our webview, so hold on
                   to it .
在 Flutter 中调用 API
这种方法取决于您用于构建应用程序的架构,最后,您将收到相同的响应。在本文中,我将保持非常简单🥹。
var headers = {
  'Authorization': 'Bearer sk_test_039***************',
  'Content-Type': 'application/json',
};
var request = http.Request('POST', Uri.parse('https://api.paystack.co/transaction/initialize'));
request.body = json.encode({
  "email": "[email protected]",
  "amount": "10000",
  "reference": "randomDetails",
  "callback_url": "https://github.com/gikwegbu",
  "metadata": {"cancel_action": "https://www.google.com/"}
});
request.headers.addAll(headers);

http.StreamedResponse response = await request.send();

if (response.statusCode == 200) {
  print(await response.stream.bytesToString());
}
else {
  print(response.reasonPhrase);
}
Retrieve the authorization_url from the response and store
it in a global variable.
在 webView 中显示 Paystack 弹窗
好的,让我们在同一页面上 。我们正在构建一个应用程序,允许用户通过 paystack 为项目付款。
️ 数据流:
当用户点击 PAY 按钮时,paystack 会弹出,用户选择合适的选项,然后继续。一旦支付成功,我们将被重定向到一个callback_url。一旦发生这种情况,我们将不得不监听该 callback_url,当检测到它时,允许我们关闭 webview 小部件,然后继续将参考代码发送到我们的服务器以完成对 PAID 项目的签出。
️ 实施:
为了使过程无缝,我将使用一个弹出对话框,将其设置为全屏以覆盖我们当前的页面,添加 webview 小部件。
下面是一个代码片段,可以帮助您了解更多:
// This is called when the PAY button is clicked.
_showPaystack() async {
    var _ref = 'ChargedFromMyApp_${DateTime.now().millisecondsSinceEpoch}';
    Map data = {
      // Removing the kobo by multiplying with 100
      "amount": double.parse('${_amount * 100}').toInt(),
      "email": _user.email,
      "reference": _ref,
      "callback_url": "https://github.com/gikwegbu",
      "metadata": {"cancel_action": "https://www.google.com/"}
    };
    // This awaits the [authorization_url](#authUrl). NB: I'm using the MVVM architecture in my live code, but it's still the same process of retrieving the authURL.
    var authUrl = await _profileCtrl.paystackWebViewChargeCard(data);

    // only pull-up the dialog box when we get the authURL
    if (authUrl != null) {
      return showGeneralDialog(
          context: context,
          barrierDismissible: true,
          barrierLabel:
              MaterialLocalizations.of(context).modalBarrierDismissLabel,
          barrierColor: Colors.black45,
          transitionDuration: const Duration(milliseconds: 200),
          pageBuilder: (BuildContext buildContext, Animation animation,
              Animation secondaryAnimation) {
            return Center(
                child: Container(
              width: MediaQuery.of(context).size.width - 10,
              // height: MediaQuery.of(context).size.height - 80,
              height: MediaQuery.of(context).size.height - 0,
              padding: const EdgeInsets.only(top: 40),
              color: Colors.white,
              child: WebView(
                initialUrl: authUrl.toString(),
                javascriptMode: JavascriptMode.unrestricted,
                userAgent: 'Flutter;Webview',
                navigationDelegate: (navigation) {
                  //Listen for callback URL
                  if (navigation.url == "https://standard.paystack.co/close") {
                    Navigator.of(context).pop(); //close webview

                    // _txnRef is my glabally created variable to handle my reference
                    _txnRef = _ref;
                    _submit();
                  }
                  if (navigation.url ==
                      "github.com/gikwegbu?trxref=$_ref&reference=$_ref") {
                    Navigator.of(context).pop();
                    _txnRef = _ref;
                    _submit();
                  }
                  if (navigation.url == "https://www.google.com/") {
                    Navigator.of(context).pop();
                  }
                  return NavigationDecision.navigate;
                },
              ),
            ));
          });
    }
  }

The _submit(), is a function that sends the reference to

my backend to complete the purchase transaction on the

selected item.
监听导航 url
从上面的代码片段中,您会注意到 navigationDelegate 部分,这是您将处理侦听 callback_url 的地方,并且在用户使用卡付款的情况下,3Ds 身份验证将不得不重定向您到“ https://standard.paystack.co/close ”。除此之外,我们将监听我们的自定义 callback_url,然后弹出我们的屏幕。
最后
我们已经成功地将我们的 paystack 支付系统与乘法选项集成到我们的 Flutter 应用程序中。要体验多个选项,请将您的测试密钥更改为您的实时密钥,然后您才会看到
边栏推荐
- shell/bash脚本命令教程
- PowerCLi 通过自建PXE Server一键esxi7下批量部署常规New-VM
- Ubuntu22.04安装mysql
- SSM框架简单介绍
- SQL连接表(内连接、左连接、右连接、交叉连接、全外连接)
- [Interview: Concurrency 38: Multithreading: Thread Pool] Basic concepts of the ThreadPoolExecutor class
- MySQL table creation statement_Three commonly used MySQL table creation statements
- 安装部署KubeSphere管理kubernetes
- 初识NK-RTU980开发板
- 哪些字符串会被FastJson解析为null呢
猜你喜欢

google搜索技巧——程序员推荐
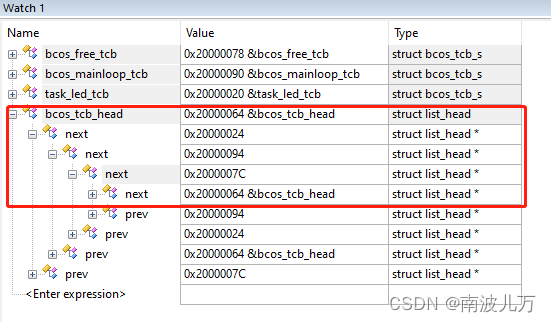
Linked list implementation and task scheduling
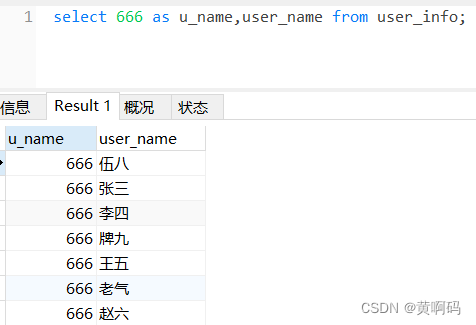
【黄啊码】MySQL入门—3、我用select ,老板直接赶我坐火车回家去,买的还是站票

48页智慧城市规划蓝图 解决方案
![[PSQL] SQL Basic Course Reading Notes (Chapter1-4)](/img/76/d416f79b7f2c93c1c79a285c30d3e6.png)
[PSQL] SQL Basic Course Reading Notes (Chapter1-4)

超级详细的mysql数据库安装指南

如何升级nodejs版本
Calculation example of matlab program iEEE9 node system for power flow calculation of AC-DC hybrid system based on alternate iteration method

Ubuntu22.04安装mysql

PowerCLi 通过自建PXE Server一键esxi7下批量部署常规New-VM
随机推荐
"C language" frog jumping steps recursion problem
进程和线程的区别&&run和start区别与联系
MySQL installation to the last step in the write the configuration file failed?And after the installation steps
Environment_Variable_and_SetUID
Open Source | Commodity Recognition Recommender System
mysql插入新字段方法
Embedded system driver primary [2] - _ parameters and dependencies under the kernel module
个人报错问题 持续总结
NK - RTU980 burning bare-metal program
开源|商品识别推荐系统
2704:寻找平面上的极大点
NK-RTU980烧写裸机程序
Read Elephant Swap in one article, why does it bring such a high premium to ePLATO?
2022.07.20_Daily Question
Pygame Surface对象
vscode输出中文乱码问题
Regarding "computing power", this article is worth reading
最大似然估计和最小二乘法 含代码
Linked list implementation and task scheduling
Machine Learning - Notes and Implementation of Linear Regression, Logistic Regression Problems