当前位置:网站首页>Haproxy搭建web群集
Haproxy搭建web群集
2022-08-04 12:48:00 【小微光】
一、Haproxy简介
1.Haproxy是一个使用c语言编写的自由及开放源代码软件,其提供高可用性、负载均衡,以及基于TCP和HTTP的应用程序代理
2.Haproxy特别实用于那些负载特别大的web站点,这些站点通常又需要会话保持或七层处理,Haproxy运行在当前的硬件上,完全可以支持数以万计的并发连接,并且它的运行模式使得它可以很简单安全的整合进你当前的架构中,同时可以保护你的web服务器不被暴露到网络上
3.Haproxy实现了一种事件驱动,单一进程模型,此模型支持非常大的并发连接数。多进程或多线程模型受内存限制系统调度器限制以及无处不在的锁限制,很少能处理数千并发连接。事件驱动模型因为在有更好的资源和时间管理的用户空间(User-Space)实现所有这些任务,所以没有这些问题。此模型的弊端是,在多核系统上,这些程序通常扩展性较差。这就是为什么他们必须进行优化以使每个cPt时间片(Cycle)做更多的工作。
4.包括GitHub、Bitbucket、Stack overflow、Reddit、Tumblr、Twitter和 ruenti在内的知名网站,及亚马逊网络服务系统都使用了Haproxy。
二、常见的Web集群调度器
目前常见的Web集群调度器分为软件和硬件
软件通常使用开源的LVS、Haproxy、Nginx
硬件一般使用的比较多的是F5,也有很多人使用梭子鱼、绿盟等国内产品
三、Haproxy应用分析
LVS在企业应用中抗负载能力很强,但存在不足
LVS不支持正则处理,不能实现动静分离
对于大型网站,LVS的实施配置复杂,维护成功相对较高
Haproxy是一款可提供高可用性、负载均衡、及基于TCP和HTTP应用的代理的软件
适用于负载大的Web站点
运行在硬件上可支持数万计的并发连接的连接请求
四、Haproxy调度算法原理
Haproxy支持多种调度算法,最常用的有三种
1.RR (Round Robin)
RR算法是最简单常用的一种算法,即轮询调度
例如:有三个节点A、B、C,第一个用户访问会被指派到节点A,第二个用户访问会被指派到节点B,第三个用户访问会被指派到C节点,第四个用户访问继续指派到节点A,轮询分配访问请求实现负载均衡效果
2.LC(Least Connections)
最小连接数算法,根据后端的节点连接数大小动态分配前端请求。
例如:有三个节点A、B、C,各节点的连接数分别为A:4、B:5、C:6,此时如果有第一个用户连接请求,会被指派到A上,连接数变为A:5、B:5、C:6
第二个用户请求会继续分配到A上,连接数变为A6、B:5、C:6;再有新的请求会分配给B,每次将新的请求指派给连接数最小的客户端
由于实际情况下A、B、C的连接数会动态释放,很难会出现一样连接数的情况,因此此算法相比较rr算法有很大改进,是目前用到比较多的一种算法
3.SH(Source Hashing)
基于来源访问调度算法,用于一些有Session会话记录在服务器端的场景,可以基于来源的IP、Cookie等做集群调度
例如:
有三个节点A、B、C,第一个用户第一次访问被指派到了A,第二个用户第次访问被指派到了B
当第一个用户第二次访问时会被继续指派到A,第二个用户第二次访问时依旧会被指派到B,只要负载均衡调度器不重启,第一个用户访问都会被指派到A,第二个用户访问都会被指派到B,实现集群的调度
此调度算法好处是实现会话保持,但某些IP访问量非常大时会引起负载不均衡,部分节点访问量超大,影响业务使用
五、Haproxy负载均衡策略非常多,常见的有如下8种:
(1)roundrobin,表示简单的轮询
(2)static-rr,表示根据权重
(3)1eastconn,表示最少连接者先处理
(4)source,表示根据请求源IP
(5)uri,表示根据请求的URI,做cdn需使用;
(6) url_param,表示根据请求的URl参数’balance url_param’requires an URL parameter name
(7)hdr(name),表示根据HTTP请求头来锁定每一次HTTP请求;
(8) rdp-cookie(name),表示根据cookie(name)来锁定并哈希每一次TCP请求。
六、LVS、Nginx、Haproxy的区别:
- LVS基于Linux操作系统内核实现软负载均衡,而Haproxy和Nginx是基于第三方应用实现
的软负载均衡; - LVS是可实现4层的IP负载均衡技术,无法实现基于目录、URL的转发。而Haproxy和Nginx
都可以实现4层和7层技术,Haproxy可提供TCP和HTTP应用的负载均衡综合解决方案: - LVs因为工作在ISO模型的第四层,其状态监测功能单一,而Haproxy在状态监测方面功能
更丰富、强大,可支持端口、URL、脚本等多种状态检测方式; - Haproxy功能强大,但整体性能低于4层模式的LVS负载均衡。
- Nginx主要用于Web服务器或缓存服务器。Nginx的upstream模块虽然也支持群集功能,但
是对群集节点健康检查功能不强,性能没有Haproxy好。
七、Haproxy搭建web群集
Haproxy服务器:192.168.80.10
nginx服务器1:192.168.80.20
nginx服务器2:192.168.80.30
客户端:192.168.80.5
1、部署haproxy服务器
关闭防火墙,将安装Haproxy所需软件包传到/opt目录下
[[email protected] haproxy]# systemctl stop firewalld
[[email protected] haproxy]# systemctl disable firewalld
[[email protected] haproxy]# setenforce 0
setenforce: SELinux is disabled
编译安装 Haproxy
[[email protected] opt]# yum install -y pcre-devel bzip2-devel gcc gcc-c++ make
[[email protected] opt]# tar zxvf haproxy-1.5.19.tar.gz
[[email protected] opt]# cd haproxy-1.5.19/
[[email protected] haproxy-1.5.19]# make TARGET=linux2628 ARCH=x86_64
[[email protected] haproxy-1.5.19]# make install
TARGET=linux26 #内核版本
#使用uname -r查看内核,如:2.6.18-371.el5,此时该参数用TARGET=linux26;kernel大于2.6.28的用TARGET=linux2628
ARCH=x86 64 #系统位数,64位系统
Haproxy服务器配置
[[email protected] haproxy-1.5.19]# mkdir /etc/haproxy
[[email protected] haproxy-1.5.19]# cp examples/haproxy.cfg /etc/haproxy/
[[email protected] haproxy-1.5.19]# cd /etc/haproxy/
[[email protected] haproxy]# vim haproxy.cfg

global
#4~5行–修改,配置日志记录,local0为日志设备,默认存放到系统日志
log /dev/log   local0 info
log /dev/log   local0 notice
#log loghost    local0 info
maxconn 4096					#最大连接数,需考虑ulimit-n限制

#8行–注释,chroot运行路径,为该服务自设置的根目录,一般需将此行注释掉
#chroot /usr/share/haproxy
uid 99							#用户UID
gid 99							#用户GID
daemon							#守护进程模式

defaults
log     global					#定义日志为global配置中的日志定义
mode    http					#模式为http
option  httplog					#采用http日志格式记录日志
option  dontlognull				#不记录健康检查日志信息
retries 3						#检查节点服务器失败次数,连续达到三次失败,则认为节点不可用
redispatch						#当服务器负载很高时,自动结束当前队列处理比较久的连接
maxconn 2000					#最大连接数
#contimeout      5000			#连接超时时间
#clitimeout      50000			#客户端超时时间
#srvtimeout      50000			#服务器超时时间
timeout http-request 10s        #默认http请求超时时间
timeout queue 1m                #默认队列超时时间
timeout connect 10s             #默认连接超时时间,新版本中替代contimeout,该参数向后兼容
timeout client 1m               #默认客户端超时时间,新版本中替代clitimeout,该参数向后兼容
timeout server 1m               #默认服务器超时时间,新版本中替代srvtimeout,该参数向后兼容
timeout http-keep-alive 10s     #默认持久连接超时时间
timeout check 10s               #设置心跳检查超时时间

删除下面所有listen项,添加

    listen  webcluster 0.0.0.0:80
    option httpchk GET /test.html	 #检查服务器的test.html文件
    balance roundrobin				 #负载均衡调度算法使用轮询算法roundrobin
    server inst1 192.168.80.20:80 check inter 2000 fall 3		#定义在线节点
    server inst2 192.168.80.30:80 check inter 2000 fall 3
添加Haproxy系统服务
[[email protected] haproxy]# cp /opt/haproxy-1.5.19/examples/haproxy.init /etc/init.d/haproxy
[[email protected] init.d]# chmod +x haproxy
[[email protected] init.d]# chkconfig --add /etc/init.d/haproxy
[[email protected] init.d]# ln -s /usr/local/sbin/haproxy /usr/sbin/haproxy
service haproxy start	或	/etc/init.d/haproxy sta
[[email protected] init.d]# systemctl start haproxy
2、节点服务器部署
节点服务器1部署
[[email protected] ~]# rpm -Uvh  http://nginx.org/packages/centos/7/noarch/RPMS/nginx-release-centos-7-0.el7.ngx.noarch.rpm
[[email protected] ~]# yum install -y  nginx
[[email protected] ~]# systemctl start nginx
节点服务器2部署
[[email protected] ~]# rpm -Uvh  http://nginx.org/packages/centos/7/noarch/RPMS/nginx-release-centos-7-0.el7.ngx.noarch.rpm
[[email protected] ~]# yum install -y  nginx
[[email protected] ~]# systemctl start nginx
编写网页内容
[[email protected] ~]# echo "this is 192.168.80.20 web1" > /usr/share/nginx/html/index.html
[[email protected] ~]# echo "this is 192.168.80.30 web2" > /usr/share/nginx/html/index.html
测试web群集
在客户端使用浏览器打开 http://192.168.80.10/test.html,不断刷新浏览器测试负载均衡效果

日志定义
#默认haproxy的日志是输出到系统的syslog中,查看起来不是非常方便,为了更好的管理haproxy的日志,我们在生产环境中一般单独定义出来。需要将haproxy的info及notice日志分别记录到不同的日志文件中。
vim /etc/haproxy/haproxy.cfg
global
log /dev/log local0 info
log /dev/log local0 notice
service haproxy restart
#需要修改rsyslog配置,为了便于管理。将haproxy相关的配置独立定义到haproxy.conf,并放到/etc/rsyslog.d/下,rsyslog启动时会自动加载此目录下的所有配置文件。
vim /etc/rsyslog.d/haproxy.conf
if ($programname == ‘haproxy’ and KaTeX parse error: Expected 'EOF', got '&' at position 74: …proxy-info.log &̲~ if (programname == ‘haproxy’ and $syslogseverity-text == ‘notice’)
then -/var/log/haproxy/haproxy-notice.log
&~
#说明:
这部分配置是将haproxy的info日志记录到/var/log/haproxy/haproxy-info.log下,将notice日志记录到/var/log/haproxy/haproxy-notice.log下。"&~"表示当日志写入到日志文件后,rsyslog停止处理这个信息。
systemctl restart rsyslog.service
#查看haproxy的访问请求日志信息
tail -f /var/log/haproxy/haproxy-info.log
八、拓展实验
用Haproxy和两个nginx服务器做负载均衡,nginx配置四层转发并且反向代理tomcat1、tomcat2
1、nginx四层转发配置
节点服务器1修改配置文件
[[email protected] ~]# cd /etc/nginx/
[[email protected] nginx]# vim nginx.conf
events {
......
stream {
        upstream tomcat_server {
           server 192.168.80.80:8080 weight=1;   #配置转发地址和权重
           server 192.168.80.80:8081 weight=1;
}
        server {
        listen 1266;                         #监听Haproxy过来的端口
        proxy_pass tomcat_server;
}
}

http {

[[email protected] nginx]# systemctl restart nginx
节点服务器2修改配置文件
[[email protected] ~]# cd /etc/nginx/
[[email protected] nginx]# vim nginx.conf
events {
......
stream {
        upstream tomcat_server {
           server 192.168.80.80:8080 weight=1;   #配置转发地址和权重
           server 192.168.80.80:8081 weight=1;
}
        server {
        listen 1266;                         #监听Haproxy过来的端口
        proxy_pass tomcat_server;
}
}

http {

[[email protected] nginx]# systemctl restart nginx
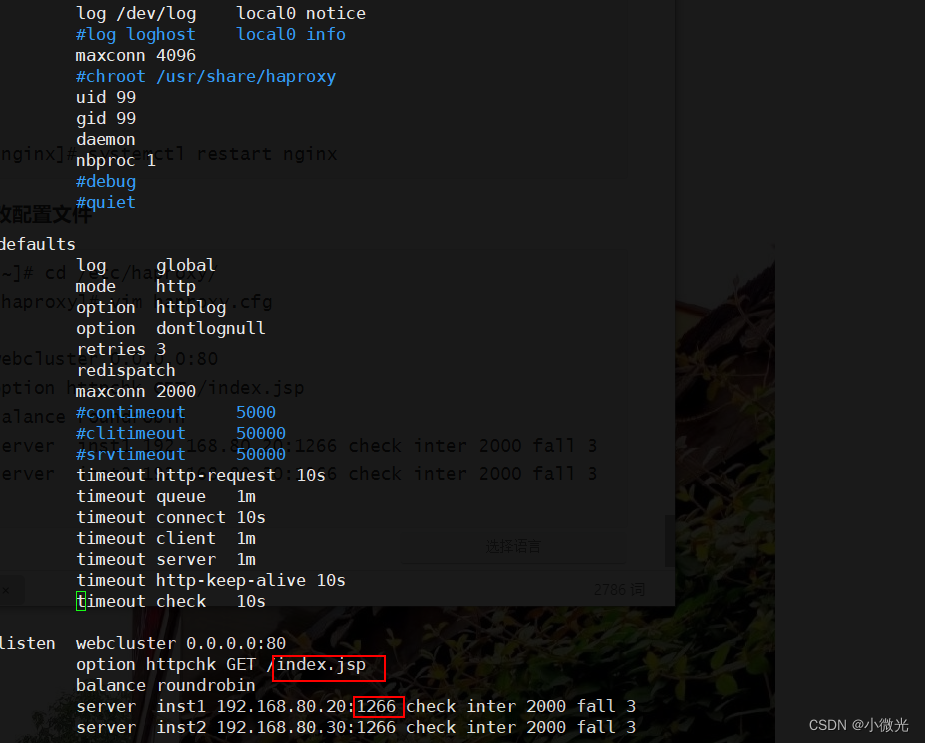
2、Haproxy修改配置文件
[[email protected] ~]# cd /etc/haproxy/
[[email protected] haproxy]# vim haproxy.cfg
......
listen  webcluster 0.0.0.0:80
        option httpchk GET /index.jsp
        balance roundrobin
        server  inst1 192.168.80.20:1266 check inter 2000 fall 3
        server  inst2 192.168.80.30:1266 check inter 2000 fall 3

[[email protected] haproxy]# systemctl restart haproxy

这里需修改文件类型和监听端口
3、tomcat部署
jdk安装
[[email protected] opt]# tar zxvf jdk-8u91-linux-x64.tar.gz -C /usr/local/
[[email protected] opt]# vim /etc/profile

[[email protected] opt]# source /etc/profile
tomcat安装
[[email protected] opt]# tar zxvf apache-tomcat-9.0.16.tar.gz
[[email protected] opt]# mkdir /usr/local/tomcat
[[email protected] opt]# mv apache-tomcat-9.0.16 /usr/local/tomcat/tomcat1
[[email protected] opt]# cp -a /usr/local/tomcat/tomcat1 /usr/local/tomcat/tomcat2
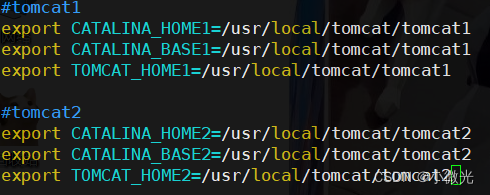
配置 tomcat 环境变量
[[email protected] opt]# vim /etc/profile.d/tomcat.sh

[[email protected] opt]# source /etc/profile.d/tomcat.sh
修改 tomcat2 中的 server.xml 文件,要求各 tomcat 实例配置不能有重复的端口号
[[email protected] opt]# vim /usr/local/tomcat/tomcat2/conf/server.xml


修改各 tomcat 实例中的 startup.sh 和 shutdown.sh 文件,添加 tomcat 环境变量
[[email protected] opt]# vim /usr/local/tomcat/tomcat1/bin/startup.sh
[[email protected] opt]# vim /usr/local/tomcat/tomcat1/bin/shutdown.sh


[[email protected] opt]# vim /usr/local/tomcat/tomcat2/bin/startup.sh
[[email protected] opt]# vim /usr/local/tomcat/tomcat2/bin/shutdown.sh


启动各 tomcat 中的 /bin/startup.sh
[[email protected] opt]# /usr/local/tomcat/tomcat1/bin/startup.sh
Using CATALINA_BASE:   /usr/local/tomcat/tomcat1
Using CATALINA_HOME:   /usr/local/tomcat/tomcat1
Using CATALINA_TMPDIR: /usr/local/tomcat/tomcat1/temp
Using JRE_HOME:        /usr/local/jdk1.8.0_91/jre
Using CLASSPATH:       /usr/local/tomcat/tomcat1/bin/bootstrap.jar:/usr/local/tomcat/tomcat1/bin/tomcat-juli.jar
Tomcat started.
[[email protected] opt]# /usr/local/tomcat/tomcat2/bin/startup.sh
Using CATALINA_BASE:   /usr/local/tomcat/tomcat2
Using CATALINA_HOME:   /usr/local/tomcat/tomcat2
Using CATALINA_TMPDIR: /usr/local/tomcat/tomcat2/temp
Using JRE_HOME:        /usr/local/jdk1.8.0_91/jre
Using CLASSPATH:       /usr/local/tomcat/tomcat2/bin/bootstrap.jar:/usr/local/tomcat/tomcat2/bin/tomcat-juli.jar
Tomcat started.
[[email protected] opt]# netstat -anpt |grep java
tcp6       0      0 127.0.0.1:8005          :::*                    LISTEN      57351/java
tcp6       0      0 127.0.0.1:8006          :::*                    LISTEN      57410/java
tcp6       0      0 :::8009                 :::*                    LISTEN      57351/java
tcp6       0      0 :::8010                 :::*                    LISTEN      57410/java
tcp6       0      0 :::8080                 :::*                    LISTEN      57351/java
tcp6       0      0 :::8081                 :::*                    LISTEN      57410/java
Tomcat1和Tomcat2 server 配置
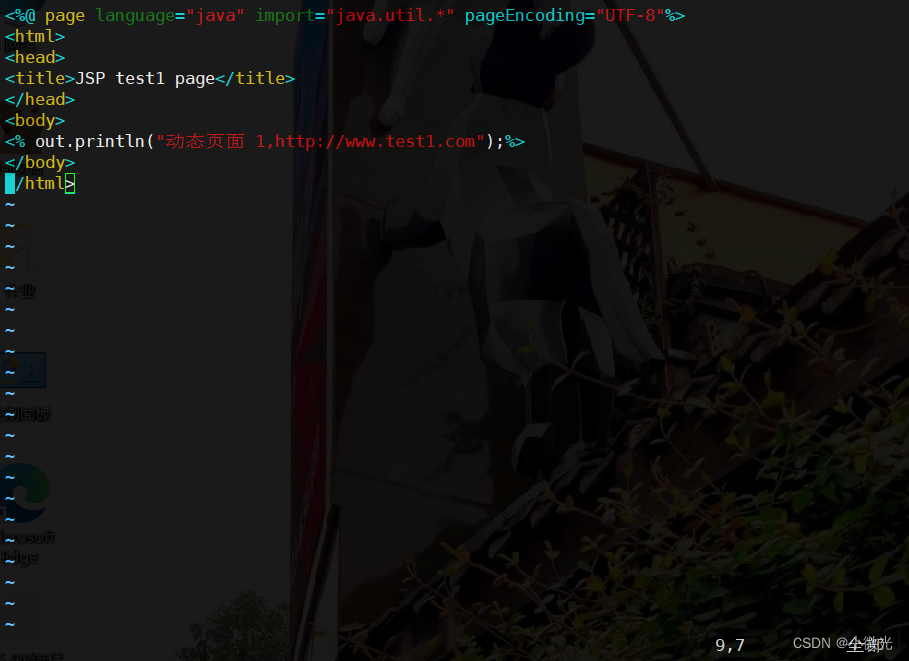
[[email protected] opt]# mkdir /usr/local/tomcat/tomcat1/webapps/test /usr/local/tomcat/tomcat2/webapps/test
[[email protected] opt]# vim /usr/local/tomcat/tomcat1/webapps/test/index.jsp

vim /usr/local/tomcat/tomcat1/conf/server.xml
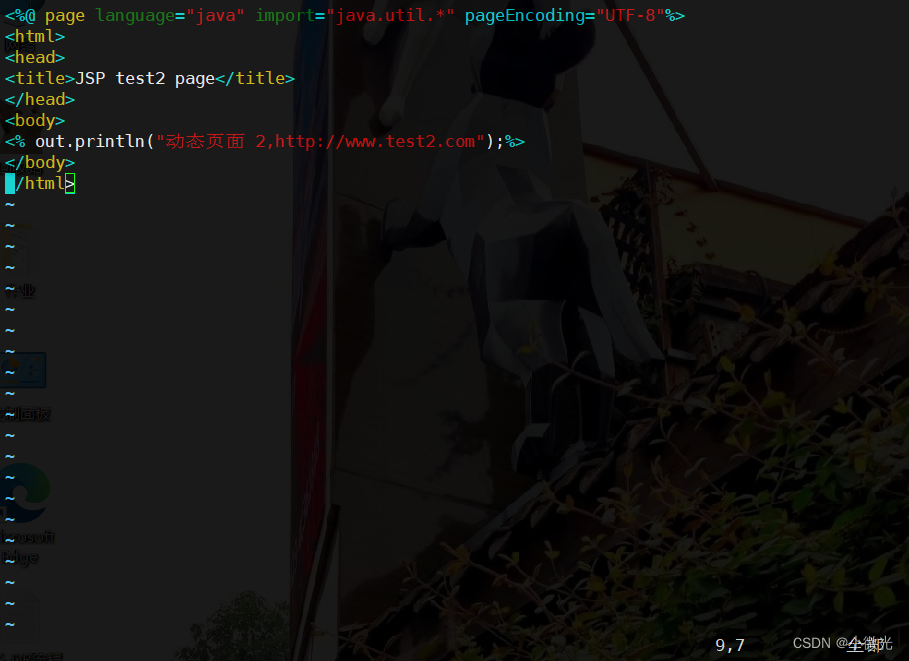
#删除前面的 HOST 配置

[[email protected] opt]# vim /usr/local/tomcat/tomcat2/webapps/test/index.jsp

[[email protected] opt]# vim /usr/local/tomcat/tomcat2/conf/server.xml
#删除前面的 HOST 配置

#重启tomcat
[[email protected] opt]# /usr/local/tomcat/tomcat1/bin/shutdown.sh
[[email protected] opt]# /usr/local/tomcat/tomcat1/bin/startup.sh
[[email protected] opt]# /usr/local/tomcat/tomcat2/bin/shutdown.sh
[[email protected] opt]# /usr/local/tomcat/tomcat2/bin/startup.sh
在客户端使用浏览器打开 http://192.168.80.10,不断刷新浏览器测试负载均衡效果

本来输入http://192.168.80.10出现的是nginx配置显示的文件内容,由于我们做了nginx的四层转发和反向代理,所以这里显示的是tomcat配置的文件内容。
边栏推荐
- 划重点!2022面试必刷461道大厂架构面试真题汇总+面经+简历模板
- Opencv学习之ORB特征提取和匹配
- MySQL - Explain详解
- PMP每日一练 | 考试不迷路-8.4(包含敏捷+多选)
- Arduino框架下I2S控制ADC采样以及PWM输出示例解析
- Programmer Qixi Gift - How to quickly build an exclusive chat room for your girlfriend in 30 minutes
- 【Game Of AutoTest】1、再度启程,重识游戏自动化测试
- Chinese valentine's day of young people crazy to make money, earn 140000 a week
- 持续交付(二)PipeLine基本使用
- 【PHP实现微信公众平台开发—基础篇】第2章 微信公众账号及申请流程详解
猜你喜欢

鲜花“刺客”收割七夕

Arduino框架下I2S控制ADC采样以及PWM输出示例解析

Practical sharing of distributed link tracking Jaeger + microservice Pig on Rainbond

分布式链路追踪Jaeger + 微服务Pig在Rainbond上的实践分享

PMP每日一练 | 考试不迷路-8.4(包含敏捷+多选)

企业应当实施的5个云安全管理策略

Diffusion Models:生成扩散模型

什么是 DevOps?看这一篇就够了!

rpm安装提示error: XXX: not an rpm package (or package manifest):

双目立体视觉笔记(二)
随机推荐
String is a reference type
du命令_set命令选项
【解决方案 三十一】Navicat数据库结构同步
PMP每日一练 | 考试不迷路-8.4(包含敏捷+多选)
判断密码是否包含键盘连续字母
Systemui qsSetting添加新图标
Chinese valentine's day of young people crazy to make money, earn 140000 a week
常用代码模板1——基础语法
手搓一个“七夕限定”,用3D Engine 5分钟实现烟花绽放效果
获取本机IP地址的脚本
他是“中台”之父,凭一个概念为阿里狂赚百亿
The head module of the yolo series
Cows 树状数组
Ceres库运行,模板内报内存冲突问题。(已解决)
MySQL - Explain详解
关于mysql join 的一些说明
视觉SLAM十四讲学习笔记 第7讲 视觉里程计
Js获取当前页面url参数
Hit the interview!The latest interview booklet of Ali Jin, nine silver and ten is stable!
COMSOL空气反应 模型框架