当前位置:网站首页>pytorch应用于MNIST手写字体识别
pytorch应用于MNIST手写字体识别
2022-08-04 01:59:00 【windawdaysss】
前言
手写字体MNIST数据集是一组常见的图像,其常用于测评和比较机器学习算法的性能,本文使用pytorch框架来实现对该数据集的识别,并对结果进行逐步的优化。
一、数据集
MNIST数据集是由28x28大小的0-255像素值范围的灰度图像(如下图所示),其中6万张用于训练模型,1万张用于测试模型。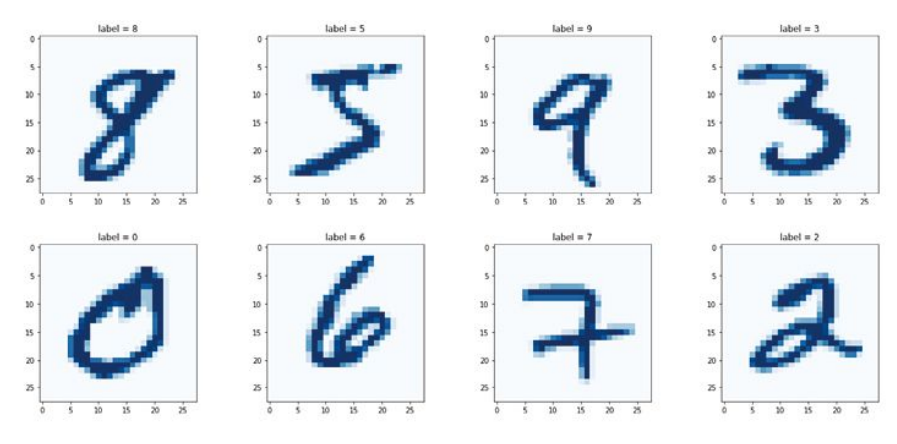
该数据集可从以下链接获取:
训练数据集:
https://pjreddie.com/media/files/mnist_train.csv
测试数据集:
https://pjreddie.com/media/files/mnist_test.csv
数据集一行有785个值,第一个值为图像中的数字标签,其余784个值为图像的像素值。
读取数据实例代码如下:
import pandas
import matplotlib.pyplot as plt

df = pandas.read_csv(r'./data/mnist_train.csv', header=None)
# print(df.head()) # 显示前5行
# print(df.info()) # 显示DataFrame概况
row = 0
data = df.iloc[row]
label = data[0],
img = data[1:].values.reshape(28, 28)
plt.title('label = ' + str(label))
plt.imshow(img, interpolation='none', cmap='Blues')
plt.show()
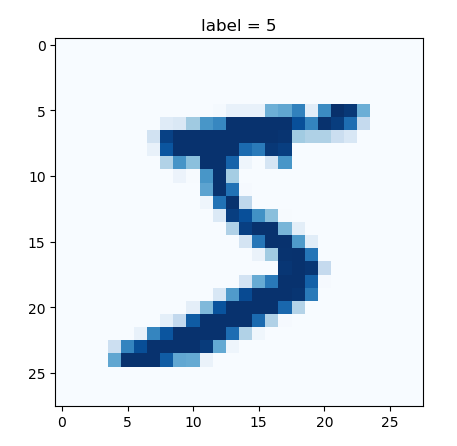
二、建立模型
# 构建模型
import torch
import torch.nn as nn
from torch.utils.data import Dataset


class Classifier(nn.Module):
    def __init__(self):
        # 初始化pytorch父类
        super().__init__()

        self.model = nn.Sequential(
            nn.Linear(784, 200),
            nn.Sigmoid(),
            nn.Linear(200, 10),
            nn.Sigmoid()
        )
        self.loss_function = nn.MSELoss()
        self.optimizer = torch.optim.SGD(self.parameters(), lr=0.01)
        self.counter = 0
        self.progress = []

    def forward(self, inputs):
        return self.model(inputs)

    def train_model(self, inputs, targets):
        outputs = self.forward(inputs)
        loss = self.loss_function(outputs, targets)

        self.optimizer.zero_grad()  # 梯度归零 ,因为反向传播计算的梯度会累计
        loss.backward()  # 反向传播
        self.optimizer.step()  # 更新权重
        # 可视化训练过程
        self.counter += 1
        if self.counter % 10 == 0:
            self.progress.append(loss.item())  # 获取单张张量里的数字
            pass
        if self.counter % 10000 == 0:
            print('counter = ', self.counter)
            pass

    def plot_progress(self):
        df = pandas.DataFrame(self.progress, columns=['loss'])
        df.plot(ylim=(0, 1.0), figsize=(16, 8), alpha=0.1, marker='.', grid=True, yticks=(0, 0.25, 0.5))
        plt.show()
        pass


class MnistDataset(Dataset):
    def __init__(self, csv_file):
        self.data_df = pandas.read_csv(csv_file, header=None)
        pass

    def __len__(self):
        return len(self.data_df)

    def __getitem__(self, index):
        label = self.data_df.iloc[index, 0]
        target = torch.zeros((10))
        target[label] = 1
        image_value = torch.FloatTensor(self.data_df.iloc[index, 1:].values) / 255.0
        return label, image_value, target

    def plot_image(self, index):
        arr = self.data_df.iloc[index, 1:].values.reshape(28, 28)
        plt.title('label = ' + str(self.data_df.iloc[index, 0]))
        plt.imshow(arr, interpolation='none', cmap='Blues')
        plt.show()
        pass
    pass
以上建立模型框架,并对训练过程进行可视化,建立读取数据类。
三、训练分类模型
mnist_train_dataset = MnistDataset(r'./data/mnist_train.csv')
# mnist_dataset.plot_image(9)

# 训练分类模型
start_time = time.time()
C = Classifier()
epochs = 3  # 训练3轮
for i in range(epochs):
    print('training epoch ', i+1, 'of', epochs)
    for lable, image_tensor, target_tensor in mnist_train_dataset:
        C.train_model(image_tensor, target_tensor)
        pass
    pass
C.plot_process()
print('run time = ', (time.time()-start_time) / 60)
训练3轮所花费的时间大约不到3min,效率还不错
四、测试模型
# 测试模型
mnist_test_dataset = MnistDataset(r'./data/mnist_test.csv')
record = 19
mnist_test_dataset.plot_image(record)  # 图像里的数字
image_data = mnist_test_dataset[record][1]
output = C.forward(image_data)
pandas.DataFrame(output.detach().numpy()).plot(kind='bar', legend=False, ylim=(0, 1))  # 预测的数字
plt.show()

score = 0
items = 0
for label, img_tensor, label_tensor in mnist_test_dataset:
    ans = C.forward(img_tensor)
    if ans.argmax() == label:
        score += 1
        pass
    items += 1
    pass
print(score, items, score / items)
模型的测试分数是87%,考虑到这是一个简单的网络,这个分数不算太差。
五、模型优化
模型的优化主要从四个方面着手:
- 1、损失函数
在上面的模型中设计损失函数为MSEloss,这里将其更改为二元交叉熵损失((binary cross entropy loss)
self.loss_function = nn.BCELoss()
训练3轮,发现分数由87%提升到91%了
- 2、激活函数
Sigmoid激活函数的一个缺点是,当输入值变大时,梯度会变得非常小甚至消失。现在常用的是改进过的线性整流函数Leaky ReLU,也叫带泄露线性整流函数。
self.model = nn.Sequential(
            nn.Linear(784, 200),
            # nn.Sigmoid(),
            nn.LeakyReLU(0.02),
            nn.Linear(200, 10),
            # nn.Sigmoid()
            nn.LeakyReLU(0.02)
        )
损失函数为原来的MSEloss,训练3轮,分数由87%上升到97%,这是一个很大的提升。
- 3 、优化器
上面模型所使用的是梯度下降法,该方法的一个缺点是会陷入损失函数的局部最小值,另一个缺点是对所有可学习参数都使用同一学习率。常见的替代方案是Adam,它利用动量减少陷入局部最小的可能,另外它对每个可学习参数使用单独的学习率,这些学习率随着每个参数在训练期间的变化而变化。
self.optimizer = torch.optim.Adam(self.parameters())
仅改变优化器发现模型达到和修改激活函数一样的效果,分数由87%提升到97%。
- 4、标准化
标准化是指减少网络中的参数和信号的取值范围,将均值转换为0,常见做法是在信号输入到神经网络前将其进行标准化。
self.model = nn.Sequential(
            nn.Linear(784, 200),
            nn.Sigmoid(),
            # nn.LeakyReLU(0.02),
            nn.LayerNorm(200),     # 标准化
            nn.Linear(200, 10),
            nn.Sigmoid()
            # nn.LeakyReLU(0.02)
        )
向网络中添加标准化,模型的分数87%提升到91%
将以上所有方法进行整合,由于二元交叉熵函数只能处理0~1的值,而LeakyReLU可能会输出范围外的值,将后一层激活函数保留为原来的Sigmoid函数:
 self.model = nn.Sequential(
            nn.Linear(784, 200),
            # nn.Sigmoid(),
            nn.LeakyReLU(0.02),
            nn.LayerNorm(200),
            nn.Linear(200, 10),
            nn.Sigmoid()
            # nn.LeakyReLU(0.02)
        )
3周期训练完后,模型的分数为97%,整合的优化方案无法使模型分数大于97%。
END
参考资料
-[英]塔里克•拉希德(Tariq Rashid)著,韩江雷译. PyTorch生成对抗网络编程. 人民邮电出版社
边栏推荐
- Hey, I had another fight with HR in the small group!
- Flask Framework Beginner-05-Command Management Manager and Database Use
- 【QT小记】QT中信号和槽的基本使用
- 小甲鱼汇编笔记
- v-model
- Kubernetes:(十一)KubeSphere的介绍和安装(华丽的篇章)
- Continuing to invest in product research and development, Dingdong Maicai wins in supply chain investment
- sudo 权限控制,简易
- APP电商如何快速分润分账?
- 实例036:算素数
猜你喜欢

云开发校园微社区微信小程序源码/二手交易/兼职交友微信小程序开源源码
Example 037: Sorting

Download install and create/run project for HBuilderX

- heavy OpenCV 】 【 mapping

Slipper - virtual point, shortest path
Web APIs BOM - operating browser: swiper plug-in

DDTL: Domain Transfer Learning at a Distance

企业虚拟偶像产生了实质性的价值效益
v-model
螺旋矩阵_数组 | leecode刷题笔记
随机推荐
flask框架初学-06-对数据库的增删改查
DDTL:远距离的域迁移学习
小程序:扫码打开参数解析
Installation and configuration of nodejs+npm
Example 041: Methods and variables of a class
TensoFlow学习记录(二):基础操作
Security First: Tools You Need to Know to Implement DevSecOps Best Practices
2022广东省安全员A证第三批(主要负责人)考试题库及模拟考试
Hey, I had another fight with HR in the small group!
阿里云国际版基于快照与镜像功能迁移云服务器数据
Flink jdbc connector 源码改造sink之 clickhouse多节点轮询写与性能分析
Multithreading JUC Learning Chapter 1 Steps to Create Multithreading
工程制图名词解释-重点知识
Continuing to pour money into commodities research and development, the ding-dong buy vegetables in win into the supply chain
pygame 中的transform模块
循环绕过问题
this巩固训练,从两道执行题加深理解闭包与箭头函数中的this
C语言力扣第54题之螺旋矩阵。模拟旋转
DHCP服务详解
实例039:有序列表插入元素