当前位置:网站首页>With the help of Kubernetes kubekey speed installation
With the help of Kubernetes kubekey speed installation
2022-08-03 18:10:00 【Mai Xiaoyu】
硬件要求
- 官方建议
- all-in-one(基于Linux系统,部署Kubernetes集群以及KubeSphere平台)
- 最小化:2C4G
- Turn on all components:8C16G
- 基于Kubernetes集群
- 最小化1C2G(kubernetes集群,masternode is required2C2G的配置要求,node节点是可以1C2G的)
- all-in-one(基于Linux系统,部署Kubernetes集群以及KubeSphere平台)
Plugin performance requirements
https://kubesphere.io/zh/docs/pluggable-components/overview/
尽管可以使用kuberadm来安装kubernetes,But still neededkubeadm init和kubeadm join等操作;作为开发人员,多数时候,We don't want to waste time on tedious installation operations,可以借助于kubesphere提供的安装工具KubeKeyto build quicklykubernetes集群.
- 注意:Actually for the convenience of development and learning、可以直接移步到minikube上.There is no need to look down;
The following will be installed单机版 kubernetes v1.21.5,Suitable for development work
基本操作
#修改主机名
[[email protected] ~]# hostnamectl set-hostname master
#Configure password-free between hosts
[[email protected] ~]# ssh-keygen
[[email protected] ~]# ssh-copy-id 192.168.72.78
[[email protected] ~]# ssh-copy-id 192.168.72.79
[[email protected] ~]# systemctl disable firewalld
[[email protected] ~]# systemctl stop firewalld
[[email protected]os ~]# sudo setenforce 0
setenforce: SELinux is disabled
[[email protected] ~]# sudo sed -i 's/^SELINUX=enforcing$/SELINUX=permissive/' /etc/selinux/config
[[email protected] ~]# getenforce
Disabled
[[email protected] ~]# swapoff -a
[[email protected] ~]#
[[email protected] ~]# yum -y install chrony
[[email protected] ~]# #Modify the time synchronization server
[[email protected] ~]# sed -i.bak '3,6d' /etc/chrony.conf && sed -i '3cserver ntp1.aliyun.com iburst' /etc/chrony.conf
[[email protected] ~]# systemctl start chronyd && systemctl enable chronyd
[[email protected] ~]# #查看同步结果
[[email protected] ~]# chronyc sources
[[email protected] ~]# cat <<EOF | sudo tee /etc/modules-load.d/k8s.conf
> br_netfilter
> EOF

[[email protected] ~]#
[[email protected] ~]# cat <<EOF | sudo tee /etc/sysctl.d/k8s.conf
> net.bridge.bridge-nf-call-ip6tables = 1
> net.bridge.bridge-nf-call-iptables = 1
> EOF

[[email protected] ~]# sudo sysctl --system
[[email protected] ~]# yum -y install socat
[[email protected] ~]# yum -y install conntrack
[[email protected] ~]# yum -y install ebtables
[[email protected] ~]# yum -y install ipset
[[email protected] ~]# yum remove docker*
[[email protected] ~]# yum install -y yum-utils
[[email protected] ~]# #配置docker的yum地址
[[email protected] ~]# wget -O /etc/yum.repos.d/docker-ce.repo http://mirrors.aliyun.com/docker-ce/linux/centos/docker-ce.repo

[[email protected] ~]#
[[email protected] ~]# #安装指定版本
[[email protected] ~]# yum install -y docker-ce-20.10.12 docker-ce-cli-20.10.12 containerd.io-1.4.12

[[email protected] ~]# #启动&开机启动docker
[[email protected] ~]# systemctl enable docker --now
[[email protected] ~]#
[[email protected] ~]# # docker加速配置
[[email protected] ~]# sudo mkdir -p /etc/docker
[[email protected] ~]# sudo tee /etc/docker/daemon.json <<-'EOF'
> {
>   "registry-mirrors": ["https://ke9h1pt4.mirror.aliyuncs.com"],
>   "exec-opts": ["native.cgroupdriver=systemd"],
>   "log-driver": "json-file",
>   "log-opts": {
>     "max-size": "100m"
>   },
>   "storage-driver": "overlay2"
> }
> EOF

[[email protected] ~]# sudo systemctl daemon-reload
[[email protected] ~]# sudo systemctl restart docker
[[email protected] ~]# cat <<EOF | sudo tee /etc/yum.repos.d/kubernetes.repo
> [kubernetes]
> name=Kubernetes
> baseurl=http://mirrors.aliyun.com/kubernetes/yum/repos/kubernetes-el7-x86_64
> enabled=1
> gpgcheck=0
> repo_gpgcheck=0
> gpgkey=http://mirrors.aliyun.com/kubernetes/yum/doc/yum-key.gpg
>    http://mirrors.aliyun.com/kubernetes/yum/doc/rpm-package-key.gpg
> EOF
折叠
下载Kubekey
[[email protected] ~]# export KKZONE=cn
[[email protected] ~]# curl -sfL https://get-kk.kubesphere.io | VERSION=v1.2.1 sh -

[[email protected] ~]#
[[email protected] ~]# ls
[[email protected] ~]# ls -l
total 0
[[email protected] ~]# curl -sfL https://get-kk.kubesphere.io | VERSION=v1.2.1 sh -
安装kubernetes v1.21.5
[[email protected] ~]# chmod +x kk
[[email protected] ~]# ./kk create cluster --with-kubernetes v1.21.5
+--------+------+------+---------+----------+-------+-------+-----------+----------+------------+-------------+------------------+--------------+
| name   | sudo | curl | openssl | ebtables | socat | ipset | conntrack | docker   | nfs client | ceph client | glusterfs client | time         |
+--------+------+------+---------+----------+-------+-------+-----------+----------+------------+-------------+------------------+--------------+
| master | y    | y    | y       | y        | y     | y     | y         | 20.10.12 |            |             |                  | CST 13:26:10 |
+--------+------+------+---------+----------+-------+-------+-----------+----------+------------+-------------+------------------+--------------+

This is a simple check of your environment.
Before installation, you should ensure that your machines meet all requirements specified at
https://github.com/kubesphere/kubekey#requirements-and-recommendations

Continue this installation? [yes/no]: yes
INFO[13:26:15 CST] Downloading Installation Files
INFO[13:26:15 CST] Downloading kubeadm ...
INFO[13:26:57 CST] Downloading kubelet ...
INFO[13:28:49 CST] Downloading kubectl ...
INFO[13:29:31 CST] Downloading helm ...
INFO[13:30:13 CST] Downloading kubecni ...
INFO[13:30:50 CST] Downloading etcd ...
INFO[13:31:04 CST] Downloading docker ...
INFO[13:31:09 CST] Downloading crictl ...
INFO[13:31:28 CST] Configuring operating system ...
[master 10.0.4.9] MSG:
net.ipv4.ip_forward = 1
net.ipv4.conf.default.rp_filter = 1
net.ipv4.conf.default.accept_source_route = 0
kernel.core_uses_pid = 1
net.ipv4.tcp_syncookies = 1
kernel.msgmnb = 65536
kernel.msgmax = 65536
net.ipv4.conf.all.promote_secondaries = 1
net.ipv4.conf.default.promote_secondaries = 1
net.ipv6.neigh.default.gc_thresh3 = 4096
net.ipv4.neigh.default.gc_thresh3 = 4096
kernel.softlockup_panic = 1
net.ipv6.conf.all.disable_ipv6 = 0
net.ipv6.conf.default.disable_ipv6 = 0
net.ipv6.conf.lo.disable_ipv6 = 0
kernel.shmmax = 68719476736
kernel.printk = 5
kernel.sysrq = 1
kernel.numa_balancing = 0
net.bridge.bridge-nf-call-arptables = 1
net.bridge.bridge-nf-call-ip6tables = 1
net.bridge.bridge-nf-call-iptables = 1
net.ipv4.ip_local_reserved_ports = 30000-32767
vm.max_map_count = 262144
vm.swappiness = 1
fs.inotify.max_user_instances = 524288
INFO[13:31:30 CST] Get cluster status
INFO[13:31:30 CST] Installing Container Runtime ...
INFO[13:31:30 CST] Start to download images on all nodes
[master] Downloading image: registry.cn-beijing.aliyuncs.com/kubesphereio/pause:3.4.1
[master] Downloading image: registry.cn-beijing.aliyuncs.com/kubesphereio/kube-apiserver:v1.21.5
[master] Downloading image: registry.cn-beijing.aliyuncs.com/kubesphereio/kube-controller-manager:v1.21.5
[master] Downloading image: registry.cn-beijing.aliyuncs.com/kubesphereio/kube-scheduler:v1.21.5
[master] Downloading image: registry.cn-beijing.aliyuncs.com/kubesphereio/kube-proxy:v1.21.5
[master] Downloading image: registry.cn-beijing.aliyuncs.com/kubesphereio/coredns:1.8.0
[master] Downloading image: registry.cn-beijing.aliyuncs.com/kubesphereio/k8s-dns-node-cache:1.15.12
[master] Downloading image: registry.cn-beijing.aliyuncs.com/kubesphereio/kube-controllers:v3.20.0
[master] Downloading image: registry.cn-beijing.aliyuncs.com/kubesphereio/cni:v3.20.0
[master] Downloading image: registry.cn-beijing.aliyuncs.com/kubesphereio/node:v3.20.0
[master] Downloading image: registry.cn-beijing.aliyuncs.com/kubesphereio/pod2daemon-flexvol:v3.20.0
INFO[13:32:13 CST] Getting etcd status
[master 10.0.4.9] MSG:
Configuration file will be created
INFO[13:32:14 CST] Generating etcd certs
INFO[13:32:14 CST] Synchronizing etcd certs
INFO[13:32:14 CST] Creating etcd service
Push /root/kubekey/v1.21.5/amd64/etcd-v3.4.13-linux-amd64.tar.gz to 10.0.4.9:/tmp/kubekey/etcd-v3.4.13-linux-amd64.tar.gz   Done
INFO[13:32:15 CST] Starting etcd cluster
INFO[13:32:15 CST] Refreshing etcd configuration
[master 10.0.4.9] MSG:
Created symlink /etc/systemd/system/multi-user.target.wants/etcd.service → /etc/systemd/system/etcd.service.
INFO[13:32:18 CST] Backup etcd data regularly
INFO[13:32:24 CST] Installing kube binaries
Push /root/kubekey/v1.21.5/amd64/kubeadm to 10.0.4.9:/tmp/kubekey/kubeadm   Done
Push /root/kubekey/v1.21.5/amd64/kubelet to 10.0.4.9:/tmp/kubekey/kubelet   Done
Push /root/kubekey/v1.21.5/amd64/kubectl to 10.0.4.9:/tmp/kubekey/kubectl   Done
Push /root/kubekey/v1.21.5/amd64/helm to 10.0.4.9:/tmp/kubekey/helm   Done
Push /root/kubekey/v1.21.5/amd64/cni-plugins-linux-amd64-v0.9.1.tgz to 10.0.4.9:/tmp/kubekey/cni-plugins-linux-amd64-v0.9.1.tgz   Done
INFO[13:32:27 CST] Initializing kubernetes cluster
[master 10.0.4.9] MSG:
W0209 13:32:28.885629   19527 utils.go:69] The recommended value for "clusterDNS" in "KubeletConfiguration" is: [10.233.0.10]; the provided value is: [169.254.25.10]
[init] Using Kubernetes version: v1.21.5
[preflight] Running pre-flight checks
        [WARNING FileExisting-tc]: tc not found in system path
[preflight] Pulling images required for setting up a Kubernetes cluster
[preflight] This might take a minute or two, depending on the speed of your internet connection
[preflight] You can also perform this action in beforehand using 'kubeadm config images pull'
[certs] Using certificateDir folder "/etc/kubernetes/pki"
[certs] Generating "ca" certificate and key
[certs] Generating "apiserver" certificate and key
[certs] apiserver serving cert is signed for DNS names [kubernetes kubernetes.default kubernetes.default.svc kubernetes.default.svc.cluster.local lb.kubesphere.local localhost master master.cluster.local] and IPs [10.233.0.1 10.0.4.9 127.0.0.1]
[certs] Generating "apiserver-kubelet-client" certificate and key
[certs] Generating "front-proxy-ca" certificate and key
[certs] Generating "front-proxy-client" certificate and key
[certs] External etcd mode: Skipping etcd/ca certificate authority generation
[certs] External etcd mode: Skipping etcd/server certificate generation
[certs] External etcd mode: Skipping etcd/peer certificate generation
[certs] External etcd mode: Skipping etcd/healthcheck-client certificate generation
[certs] External etcd mode: Skipping apiserver-etcd-client certificate generation
[certs] Generating "sa" key and public key
[kubeconfig] Using kubeconfig folder "/etc/kubernetes"
[kubeconfig] Writing "admin.conf" kubeconfig file
[kubeconfig] Writing "kubelet.conf" kubeconfig file
[kubeconfig] Writing "controller-manager.conf" kubeconfig file
[kubeconfig] Writing "scheduler.conf" kubeconfig file
[kubelet-start] Writing kubelet environment file with flags to file "/var/lib/kubelet/kubeadm-flags.env"
[kubelet-start] Writing kubelet configuration to file "/var/lib/kubelet/config.yaml"
[kubelet-start] Starting the kubelet
[control-plane] Using manifest folder "/etc/kubernetes/manifests"
[control-plane] Creating static Pod manifest for "kube-apiserver"
[control-plane] Creating static Pod manifest for "kube-controller-manager"
[control-plane] Creating static Pod manifest for "kube-scheduler"
[wait-control-plane] Waiting for the kubelet to boot up the control plane as static Pods from directory "/etc/kubernetes/manifests". This can take up to 4m0s
[apiclient] All control plane components are healthy after 14.501817 seconds
[upload-config] Storing the configuration used in ConfigMap "kubeadm-config" in the "kube-system" Namespace
[kubelet] Creating a ConfigMap "kubelet-config-1.21" in namespace kube-system with the configuration for the kubelets in the cluster
[upload-certs] Skipping phase. Please see --upload-certs
[mark-control-plane] Marking the node master as control-plane by adding the labels: [node-role.kubernetes.io/master(deprecated) node-role.kubernetes.io/control-plane node.kubernetes.io/exclude-from-external-load-balancers]
[mark-control-plane] Marking the node master as control-plane by adding the taints [node-role.kubernetes.io/master:NoSchedule]
[bootstrap-token] Using token: wborow.hx6d7x0dib4zafi7
[bootstrap-token] Configuring bootstrap tokens, cluster-info ConfigMap, RBAC Roles
[bootstrap-token] configured RBAC rules to allow Node Bootstrap tokens to get nodes
[bootstrap-token] configured RBAC rules to allow Node Bootstrap tokens to post CSRs in order for nodes to get long term certificate credentials
[bootstrap-token] configured RBAC rules to allow the csrapprover controller automatically approve CSRs from a Node Bootstrap Token
[bootstrap-token] configured RBAC rules to allow certificate rotation for all node client certificates in the cluster
[bootstrap-token] Creating the "cluster-info" ConfigMap in the "kube-public" namespace
[kubelet-finalize] Updating "/etc/kubernetes/kubelet.conf" to point to a rotatable kubelet client certificate and key
[addons] Applied essential addon: CoreDNS
[addons] Applied essential addon: kube-proxy

Your Kubernetes control-plane has initialized successfully!

To start using your cluster, you need to run the following as a regular user:

  mkdir -p $HOME/.kube
  sudo cp -i /etc/kubernetes/admin.conf $HOME/.kube/config
  sudo chown $(id -u):$(id -g) $HOME/.kube/config

Alternatively, if you are the root user, you can run:

  export KUBECONFIG=/etc/kubernetes/admin.conf

You should now deploy a pod network to the cluster.
Run "kubectl apply -f [podnetwork].yaml" with one of the options listed at:
  https://kubernetes.io/docs/concepts/cluster-administration/addons/

You can now join any number of control-plane nodes by copying certificate authorities
and service account keys on each node and then running the following as root:

  kubeadm join lb.kubesphere.local:6443 --token wborow.hx6d7x0dib4zafi7 \
        --discovery-token-ca-cert-hash sha256:ec78c9a060dcf45a6fb8c67886491b9d05dd240df315b93ac8321b59e54c1e06 \
        --control-plane

Then you can join any number of worker nodes by running the following on each as root:

kubeadm join lb.kubesphere.local:6443 --token wborow.hx6d7x0dib4zafi7 \
        --discovery-token-ca-cert-hash sha256:ec78c9a060dcf45a6fb8c67886491b9d05dd240df315b93ac8321b59e54c1e06
[master 10.0.4.9] MSG:
node/master untainted
[master 10.0.4.9] MSG:
node/master labeled
[master 10.0.4.9] MSG:
service "kube-dns" deleted
[master 10.0.4.9] MSG:
service/coredns created
Warning: resource clusterroles/system:coredns is missing the kubectl.kubernetes.io/last-applied-configuration annotation which is required by kubectl apply. kubectl apply should only be used on resources created declaratively by either kubectl create --save-config or kubectl apply. The missing annotation will be patched automatically.
clusterrole.rbac.authorization.k8s.io/system:coredns configured
[master 10.0.4.9] MSG:
serviceaccount/nodelocaldns created
daemonset.apps/nodelocaldns created
[master 10.0.4.9] MSG:
configmap/nodelocaldns created
INFO[13:33:09 CST] Get cluster status
INFO[13:33:10 CST] Joining nodes to cluster
INFO[13:33:10 CST] Deploying network plugin ...
[master 10.0.4.9] MSG:
configmap/calico-config created
customresourcedefinition.apiextensions.k8s.io/bgpconfigurations.crd.projectcalico.org created
customresourcedefinition.apiextensions.k8s.io/bgppeers.crd.projectcalico.org created
customresourcedefinition.apiextensions.k8s.io/blockaffinities.crd.projectcalico.org created
customresourcedefinition.apiextensions.k8s.io/clusterinformations.crd.projectcalico.org created
customresourcedefinition.apiextensions.k8s.io/felixconfigurations.crd.projectcalico.org created
customresourcedefinition.apiextensions.k8s.io/globalnetworkpolicies.crd.projectcalico.org created
customresourcedefinition.apiextensions.k8s.io/globalnetworksets.crd.projectcalico.org created
customresourcedefinition.apiextensions.k8s.io/hostendpoints.crd.projectcalico.org created
customresourcedefinition.apiextensions.k8s.io/ipamblocks.crd.projectcalico.org created
customresourcedefinition.apiextensions.k8s.io/ipamconfigs.crd.projectcalico.org created
customresourcedefinition.apiextensions.k8s.io/ipamhandles.crd.projectcalico.org created
customresourcedefinition.apiextensions.k8s.io/ippools.crd.projectcalico.org created
customresourcedefinition.apiextensions.k8s.io/kubecontrollersconfigurations.crd.projectcalico.org created
customresourcedefinition.apiextensions.k8s.io/networkpolicies.crd.projectcalico.org created
customresourcedefinition.apiextensions.k8s.io/networksets.crd.projectcalico.org created
clusterrole.rbac.authorization.k8s.io/calico-kube-controllers created
clusterrolebinding.rbac.authorization.k8s.io/calico-kube-controllers created
clusterrole.rbac.authorization.k8s.io/calico-node created
clusterrolebinding.rbac.authorization.k8s.io/calico-node created
daemonset.apps/calico-node created
serviceaccount/calico-node created
deployment.apps/calico-kube-controllers created
serviceaccount/calico-kube-controllers created
Warning: policy/v1beta1 PodDisruptionBudget is deprecated in v1.21+, unavailable in v1.25+; use policy/v1 PodDisruptionBudget
poddisruptionbudget.policy/calico-kube-controllers created
INFO[13:33:11 CST] Congratulations! Installation is successful.
[[email protected] ~]#
About some errors that will appear,以及解决方法
If there is always an error:The connection to the server localhost:8080 was refused - did you specify the right host or port?: Process exited with status 1
可以尝试下面的命令,清除集群,重新创建集群
# ./kk delete cluster -f config-sample.yaml
If the mirror has already been downloaded, an error will be reported,After clearing the cluster,Just create the cluster again
# ./kk create cluster --with-kubernetes v1.20.4 --with-kubesphere v3.1.0 -f config-sample.yaml -y
If you see this error,就看一下,Is it the wrong node,缺少依赖
Failed to join node: interrupted by error
到所有节点,Execute the following command again,确保返回
Nothing to do
# yum install -y socat conntrack ebtables ipset
验证
[[email protected] ~]# kubectl get nodes
NAME     STATUS   ROLES                         AGE   VERSION
master   Ready    control-plane,master,worker   17m   v1.21.5
[[email protected] ~]# kubectl cluster-info
Kubernetes control plane is running at https://lb.kubesphere.local:6443
coredns is running at https://lb.kubesphere.local:6443/api/v1/namespaces/kube-system/services/coredns:dns/proxy

To further debug and diagnose cluster problems, use 'kubectl cluster-info dump'.
k8s安装其他应用:简单
k8s install ingress-nginx. Installation with Manifests | NGINX Ingress Controller
kubectl apply -f https://raw.githubusercontent.com/kubernetes/ingress-nginx/controller-v1.3.0/deploy/static/provider/cloud/deploy.yamlk8s install argocd
kubectl create namespace argocd
kubectl apply -n argocd -f https://raw.githubusercontent.com/argoproj/argo-cd/stable/manifests/install.yaml边栏推荐
猜你喜欢

【美丽天天秒】链动2+1模式开发

使用.NET简单实现一个Redis的高性能克隆版(一)
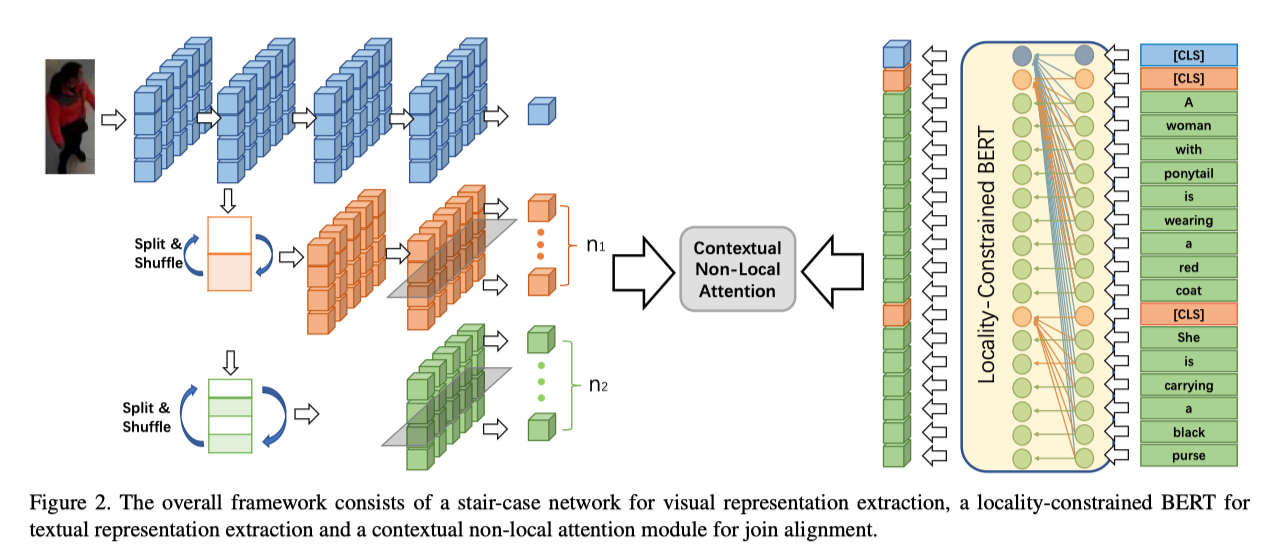
全尺度表示的上下文非局部对齐,南科大&优图提出NAFS解决基于文本的Re ID

Weekly recommended short video: In order to fill the gap of learning resources, the author specially wrote a book?

理想L9旗舰级的安全性有多强?守护一家人安全出行“底线”
架构基本概念和架构本质
常见亲脂性细胞膜染料DiO, Dil, DiR, Did光谱图和实验操作流程
一文带你弄懂 CDN 技术的原理

mysql之数据库账户管理与优化

异常与智能指针
随机推荐
Interpretation of the paper (JKnet) "Representation Learning on Graphs with Jumping Knowledge Networks"
mysql之的执行计划
我们为何看好投资 DAO?
Postgresql 备份大小情况!
Unable to start SinkRunner: { policy:org.apache.flume
Execution plan of mysql
架构基本概念和架构本质
动态接口比例性能测试实践
云图说丨初识华为云微服务引擎CSE
爬虫之selenium
Discuz新闻资讯GBK模板
Weekly recommended short video: In order to fill the gap of learning resources, the author specially wrote a book?
LyScript 内存交换与差异对比
【Azure 事件中心】使用Azure AD认证方式创建Event Hub Consume Client + 自定义Event Position
2021年数据泄露成本报告解读
mysql命令
excel写入不完全sheet.append方法(openpyxl)
图像传感第一章学习心得
5000元价位高性能轻薄本标杆 华硕无双高颜能打
warnings.warn(“Title is more than 31 characters. Some applications may not be able to read the file