当前位置:网站首页>Airtest automated test
Airtest automated test
2022-06-11 14:06:00 【JSon liu】
airtest Automated testing framework
- 01airtest Foundation and installation
- 02 web Application Automation ( Cool dog music playing )
- 03 Wechat applet ( Take Ping An Securities as an example )
- 04 WeChat official account ( Ping An Securities )
01airtest Foundation and installation
1.1airtest brief introduction
Official document :https://airtest.readthedocs.io/en/latest/
Airtest Project: It is a complete set of Games launched by Netease UI Automation project , It contains 3 Parts of :Airtest、Poco、AirtestIDE.
Airtest frame : It's a cross platform 、 Based on image recognition UI Automated testing framework , For games and App, Support Windows、Android and iOS platform . yes Python A third-party package of , and Selenium、requests The bag is the same .
Poco frame : It's based on UI Automatic testing framework for control recognition , At present, we support Unity3D/cocos2dx-*/Android Native app/iOS Native app/ Wechat applet , It can also be accessed by itself in other engines poco-sdk To use ( The game must be connected to Poco-SDK). yes Python A third-party package of , and Selenium、Requests The bag is the same .
AirtestIDE: Integrated development environment (IDE,Integrated Development Environment) Is an application used to provide a program development environment , Generally including code editor 、 compiler 、 Tools such as debugger and graphical user interface . therefore AirtestIDE Is used to write airtest、Poco Automated code editor , Its functions include : Write code 、 debugging 、 Screenshot 、 see App Control 、 Recording 、 Reports, etc. .
1.2 airtest Installation mode
1.2.1 python The way
command:
pip3 install -U airtest -i https://pypi.douban.com/simple/
explain︰ install python Of AirTest library , adopt python Code calls directly AirTest Library Api MethodTips︰ This way , It needs to be python Code base


1.2.2 AirTestIDE
- explain :AirTestIDE The tool comes with python Environmental Science , No separate installation required .
- Tips : Use the tool to record actions , You can also write calls manually api
1. Download from the official website
- Download link :https://airtest.netease.com/changelog.html

2. decompression 
3. IED Starting mode
- Right click to run as administrator
AirtestIDE.exestart-up
- Right click to run as administrator
Compatibility mode starts .batstart-up

1.3 Environment depends on ( Real machine / Simulator /windows application )
1.3.1 Simulator connection ( use mumu)
1. Download from the official website
- Address :https://mumu.163.com/


2. Double click installation ( For speed , This time, it is installed in the solid-state disk )

3. start-up 

4. To configure 


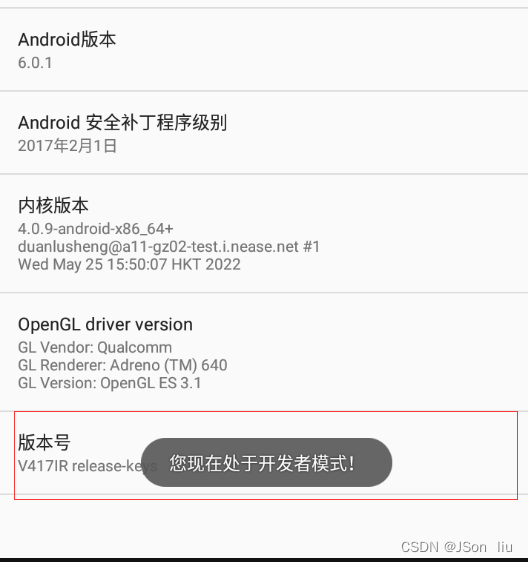
5. Open developer mode : Click the version number several times , You can start the developer mode 

6. open usb Mode mode 


7. Connect the simulator 


1.3.2 android Real connection
Reference source :https://blog.csdn.net/chengyq116/article/details/108296042
abd Connect
1. Data cable to mobile phone
2. Open developer mode
- “ Set up ”–>“ About mobile phone ”–> Click on the straight “ Version number ”, You can open


3. choice usb Configuration mode
- “ Systems and updates ”–>“ Developer options ” --> Get into “ choice USB To configure ” --> choice "RNDIS(USB Ethernet )"


4. “ Systems and updates ”–>“ Developer options ” --> open “USB debugging ” switch

5. adb Connecting device
C:\Users\jsonliu>adb kill-server

C:\Users\jsonliu>adb start-server
adb server version (40) doesn't match this client (41); killing...
* daemon started successfully

C:\Users\jsonliu>adb devices
adb server version (40) doesn't match this client (41); killing...
* daemon started successfully
List of devices attached
AN2FUT1B19000032        device
6. start-up adb server
adb kill-server
adb -a -P 5037 nodaemon server #  Designated port
adb -a nodaemon server #  Use default port

airtestIDE Connect the real machine


1.3.3 ios Real connection
Environment depends on
1. ios-Tagent :
- effect ︰ Create a... On your phone WebDriver The server , Can be used for remote control iOS equipment , location UI Elements
- download :https://github.com/facebookarchive/WebDriverAgent
- Operational dependency :xcode
2. xcode
- effect :ios Develop integration tools , The main function in this theory is to run WebDriverAgen File to mobile
- download :AppSotre-> Platform search xcode
- Operational dependency : Developer account
- xcode To configure ( Premise : Use xcode Open the download webDrvierAgent)
- Add developer account ( ordinary apple ID that will do )
- To configure WebDriverAgent ( Team、Product Bundle Identifiier)
- test run WebDriverAgentRunner To mobile phone
3. iproxy
- effect : Setting up the proxy will iPhone Port maps to computer port , Access the port of the mobile phone through the port of the computer
- download :
brew install libimobiledevice - function :
iproxy 8100 8100
4. verification
- see : Open the browser and type
http://127.0.0.1:8100/statusappear json Format connection information - PrintScreen :
http://127.0.0.1:8100/inspector
5. AirtestIDE Tools : download ios edition
Connection steps
1. Connect the real machine to the computer with a data cable
2. start-up xcode And open the configured iOS-Tagent project ( menu -Product->Test Start the automation service program )
3. Turn on the terminal to run :iproxy 8100 8100( Start the port mapping service )
4. start-up AirTestIDE Tools ( Connect ios equipment -> connect Button )
5. matters needing attention
- stay xcode Click on the Test front , Check whether the real equipment is selected for the default terminal of the project
- Click on xcode in Test after , To view control information , If the console does not output any information , Can wait or more Test A few times , Until the console outputs startup related information
- xcode To configure iOS-Tagent Just configure it for the first time , After use, there is no need to configure it separately , Don't modify parameters
- In real equipment , To turn on automated testing and trust iOS-Tagent project
1.3.4 windows Application connection
1. Click on the menu bar " Options "–> Click on “ Set up ”, stay "selenium" Column selection chrome Installation path
2. Launch the browser : The library file code to be imported will be generated by default , No need to write it manually
3. A simple test 


1.3.5 windows Application connection
- Open the web application –>“windows Window connection ” --> Click on “ Search window ” -->“refresh” -->


1.4 airtest Layout
- ① The menu bar and ② Shortcut button : Create a new project , Save the project , Run the script and check the report output
- ③ Based on image recognition framework :
- ④poco library : Support mainstream game engines 、Android Applications
- ⑤selenium windows :web The project framework
- Script editor :
- ⑥ Script editing area :
- ⑦log journal :
- ⑧ Real time mobile screen : Support remote control of devices using mouse events

1.5 Quick to use
1. Select new script type
.air AirTest project︰ Generate a project name .air Catalog , There is a project name under the directory .py filepy pure Python( Advanced users )︰ Generate a project name .py file- difference :
- The same thing ︰ All are python file
- Difference ∶ The script file initialization code is different , A default value cannot be seen , One can see the default value , Make changes
2. Element positioning and element operation
3. Run script
- F5/ Right click to run

- Command line run :
- Some dependencies that need to be installed
- airtest
- pocoui
- pynput
- Some dependencies that need to be installed
airtest run  Script name .air --device Android:/// Cell phone device number  [--log  Log path ]
python -m airtest run  Script name .air --device Android:/// Cell phone device number  [--log  Log path ]
python -m airtest run  Script name .air # web Run the command


- bat The batch file executes the test script
echo offw When echo Set up off When it's worth it , Then the following instructions will only be executed without displaying
C:
cd C:\xxxx\airtestFramework
start airtest run  Script name .air
exit
4. Check the report (control+L)
5. Common shortcut key
F5: Script runCtrl+L: Report viewshift+F5: The script stopscontrol+S: preservation
6. code annotation
""""""Multiline comment#Single-line comments- Shortcut key :
control+?


1.6 Commonly used api
1.6.1 touch
touch(v,times=1,duration=0.01,right_click=False)- Common parameters :
v: Click on the picture or coordinatestimes: Number of hits . Default 1 Timeduration: Press and hold time , Default 0.01s
-right click: windows It works
1.6.2 swipe
- effect : Slide from one position on the screen to another
- Common parameters :
v1: Picture or coordinates (x,y)
-v2: Picture or coordinates (x,y)vector:[x,y] Automatically generated when recording , The sliding ratio in the screen is recorded , To the right is x Zhouzhengzheng , Down is Y Positive axisduration: Duration of sliding operation , Default 0.5 second- When coordinate points are used , Each set of values needs to use ()

Realize sliding screen mode
1. Screen based recording 
2. Image based implementation 
3_1 Based on screen coordinates : Enter coordinates directly
from poco.drivers.unity3d import UnityPoco
poco = UnityPoco()
#  Slide down to the bottom
poco.swipe([0.5,0.9],[0.5,0])
#  Slide up to the top
# poco.swipe([0.5,0.1],[0.5,0.9])

3_2 Based on screen coordinates : According to the screen size
#  Get the current screen width and height
width, height = device().get_current_resolution()
#  Calibrate the start and end points of the slide
start_pt = (width / 2, height * 0.9)
end_pt = (width / 2, height * 0.1)
swipe(start_pt, end_pt, duration=2)

1.6.3 text
- effect : Enter text operation
- Common parameters :
text: Text to enter ( notes ︰ The entered position is the default focus element of the current page touch Use it together )enter: Automatically execute after complete input Enter operation , The default is Truesearch: Force... After entering search operation , The default is False

1.6.4 keyevent
- effect : Simulate keyboard key input , Support key code
- Key common parameters :
keyname: Key code or key name- android keycode Reference resources :https://www.cnblogs.com/findyou/p/5614178.html
- Common key names : Key code
 Key name 					 Key 		 Key code
KEYCODE_ENTER			 enter 		66
KEYCODE_FORWARD_DEL 	 Delete 		112
KEYCODE_CLEAR			Clear		28
KEYCODE_TAB				Tab key 		61
KEYCODE_HOME			Home		3
KEYCODE_BACK			 Return key 		4
KEYCODE_SEARCH			 The search button 		84
KEYCODE_DEL				 backspace 		67
KEYCODE_SPACE			 Space bar 		62

1.6.5 snapshot
- effect : Capture the current screen picture , It can be shown in the test report .
- Common parameters :
Filename: Save the screenshot as the specified filemsg: Describe the test points , Can be in HTML The report presents

1.6.6 wait
- effect : Wait for an element to appear , If it appears, return the coordinates of the center point of the element , Otherwise throw TargetNotFoundError abnormal
- Common parameters :
v: picturetimeout: Waiting for timeout , The default is 20sinterval: The time interval of each match , The default is 0.5sintervalfunc: If the picture is not found, execute the following function , The default is None

1.6.7 exists
- effect : Judge whether the picture exists , If it exists, return the center coordinate of the picture , Go back if it doesn't exist False
- Common parameters
v: picturereturn: Return value , If it exists, return the center coordinate of the picture , There is no return False


1.6.8 sleep
- effect : Pause time
- Common parameters
secs: Delay time (s), Default 1.0s
1.7 Assertion
1. assert_exists
- effect ︰ Assertion ( Judge ) There are elements on the page
- Common parameters
v: picture ( To determine whether there are elements on the page )msg: Describe the test pointsreturn: Find the picture and return the coordinates of the center point of the picture , Otherwise it would be raise AssertionError
2. assert_not_exists
- effect : Assertion ( Judge ) There is no element on the page
- Common parameters
v: picture ( notes : Judge that there are no picture elements on the current page , There is no such thing as , There are failures )msg: Describe the test points ( The test report shows )
3. assert_equal
- effect : Judge whether the first value is equal to the second value
- Common parameters
first: The first value issecond: Second valuemsg: Describe the test point content corresponding to this assertion statement
4. assert_not_equal
- effect : Judge that the first entry is not equal to the second entry
- Common parameters
-first: The first value is
-second: Second value
-msg: Describe the test point content corresponding to this assertion statement

1.8 comprehensive demo( Flush landing )
- General process : Click on the picture –> Click on the account to log in --> enter one user name 、 password --> Check the agreement --> Click login --> Assert successful login ( user id) --> Click Settings --> Pull to the bottom of the page --> Click on “ Exit current account ” --> determine --> Judge " Login account Experience more service presence " Again back


02 web Application Automation ( Cool dog music playing )
General process : Click on the search box –> Enter song name –> Click play
- IDE function

Script :
# -*- encoding=utf8 -*-
__author__ = "jsonliu"

from airtest.core.api import *

auto_setup(__file__)
for i in range(3):
    if exists(Template(r"tpl1654356304880.png", record_pos=(0.033, -0.316), resolution=(1018, 720))):
        touch(wait(Template(r"tpl1654356314479.png", record_pos=(0.031, -0.316), resolution=(1018, 720)))
)
    touch(wait(Template(r"tpl1654356195086.png", record_pos=(-0.045, -0.316), resolution=(1018, 720)))
)

    text(" I'll be fine ")
    sleep(1)
    touch(wait(Template(r"tpl1654355322512.png", record_pos=(-0.296, -0.065), resolution=(1020, 720)))
)
    touch(wait(Template(r"tpl1654355071000.png", record_pos=(-0.298, 0.109), resolution=(1020, 720)))
)
    if exists(Template(r"tpl1654355241031.png", record_pos=(-0.392, 0.141), resolution=(1020, 720))):
        touch(Template(r"tpl1654355241031.png", record_pos=(-0.392, 0.141), resolution=(1020, 720)))
03 Wechat applet ( Take Ping An Securities as an example )
1. precondition :
- airtest Connect the real machine / Simulator
- Tips : The real machine has a flash back phenomenon
- Install wechat app
- Register and successfully log in to wechat account


2. Realization function :
- Open the WeChat –> Search for “ Ping An Securities ” Applet
- Click on “ my ”–> Click on “ Search for ”
- Click on the fund search box –> Clear the input box –> Enter the fund code / The full or partial value of the name
- Click on “+” —> Capture the current screen —> Assert that the text is equal to “ AutoSelect added ”
- Click on “√” —> The assertion text shows “ AutoSelect deleted ”
- Clean up the environment : Exit and return to the wechat homepage
3. General process
- Create project
- Write a script
- Run test cases
- Check the report


4. Automation script
# -*- encoding=utf8 -*-
__author__ = "jsonliu"

from airtest.core.api import *
auto_setup(__file__)

ym = "com.netease.nie.yosemite/.ime.ImeService"
bd = "com.baidu.input_hihonor/com.baidu.input_huawei.ImeService"
def set_ime(ime):

    #  Input method switching
    shell("ime enable " + ime) #  Start the specified input method
    shell("ime set " + ime) #  Set the specified input method
# set_ime(ym)
def safe_keyboad(num_l):
    l = []
    for i in num_l:
        if i==0:
            num = wait(Template(r"tpl1654415856731.png", record_pos=(0.0, 0.902), resolution=(1080, 2340)))
        elif i==1:
            num = wait(Template(r"tpl1654415157979.png", record_pos=(-0.33, 0.427), resolution=(1080, 2340)))
        elif i==2:
            num = wait(Template(r"tpl1654415172531.png", record_pos=(-0.002, 0.428), resolution=(1080, 2340)))
        elif i==3:
            num = wait(Template(r"tpl1654415225016.png", record_pos=(0.333, 0.424), resolution=(1080, 2340)))
        elif i==4:
            num = wait(Template(r"tpl1654415682693.png", record_pos=(-0.334, 0.586), resolution=(1080, 2340)))
        elif i==5:
            num = wait(Template(r"tpl1654415692437.png", record_pos=(-0.001, 0.589), resolution=(1080, 2340)))
        elif i==6:
            num = wait(Template(r"tpl1654415704268.png", record_pos=(0.333, 0.589), resolution=(1080, 2340)))
        elif i ==7:
            num = wait(Template(r"tpl1654415733890.png", record_pos=(-0.331, 0.748), resolution=(1080, 2340)))
        elif i ==8:
            num = wait(Template(r"tpl1654415818604.png", record_pos=(0.002, 0.741), resolution=(1080, 2340)))
        elif i == 9:
            num = wait(Template(r"tpl1654415826674.png", record_pos=(0.333, 0.747), resolution=(1080, 2340)))
        l.append(num)
    return l

def open_wechat_and_search():
    # 1.  Open wechat and search “ Ping An Finance ” Applet
    touch(wait(Template(r"tpl1654419360669.png", record_pos=(-0.353, 0.555), resolution=(1080, 2340)))
)

    touch(wait(Template(r"tpl1654409526583.png", record_pos=(0.324, -0.934), resolution=(1080, 2340)))
)
    touch(wait(Template(r"tpl1654410169024.png", record_pos=(-0.338, -0.929), resolution=(1080, 2340)))
)
    keyevent("clear")
    text(" Ping An Securities ")
    keyevent("66")
    touch(wait(Template(r"tpl1654410492936.png", record_pos=(-0.143, -0.245), resolution=(1080, 2340)))
)
    for i in range(3):
        if exists(Template(r"tpl1654423805902.png", record_pos=(-0.322, -0.294), resolution=(720, 1280))):
            touch(wait(Template(r"tpl1654423613589.png", record_pos=(-0.257, -0.172), resolution=(720, 1280)))
)
            break
        else:
            sleep(2)

def fund_search():
	# 2.  Search the corresponding fund and add your own
    touch(wait(Template(r"tpl1654423981398.png", record_pos=(0.246, 0.826), resolution=(720, 1280)))
)
    touch(wait(Template(r"tpl1654422851414.png", record_pos=(-0.372, -0.42), resolution=(1080, 2340)))
)
    sleep(10)
    touch(wait(Template(r"tpl1654424437787.png", record_pos=(0.433, -0.683), resolution=(720, 1280)))
)
    touch(wait(Template(r"tpl1654424451052.png", record_pos=(0.3, -0.439), resolution=(720, 1280)))
)
    for i in range(3):
        if exists(Template(r"tpl1654424792042.png", record_pos=(-0.01, -0.686), resolution=(720, 1280))):
            touch(wait(Template(r"tpl1654424870398.png", record_pos=(-0.028, -0.569), resolution=(720, 1280)))
)
        else:
            sleep(5)
    keyevent("28")
    text(" Noah grew up ")
    keyevent("66")
    touch(wait(Template(r"tpl1654422056528.png", record_pos=(0.433, -0.388), resolution=(1080, 2340)))
)
    snapshot(msg=" Add AutoSelect ")
    assert_equal(" AutoSelect added "," AutoSelect added ")

    touch(wait(Template(r"tpl1654422150769.png", record_pos=(0.43, -0.387), resolution=(1080, 2340)))
)
    assert_equal(" AutoSelect deleted "," AutoSelect deleted ")

def test_fund_add_optional():
	#  Return to the mobile desktop
    while not exists(Template(r"tpl1654419360669.png", record_pos=(-0.353, 0.555), resolution=(1080, 2340))):
        keyevent("4")
    open_wechat_and_search()
    fund_search()
    #  Return to the wechat homepage
    while not exists(Template(r"tpl1654419202677.png", record_pos=(0.288, -0.925), resolution=(1080, 2340))):
        keyevent("4")
test_fund_add_optional()
04 WeChat official account ( Ping An Securities )
The test method is similar to that of an applet
边栏推荐
- Redis uses 10 tips, please accept!
- AGV机器人RFID传感器CK-G06A与西门子1200PLC应用手册
- How to manage the server to make the website stable and smooth
- 在启牛开的证券账户安全吗?如何申请低佣金的股票账户?
- 【Flink】Flink CancellationException null DefaultExecutionGraphCache LeaderRetrievalHandler
- Pond (topology + priority queue)
- Which exchange is PTA futures on? How can PTA futures be safe?
- Redis configuration and optimization of NoSQL
- 提取式存储才是最佳的记忆方法
- Learning notes of yolov3: model structure of yolov3
猜你喜欢

Bs-xx-007 registered residence management system based on JSP

基于FPGA的VGA协议实现
![[issue 268] accidentally submit the test code to the production environment. I will teach you six ways to solve it in seconds!](/img/e7/448ba3e38fe8c14301f4dfef7f0346.jpg)
[issue 268] accidentally submit the test code to the production environment. I will teach you six ways to solve it in seconds!

Please, don't use enumeration types in external interfaces any more!

【Flink】Flink CancellationException null DefaultExecutionGraphCache LeaderRetrievalHandler
Explanation of waitgroup usage in go language learning

Recommandation de la Bibliothèque open source de programmation
Operating instructions for communication between RS485 (Modbus RTU) industrial RFID reader ck-fr03-a01 and PLC Mitsubishi fx5u

折叠表达式

Easyexcel configuration and Application

随机推荐
Two small things, feel the gap with the great God
Variable parameter expression
小米9线刷ROM
The application of machine learning in database cardinality estimation
Recommandation de la Bibliothèque open source de programmation
Container -- reverse content -- use of explosion, splicing, and inversion functions
[signal de-noising] chromatographic baseline estimation and de-noising based on sparsity (beads) with matlab code and papers
My struggle: my years in foreign enterprises (II)
2022.2.26 library management system 2 - module 2: reader management system
Leetcode 1962. 移除石子使总数最小(应该是向上取整)
Is the securities account opened in qiniu safe? How to apply for a low commission stock account?
Can't understand kotlin source code? Starting with the contracts function~
Is bone conduction earphone good for bone? Is bone conduction earphone harmful to the body?
Redis configuration and optimization of NoSQL
Explanation of waitgroup usage in go language learning
Learning notes of yolov3: model structure of yolov3
cadence SPB17.4 - group operation(add to group, view group list, delete group)
为什么每运行一部都显示一次数据库已存在,都要删除数据库,然后才能成功,每运行一部都要删除一次数据库,重新运行整体才成功.
使用cpolar远程办公(1)
Energy storage operation and configuration analysis of high proportion wind power system (realized by Matlab)