当前位置:网站首页>knife4j配置使用直接拷贝即可
knife4j配置使用直接拷贝即可
2022-06-10 19:21:00 【贺贺学编程】
废话我就不多说了,直接上maven依赖
<!-- knife4j接口文档 -->
<dependency>
    <groupId>com.github.xiaoymin</groupId>
    <artifactId>knife4j-spring-boot-starter</artifactId>
    <version>3.0.3</version>
</dependency>
然后写一个配置类Knife4jConfig,为了避免导错包,把包也给你们了
import org.springframework.context.annotation.Bean;
import org.springframework.context.annotation.Configuration;
import springfox.documentation.builders.ApiInfoBuilder;
import springfox.documentation.builders.PathSelectors;
import springfox.documentation.builders.RequestHandlerSelectors;
import springfox.documentation.service.Contact;
import springfox.documentation.spi.DocumentationType;
import springfox.documentation.spring.web.plugins.Docket;
import springfox.documentation.swagger2.annotations.EnableSwagger2;

@Configuration
@EnableSwagger2
public class Knife4jConfig {


    @Bean(value = "defaultApi2")
    public Docket defaultApi2() {

        Docket docket = new Docket(DocumentationType.SWAGGER_2)
                .apiInfo(new ApiInfoBuilder()
                        .title("xxx接口说明")
                        .description("xxx接口描述")
                        .termsOfServiceUrl("http://www.xx.com/")
                        .contact(new Contact("xxx公司", "http://xxx.com/", "[email protected]"))
                        .version("1.0")
                        .build())
                //分组名称
                .groupName("2.X版本")
                .select()
                //这里指定Controller扫描包路径
                .apis(RequestHandlerSelectors.basePackage("com.xxx.controller"))
                .paths(PathSelectors.any())
                .build();
        return docket;
    }
}
运行项目访问 http://localhost:8080/doc.html
边栏推荐
- 如何使用物联网低代码平台进行工作表管理?
- 腾讯云数据库TDSQL-大咖论道 | 基础软件的过去、现在、未来
- C pointer (interview classic topic exercise)
- Zabbix_监控ssh/crond服务-微信告警
- How to increase the monthly salary of software testing from 10K to 30K? Only automated testing can do it
- Hm3416h buck IC chip pwm/pfm controls DC-DC buck converter
- 【观察】昇腾智行:场景驱动,创新先行,为智慧交通按下“加速键”
- Standing at such a time node today, we may have a clearer understanding of the industrial Internet
- Analysis of epidemic situation in Shanghai based on improved SEIR model
- Change the root
猜你喜欢

20192407 2021-2022-2 《网络与系统攻防技术》实验八实验报告

Rotated Sorted Array旋转排序数组相关题
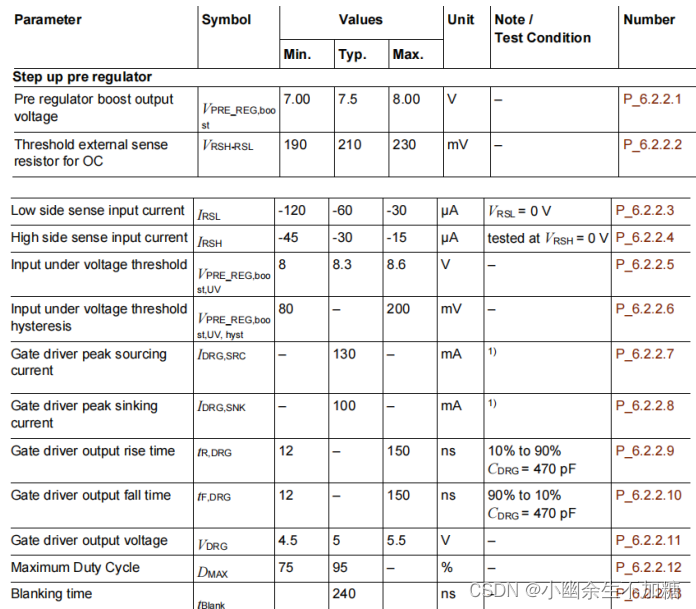
SBC chip 35584 data manual pre regulator translation
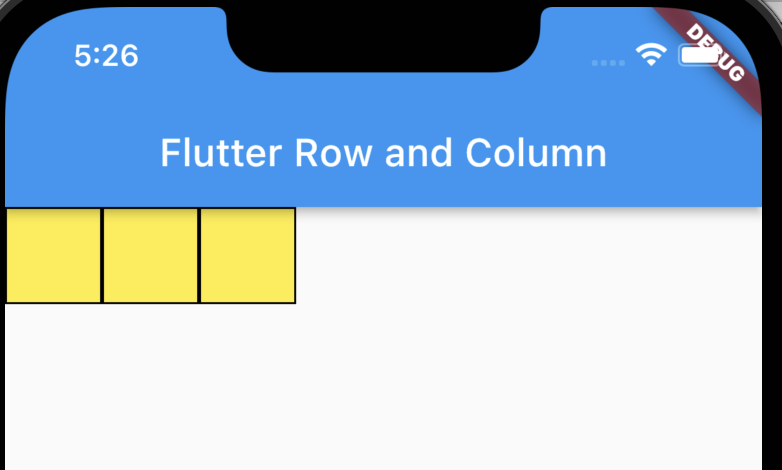
Flutter series: UI layout introduction

MySQL数据库基础

C pointer (interview classic topic exercise)

江波龙 FORESEE XP2000 PCIe 4.0 SSD 多重加密功能,锁定数据安全

ZABBIX server trapper Remote Code Execution Vulnerability (cve-2017-2824)

Analysis of epidemic situation in Shanghai based on improved SEIR model

大学生毕业季找房,VR全景看房帮你线上筛选
随机推荐
FS4100 锂电充电管理IC输入12V给8.4V充电IC
Qualcomm qc2.0 fast charging intelligent identification IC fp6719
[FAQ] summary of common problems and solutions during the use of rest API interface of sports health service
Does Seata still not support sqlserver?
国家先进计算产业创新(宜昌)中心正式落地 中科曙光、升哲科技联合运营
ESP8266 系统环境搭建
It took 2 years, 442 authors and 132 institutions! Google released the new benchmark big bench for language model evaluation. 204 tasks comprehensively evaluated the language model ability, with paper
NFS network mount to create server image
Congratulations | Najie research group of Medical College revealed the function of junB in the process of differentiation of artificial blood progenitor cells in vitro through multi group analysis
FPGA状态机
Rmarkdown easily input mathematical formula
腾讯云数据库TDSQL-大咖论道 | 基础软件的过去、现在、未来
Zabbix_原理架构-安装部署-自定义监控
网上开期货账户安全吗?如何避免被骗?
[enter textbook latex record]
VR全景作品中各式各样的嵌入功能是如何做到的?
性能测试方案(计划)模板
Change the root
LLDP协议编写要点
Flutter series: UI layout introduction