当前位置:网站首页>Object detection based on OpenCV haarcascades
Object detection based on OpenCV haarcascades
2022-07-04 23:03:00 【Just_ Paranoid】
OpenCV:https://github.com/opencv/opencv
haarcascades - This folder contains a specific type of classifier trained to detect objects , for example Face ( positive 、 The side )、 Pedestrians, etc . Some classifiers have a special license. Please check the file for details .
OpenCV Already contains many for the face , eyes , Pre classifier of smiling face, etc . these XML Files are stored in opencv/data/haarcascades/ In the folder
OpenCV The trainer and detector are attached . If you want a car , Aircraft and any other objects train your own classifier , You can use OpenCV Create a . Its full details are given here : Cascade classifier training .
https://docs.opencv.org/2.4/doc/user_guide/ug_traincascade.html
# openCV  Common usage

#  Import opencv library
import os
import cv2


#  Recognize faces in pictures : Use  haarcascade_frontalface_default.xml
def face_detect(img_path):
    #  Initialize model
    detector = cv2.CascadeClassifier('../haarcascades/haarcascade_frontalface_default.xml')
    #  Initialize window
    cv2.namedWindow('image', cv2.WINDOW_AUTOSIZE)
    #  Read the picture
    img = cv2.imread(img_path)
    #  display picture
    # cv2.imshow('image', img)
    #  Convert to grayscale
    img_gray = cv2.cvtColor(img, cv2.COLOR_BGR2GRAY)
    #  Face detection
    dets = detector.detectMultiScale(img_gray, 1.1, 5)
    #  Get face frame
    faces = []
    for i, d in enumerate(dets):
        x1 = d[0] if d[0] > 0 else 0
        y1 = d[1] if d[1] > 0 else 0
        x2 = d[0] + d[2] if d[0] + d[2] > 0 else 0
        y2 = d[1] + d[3] if d[1] + d[3] > 0 else 0
    #  Show face box
    cv2.rectangle(img, (x1, y1), (x2, y2), (0, 255, 0), 2)
    #  Save the picture
    cv2.imwrite('../result/face_detect_1.jpg', img)
    #  Display picture tag face box
    # cv2.imshow('image', img)
    #  Wait for the window to close
    # cv2.waitKey(0)


#  Eye detection : Use  haarcascade_eye_tree_eyeglasses.xml
def eye_detect(img_path):
    #  Initialize model
    detector = cv2.CascadeClassifier('../haarcascades/haarcascade_eye_tree_eyeglasses.xml')
    #  Initialize window
    cv2.namedWindow('image', cv2.WINDOW_AUTOSIZE)
    #  Read the picture
    img = cv2.imread(img_path)
    #  display picture
    # cv2.imshow('image', img)
    #  Convert to grayscale
    img_gray = cv2.cvtColor(img, cv2.COLOR_BGR2GRAY)
    #  Eye detection
    dets = detector.detectMultiScale(img_gray, 1.1, 5)
    #  Get eye frame
    faces = []
    for i, d in enumerate(dets):
        x1 = d[0] if d[0] > 0 else 0
        y1 = d[1] if d[1] > 0 else 0
        x2 = d[0] + d[2] if d[0] + d[2] > 0 else 0
        y2 = d[1] + d[3] if d[1] + d[3] > 0 else 0
    #  Show face box
    cv2.rectangle(img, (x1, y1), (x2, y2), (0, 255, 0), 2)
    #  Save the picture
    cv2.imwrite('../result/eye_detect_1.jpg', img)
    #  Display picture tag face box
    cv2.imshow('image', img)
    #  Wait for the window to close
    cv2.waitKey(0)


def eye_detect_save(img_path, filename):
    #  Initialize model
    detector = cv2.CascadeClassifier('../haarcascades/haarcascade_eye_tree_eyeglasses.xml')
    #  Read the picture
    img = cv2.imread(img_path)
    #  Convert to grayscale
    img_gray = cv2.cvtColor(img, cv2.COLOR_BGR2GRAY)
    #  Eye detection
    dets = detector.detectMultiScale(img_gray, 1.1, 5)
    #  Get eye frame
    faces = []
    for i, d in enumerate(dets):
        x1 = d[0] if d[0] > 0 else 0
        y1 = d[1] if d[1] > 0 else 0
        x2 = d[0] + d[2] if d[0] + d[2] > 0 else 0
        y2 = d[1] + d[3] if d[1] + d[3] > 0 else 0
    #  Show face box
    cv2.rectangle(img, (x1, y1), (x2, y2), (0, 255, 0), 2)
    #  Save the picture
    save_path = '../result/' + filename
    cv2.imwrite(save_path, img)


#  Eye detection : Use  haarcascade_eye.xml
def eye_detect_2(img_path):
    #  Initialize model
    detector = cv2.CascadeClassifier('../haarcascades/haarcascade_eye.xml')
    #  Initialize window
    cv2.namedWindow('image', cv2.WINDOW_AUTOSIZE)
    #  Read the picture
    img = cv2.imread(img_path)
    #  display picture
    # cv2.imshow('image', img)
    #  Convert to grayscale
    img_gray = cv2.cvtColor(img, cv2.COLOR_BGR2GRAY)
    #  Eye detection
    dets = detector.detectMultiScale(img_gray, 1.1, 5)
    #  Get eye frame
    faces = []
    for i, d in enumerate(dets):
        x1 = d[0] if d[0] > 0 else 0
        y1 = d[1] if d[1] > 0 else 0
        x2 = d[0] + d[2] if d[0] + d[2] > 0 else 0
        y2 = d[1] + d[3] if d[1] + d[3] > 0 else 0
    #  Show face box
    cv2.rectangle(img, (x1, y1), (x2, y2), (0, 255, 0), 2)
    #  Save the picture
    cv2.imwrite('../result/eye_detect2_1.jpg', img)
    #  Display picture tag face box
    cv2.imshow('image', img)
    #  Wait for the window to close
    cv2.waitKey(0)


#  Portrait detection :haarcascade_profileface.xml
def profile_face(img_path):
    #  Initialize model
    detector = cv2.CascadeClassifier('../haarcascades/haarcascade_profileface.xml')
    #  Initialize window
    cv2.namedWindow('image', cv2.WINDOW_AUTOSIZE)
    #  Read the picture
    img = cv2.imread(img_path)
    #  display picture
    # cv2.imshow('image', img)
    #  Convert to grayscale
    img_gray = cv2.cvtColor(img, cv2.COLOR_BGR2GRAY)
    #  Eye detection
    dets = detector.detectMultiScale(img_gray, 1.1, 5)
    #  Get eye frame
    faces = []
    for i, d in enumerate(dets):
        x1 = d[0] if d[0] > 0 else 0
        y1 = d[1] if d[1] > 0 else 0
        x2 = d[0] + d[2] if d[0] + d[2] > 0 else 0
        y2 = d[1] + d[3] if d[1] + d[3] > 0 else 0
    #  Show face box
    cv2.rectangle(img, (x1, y1), (x2, y2), (0, 255, 0), 2)
    #  Save the picture
    cv2.imwrite('../result/profile_face_6.jpg', img)
    #  Display picture tag face box
    cv2.imshow('image', img)
    #  Wait for the window to close
    cv2.waitKey(0)


#  Smile detection :haarcascade_smile.xml
def smile_detect(img_path):
    #  Initialize model
    detector = cv2.CascadeClassifier('../haarcascades/haarcascade_smile.xml')
    #  Initialize window
    cv2.namedWindow('image', cv2.WINDOW_AUTOSIZE)
    #  Read the picture
    img = cv2.imread(img_path)
    #  display picture
    # cv2.imshow('image', img)
    #  Convert to grayscale
    img_gray = cv2.cvtColor(img, cv2.COLOR_BGR2GRAY)
    #  Eye detection
    dets = detector.detectMultiScale(img_gray, 1.1, 5)
    #  Get eye frame
    faces = []
    for i, d in enumerate(dets):
        x1 = d[0] if d[0] > 0 else 0
        y1 = d[1] if d[1] > 0 else 0
        x2 = d[0] + d[2] if d[0] + d[2] > 0 else 0
        y2 = d[1] + d[3] if d[1] + d[3] > 0 else 0
    #  Show face box
    cv2.rectangle(img, (x1, y1), (x2, y2), (0, 255, 0), 2)
    #  Save the picture
    cv2.imwrite('../result/smile_detect_1.jpg', img)
    #  Display picture tag face box
    cv2.imshow('image', img)
    #  Wait for the window to close
    cv2.waitKey(0)


if __name__ == '__main__':
    print('PyCharm')
    # face_detect('../face/face01.jpg')
    # eye_detect('../face/face01.jpg')
    # eye_detect_2('../face/face01.jpg')
    # profile_face('../face/face06.jpg')
    # smile_detect('../face/face08.jpg')
    #  Traverse face Folder   Output   Eye detection   Output   Mark to  result Folder
    for dirpath, dirnames, filenames in os.walk('../face'):
        for filename in filenames:
            print(os.path.join(dirpath, filename))
            eye_detect_save(os.path.join(dirpath, filename), filename)
边栏推荐
- A complete tutorial for getting started with redis: redis usage scenarios
- Excel 快捷键-随时补充
- PS style JS webpage graffiti board plug-in
- Explanation of bitwise operators
- Summary of index operations in mongodb
- A complete tutorial for getting started with redis: hyperloglog
- Serial port data frame
- Attack and defense world misc advanced area ditf
- Unity vscode emmylua configuration error resolution
- Redis入门完整教程:Redis Shell
猜你喜欢

Attack and defense world misc advanced zone 2017_ Dating_ in_ Singapore

Co create a collaborative ecosystem of software and hardware: the "Joint submission" of graphcore IPU and Baidu PaddlePaddle appeared in mlperf
MySQL Architecture - user rights and management

常用技术指标之一文读懂BOLL布林线指标
攻防世界 MISC 进阶区 3-11
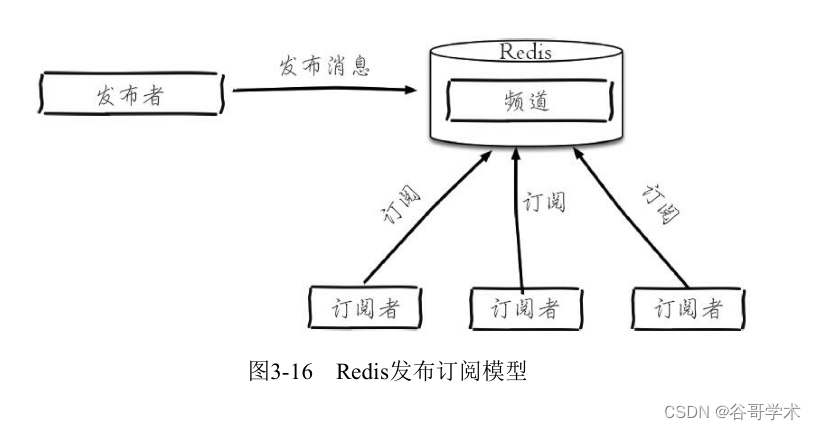
Redis入门完整教程:发布订阅
攻防世界 MISC 进阶 glance-50
位运算符讲解

Install the gold warehouse database of NPC
colResizable. JS auto adjust table width plug-in
随机推荐
Sword finger offer 67 Convert a string to an integer
字体设计符号组合多功能微信小程序源码
图片懒加载的原理
Redis入门完整教程:客户端通信协议
共创软硬件协同生态:Graphcore IPU与百度飞桨的“联合提交”亮相MLPerf
Redis getting started complete tutorial: Key Management
[machine learning] handwritten digit recognition
ECS settings SSH key login
Wechat official account solves the cache problem of entering from the customized menu
攻防世界 misc 高手进阶区 a_good_idea
Redis入门完整教程:列表讲解
PS style JS webpage graffiti board plug-in
智力考验看成语猜古诗句微信小程序源码
Google Earth engine (GEE) - tasks upgrade enables run all to download all images in task types with one click
Persistence mechanism of redis
【剑指Offer】6-10题
Serial port data frame
Redis introduction complete tutorial: client communication protocol
Principle of lazy loading of pictures
Redis getting started complete tutorial: Geo