当前位置:网站首页>Create a virtual machine on VMware (system not installed)
Create a virtual machine on VMware (system not installed)
2022-07-05 21:53:00 【Longquan TAIA】
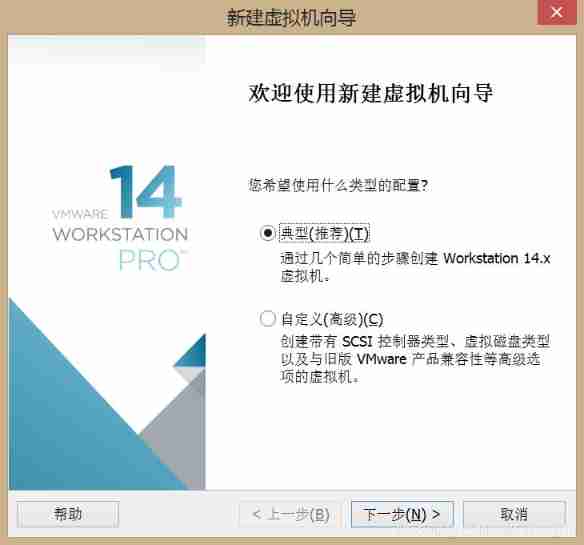
open VMware Software , Then click on the file → New virtual machine , The following window will pop up , Choose typical options :
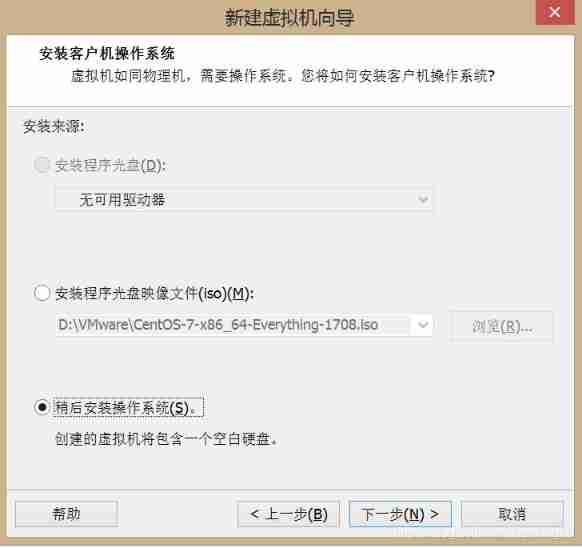
Click next , The following window will pop up , choice “ Install the operating system later ” Options .
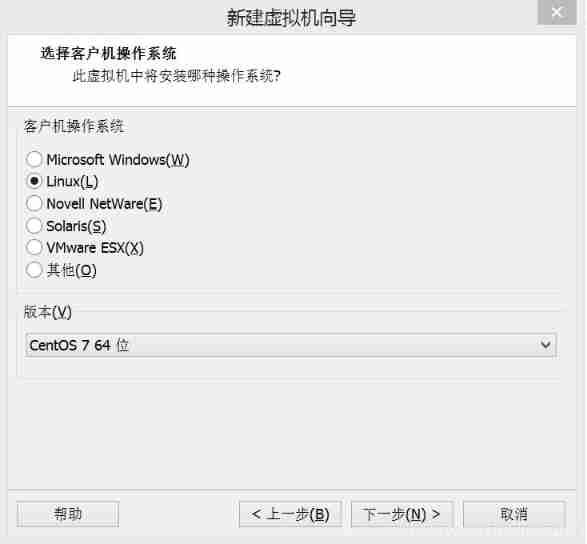
Click next , The following window will pop up , Let you choose the type and version of the operating system to be installed in the virtual machine , here , To install Linux Systematic CentOS7 Version as an example .
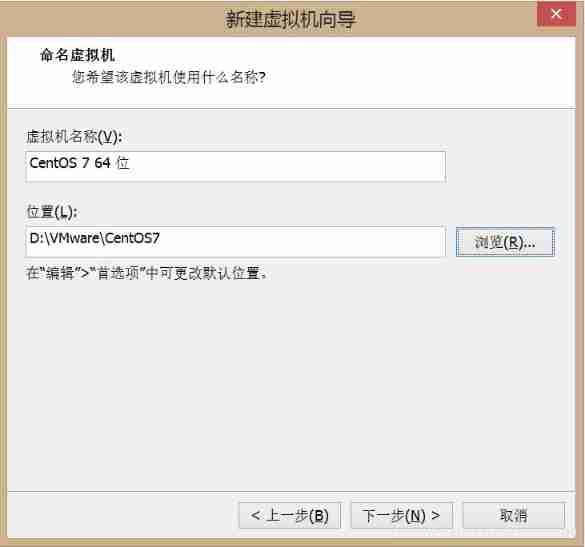
Click next , Set the name and storage location of the virtual machine , You can choose any name , Save the location , The default is to save in C A directory on the disk , But it is not recommended to put it in C disc , It can be put in D A directory under the disk ( Such as D:\VMware\CentOS7), Convenient for future management .
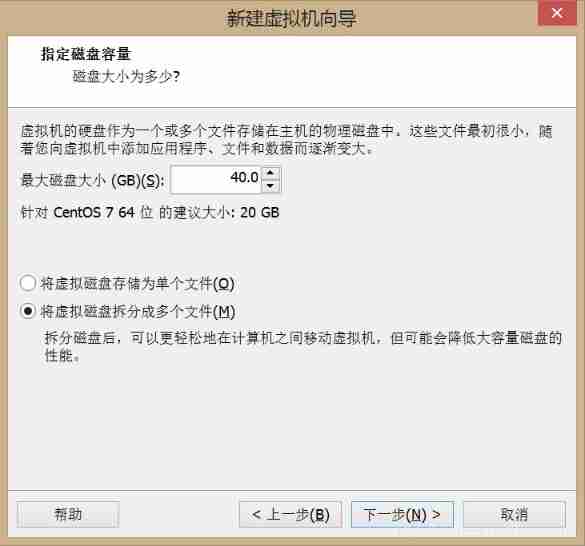
Click next , Set the maximum hard disk space of the virtual machine , The default is 20G, I choose to assign 40G As the hard disk space of the virtual machine .
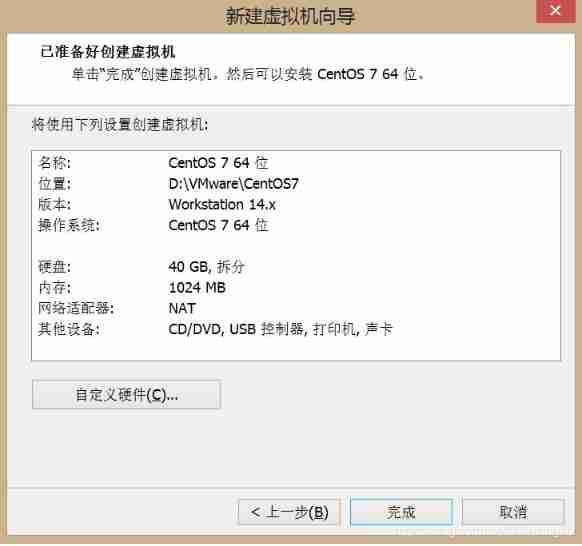
Click next , The following interface pops up , Complete the creation of virtual machine . This interface has a “ Custom hardware ” The button , Click it to set the hardware in the virtual machine , But generally speaking , The default hardware setting is ok . If you need to change the hardware settings , We can also create the virtual machine after , Make flexible settings in the virtual machine interface . therefore , Click here to finish .
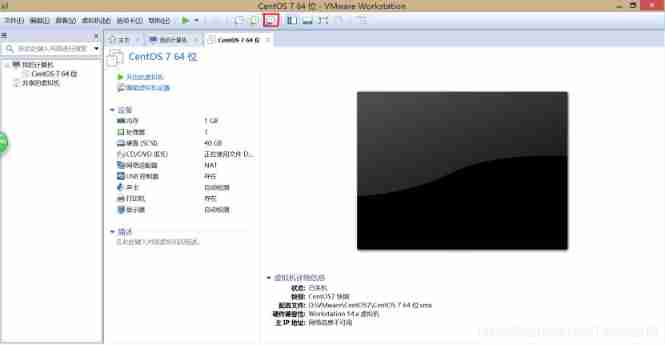
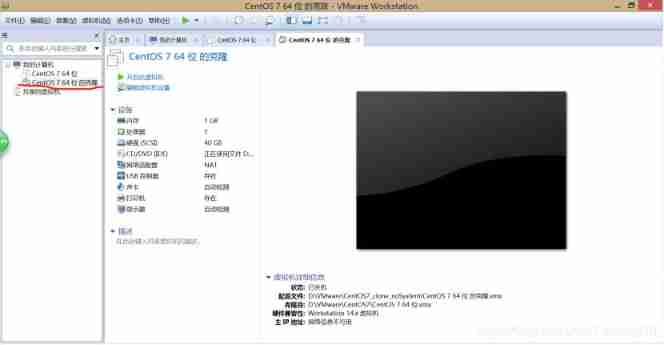
After the virtual machine is created , You can go to VMware We can see the virtual machine we just created in the main interface of CentOS7, Here's the picture :
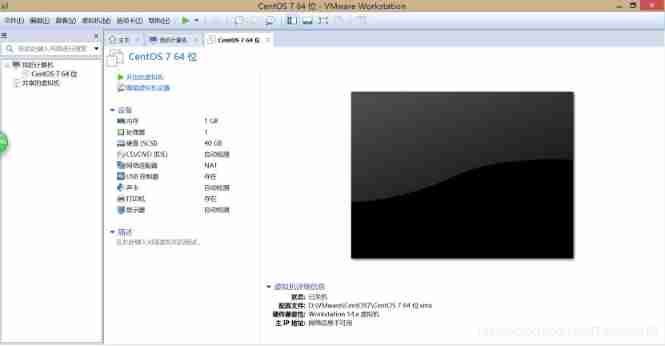
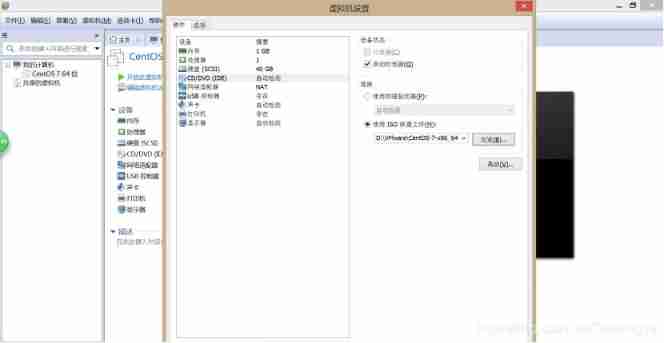
such , Our virtual machine is created . This virtual machine is equivalent to a real computer , But we haven't installed the operating system yet . Before installing the operating system , If necessary , We can flexibly change the hardware settings of the virtual machine ( Such as : Memory size 、 Number of processors 、 Network adapters, etc ). You can click “ virtual machine → Set up ”, To make changes .
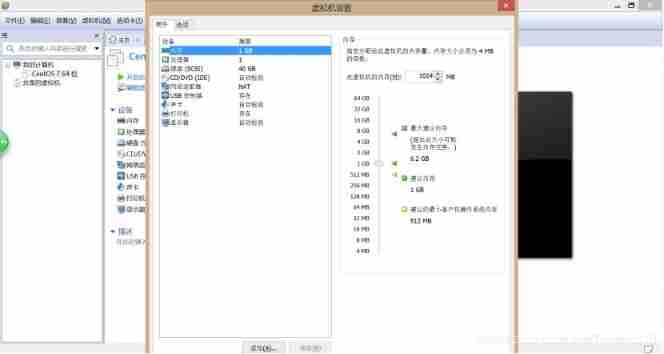
The memory size of the virtual machine is allocated by default 1G Space , It is recommended not to exceed half of the memory size of the real machine .
Virtual machine processor settings , It can be compared with your real machine CPU The settings of the processor are consistent . The default setting is : The number of processors is 1, The number of cores of the processor is also 1( Single core processor ). Generally speaking , The default value is OK . Unless you want the performance of the virtual machine to be very good , Change it to the maximum .
The hard disk size of the virtual machine is the hard disk size you just allocated , By default, there is only one hard disk , If necessary , You can add one or more hard drives .
The virtual machine CD/DVD(IDE)( I.e. optical drive ) Set up , The setting of the optical drive is very important , It is related to whether you can successfully install the operating system on the virtual machine later . In the state of the equipment , You can see “ Connected ” Not checked , This is because the virtual machine has not been powered on , After starting up, you must ensure that it is checked , otherwise , The CD-ROM drive will not be detected , There is no way to install the operating system for the virtual machine . Because our real machine has no physical drive ( Physical optical drive ), There is no system CD , So here we choose “ Use ISO Image file ”, Then click on the one on the right “ Browse ” Button , Select the system image file you downloaded ( Such as CentOS-7-x86_64-Everything-1708.iso), Click the OK button .
If you haven't linux System image file , Clickable http://pan.baidu.com/s/1qYESbBA download , Or search Baidu for the download address by yourself .
Network adapter settings of virtual machine , Whether the network connection of the virtual machine is normal , There is no introduction here , I'll talk about it in detail later .
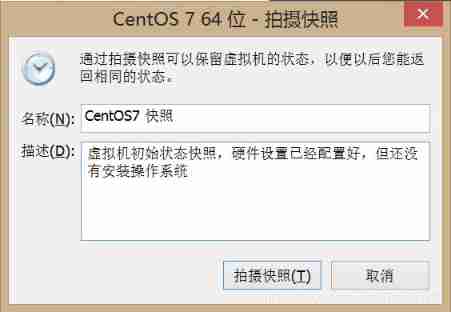
Now? , The virtual machine is created , The basic hardware settings are also configured . In order to prevent problems with the virtual machine in the future , Can quickly return to the initial state , We can use VMware The snapshot function of .
3. VMware The snapshot function of
VMware The snapshot function of can help us save a snapshot state for a certain state of the virtual machine , In order to quickly recover a certain state of the virtual machine in the future . It should be noted that , The snapshot function is just VMware The function of , Actual linux The system does not have this function , If you are not using a virtual machine linux System , You need to pay attention to linux Back up the relevant files of the system .
Click the icon shown in the figure below , You can save a snapshot of the current virtual machine state .

Click the icon shown in the figure below , Snapshots of virtual machines can be managed ( take snapshot 、 Restore the snapshot 、 Delete snapshot 、 Clone snapshots, etc ).
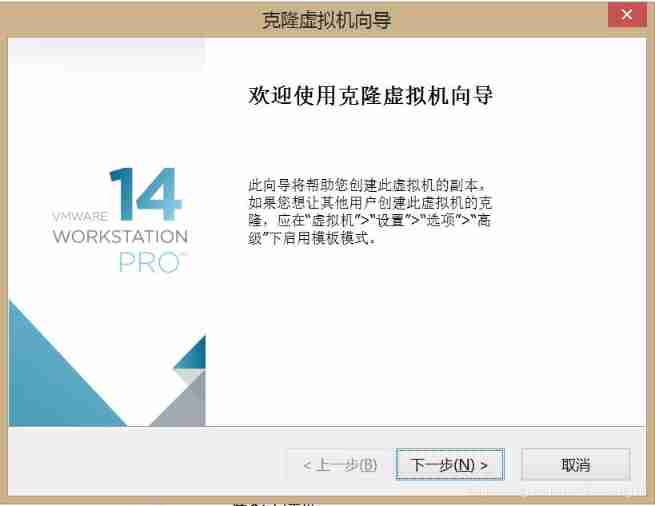
4. VMware The cloning function of
VMware The cloning function of is another very convenient function . It can help you quickly clone a copy of the current virtual machine , And it doesn't need to occupy more disk space .
such as , You need more linux When the system performs server cluster test , You can use the cloning function . If you re create a virtual machine , Then install the operating system , It not only takes a long time , And the new virtual machine will also occupy more disk space . Cloning is different , It can quickly clone a copy of the current virtual machine , And it only takes up tens of megabytes of disk space ( Link cloning is required ). therefore , Cloning function is very convenient and practical .
It should be noted that , The cloned virtual machine is just a copy of the original virtual machine , If the original virtual machine is deleted , The cloned replica virtual machine cannot be used normally .
although , Now we haven't installed the operating system for the original virtual machine , But here we still demonstrate the method of cloning ( Generally, cloning is carried out after the operating system is installed ), Steps are as follows :
Click on VMware The main menu bar “ virtual machine → management → clone ”, Pop up the following window :
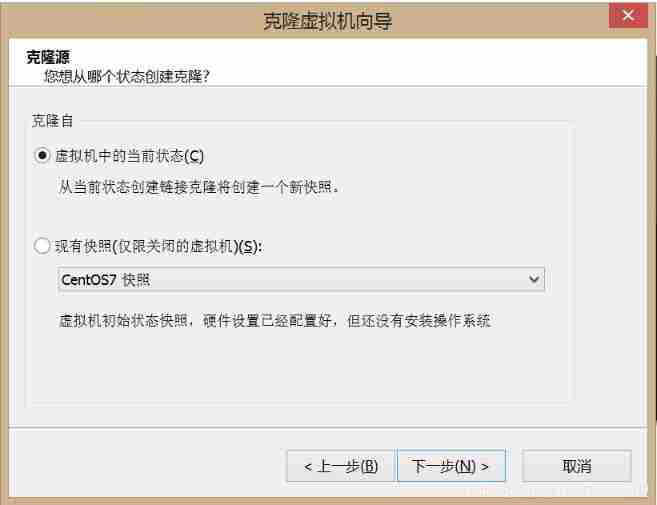
Click next , Select clone from “ The current state in the virtual machine ”, Here's the picture :
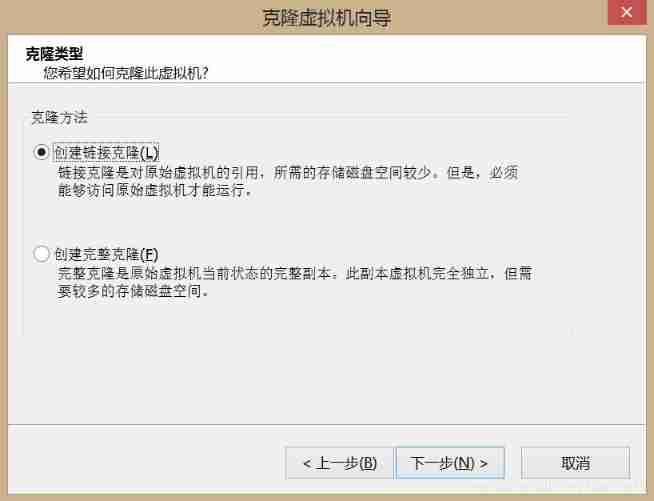
Click next , Clone method selection “ Create a link Clone ”, Here's the picture :
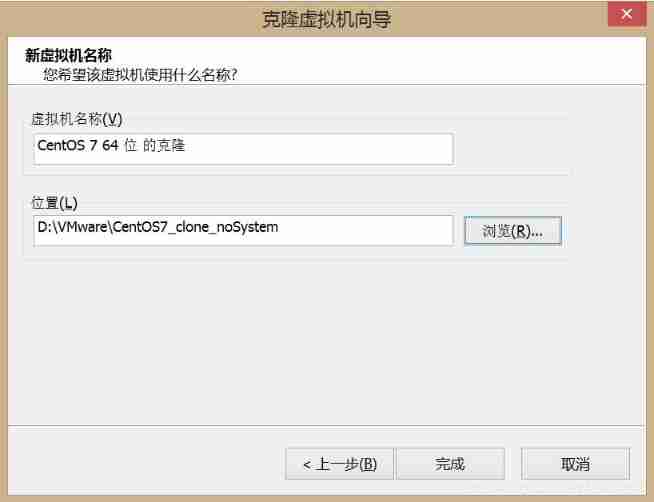
Click next , Set the name and save location of the new virtual machine .
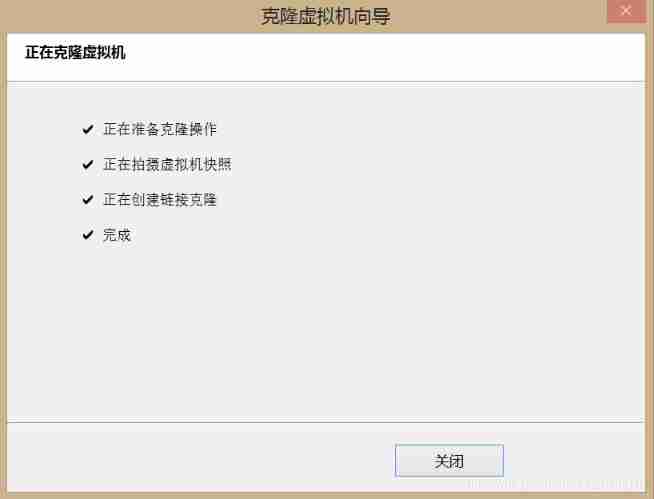
Last , Click Finish . such , We can do that VMware Main interface , I see two identical virtual machines .
5. Install Linux operating system
at present , We have already created a virtual machine (CentOS7), The hardware settings are also configured , Only need to install the operating system for the virtual machine .
About how to use VMware Install linux Of CentOS System , It will be explained in the next chapter .
边栏推荐
- QML reported an error expected token ";", expected a qualified name ID
- Codeforces 12D ball tree array simulation 3 sorting elements
- An exception occurred in Huawei game multimedia calling the room switching method internal system error Reason:90000017
- Tips for using SecureCRT
- Kingbasees v8r3 data security case - audit record clearing case
- one hundred and twenty-three thousand four hundred and fifty-six
- Gcc9.5 offline installation
- MQ----activeMq
- Drawing HSV color wheel with MATLAB
- Shell script, awk uses if, for process control
猜你喜欢
Dbeaver executes multiple insert into error processing at the same time
Efficiency difference between row first and column first traversal of mat data types in opencv
Daily question brushing record (XIV)

Cross end solution to improve development efficiency rapidly

华为游戏多媒体调用切换房间方法出现异常Internal system error. Reason:90000017
SQL knowledge leak detection
Emotional analysis of wechat chat records on Valentine's day based on Text Mining
Summarize the reasons for 2XX, 3xx, 4xx, 5xx status codes

Shell script, awk condition judgment and logic comparison &||
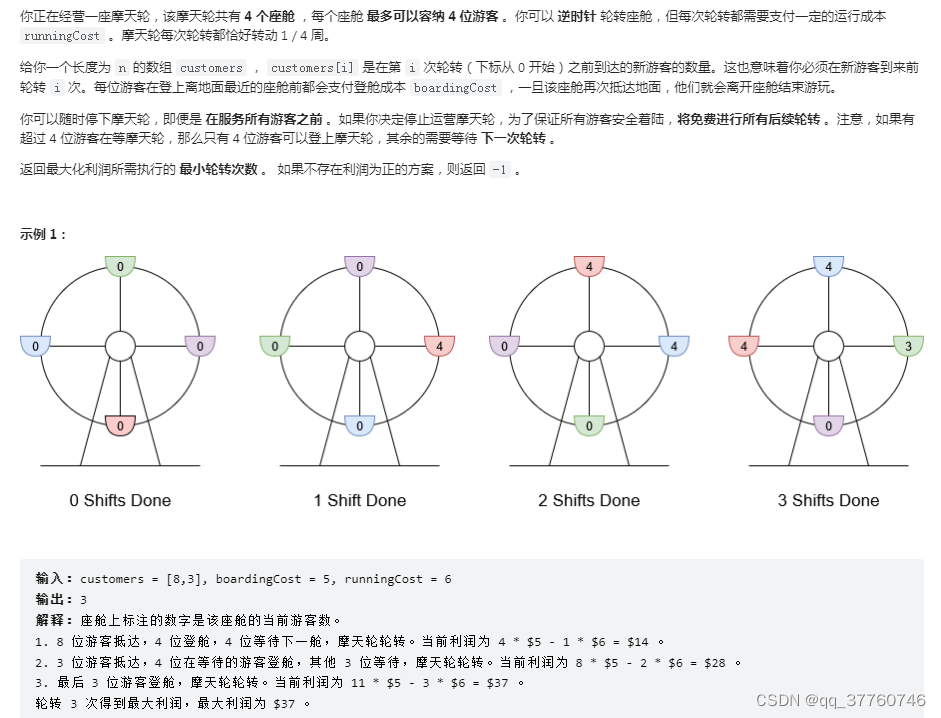
力扣------经营摩天轮的最大利润
随机推荐
Summary of El and JSTL precautions
Dbeaver executes multiple insert into error processing at the same time
Drawing HSV color wheel with MATLAB
Cross end solution to improve development efficiency rapidly
The American Championship is about to start. Are you ready?
PIP install beatifulsoup4 installation failed
Exercise 1 simple training of R language drawing
Advantages of robot framework
GCC9.5离线安装
CRM creates its own custom report based on fetch
Alibaba cloud award winning experience: build a highly available system with polardb-x
Shell script, awk uses if, for process control
Reptile practice
SQL common syntax records
Simple interest mode - evil Chinese style
How to view Apache log4j 2 remote code execution vulnerability?
Li Kou ----- the maximum profit of operating Ferris wheel
How can Huawei online match improve the success rate of player matching
Chap2 steps into the palace of R language
What should I do to prepare for the interview algorithm position during school recruitment?