当前位置:网站首页>Anaconda = > pycharm=> CUDA=> cudnn=> pytorch environment configuration
Anaconda = > pycharm=> CUDA=> cudnn=> pytorch environment configuration
2022-07-27 00:18:00 【LiDe2000】
Tips : When the article is finished , Directories can be generated automatically , How to generate it, please refer to the help document on the right
Preface
Anaconda => PyCharm => CUDA => cudnn => PyTorch Environment configuration
Tips : The following is the main body of this article , The following cases can be used for reference
One 、Anaconda install
1、 Go to the official website to download the version , Just download the latest version , The following is the official website link .
https://www.anaconda.com/products/distribution
2、 After downloading, it has been run as an administrator
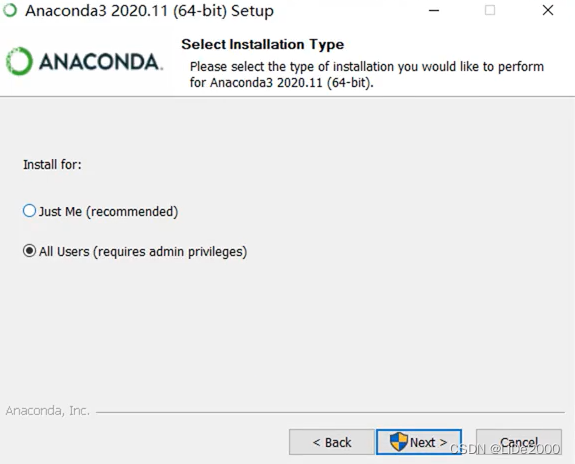
3、 For personal use Just Me, A bunch of people use it All Users, Will do , Not much difference .

4、 Change the path by yourself , You need to remember the corresponding path !

5、 Check the first , Otherwise, you need to add environment variables later .
6、 then Install, Wait patiently for installation .


Uncheck both , Otherwise, the browser will open , Pop up the page . Click on Finish Complete the installation .

Anaconda Prompt: Command line window .
Spyder: Can be done Python Code writing .
7、 To check whether this computer has been installed Anaconda, May press win+R Call up the command line window , Input cmd command 
8、 Input conda -V You can check whether it is installed conda, If it is not installed, it displays conda Not internal or system commands .
Two 、Anaconda Configuration needs Python A virtual environment
1、 open Anaconda Prompt .
2、 Input python You can view it Anaconda Installed Python edition ( Pre installation was also mentioned in the previous installation process .)
3、 Enter the following command to create a virtual environment .
conda create -n python3.7 python=3.7
conda create -n : Prefix , establish
python3.7 : The name of the folder created ( It can be changed to a name convenient for you )
python=3.7 :python Corresponding version , Here to install 3.7 edition 
4、 Create success !
5、 Activate the environment
conda activate python3.7
6、 After entering the environment, you can view the installed python edition ,
as well as You need to install the corresponding CUDA Version of Pytorch.
7、 Then create a folder , stay pycharm Open as project in ,
Set up python The interpreter is created in the virtual environment python.exe. that will do
View the created python See the following blog for the location of virtual environment :
https://blog.csdn.net/LiDe2000/article/details/125946216?spm=1001.2014.3001.5501

3、 ... and 、Pycharm install
Download it on the official website , The following is the official website link .
https://www.jetbrains.com/zh-cn/pycharm/
The professional edition costs money ( You can find the cracked version by yourself ), Community free ( Basically enough for daily use )
Download the latest Community Edition ( You can also download the previous version , No big problem )
It can be installed normally ( Fill in the pictures later ..)
Four 、CUDA install
1、 open NVIDA Control panel , Click the system information in the lower left corner , Check the maximum supported by the graphics card CUDA edition .

2、 Go to Pytorch Check the official website for supported CUDA edition .
https://pytorch.org/get-started/locally/

3、 Find Pytorch Supported by CUDA After version (CUDA Version needs to be associated with Pytorch The installation command corresponds to , Otherwise, you may not be able to call GPU), Go to CUDA Download the corresponding version on the official website .
Official website :https://developer.nvidia.cn/zh-cn

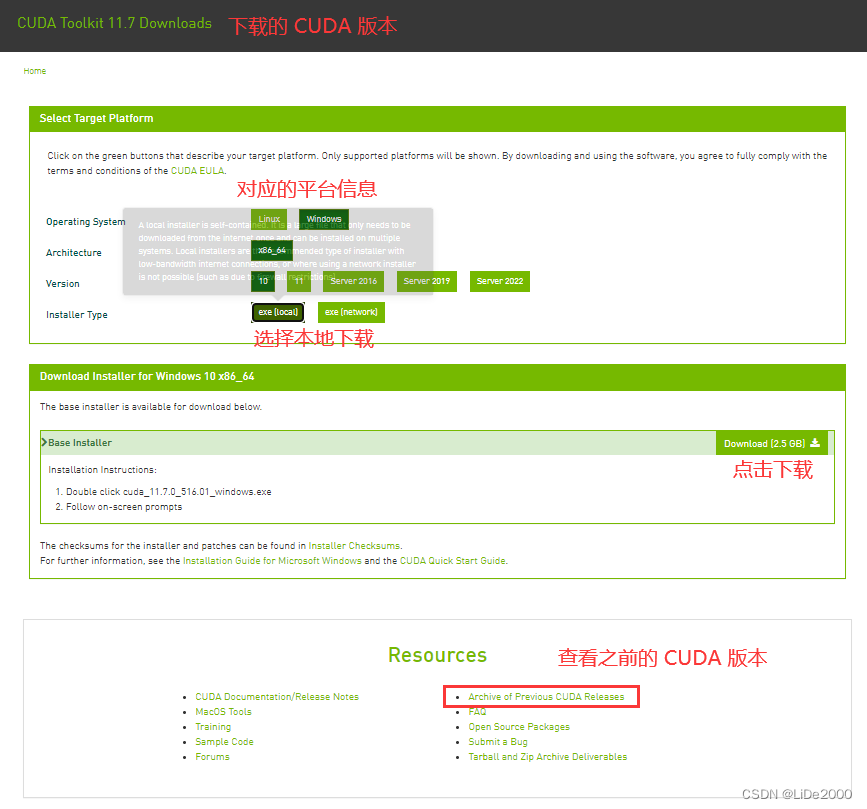
I choose to download 11.3 (11.3.0 And 11.3.1 All possible ).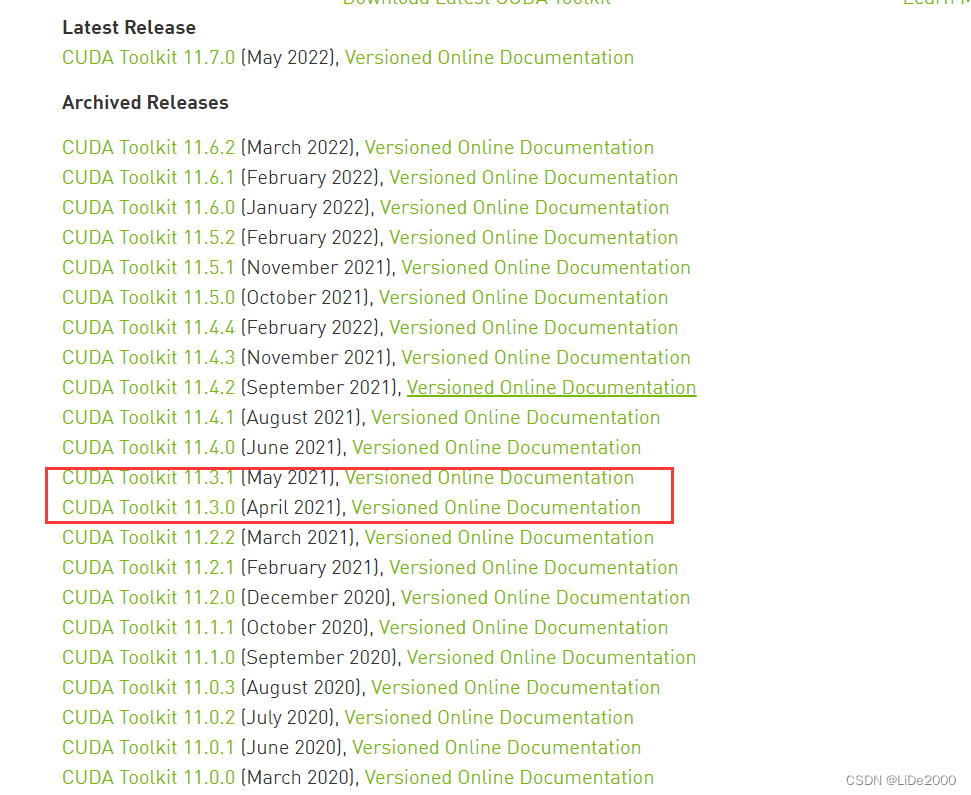
4、 Download it CUDA after , Choose to run as Administrator
Compare new 、 current version , If the new version is low, uncheck , Not to install .
Choose the installation location, then you can create a new location by yourself ( Forget the screenshot , There is no picture )
It can be installed normally .
5、 ... and 、cudnn To configure
1、 Go to the official website to download CUDA Corresponding cudnn edition , The corresponding version will be displayed when downloading .
Official website :https://developer.nvidia.cn/zh-cn

You may have to join to download , Then log in , Download after joining .
2、 Download after decompression , Copy the three folders 、 Paste into the previously installed CUDA Under the installation way .

complete !
6、 ... and 、PyTorch install
1、 open Anaconda Prompt , Using the previous command, you need to install Pytorch Virtual environment for .
You can view the installed CUDA edition .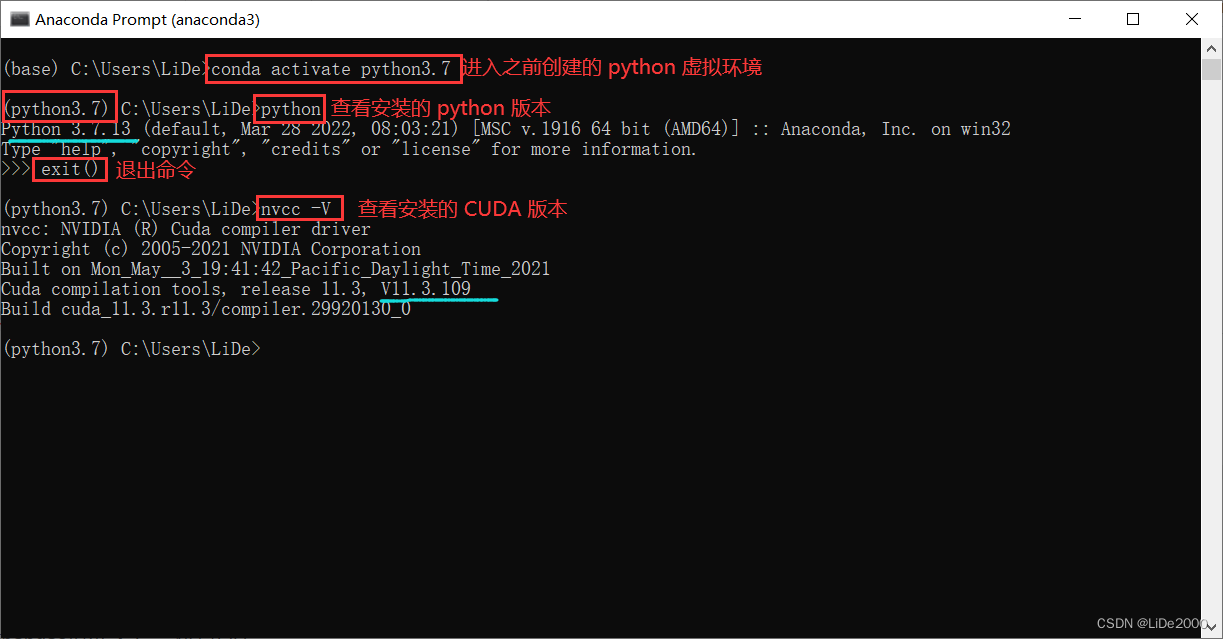
2、 stay Pytorch Find the corresponding installation command on the official website , Enter into the panel above , Ready for installation ( The installation uses American sources , Therefore, the installation may fail or be slow , If the installation fails, install it during the day or after installing the domestic source .)
Previously installed by the author CUDA 11.3, So choose the installation command here .
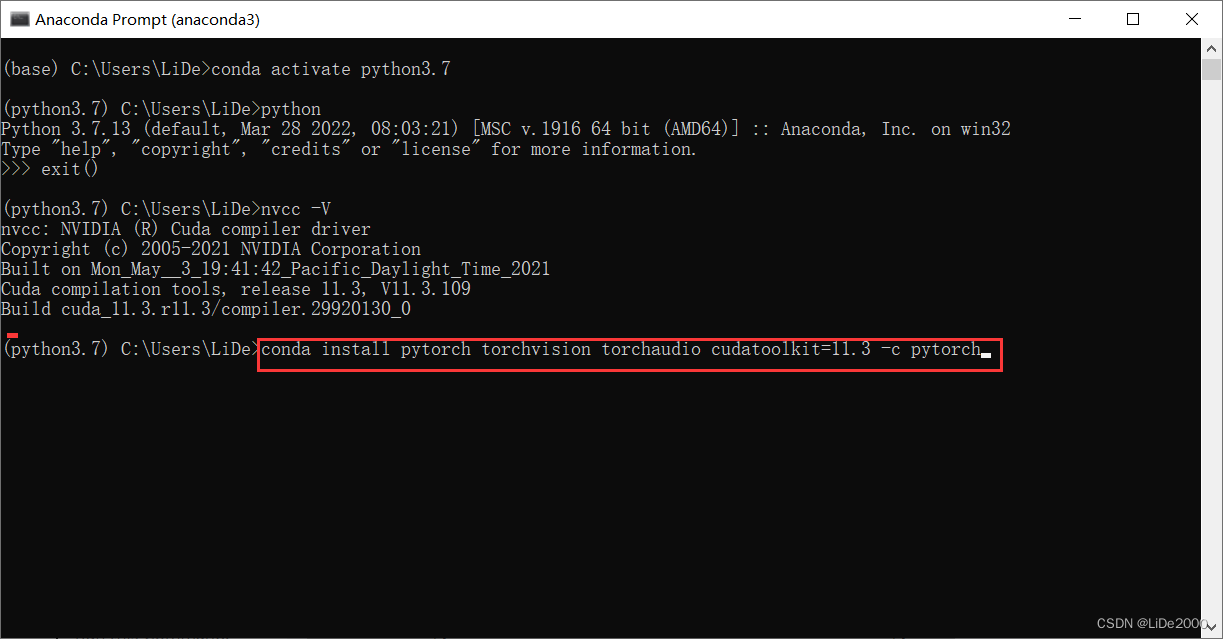
3、 Wait for installation 
7、 ... and 、 Verify that GPU
1、 stay Pycharm Choose to install Pytorch Of Python Environmental Science , Above installation Anaconda When writing in detail .
import torch
print(torch.__version__)
flag = torch.cuda.is_available()
if flag:
    print("CUDA is available !")
else:
    print("CUDA is not available !")

gpu_num = 1
# Device which device we want to run on
device = torch.device("cuda:0" if (torch.cuda.is_available() and gpu_num > 0) else "cpu")
print("Drive is: ", device)
print("GPU model: ", torch.cuda.get_device_name(0))

GPU Can successfully call .
summary
The configuration process is a little long , It may not be detailed enough ( It is a record post of the author ), Other problems encountered during installation will be updated later .
边栏推荐
- push to origin/master was rejected 错误解决方法
- 07 design of ponding monitoring system based on 51 single chip microcomputer
- Typesript generic constraint
- 13_ conditional rendering
- Design of electronic scale based on 51 single chip microcomputer
- Everything you should know about wearable NFT!
- Arthas quick start
- Training team lpoj round10 e Jumping Frog
- 4-4 object lifecycle
- 蒙着头配置deeplabcut2
猜你喜欢


随机推荐
push to origin/master was rejected 错误解决方法
三层架构 模拟
14_ Basic list
Go exceed API source code reading (IV) -- save (), SaveAs (name string)
Mysql database complex operations: Database Constraints, query / connect table operations
NFT display guide: how to display your NFT collection
Flink SQL (II) Kafka connector
Everything you should know about wearable NFT!
The place where the dream begins ---- first knowing C language (2)
Meeting OA project seating function and submission function
MySQL数据库复杂操作:数据库约束,查询/连接表操作
Opencv camera calibration and distortion correction
Design of alcohol detector based on 51 single chip microcomputer
信号与系统冲激响应与阶跃响应
Apple TV HD with the first generation Siri remote is listed as obsolete
13_ conditional rendering
Chapter 7 course summary
MVC three-tier architecture
yolov5在jetson nano上的部署 deepstream
LeetCode题目——二叉树篇