当前位置:网站首页>Let you have a deep understanding of gitlab CI / CD principle and process
Let you have a deep understanding of gitlab CI / CD principle and process
2020-11-07 17:19:00 【PHP open source community】

GitLab CI/CD It's a built-in GitLab Tools in , For software development through a continuous approach :
- Continuous Integration (CI) Continuous integration
- Continuous Delivery (CD) Continuous delivery
- Continuous Deployment (CD) Continuous deployment
Continuous integration works by pushing small blocks of code to Git In the repository hosted application code base , And every time I push , Run a series of scripts to build 、 Test and verify code changes , Then merge it into the main branch .
Continuous delivery and deployment is equivalent to further CI, The application can be deployed to production every time it is pushed to the default branch of the warehouse .
These methods allow discovery early in the development cycle bugs and errors, This ensures that all code deployed to the production environment meets the code standards established for the application .
GitLab CI/CD By a person named .gitlab-ci.yml File to configure , The file is located in the root directory of the warehouse . The script specified in the file is created by GitLab Runner perform .
1. GitLab CI/CD Introduce
The continuous approach to software development is based on the automatic execution of scripts , To minimize the chance of introducing errors when developing applications . From developing new code to deploying new code , They hardly need human intervention , There's no need for intervention at all .
It involves constantly building... In each small iteration 、 Test and deploy code changes , So it's less based on what's already there bug Or failed previous versions of the opportunity to develop new code .
Continuous Integration( Continuous integration )
Suppose an application , The code is stored in GitLab Of Git Warehouse . Developers push code changes many times a day . For every push to the warehouse , You can create a set of scripts to automatically build and test your application , This reduces the chance of introducing errors into the application . This approach is called continuous integration , For submission to an application ( Even the development branch ) Every change of , It will automatically build and test continuously , To ensure that the changes introduced pass all the tests you've set up for your application , Guidelines and code compliance standards .
Continuous Delivery( Continuous delivery )
Continuous delivery is a step beyond continuous integration . The application is not only built and tested every time code changes that are pushed to the code base , and , Although deployment is triggered manually , But as an additional step , It can also be deployed continuously . This method ensures that the code is checked automatically , However, manual intervention is required to trigger the change manually from the policy to input the change .
Continuous Deployment( Continuous deployment )
Similar to continuous delivery , But the difference is , You don't have to deploy it manually , Instead, set it to auto deploy . Deploy your application without human intervention at all .
1.1. GitLab CI/CD How it works
In order to use GitLab CI/CD, You need a trusteeship in GitLab Application code base on , And in the root directory .gitlab-ci.yml The file specifies the build 、 Test and deploy scripts .
In this file , You can define the script to run , Define the dependencies that are contained , Select the commands to run in sequence and the commands to run in parallel , Define where to deploy the application , And specify whether To run scripts automatically or manually trigger scripts .
To visualize the process , Assume that all scripts added to the configuration file are the same as the commands running on the computer's terminal .
Once you've added .gitlab-ci.yml Go to the warehouse ,GitLab The file will be detected , And use the name GitLab Runner To run your script . The operation of the tool is similar to that of the terminal .
These scripts are grouped into jobs, Together they form a pipeline. One of the simplest .gitlab-ci.yml The file might look like this :
before_script:
 - apt-get install rubygems ruby-dev -y
run-test:
 script:
 - ruby --version 6
before_script Property will install dependencies for your app before running anything , A group called run-test Of job( Homework ) Will print the current system's Ruby edition . Together they make up the trigger every time a branch is pushed to the warehouse pipeline( The Conduit ).
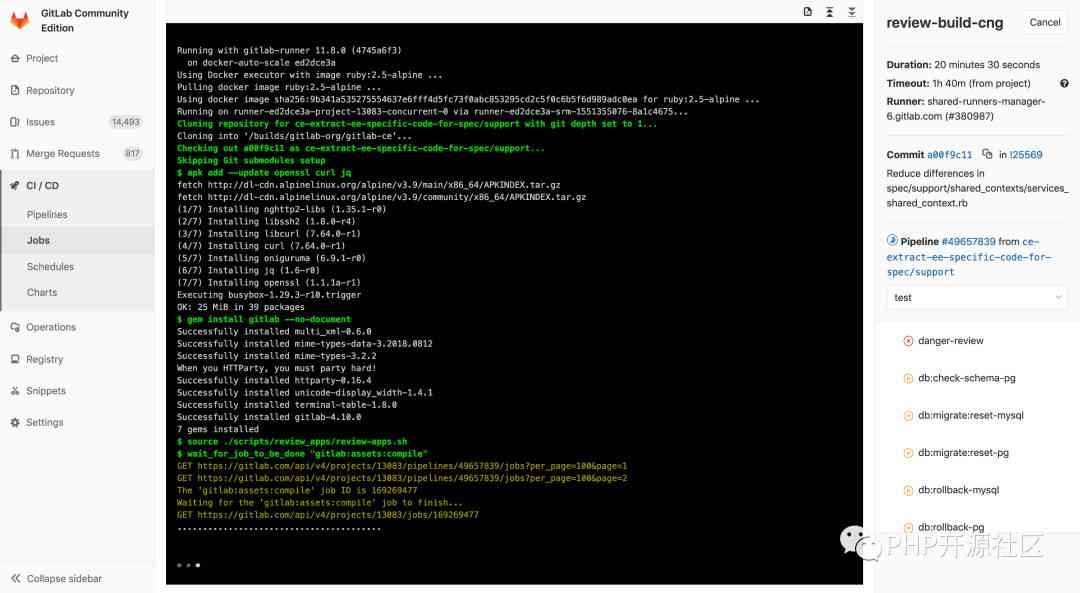
GitLab CI/CD Not only can you execute the job, You can also show what happened during execution , As you can see at the terminal :
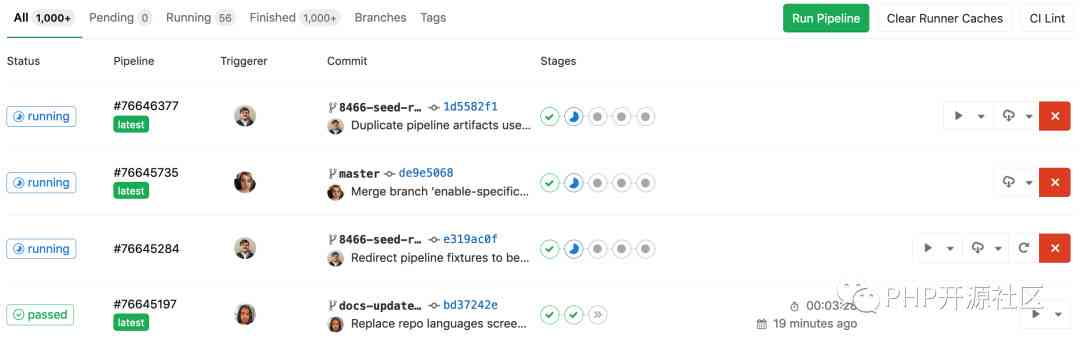
Create a strategy for your app ,GitLab It will run according to your definition pipeline. Your pipeline state will also be GitLab Show :

Last , If there are any problems , You can easily roll back all changes :

1.2. basic CI/CD Workflow
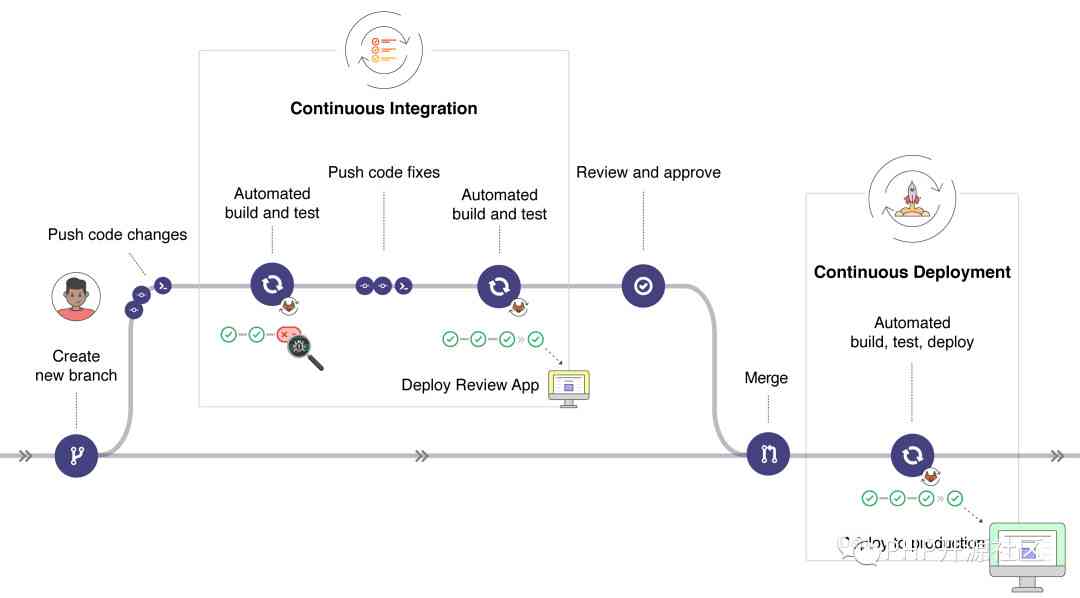
Once you push the commit to the branch of the remote repository , So what you set up for the project CI/CD The pipe will be triggered .GitLab CI/CD By doing so :
- Run automation scripts ( Serial or parallel ) Code Review And get approval
- Build and test your application
- As you can see on this machine , Use Review Apps Preview the changes for each merge request
- Code Review And get approval
- Merge feature Branch to default Branch , At the same time, automatically deploy this change to the production environment
- If something goes wrong , It's easy to roll back
adopt GitLab UI All the steps are visual
1.3. Deepen understanding CI/CD Basic workflow
If we go deep into the basic workflow , Can be in DevOps At every stage of the life cycle you see GitLab Functions available in , As shown in the figure below :

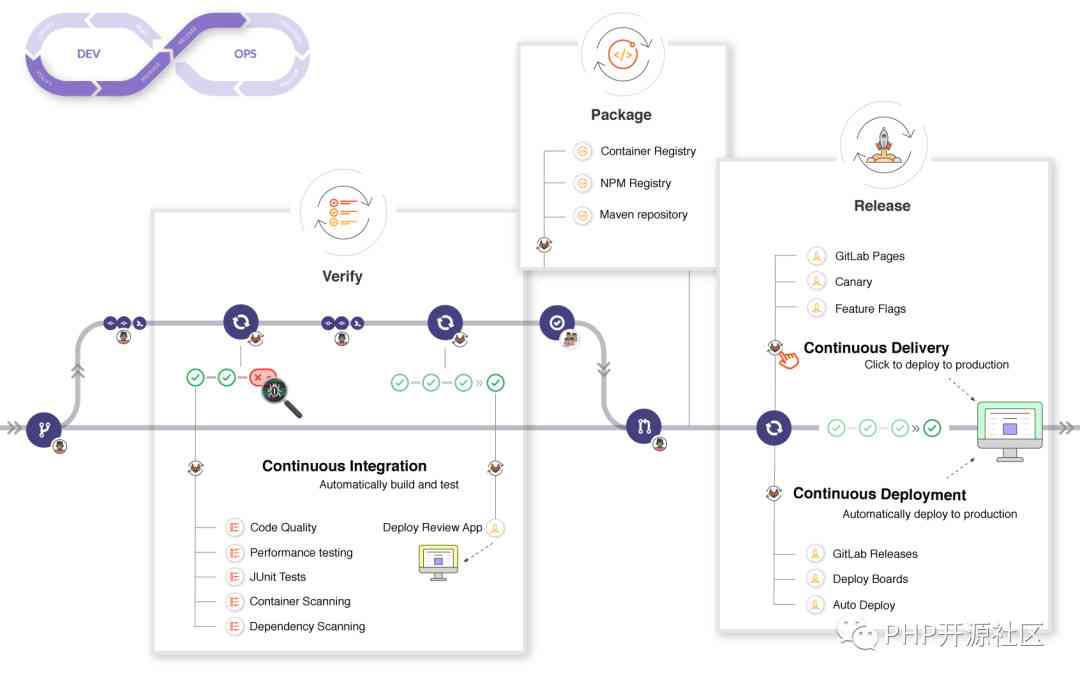
- Verify
- Build and test your application automatically through continuous integration
- Use GitLab Code quality (GitLab Code Quality) Analyze the quality of your source code
- Through the browser performance test (Browser Performance Testing) Determine the performance impact of code changes
- Perform a series of tests , such as Container Scanning , Dependency Scanning , JUnit tests
- use Review Apps Deployment changes , To preview application changes on each branch
- Package
- use Container Registry Storage Docker Mirror image
- use NPM Registry Storage NPM package
- use Maven Repository Storage Maven artifacts
- use Conan Repository Storage Conan package
- Release
- Continuous deployment , Automatically deploy your application to the production environment
- Continuous delivery , Manually click to deploy your application to production
- use GitLab Pages Deploying a static website
- Deploy functionality to only one Pod On , And let a certain proportion of user groups pass through Canary Deployments Access to temporary deployment features (PS: That is, grayscale Publishing )
- stay Feature Flags Then deploy the function
- use GitLab Releases Add release notes to any Git tag
- Use Deploy Boards Check in Kubernetes On each of the CI The current state and state of the environment
- Use Auto Deploy Deploy application to Kubernetes The production environment in a cluster
Use GitLab CI/CD, just so so :
- adopt Auto DevOps Easily set up the entire life cycle of an application
- Deploy applications to different environments
- Install your own GitLab Runner
- Schedule pipelines
- Use security test reports (Security Test reports) Check for application vulnerabilities
2. GitLab CI/CD Quick start
.gitlab-ci.yml File tell GitLab Runner What to do . A simple pipeline usually consists of three stages :build、test、deploy
Pipes in CI/CD > Pipelines page
2.1. Create a .gitlab-ci.yml file
By configuring .gitlab-ci.yml File to tell CI What to do with your project . It's in the root of the repository .
Once the warehouse receives any push ,GitLab Will immediately look for .gitlab-ci.yml file , According to the contents of the document, the Runner Start the job on .
Here's a Ruby Project configuration example :
image: "ruby:2.5"
 before_script:
 - apt-get update -qq && apt-get install -y -qq sqlite3 libsqlite3-dev nodejs
 - ruby -v
 - which ruby
 - gem install bundler --no-document
 - bundle install --jobs $(nproc)  "${FLAGS[@]}"

 rspec:
 script:
 - bundle exec rspec
 rubocop:
 script:
 - bundle exec rubocop
In the example above , Two assignments in the definition , Namely rspec and rubocop, Before each job starts to execute , To perform before_script Command below
2.2. push .gitlab-ci.yml To GitLab
git add .gitlab-ci.yml
git commit -m "Add .gitlab-ci.yml"
git push origin master
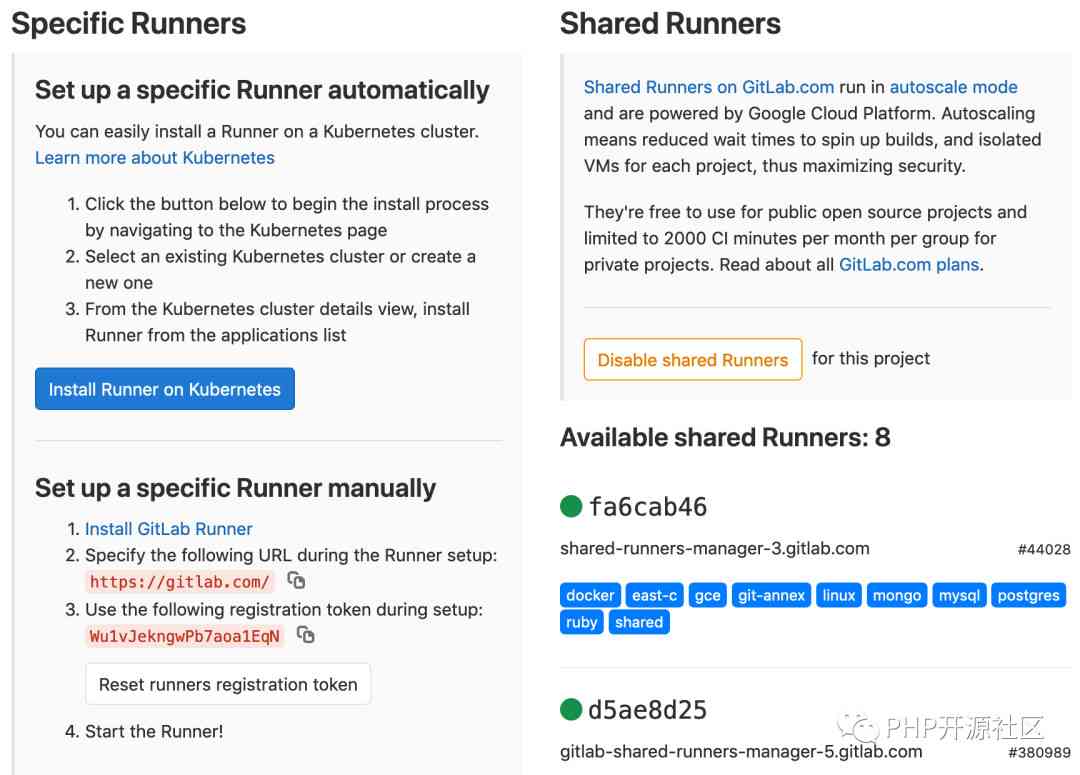
2.3. To configure a Runner
stay GitLab in ,Runner Run what you define in .gitlab-ci.yml Homework in (job)
One Runner A virtual machine can be a virtual machine 、 The physical machine 、docker Containers , Or a container cluster
GitLab And Runner Through between API communicate , So we just need Runner The machine has a network and can access GitLab The server can
You can go to Settings * CI/CD See if there is already Runner Linked to your project , Set up Runner Simple and direct
2.4. see pipeline and jobs The state of
After successfully configuring Runner in the future , You should be able to see the status of your recent submission
To see all of jobs, You can go to Pipelines * Jobs page
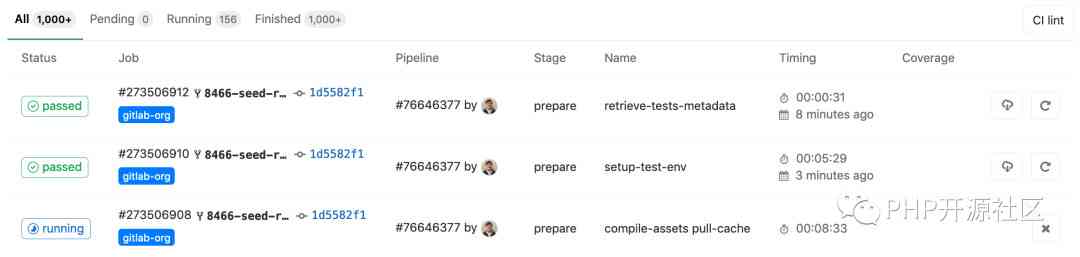
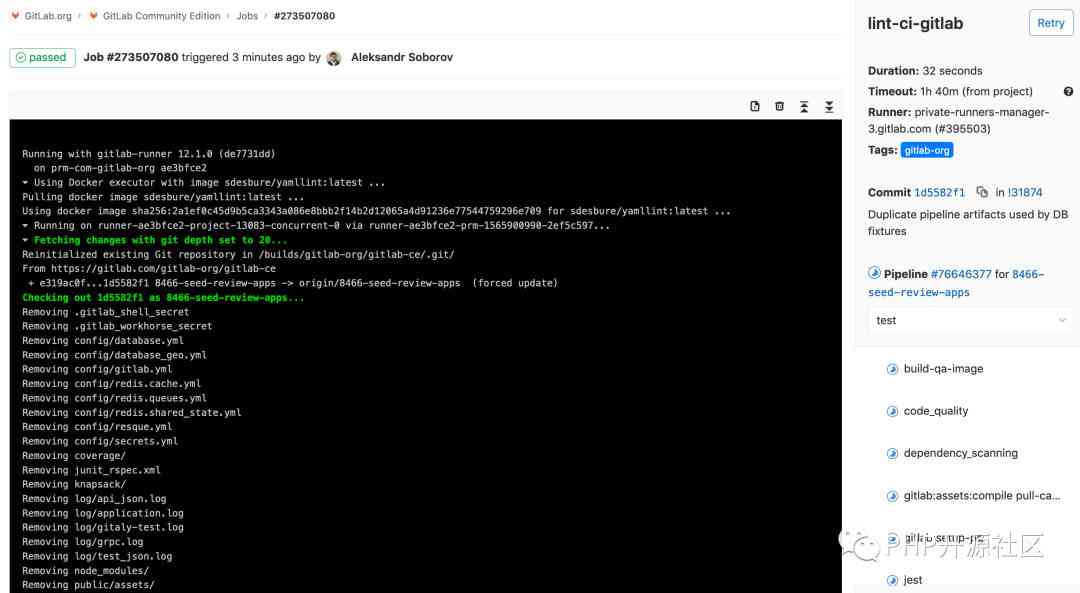
By clicking on the status of the assignment , You can see the log of the job running
Take a look back. :
1、 First , Definition .gitlab-ci.yml file . In this file, you define the job And orders
2、 next , Push files to remote warehouses
3、 Last , To configure Runner, Used to run the job
- Auto DevOps
Auto DevOps Provides predefined CI/CD To configure , So you can automatically detect , structure , test , Deploy and monitor applications . With the help of CI/CD Best practices and tools ,Auto DevOps Designed to simplify the setup and execution of mature and modern software development lifecycles .
With the help of Auto DevOps, It's easier to set up the software development process , Because each project can use the minimum configuration to complete the workflow from validation to monitoring . Just push your code ,GitLab It'll take care of everything else . This makes it easier to start new projects , And make the application settings consistent across the company .
The following example shows how to use Auto DevOps take GitLab.com Projects hosted on are deployed to Google Kubernetes Engine
In the example, you will use GitLab Native Kubernetes Integrate , So you don't need to create it manually anymore Kubernetes colony
This example will create and deploy a from GitLab Template creation application
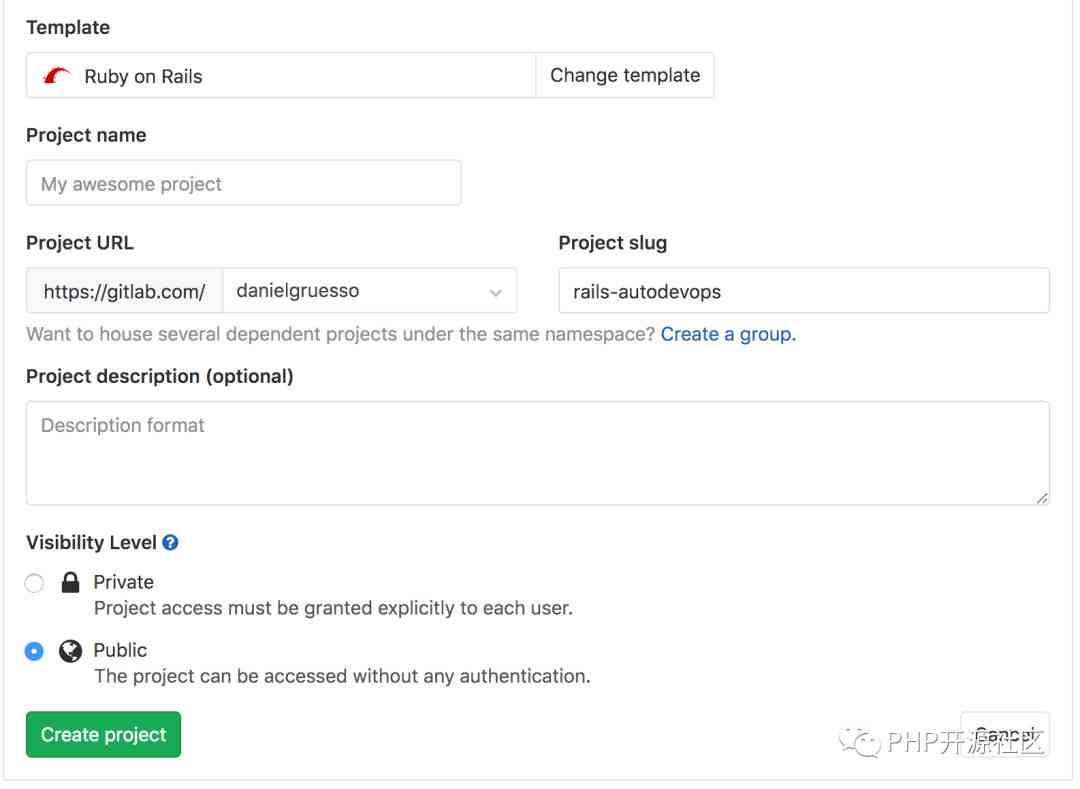
3.1. from GitLab Template creation project
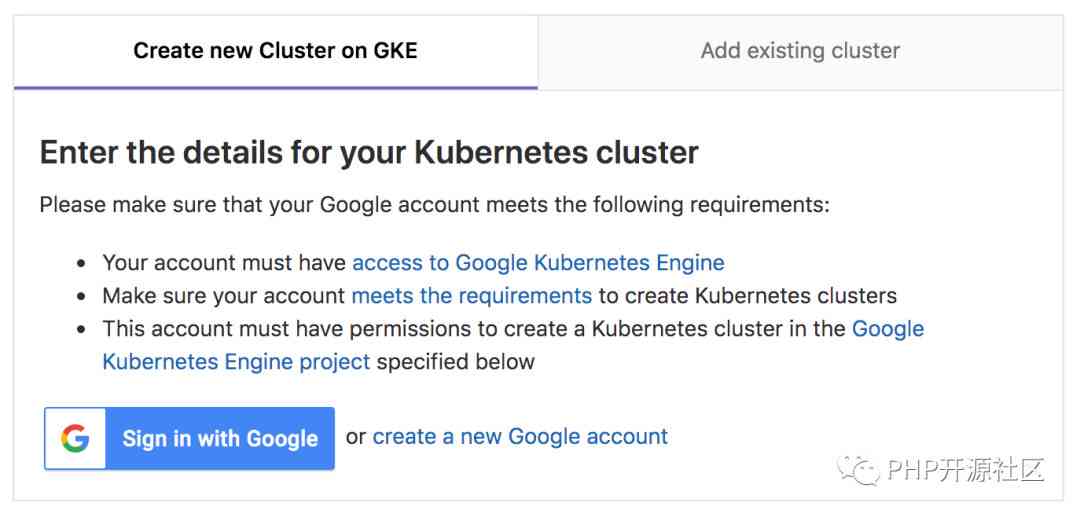
Creating Kubernetes Cluster and connect it to GitLab Before the project , You need one Google Cloud Platform account
Use GitLab To create a new project
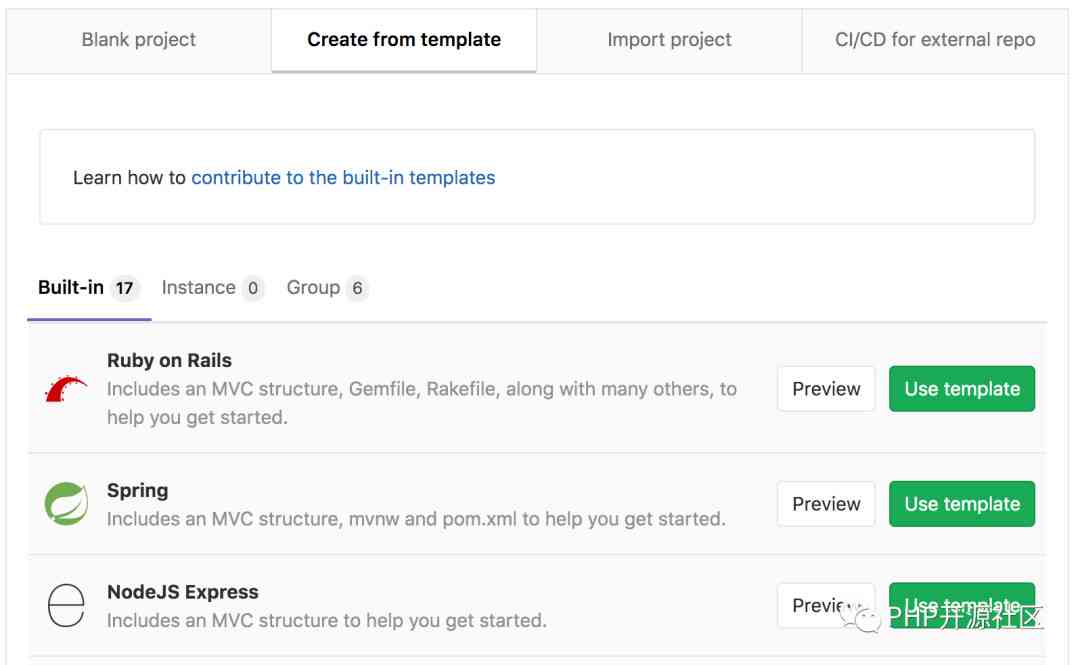
Give the project a name , And make sure it's public
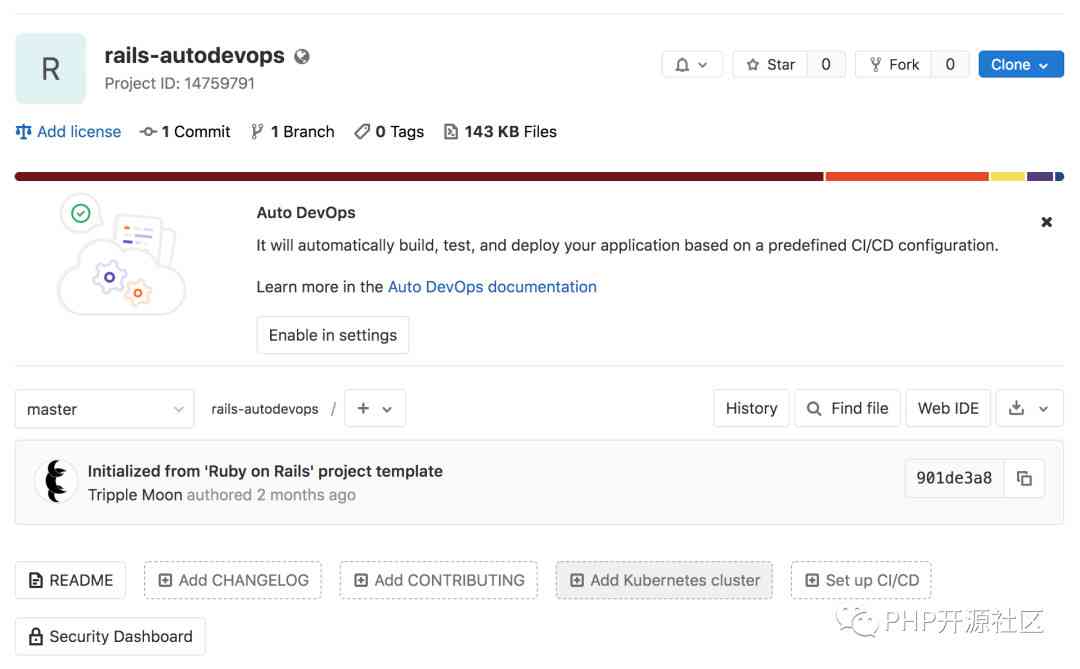
3.2. from GitLab Template creation Kubernetes colony
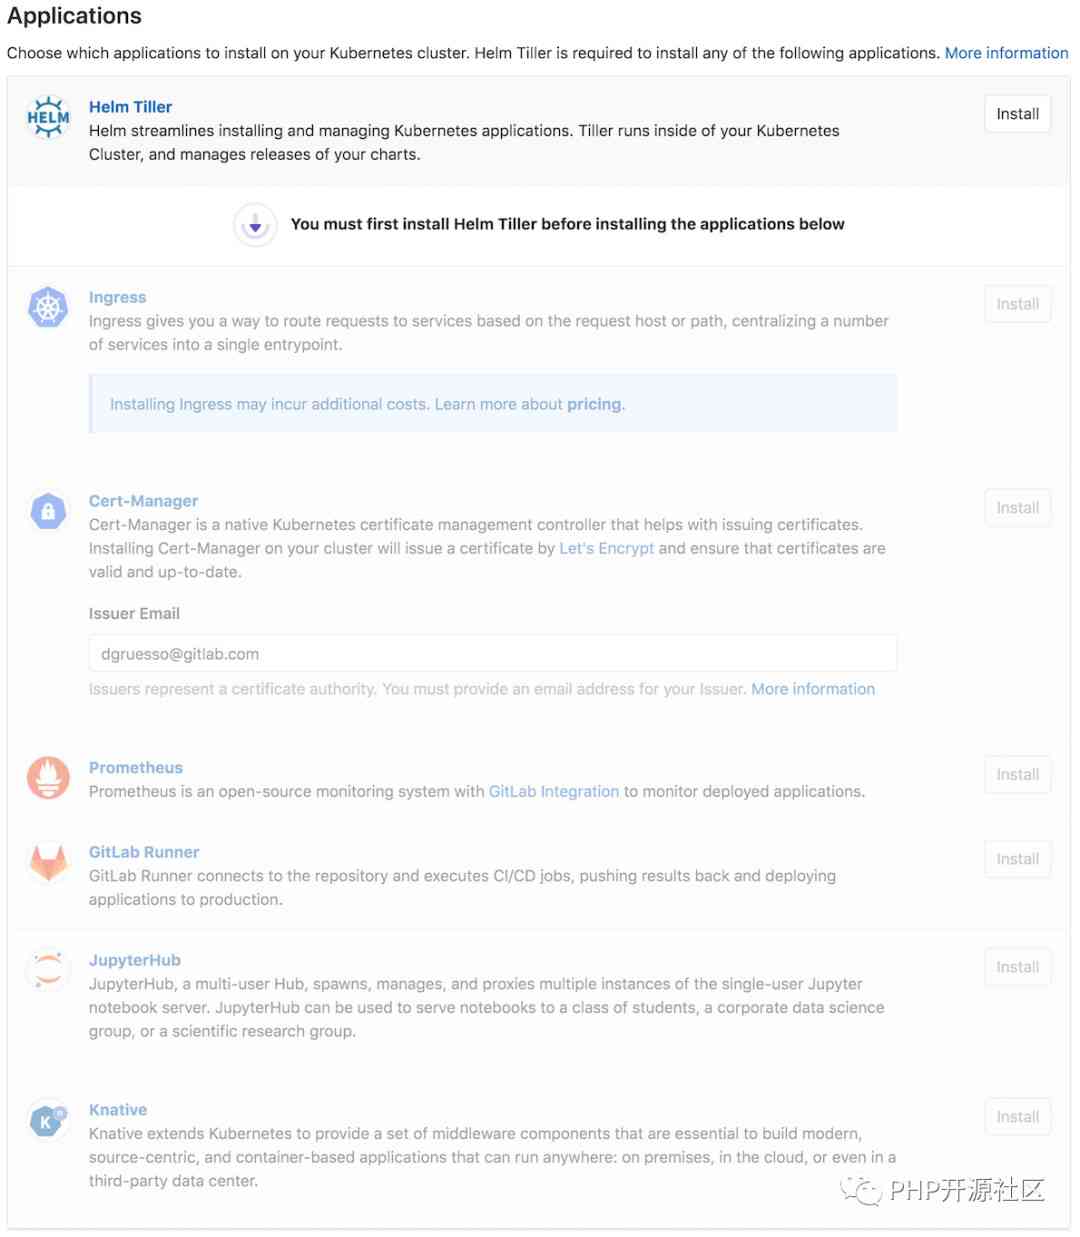
Click on Add Kubernetes cluster Button , perhaps Operations > Kubernetes
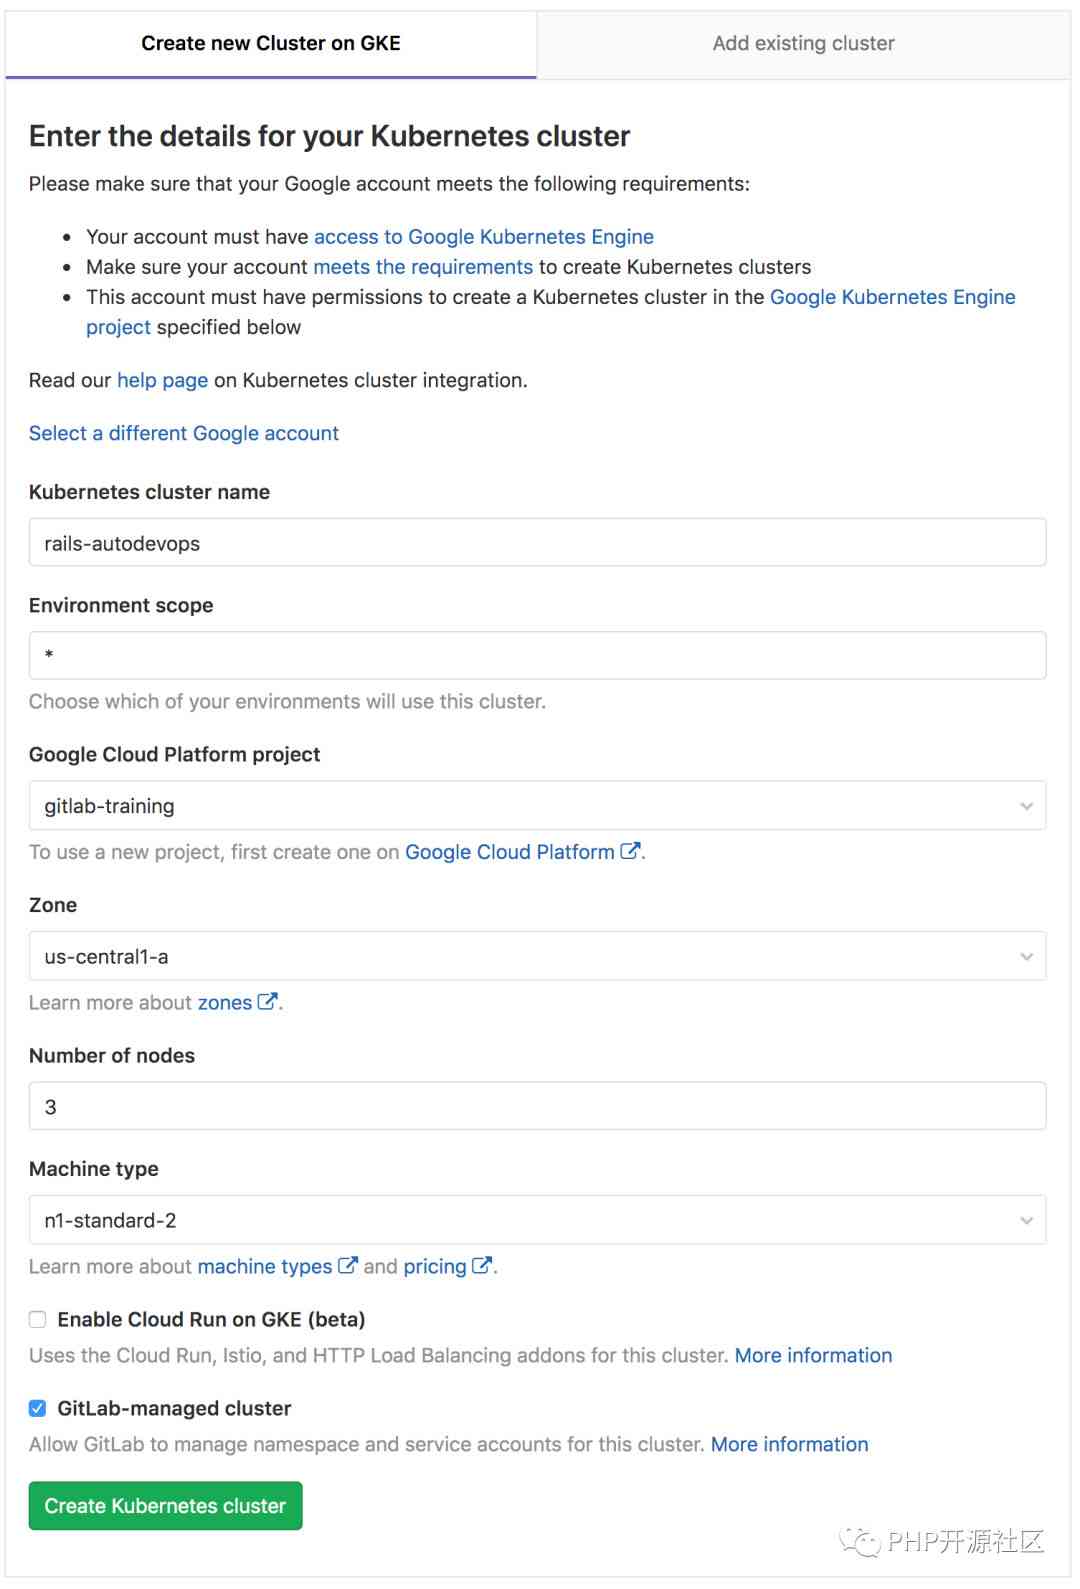
install Helm, Ingress, and Prometheus
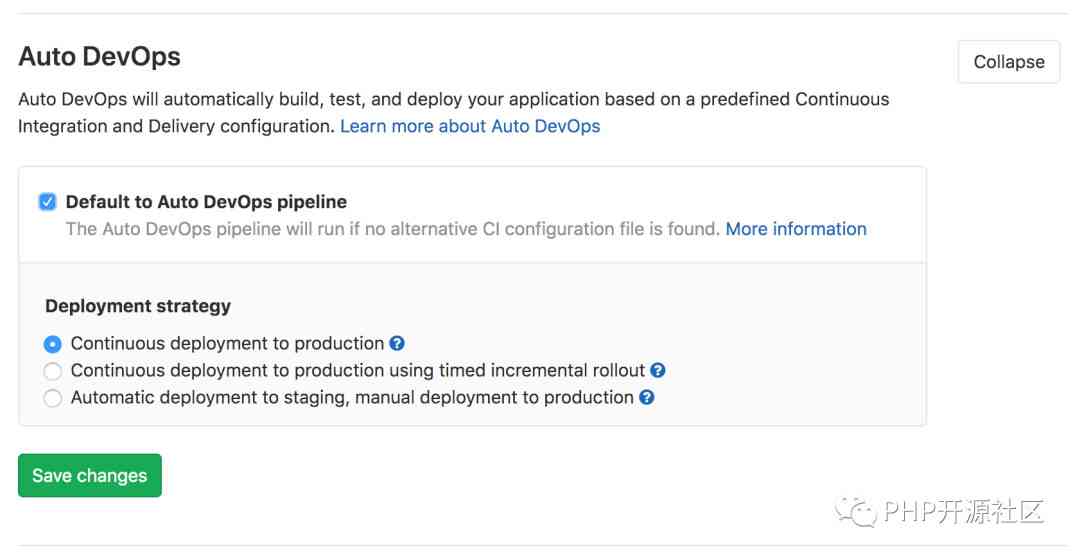
3.3. Enable Auto DevOps ( Optional )
Auto DevOps Enabled by default .
The navigation bar Settings > CI/CD > Auto DevOps
Check Default to Auto DevOps pipeline
Finally, choose the deployment strategy
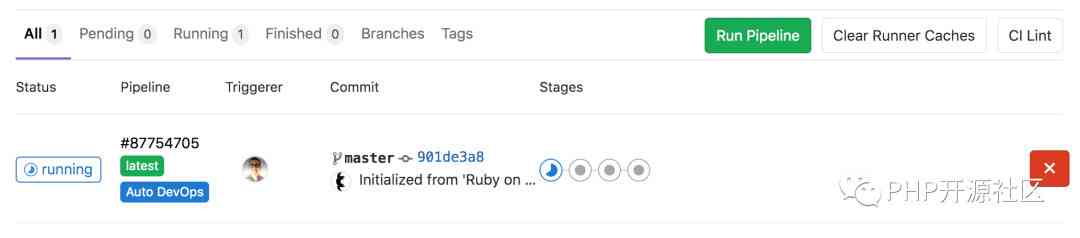
Once you've done all of the above , So a new one pipeline Will be created automatically . To see pipeline, You can go to CI/CD > Pipelines
3.4. Deploy the application
up to now , You should see that the pipeline is running , But what exactly is it running ?
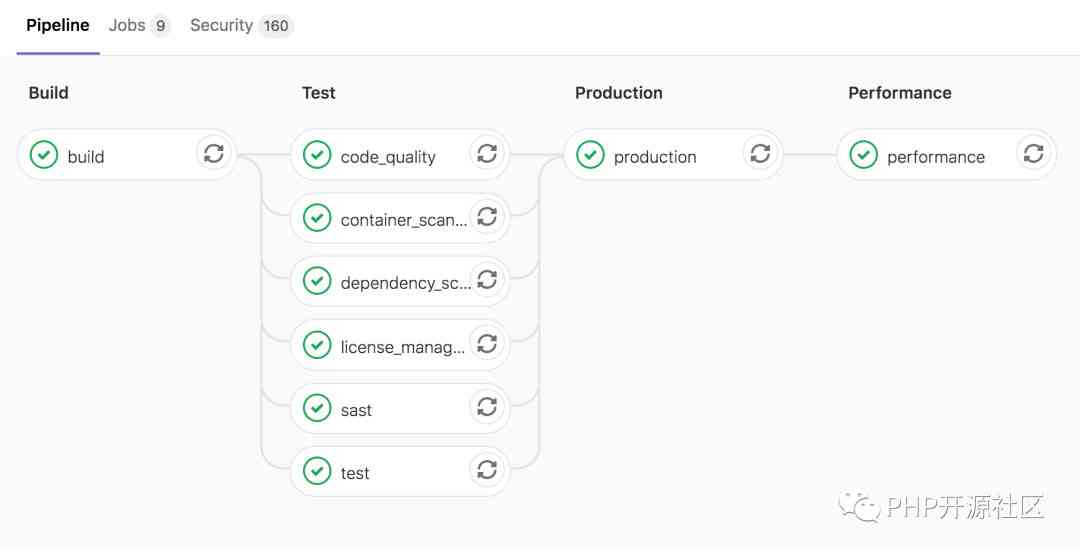
The inside of the pipe is divided into 4 Stages , We can see how many jobs are running at each stage , Here's the picture :
structure -> test -> Deploy -> Performance testing
Now? , The application has been successfully deployed , Let's look through the browser .
First , Navigate to Operations > Environments
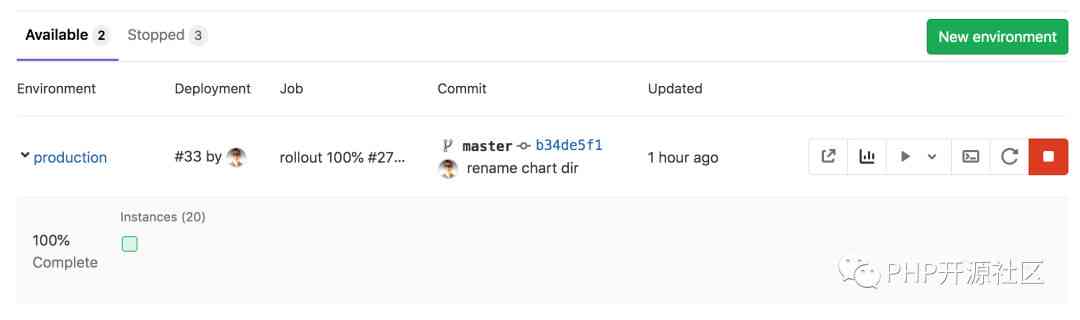
stay Environments in , You can see the details of the deployed application . There are three buttons on the far right , Let's take a look at :
The first icon opens the... Of the application deployed in the production environment URL. This is a very simple page , But the important thing is that it works !
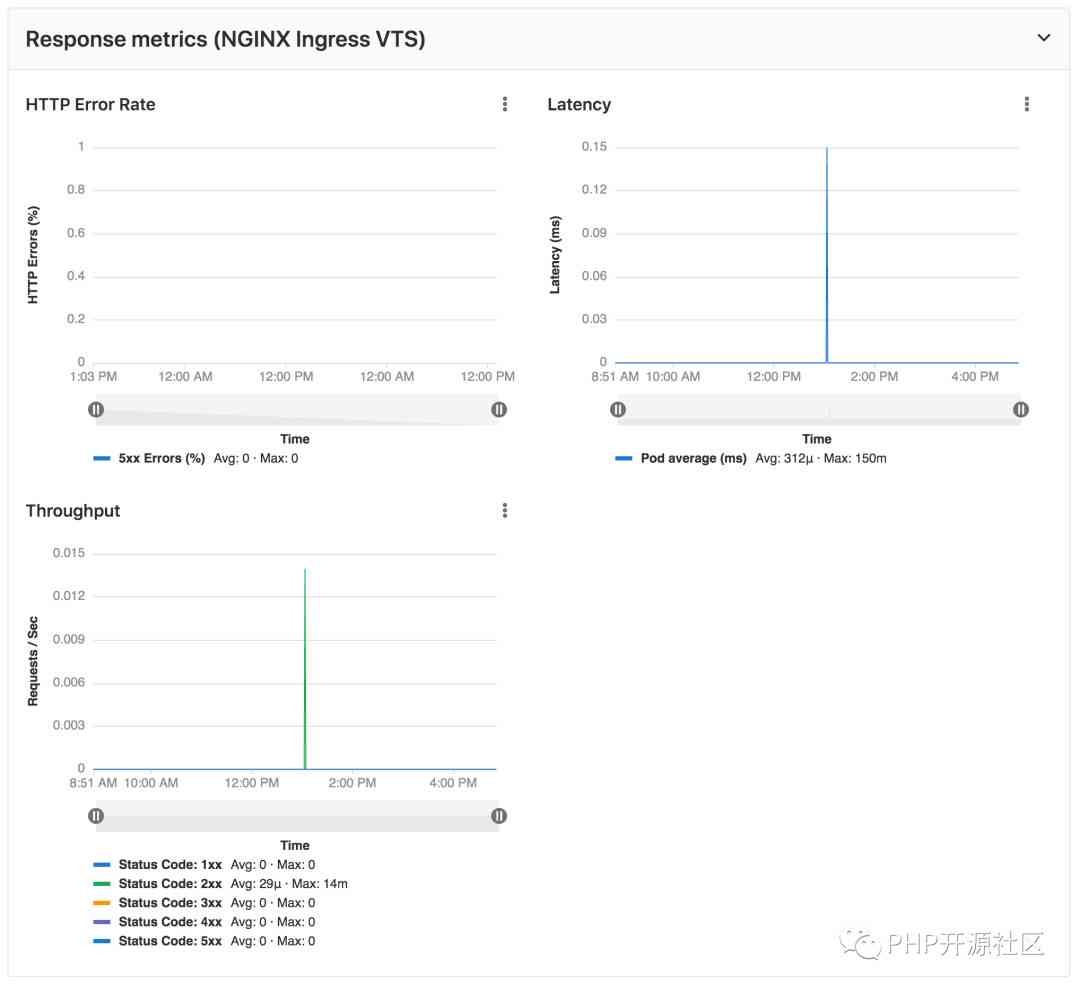
Next to it is an icon with a small image ,Prometheus It will collect information about Kubernetes How clusters and applications affect its data ( In the memory / CPU Usage rate , Delay, etc )
The third icon is Web terminal , It will open a terminal session in the container where the application is running .
4. Examples
Use GitLab CI/CD Deploy a Spring Boot application
Example .gitlab-ci.yml
image: java:8

 stages:
 - build
 - deploy

 before_script:
 - chmod +x mvnw

 build:
 stage: build
 script: ./mvnw package
 artifacts:
 paths:
 - target/demo-0.0.1-SNAPSHOT.jar

 production:
 stage: deploy
 script:
 - curl --location "https://cli.run.pivotal.io/stable?release=linux64-binary&source=github" | tar zx
 - ./cf login -u $CF_USERNAME -p $CF_PASSWORD -a api.run.pivotal.io
 - ./cf push
 only:
 - master
5. Docs
https://about.gitlab.com/solu...
https://docs.gitlab.com/ee/ci...
https://docs.gitlab.com/ee/ci...
https://docs.gitlab.com/ee/to...
https://docs.gitlab.com/ee/ci...

版权声明
本文为[PHP open source community]所创,转载请带上原文链接,感谢
边栏推荐
- 嘉宾专访|2020 PostgreSQL亚洲大会阿里云数据库专场:王旭
- Introduction to Jenkins (2) declarative pipeline
- 2020-11-06:go中,谈一下调度器。
- Opencv computer vision learning (10) -- image transform (Fourier transform, high pass filter, low pass filter)
- Windows 10 Bluetooth management page 'add Bluetooth or other devices' option click no response solution
- git 提交规范
- 【原創】ARM平臺記憶體和cache對xenomai實時性的影響
- “非洲用户的付费意愿并不低”——专访四达时代研发总监张亮
- 失眠一个整晚上
- 7. Swarm builds clusters
猜你喜欢

How to solve the problem of blank page in Google Chrome browser
南京标志设计,logo设计公司
CI / CD of gitlab continuous integrated development environment
python3操作Jenkins模块api
ImageMagick - add watermark
使用RabbitMQ实现分布式事务
关于DevOps的七大误解,99%的人都曾中过招!
How to use Gantt chart layers and filters
Application of UHF RFID medical blood management system
JS string - string string object method
随机推荐
Introduction to Jenkins (2) declarative pipeline
And how to solve the conflict between pop-up menu and pop-up menu
频收罚单的浦发银行:增收不增利,曾遭骗贷数亿元,内控缺位?
图像处理工具包ImagXpress使用教程,如何查看事件
课堂练习
Exclusive interview with alicloud database of | 2020 PostgreSQL Asia Conference: Wang Xu
RECH8.0版本学习 days 12 rh134部分
Jenkins入门(二)声明式流水线Jenkins Pipeline
9.集群之间服务通信 RoutingMesh
谈了多年的数字化转型,为什么还有很多企业依然“口头管理”
Vue: Axios uses this pointer
Andque.
Knowledge competition of garbage classification
[note] error while loading pyv8 binary: exit code 1 solution
Three steps to understand Kerberos Protocol easily
QT audio and video development 46 video transmission UDP version
confd
Composition of MRAM cache
Insomnia all night
gitlab 持续集成开发环境之CI/CD