当前位置:网站首页>Layoutmanager layout manager: flowlayout, borderlayout, GridLayout, gridbaglayout, CardLayout, BoxLayout
Layoutmanager layout manager: flowlayout, borderlayout, GridLayout, gridbaglayout, CardLayout, BoxLayout
2022-07-04 05:53:00 【Gentle ~】
Recommended reading :Java Detailed explanation of graphical interface (AWT、Swing) special column
List of articles
summary
Before , We introduced Component There is a method in setBounds() You can set the position and size of the current container , But we need to be clear about one thing , If we manually set the location and size of components , It will cause the non generality of the program , for example :Label label = new Label(" Hello , The world ");
Created a lable Components , In many cases , We need to get lable The width and height of the component Hello , The world The width and height of the string itself are consistent , This size is called Best size . Due to operating system differences , For example, in windows On , We want to achieve this effect , Need to Lable The width and height of the component are set to 100px,20px, But in Linux On the operating system , It may be necessary to Lable The width and height of the component are set to 120px,24px, To achieve the same effect .
If you want our program to run under different operating systems , Have the same experience , Then manually set the position and size of the component , It's a disaster, no doubt , Because there are too many components , You need to set the size and location under different operating systems . To solve this problem ,Java Provides LayoutManager Layout manager , The size of components can be automatically adjusted according to the running platform , Programmers no longer have to manually set the size and location of components , Just select the appropriate layout manager for the container .

Panel By default FlowLayout Manage its internal component layout .Window Under the Frame、Dialog as well as ScrollPane By default BorderLayout Manager .
FlowLayout
summary 、 Constructors
stay FlowLayout Layout manager in , Components flow in a certain direction like water flow ( array ) , Encounter obstacles ( The border ) Just turn back , Start again . By default , FlowLayout The layout manager arranges all components from left to right , If you encounter a boundary, you will fold back to the next line and start again .
| Construction method | Method function |
|---|---|
| FlowLayout() | Use the default Alignment and default vertical spacing 、 Create horizontal spacing FlowLayout Layout manager |
| FlowLayout(int align) | Use the specified alignment and default vertical spacing 、 Create horizontal spacing FlowLayout Layout manager |
| FlowLayout(int align,int hgap,int vgap) | Use the specified alignment and the specified vertical spacing 、 Create horizontal spacing FlowLayout Layout manager |
FlowLayout The arrangement direction of components in ( From left to right 、 From right to left 、 Wait from the middle to both sides ) , This parameter should use FlowLayout Static constant of class : FlowLayout. LEFT 、 FlowLayout. CENTER 、 FlowLayout. RIGHT , The default is left alignment .
FlowLayout The component spacing in is set by an integer , Unit is pixel , The default is 5 Pixel .
Code example

import java.awt.*;

public class FlowLayoutDemo {


    public static void main(String[] args) {

        //1. establish Frame object
        Frame frame = new Frame(" Test here FlowLayout");
        //2. modify Frame The layout manager of the container is FlowLayout
        frame.setLayout(new FlowLayout(FlowLayout.LEFT,20,20));

        //3. Go to Frame Add 100 individual button
        for (int i = 0; i < 100; i++) {

            frame.add(new Button(" Button "+i));
        }

        //4. Set up Frame For the best size
        frame.pack();
        //5. Set up Frame so
        frame.setVisible(true);
    }
}
BorderLayout
summary 、 Constructors
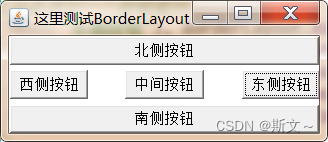
BorderLayout Divide the container into EAST 、 SOUTH 、 WEST 、 NORTH 、 CENTER Five areas , Ordinary components can be placed here 5 In any one of the regions ,BorderLayout Layout The layout diagram of the manager is shown in the figure .

When changing use BorderLayout The size of the container , NORTH 、 SOUTH and CENTER Regional level adjustment , and EAST 、 WEST and CENTER Area vertical adjustment . Use BorderLayout There are two points to note :
1. When using BorderLayout When adding components to the container of the layout manager , You need to specify which area to add to . If you do not specify which area to add to , It is added to the middle area by default ;
2. If you add multiple components to the same area , The components put in later will overwrite the components put in earlier ;
| Construction method | Method function |
|---|---|
| BorderLayout() | Use the default horizontal spacing 、 vertical Spacing creates BorderLayout Layout manager |
| BorderLayout(int hgap,int vgap): | Use the specified horizontal spacing 、 Vertical spacing creates BorderLayout Layout manager |
Code example 1
import java.awt.*;

public class BorderLayoutDemo1 {


    public static void main(String[] args) {

        //1. establish Frame object
        Frame frame = new Frame(" Test here BorderLayout");
        //2. Appoint Frame The layout manager for the object is BorderLayout
        frame.setLayout(new BorderLayout(30,5));
        //3. Go to Frame Specify to add a button component in the southeast, northwest and northwest respectively
        frame.add(new Button(" East button "), BorderLayout.EAST);
        frame.add(new Button(" West button "), BorderLayout.WEST);
        frame.add(new Button(" South button "), BorderLayout.SOUTH);
        frame.add(new Button(" North button "), BorderLayout.NORTH);
        frame.add(new Button(" The middle button "), BorderLayout.CENTER);
        //4. Set up Frame For the best size
        frame.pack();
        //5. Set up Frame so
        frame.setVisible(true);
    }
}
Code example 2
If you don't put components in an area , Then the area will not be blank , It will be occupied by other areas .
import java.awt.*;

public class BorderLayoutDemo2 {


    public static void main(String[] args) {

        //1. establish Frame object
        Frame frame = new Frame(" Test here BorderLayout");
        //2. Appoint Frame The layout manager for the object is BorderLayout
        frame.setLayout(new BorderLayout(30,5));
        //3. Go to Frame Designated South , north , Put in a button , Put one in the middle area Panel

        frame.add(new Button(" South button "), BorderLayout.SOUTH);
        frame.add(new Button(" North button "), BorderLayout.NORTH);

        Panel panel = new Panel();
        panel.add(new TextField(" Test text "));
        panel.add(new Button(" The middle button "));

        frame.add(panel, BorderLayout.CENTER);

        //4. Set up Frame For the best size
        frame.pack();
        //5. Set up Frame so
        frame.setVisible(true);
    }
}
GridLayout
summary 、 Constructors
GridLayout The layout manager divides the container into grids separated by vertical and horizontal lines , Each grid occupies the same area size . When using GridLayout When adding components to the container of the layout manager , The default is from left to right 、 Add to each grid from top to bottom . And FlowLayout The difference is , Put in GridLayout The size of each component in the layout manager is determined by the area where the component is located ( Every time Components will automatically fill the entire area ) .
| Construction method | Method function |
|---|---|
| GridLayout(int rows,in t cols) | Take the specified number of rows 、 Number of columns , And the default horizontal spacing 、 The longitudinal spacing will the container Split into multiple meshes |
| GridLayout(int rows,int cols,int hgap,int vgap) | Use specified The number of rows 、 Column Count , And the specified lateral spacing 、 Vertical spacing divides the container into multiple grids |
Code example
Use Frame+Panel, coordination FlowLayout and GridLayout Complete a calculator effect .
import java.awt.*;

public class GridLayoutDemo{


    public static void main(String[] args) {


        //1. establish Frame object , And the title is set to calculator
        Frame frame = new Frame(" Calculator ");

        //2. Create a Panel object , And go to Panel Put one in TextField Components
        Panel p1 = new Panel();
        p1.add(new TextField(30));

        //3. Put the above Panel Put in Frame The north side of the area
        frame.add(p1,BorderLayout.NORTH);

        //4. Create a Panel object , And set its layout manager to GridLayout
        Panel p2 = new Panel();
        p2.setLayout(new GridLayout(3,5,4,4));

        //5. Go to the above Panel in , place 15 Button , The contents are :0,1,2,3,4,5,6,7,8,9,+,-,*,/,.
        for (int i = 0; i < 10; i++) {

            p2.add(new Button(i+""));
        }
        p2.add(new Button("+"));
        p2.add(new Button("-"));
        p2.add(new Button("*"));
        p2.add(new Button("/"));
        p2.add(new Button("."));

        //6. Put the above Panel Add to Frame The middle region of China
        frame.add(p2);
        //7. Set up Frame For the best size
        frame.pack();

        //8. Set up Frame so
        frame.setVisible(true);

    }
}
GridBagLayout
summary
GridBagLayout Layout manager is the most powerful , But it's also the most complicated , And GridLayout The difference between the layout manager is , stay GridBagLayout In the layout manager , A component can span one or more grids , And you can set the size of each grid to be different from each other , This increases the flexibility of the layout . When the size of the window changes , GridBagLayout The layout manager of each window can also control the layout of each part accurately .
Because in GridBagLayout Layout , Each component can occupy multiple grids , here , When we add components to the container , You need to control how many grids each component occupies ,java Provided GridBagConstaints class , Bind to specific components , You can set the specific size and span .
GridBagConstraints API
| Member variables | meaning |
|---|---|
| gridx | Sets the number of objects controlled by this object GUI The horizontal index of the grid where the upper left corner of the component is located |
| gridy | Sets the number of objects controlled by this object GUI The vertical index of the grid where the upper left corner of the component is located |
| gridwidth | Sets the number of objects controlled by this object GUI How many grids does the component span horizontally , If the attribute value is GridBagContraints.REMAIND, Indicates that the current component is the last component in the horizontal direction , If the attribute value is GridBagConstraints.RELATIVE, Indicates that the current component is the penultimate component in the horizontal direction . |
| gridheight | Sets the number of objects controlled by this object GUI How many grids does the component span vertically , If the attribute value is GridBagContraints.REMAIND, Indicates that the current component is the last component in the vertical direction , If the attribute value is GridBagConstraints.RELATIVE, Indicates that the current component is the penultimate component in the vertical direction . |
| fill | When " Display area " Greater than " Components " When , How to adjust components : GridBagConstraints.NONE : GUI Components do not expand GridBagConstraints.HORIZONTAL: GUI Horizontal expansion of components With Occupy a blank area GridBagConstraints.VERTICAL: GUI The component expands vertically to occupy a blank area GridBagConstraints.BOTH: GUI Component level 、 Expand vertically at the same time to occupy the blank area . |
| ipadx | Sets the number of objects controlled by this object GUI The size of the lateral internal fill of the component , namely On the basis of the minimum size of the component, how much more needs to be increased . |
| ipady | Sets the number of objects controlled by this object GUI The size of the vertical internal fill of the component , namely On the basis of the minimum size of the component, how much more needs to be increased . |
| insets | Settings are controlled by this object Of GUI Component's The size of the external fill , That is, the component boundary and display area Between domain boundaries distance . |
| weightx | Settings are controlled by this object Of GUI The horizontal proportion of excess space occupied by components , Suppose a container The horizontal line of includes three GUI Components , The proportion of their level increase is 1 、 2 、 3 , But the container width increases 60 Pixels when , The width of the first component increases 10 Pixels , The width of the second component increases 20 Pixels , Third component width increases 30 image plain . Such as Guo Qizeng The addition ratio is 0 , be It means that... Will not be increased . |
| weighty | Settings are controlled by this object Of GUI The vertical proportion of excess space occupied by components |
| anchor | Settings are controlled by this object Of GUI How the component is positioned in its display area : GridBagConstraints .CENTER ( in between ) GridBagConstraints.NORTH ( upper-middle ) GridBagConstraints.NORTHWEST ( top left corner ) GridBagConstraints.NORTHEAST ( Upper right corner ) GridBagConstraints.SOUTH ( lower-middle ) GridBagConstraints.SOUTHEAST ( The lower right corner ) GridBagConstraints.SOUTHWEST ( The lower left corner ) GridBagConstraints.EAST ( Right middle ) GridBagConstraints.WEST ( Left center ) |
GridBagLayout Use steps
1. establish GridBagLaout Layout manager object , And set the layout manager object for the container ;

2. establish GridBagConstraints object , And set the control properties of the object :

	gridx:  Used to specify the horizontal index of the component in the grid ;

	gridy:  Used to execute the vertical index of the component in the grid ;

	gridwidth:  Used to specify how many grids the component spans horizontally ;

	gridheight:  Used to specify how many grids the component spans vertically ;

3. call GridBagLayout Object's setConstraints(Component c,GridBagConstraints gbc ) Method , Add the component to the container c and GridBagConstraints Object association ;

4.  Add components to the container ;
Code example

import java.awt.*;

public class GridBagLayoutDemo {


    public static void main(String[] args) {

        //1. establish Frame object
        Frame frame = new Frame(" Here is GridBagLayout test ");

        //2. establish GridBagLayout object
        GridBagLayout gbl = new GridBagLayout();

        //3. hold Frame The layout manager of the object is set to GridBagLayout
        frame.setLayout(gbl);

        //4. establish GridBagConstraints object
        GridBagConstraints gbc = new GridBagConstraints();

        //5. Create a capacity of 10 Of Button Array
        Button[] bs = new Button[10];

        //6. Traversal array , Initialize each Button
        for (int i = 0; i < bs.length; i++) {

            bs[i] = new Button(" Button "+(i+1));
        }

        //7. Set all GridBagConstraints Object's fill The attribute is GridBagConstraints.BOTH, When there is a blank area , The component automatically expands to fill the blank area
        gbc.fill=GridBagConstraints.BOTH;

        //8. Set up GridBagConstraints Object's weightx Set to 1, Indicates that the horizontal expansion ratio is 1
        gbc.weightx=1;

        //9. Go to frame Add the first... In the array 3 individual Button
        addComponent(frame,bs[0],gbl,gbc);
        addComponent(frame,bs[1],gbl,gbc);
        addComponent(frame,bs[2],gbl,gbc);

        //10. hold GridBagConstraints Of gridwidth Set to GridBagConstraints.REMAINDER, Indicates that the current component is the last component in the horizontal direction
        gbc.gridwidth=GridBagConstraints.REMAINDER;

        //11. hold button The fourth button in the array is added to frame in
        addComponent(frame,bs[3],gbl,gbc);


        //12. hold GridBagConstraints Of weighty Set to 1, Indicates that the vertical expansion ratio is 1
        gbc.weighty=1;

        //13. hold button No 5 Add a button to frame in
        addComponent(frame,bs[4],gbl,gbc);

        //14. hold GridBagConstaints Of gridheight and gridwidth Set to 2, Indicates that vertical and horizontal will occupy two grids
        gbc.gridheight=2;
        gbc.gridwidth=2;

        //15. hold button No 6 Add a button to frame in
        addComponent(frame,bs[5],gbl,gbc);

        //16. hold GridBagConstaints Of gridheight and gridwidth Set to 1, It means that the vertical will occupy 1 Grid (s)
        gbc.gridwidth=1;
        gbc.gridheight=1;
        //17. hold button No 7 Add a button to frame in
        addComponent(frame,bs[6],gbl,gbc);

        //18. hold GridBagConstraints Of gridwidth Set to GridBagConstraints.REMAINDER, Indicates that the current component is the last component in the horizontal direction
        gbc.gridwidth=GridBagConstraints.REMAINDER;

        //19. hold button No 8 Add a button to frame in
        addComponent(frame,bs[7],gbl,gbc);

        //20. hold GridBagConstaints Of gridwidth Set to 1, It means that the vertical will occupy 1 Grid (s)
        gbc.gridwidth=1;

        //21. hold button No 9、10 Add a button to frame in
        addComponent(frame,bs[8],gbl,gbc);
        addComponent(frame,bs[9],gbl,gbc);

        //22. Set up frame For the best size
        frame.pack();

        //23. Set up frame so
        frame.setVisible(true);
    }

    public static void addComponent(Container container,Component c,GridBagLayout gridBagLayout,GridBagConstraints gridBagConstraints){

        gridBagLayout.setConstraints(c,gridBagConstraints);
        container.add(c);
    }
}
CardLayout
summary 、 Constructors
CardLayout The layout manager manages its components in time rather than space , It treats all the components added to the container as a stack of cards ( Each card is actually a component ), Only the top one at a time Component Only then can we see . It's like a deck of playing cards , They are stacked together , Only the top playing card is visible at a time .
| Method name | Method function |
|---|---|
| CardLayout() | Create default CardLayout Layout manager . |
| CardLayout(int hgap,int vgap) | By specifying the spacing between the card and the left and right boundaries of the container C hgap) 、 Up and down the border Cvgap) To create CardLayout Layout manager . |
| first(Container target) | Show target The first card in the container . |
| last(Container target) | Show target The last card in the container . |
| previous(Container target) | Show target The previous card in the container . |
| next(Container target) | Show target The last card in the container . |
| show(Container taget,String name) | display in target A card with a specified name in the container . |
Code example

import java.awt.*;
import java.awt.event.ActionEvent;
import java.awt.event.ActionListener;

public class CardLayoutDemo {


    public static void main(String[] args) {

        //1. establish Frame object
        Frame frame = new Frame(" Test here CardLayout");

        //2. Create a String Array , Store the names of different cards
        String[] names = {
    " The first one "," The second "," Third sheets "," The fourth "," Fifth "};

        //3. Create a Panel Containers p1, And set its layout manager to CardLayout, Used to store multiple cards
        CardLayout cardLayout = new CardLayout();
        Panel p1 = new Panel();
        p1.setLayout(cardLayout);

        //4. Go to p1 Storage in 5 individual Button Button , The name comes from String From array
        for (int i = 0; i < 5; i++) {

            p1.add(names[i],new Button(names[i]));
        }

        //5. Create a Panel Containers p2, Used to store 5 Button , Complete the card switching
        Panel p2 = new Panel();

        //6. establish 5 Button , And set a listener for the button
        ActionListener listener = new ActionListener() {

            @Override
            public void actionPerformed(ActionEvent e) {

                String command = e.getActionCommand();
                switch (command){

                    case " Previous ":
                        cardLayout.previous(p1);
                        break;
                    case " Next ":
                        cardLayout.next(p1);
                        break;
                    case " The first one ":
                        cardLayout.first(p1);
                        break;
                    case " The last one ":
                        cardLayout.last(p1);
                        break;
                    case " Third sheets ":
                        cardLayout.show(p1," Third sheets ");
                        break;
                }
            }
        };

        Button b1 = new Button(" Previous ");
        Button b2 = new Button(" Next ");
        Button b3 = new Button(" The first one ");
        Button b4 = new Button(" The last one ");
        Button b5 = new Button(" Third sheets ");
        b1.addActionListener(listener);
        b2.addActionListener(listener);
        b3.addActionListener(listener);
        b4.addActionListener(listener);
        b5.addActionListener(listener);

        //7. hold 5 Add a button to p2 in
        p2.add(b1);
        p2.add(b2);
        p2.add(b3);
        p2.add(b4);
        p2.add(b5);


        //8. hold p1 Add to frame In the middle of
        frame.add(p1);


        //9. hold p2 Add to frame The bottom area of
        frame.add(p2,BorderLayout.SOUTH);

        //10 Set up frame Best size and visible
        frame.pack();
        frame.setVisible(true);
    }
}
BoxLayout
summary 、 Constructors
To simplify development ,Swing Introduced A new layout manager : BoxLayout . BoxLayout Can be in vertical and Place in two horizontal directions GUI Components , BoxLayout A simple constructor is provided as follows :
| Method name | Method function |
|---|---|
| BoxLayout(Container target, int axis) | Specifies that the creation is based on target Container of BoxLayout Layout manager , The components in the layout manager press axis To arrange in a direction . among axis Yes BoxLayout.X_AXIS( The transverse ) and BoxLayout.Y _AXIS ( The longitudinal 〉 Two directions . |
stay java.swing In bag , A new container is provided Box, The default layout manager for this container is BoxLayout, Most of the time , Use Box Containers to hold multiple GUI Components , Then take it. Box Container as a component , Add to other containers , So as to form the overall window layout .
| Method name | Method function |
|---|---|
| static Box createHorizontalBox() | Create a horizontal arrangement of components Box Containers |
| static Box createVerticalBox() | Create a vertical arrangement of components Box Containers |
Box Class , Provides 5 A convenient static method to generate these interval components :
| Method name | Method function |
|---|---|
| static Component createHorizontalGlue() | Create a horizontal line Glue ( Spacing that can be stretched simultaneously in both directions ) |
| static Component createVerticalGlue() | Create a vertical line Glue ( Spacing that can be stretched simultaneously in both directions ) |
| static Component createHorizontalStrut(int width) | Create a specified width ( The width is fixed , Can't stretch ) The level of Strut ( Spacing that can be stretched in the vertical direction ) |
| static Component createVerticalStrut(int height) | Create a specified height ( The height is fixed , Can't stretch ) Vertical of Strut ( Spacing that can be stretched horizontally ) |
Code example 1
Use Frame and BoxLayout Complete the image below :

import javax.swing.*;
import java.awt.*;

public class BoxLayoutDemo1 {


    public static void main(String[] args) {


        //1. establish Frame object
        Frame frame = new Frame(" Test here BoxLayout");
        //2. establish BoxLayout Layout manager , And specify the container as above frame object , Specifies that the component arrangement direction is vertical
        BoxLayout boxLayout = new BoxLayout(frame, BoxLayout.Y_AXIS);
        frame.setLayout(boxLayout);

        //3. Go to frame Object
        frame.add(new Button(" Button 1"));
        frame.add(new Button(" Button 2"));


        //4. Set up frame Best size , And visible
        frame.pack();
        frame.setVisible(true);
    }
}
Code example 2
Use Frame and Box, Complete the image below :

import javax.swing.*;
import java.awt.*;

public class BoxLayoutDemo2 {


    public static void main(String[] args) {


        //1. establish Frame object
        Frame frame = new Frame(" Test here BoxLayout");

        //2. Create a horizontal Box, And add two buttons
        Box hBox = Box.createHorizontalBox();
        hBox.add(new Button(" Horizontal button 1 "));
        hBox.add(new Button(" Horizontal button 2 "));

        //3. Create a vertical Box, And add two buttons
        Box vBox = Box.createVerticalBox();
        vBox.add(new Button(" Vertical button one "));
        vBox.add(new Button(" Vertical button 2 "));

        //4. hold box The container is added to frame In the container
        frame.add(hBox,BorderLayout.NORTH);
        frame.add(vBox);


        //5. Set up frame Best size and visible

        frame.pack();
        frame.setVisible(true);

    }
}
Code example 3
Add intervals for components

import javax.swing.*;
import java.awt.*;

public class BoxLayoutDemo3 {


    public static void main(String[] args) {

        //1. establish Frame object
        Frame frame = new Frame(" Test here BoxLayout");

        //2. Create a horizontal Box, And add two buttons
        Box hBox = Box.createHorizontalBox();
        hBox.add(new Button(" Horizontal button 1 "));
        hBox.add(Box.createHorizontalGlue());// Spacing that can be stretched in both directions
        hBox.add(new Button(" Horizontal button 2 "));
        hBox.add(Box.createHorizontalStrut(10));// Fixed horizontal spacing , The vertical direction can be stretched
        hBox.add(new Button(" Horizontal button 3"));


        //3. Create a vertical Box, And add two buttons
        Box vBox = Box.createVerticalBox();
        vBox.add(new Button(" Vertical button one "));
        vBox.add(Box.createVerticalGlue());// Spacing that can be stretched in both directions
        vBox.add(new Button(" Vertical button 2 "));
        vBox.add(Box.createVerticalStrut(10));// Fixed vertical spacing , You can stretch horizontally
        vBox.add(new Button(" Vertical button 3 "));


        //4. hold box The container is added to frame In the container
        frame.add(hBox, BorderLayout.NORTH);
        frame.add(vBox);


        //5. Set up frame Best size and visible

        frame.pack();
        frame.setVisible(true);
    }
}
Recommended reading :Java Detailed explanation of graphical interface (AWT、Swing) special column
边栏推荐
- Programmers don't talk about morality, and use multithreading for Heisi's girlfriend
- Introduction To AMBA 简单理解
- Use of hutool Pinyin tool
- [microservice] Nacos cluster building and loading file configuration
- JS execution mechanism
- Redis realizes ranking function
- el-select如何实现懒加载(带搜索功能)
- transformer坑了多少算力
- 卸载Google Drive 硬盘-必须退出程序才能卸载
- Introduction to AMBA
猜你喜欢
webrtc 快速搭建 视频通话 视频会议
win10清除快速访问-不留下痕迹
Canoe panel learning video
冲击继电器JC-7/11/DC110V
19. Framebuffer application programming
A little understanding of GSLB (global server load balance) technology

Overview of relevant subclasses of beanfactorypostprocessor and beanpostprocessor

Google Chrome browser will support the function of selecting text translation

Signification des lettres du module optique et abréviation des paramètres Daquan
![[excel] PivotChart](/img/45/be87e4428a1d8ef66ef34a63d12fd4.png)
[excel] PivotChart
随机推荐
BUU-Crypto-Cipher
如何判断数组中是否含有某个元素
gslb(global server load balance)技术的一点理解
How to configure static IP for Kali virtual machine
js如何将秒转换成时分秒显示
Basic concept of bus
Steady! Huawei micro certification Huawei cloud computing service practice is stable!
Design and implementation of tcp/ip series overview
input显示当前选择的图片
[openvino+paddle] paddle detection / OCR / SEG export based on paddle2onnx
Configure cross compilation tool chain and environment variables
JS get the attribute values nested in the object
What is MQ?
Easy change
LayoutManager布局管理器:FlowLayout、BorderLayout、GridLayout、GridBagLayout、CardLayout、BoxLayout
如何展开Collapse 的所有折叠面板
Accidentally deleted the data file of Clickhouse, can it be restored?
The end of the Internet is rural revitalization
LC weekly 300
Excel comparator