当前位置:网站首页>怎么将yolov5中的PANet层改为BiFPN
怎么将yolov5中的PANet层改为BiFPN
2022-07-03 02:24:00 【亿速云】
怎么将yolov5中的PANet层改为BiFPN
今天小编给大家分享一下怎么将yolov5中的PANet层改为BiFPN的相关知识点,内容详细,逻辑清晰,相信大部分人都还太了解这方面的知识,所以分享这篇文章给大家参考一下,希望大家阅读完这篇文章后有所收获,下面我们一起来了解一下吧。
一、Add
1.在common.py后加入如下代码
# 结合BiFPN 设置可学习参数 学习不同分支的权重# 两个分支add操作class BiFPN_Add2(nn.Module): def __init__(self, c1, c2): super(BiFPN_Add2, self).__init__() # 设置可学习参数 nn.Parameter的作用是:将一个不可训练的类型Tensor转换成可以训练的类型parameter # 并且会向宿主模型注册该参数 成为其一部分 即model.parameters()会包含这个parameter # 从而在参数优化的时候可以自动一起优化 self.w = nn.Parameter(torch.ones(2, dtype=torch.float32), requires_grad=True) self.epsilon = 0.0001 self.conv = nn.Conv2d(c1, c2, kernel_size=1, stride=1, padding=0) self.silu = nn.SiLU() def forward(self, x): w = self.w weight = w / (torch.sum(w, dim=0) + self.epsilon) return self.conv(self.silu(weight[0] * x[0] + weight[1] * x[1])) # 三个分支add操作class BiFPN_Add3(nn.Module): def __init__(self, c1, c2): super(BiFPN_Add3, self).__init__() self.w = nn.Parameter(torch.ones(3, dtype=torch.float32), requires_grad=True) self.epsilon = 0.0001 self.conv = nn.Conv2d(c1, c2, kernel_size=1, stride=1, padding=0) self.silu = nn.SiLU() def forward(self, x): w = self.w weight = w / (torch.sum(w, dim=0) + self.epsilon) # 将权重进行归一化 # Fast normalized fusion return self.conv(self.silu(weight[0] * x[0] + weight[1] * x[1] + weight[2] * x[2]))
2.yolov5s.yaml进行修改
# YOLOv5 ???? by Ultralytics, GPL-3.0 license # Parametersnc: 80 # number of classesdepth_multiple: 0.33 # model depth multiplewidth_multiple: 0.50 # layer channel multipleanchors: - [10,13, 16,30, 33,23] # P3/8 - [30,61, 62,45, 59,119] # P4/16 - [116,90, 156,198, 373,326] # P5/32 # YOLOv5 v6.0 backbonebackbone: # [from, number, module, args] [[-1, 1, Conv, [64, 6, 2, 2]], # 0-P1/2 [-1, 1, Conv, [128, 3, 2]], # 1-P2/4 [-1, 3, C3, [128]], [-1, 1, Conv, [256, 3, 2]], # 3-P3/8 [-1, 6, C3, [256]], [-1, 1, Conv, [512, 3, 2]], # 5-P4/16 [-1, 9, C3, [512]], [-1, 1, Conv, [1024, 3, 2]], # 7-P5/32 [-1, 3, C3, [1024]], [-1, 1, SPPF, [1024, 5]], # 9 ] # YOLOv5 v6.0 BiFPN headhead: [[-1, 1, Conv, [512, 1, 1]], [-1, 1, nn.Upsample, [None, 2, 'nearest']], [[-1, 6], 1, BiFPN_Add2, [256, 256]], # cat backbone P4 [-1, 3, C3, [512, False]], # 13 [-1, 1, Conv, [256, 1, 1]], [-1, 1, nn.Upsample, [None, 2, 'nearest']], [[-1, 4], 1, BiFPN_Add2, [128, 128]], # cat backbone P3 [-1, 3, C3, [256, False]], # 17 (P3/8-small) [-1, 1, Conv, [512, 3, 2]], # 为了BiFPN正确add,调整channel数 [[-1, 13, 6], 1, BiFPN_Add3, [256, 256]], # cat P4 <--- BiFPN change 注意v5s通道数是默认参数的一半 [-1, 3, C3, [512, False]], # 20 (P4/16-medium) [-1, 1, Conv, [512, 3, 2]], [[-1, 10], 1, BiFPN_Add2, [256, 256]], # cat head P5 [-1, 3, C3, [1024, False]], # 23 (P5/32-large) [[17, 20, 23], 1, Detect, [nc, anchors]], # Detect(P3, P4, P5) ]
3.修改yolo.py,在parse_model函数中找到elif m is Concat:语句,在其后面加上BiFPN_Add相关语句:
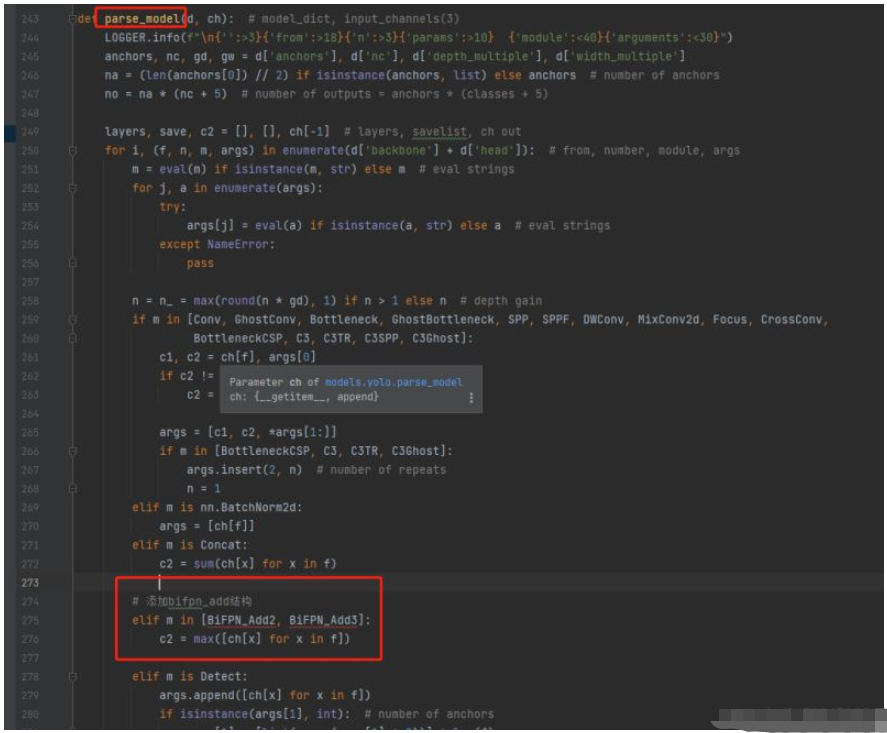
# 添加bifpn_add结构elif m in [BiFPN_Add2, BiFPN_Add3]: c2 = max([ch[x] for x in f])
4.修改train.py,向优化器中添加BiFPN的权重参数
将BiFPN_Add2和BiFPN_Add3函数中定义的w参数,加入g1
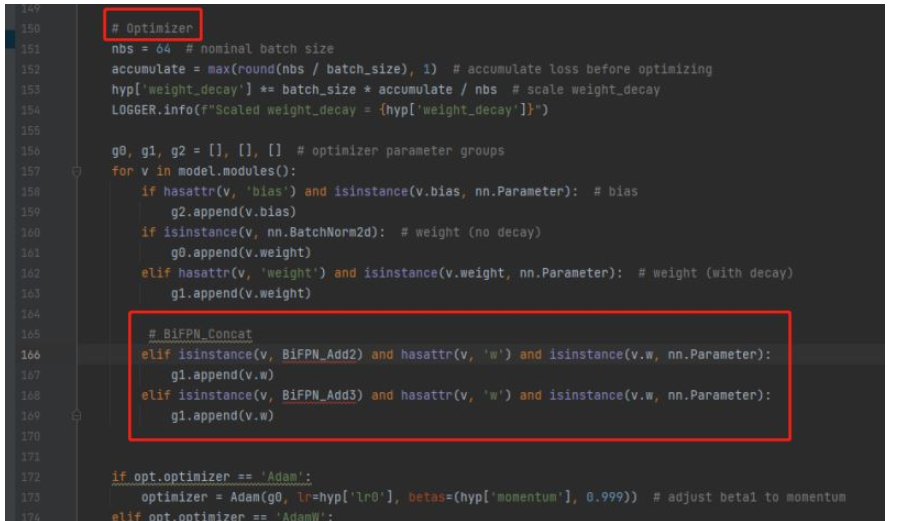
# BiFPN_Concat elif isinstance(v, BiFPN_Add2) and hasattr(v, 'w') and isinstance(v.w, nn.Parameter): g1.append(v.w) elif isinstance(v, BiFPN_Add3) and hasattr(v, 'w') and isinstance(v.w, nn.Parameter): g1.append(v.w)
然后导入一下这两个包

二、Concat
1.在common.py后加入如下代码
# 结合BiFPN 设置可学习参数 学习不同分支的权重# 两个分支concat操作class BiFPN_Concat2(nn.Module): def __init__(self, dimension=1): super(BiFPN_Concat2, self).__init__() self.d = dimension self.w = nn.Parameter(torch.ones(2, dtype=torch.float32), requires_grad=True) self.epsilon = 0.0001 def forward(self, x): w = self.w weight = w / (torch.sum(w, dim=0) + self.epsilon) # 将权重进行归一化 # Fast normalized fusion x = [weight[0] * x[0], weight[1] * x[1]] return torch.cat(x, self.d) # 三个分支concat操作class BiFPN_Concat3(nn.Module): def __init__(self, dimension=1): super(BiFPN_Concat3, self).__init__() self.d = dimension # 设置可学习参数 nn.Parameter的作用是:将一个不可训练的类型Tensor转换成可以训练的类型parameter # 并且会向宿主模型注册该参数 成为其一部分 即model.parameters()会包含这个parameter # 从而在参数优化的时候可以自动一起优化 self.w = nn.Parameter(torch.ones(3, dtype=torch.float32), requires_grad=True) self.epsilon = 0.0001 def forward(self, x): w = self.w weight = w / (torch.sum(w, dim=0) + self.epsilon) # 将权重进行归一化 # Fast normalized fusion x = [weight[0] * x[0], weight[1] * x[1], weight[2] * x[2]] return torch.cat(x, self.d)
2.yolov5s.yaml进行修改
# YOLOv5 ???? by Ultralytics, GPL-3.0 license # Parametersnc: 80 # number of classesdepth_multiple: 0.33 # model depth multiplewidth_multiple: 0.50 # layer channel multipleanchors: - [10,13, 16,30, 33,23] # P3/8 - [30,61, 62,45, 59,119] # P4/16 - [116,90, 156,198, 373,326] # P5/32 # YOLOv5 v6.0 backbonebackbone: # [from, number, module, args] [[-1, 1, Conv, [64, 6, 2, 2]], # 0-P1/2 [-1, 1, Conv, [128, 3, 2]], # 1-P2/4 [-1, 3, C3, [128]], [-1, 1, Conv, [256, 3, 2]], # 3-P3/8 [-1, 6, C3, [256]], [-1, 1, Conv, [512, 3, 2]], # 5-P4/16 [-1, 9, C3, [512]], [-1, 1, Conv, [1024, 3, 2]], # 7-P5/32 [-1, 3, C3, [1024]], [-1, 1, SPPF, [1024, 5]], # 9 ] # YOLOv5 v6.0 BiFPN headhead: [[-1, 1, Conv, [512, 1, 1]], [-1, 1, nn.Upsample, [None, 2, 'nearest']], [[-1, 6], 1, BiFPN_Concat2, [1]], # cat backbone P4 <--- BiFPN change [-1, 3, C3, [512, False]], # 13 [-1, 1, Conv, [256, 1, 1]], [-1, 1, nn.Upsample, [None, 2, 'nearest']], [[-1, 4], 1, BiFPN_Concat2, [1]], # cat backbone P3 <--- BiFPN change [-1, 3, C3, [256, False]], # 17 (P3/8-small) [-1, 1, Conv, [256, 3, 2]], [[-1, 14, 6], 1, BiFPN_Concat3, [1]], # cat P4 <--- BiFPN change [-1, 3, C3, [512, False]], # 20 (P4/16-medium) [-1, 1, Conv, [512, 3, 2]], [[-1, 10], 1, BiFPN_Concat2, [1]], # cat head P5 <--- BiFPN change [-1, 3, C3, [1024, False]], # 23 (P5/32-large) [[17, 20, 23], 1, Detect, [nc, anchors]], # Detect(P3, P4, P5) ]
3.修改yolo.py,在parse_model函数中找到elif m is Concat:语句,在其后面加上BiFPN_Concat相关语句:

# 添加bifpn_concat结构elif m in [Concat, BiFPN_Concat2, BiFPN_Concat3]: c2 = sum(ch[x] for x in f)
4.修改train.py,向优化器中添加BiFPN的权重参数
添加复方式同上(Add)
# BiFPN_Concat elif isinstance(v, BiFPN_Concat2) and hasattr(v, 'w') and isinstance(v.w, nn.Parameter): g1.append(v.w) elif isinstance(v, BiFPN_Concat3) and hasattr(v, 'w') and isinstance(v.w, nn.Parameter): g1.append(v.w)
以上就是“怎么将yolov5中的PANet层改为BiFPN”这篇文章的所有内容,感谢各位的阅读!相信大家阅读完这篇文章都有很大的收获,小编每天都会为大家更新不同的知识,如果还想学习更多的知识,请关注亿速云行业资讯频道。
边栏推荐
- Unrecognized SSL message, plaintext connection?
- Machine learning process and method
- [Yu Yue education] reference materials of love psychology of China University of mining and technology
- Tongda OA V12 process center
- Awk from introduction to earth (0) overview of awk
- GBase 8c系统表-pg_collation
- 返回一个树形结构数据
- Comment communiquer avec Huawei Cloud IOT via le Protocole mqtt
- 《上市风云》荐书——唯勇气最可贵
- awk从入门到入土(1)awk初次会面
猜你喜欢
Flink CDC mongoDB 使用及Flink sql解析monggo中复杂嵌套JSON数据实现

Restcloud ETL cross database data aggregation operation
详细些介绍如何通过MQTT协议和华为云物联网进行通信
The use of Flink CDC mongodb and the implementation of Flink SQL parsing complex nested JSON data in monggo

Thread safe singleton mode

Servlet中数据传到JSP页面使用el表达式${}无法显示问题
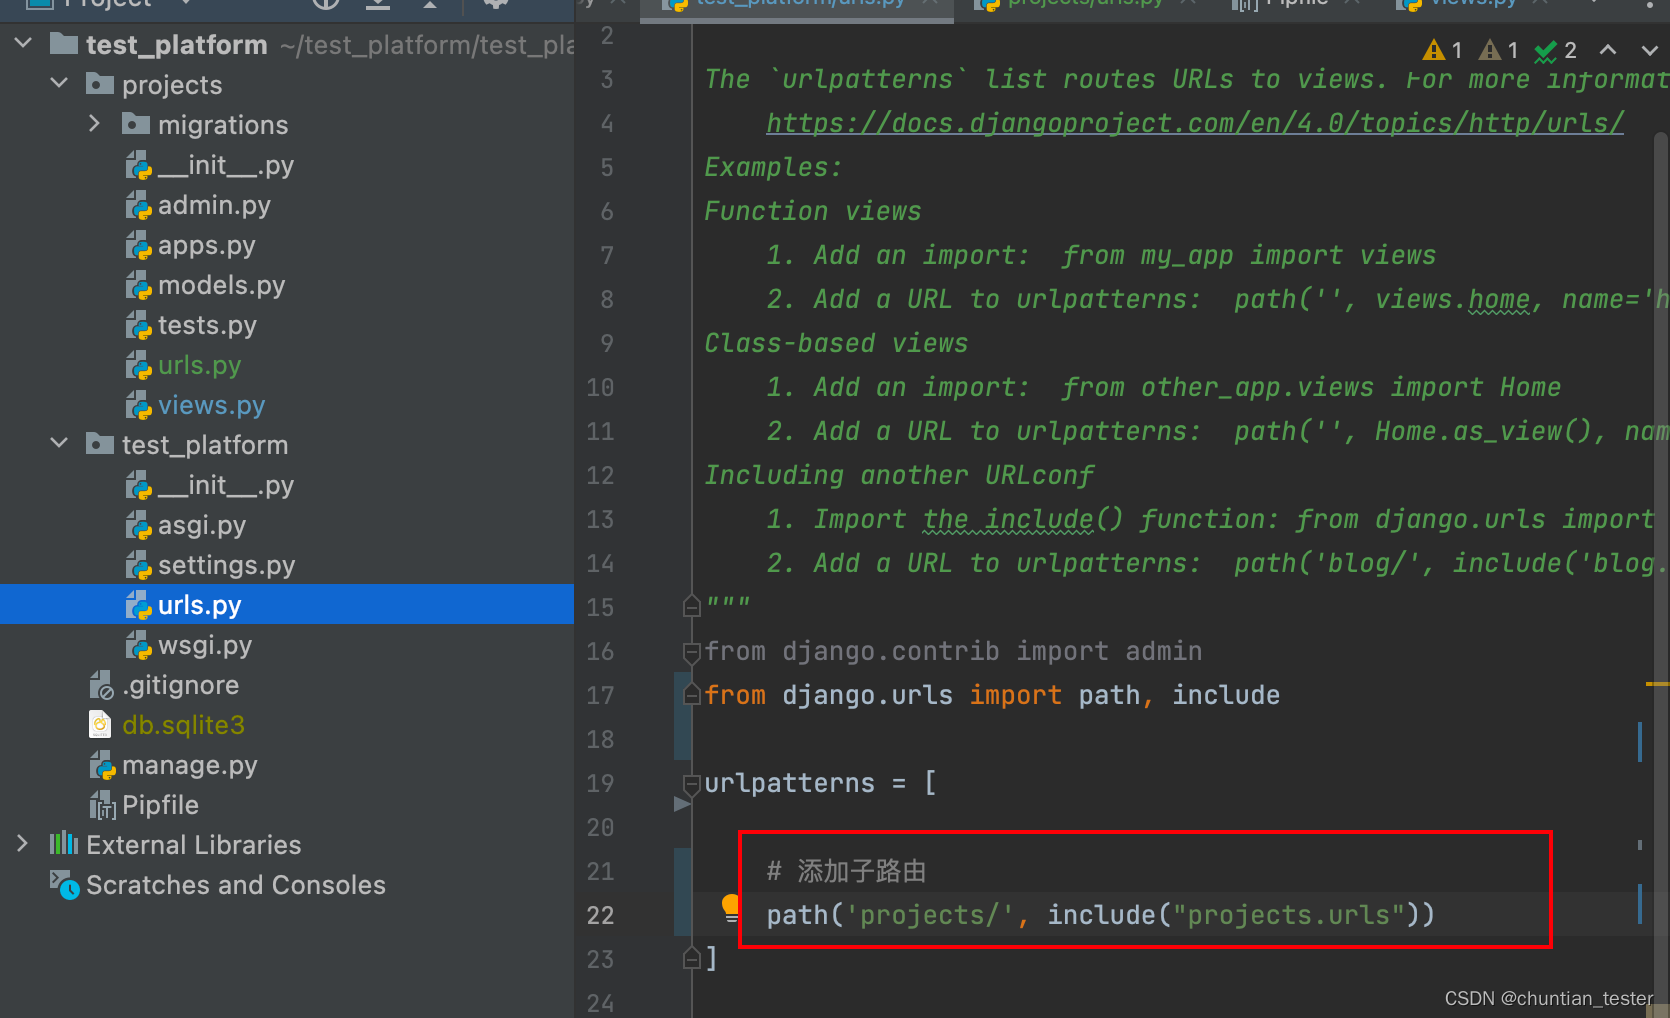
Create + register sub apps_ Define routes, global routes and sub routes

stm32F407-------ADC
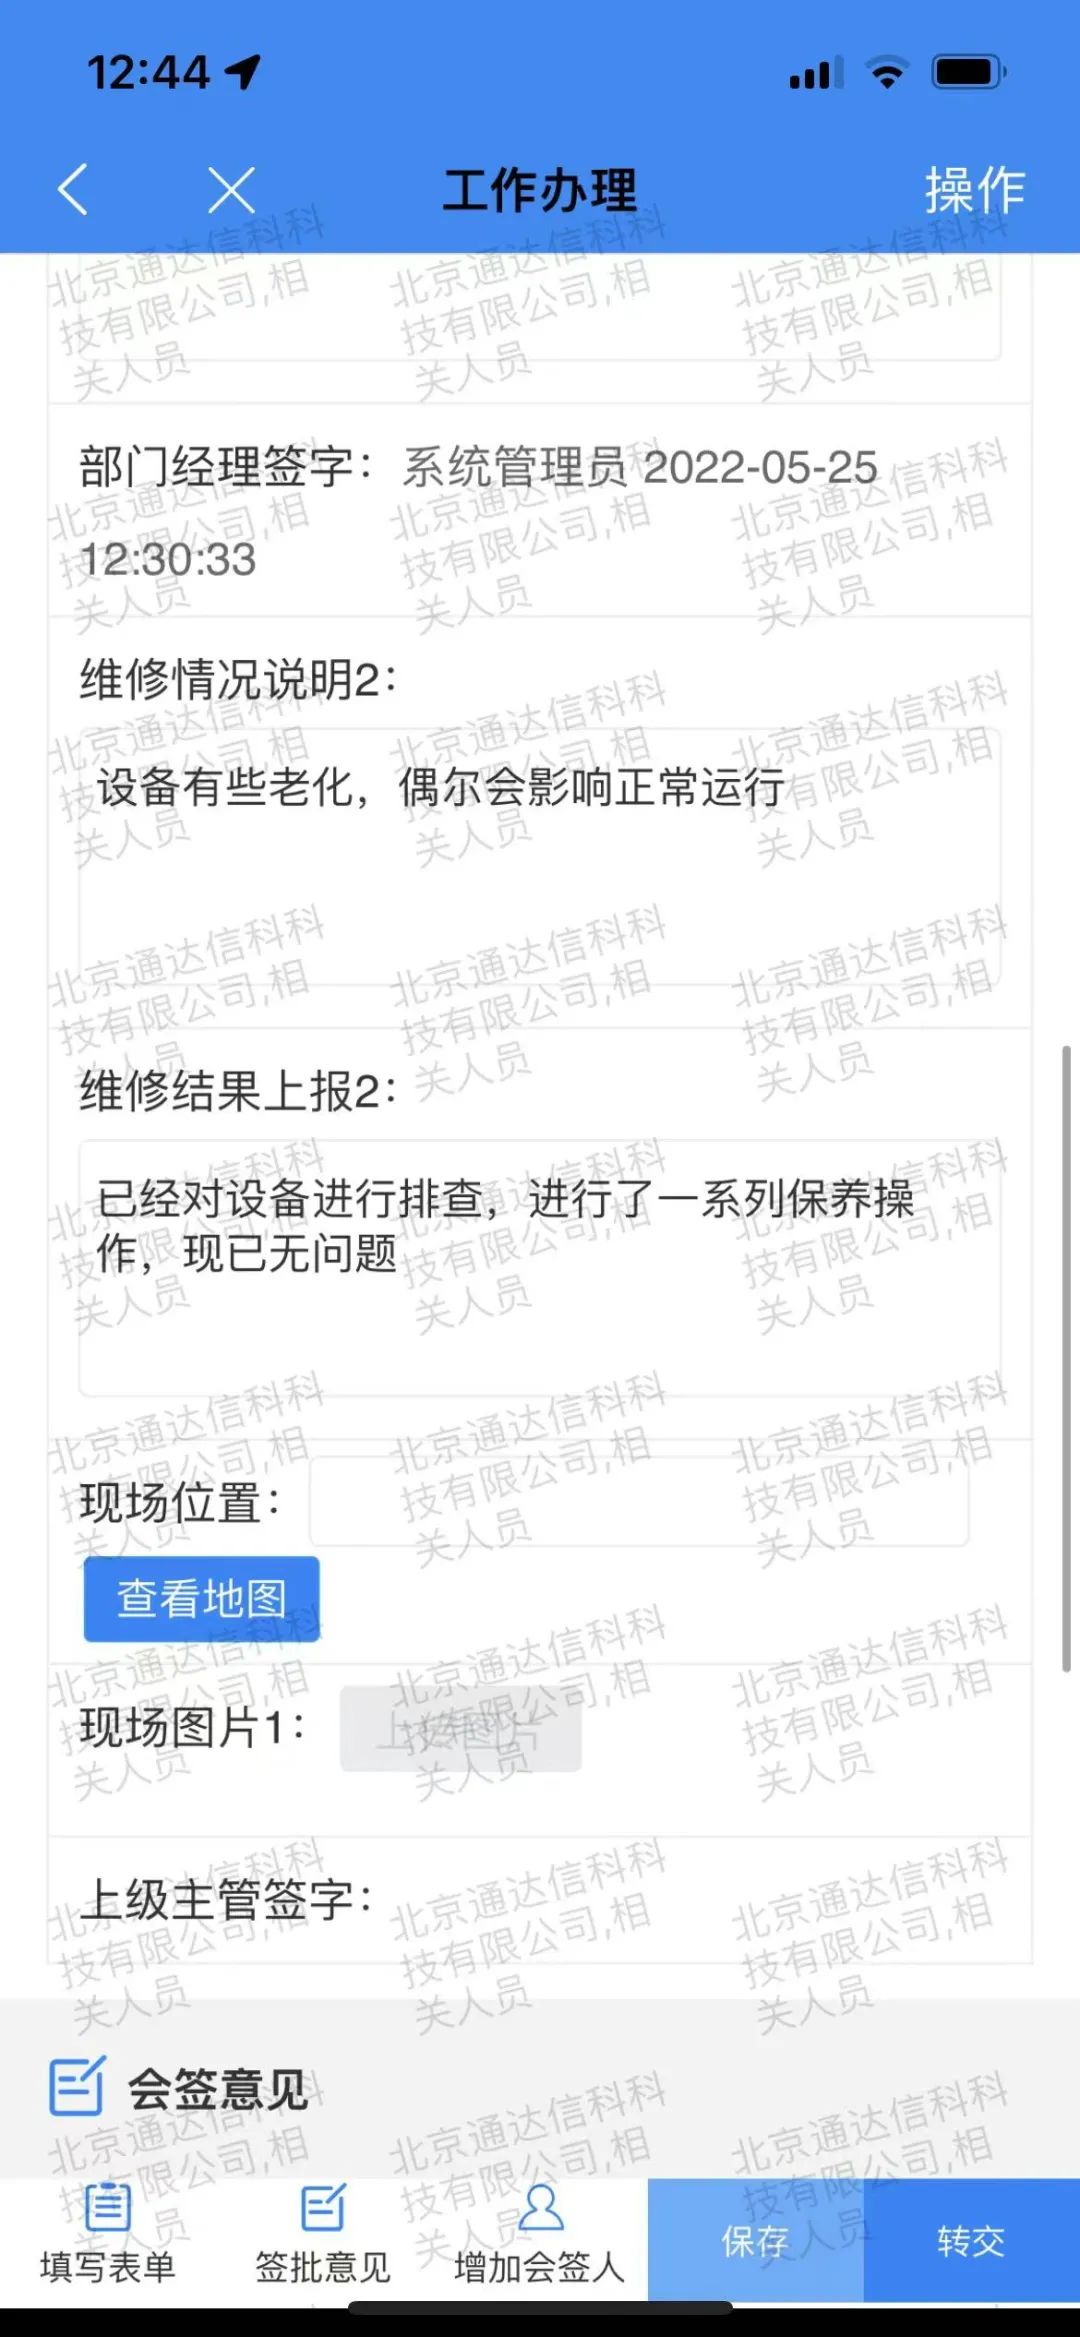
Tongda OA V12 process center
微服务组件Sentinel (Hystrix)详细分析
随机推荐
GBase 8c系统表-pg_amop
簡單理解svg
5. File operation
Missing library while loading shared libraries: libisl so. 15: cannot open shared object file: No such file
Monitoring and management of JVM
Oauth2.0 authentication, login and access "/oauth/token", how to get the value of request header authorization (basictoken)???
Gbase 8C function / stored procedure parameters (II)
GBase 8c系统表pg_cast
简单理解svg
GBase 8c系统表-pg_collation
Simple understanding of SVG
stm32F407-------ADC
easyExcel
awk从入门到入土(0)awk概述
去除网页滚动条方法以及内外边距
Swift development learning
GBase 8c系统表-pg_am
oauth2.0鉴权,登录访问 “/oauth/token”,请求头Authorization(basicToken)如何取值???
Unrecognized SSL message, plaintext connection?
iptables 4层转发