当前位置:网站首页>OpenCV CEO教你用OAK(四):创建复杂的管道
OpenCV CEO教你用OAK(四):创建复杂的管道
2022-06-11 09:07:00 【OAK中国_官方】
编辑:OAK中国
首发:oakchina.cn
喜欢的话,请多多️
▌前言
Hello,大家好,这里是OAK中国,我是助手君。
新手必看的系列文章又更新啦!干货奉上!
注:本教程适用于OAK相机。
▌1.介绍
这是此系列的第四篇文章,前三篇文章内容如下:
在这里,我们将仔细看看DepthAI管道(pipeline),它的不同节点(nodes),以及这些单独的节点如何组合在一起创建一个工作系统。
在之前的文章中,我们已经看到了一些起作用的节点。在这里,我们将更多地关注那些我们到目前为止还没有尝试过的方法。
▌2.管道
来自DepthAI的任何动作,无论是神经推理还是彩色相机输出,都需要定义一个管道,包括对应我们需求的节点和连接。
在管道中,不同的节点相互连接,数据以定义的顺序从一个节点流向另一个节点,同时在每个节点对数据执行不同的操作。
这里有一个简单的管道来获得OAK-D上的黑白相机模块的输出。

首先在主机上创建管道,定义节点之间的连接和数据流。然后,在初始化期间,定义的管道被发送到OAK设备,并使用来自摄像机和其他模块的所需输入来运行,输出被发送回主机。
让我们看看可供我们使用的不同节点,以及我们如何使用它们。
▌3.节点
到目前为止,我们知道节点是DepthAI管道的构建块,但节点本身是什么?
你可以将每个节点视为一个函数,它对一组给定的输入应用一些操作,并产生一组输出。
现在,这些节点可以链接在一起,这样一个节点的输出就可以作为管道中另一个节点的输入。
我们已经在以前的文章中看到了一些节点,如StereoDepth、MonoCamera和其他NN节点。让我们看看更多可供我们使用的节点,以及每个节点的用途。
3.1 XLinkIn/XLinkOut
XLinkIn和XLinkOut是两个最基本的节点,它们使主机能够与OAK设备进行交互。
XLinkIn
XLinkIn节点用于从主机向设备发送数据。
输入:
任何输入都可以从主机端发送到设备。
输出:
节点的输出是来自主计算机的可以在管道中使用的未改变的输入。
语法:
pipeline = dai.Pipeline()
xlinkIn = pipeline.create(dai.node.XLinkIn)
XLinkOut
XLinkOut节点用于将数据从设备发送到主机。
输入:
任何输入都可以从设备发送到主机端。
输出:
节点的输出是主机可以使用的来自设备计算机的未改变的输入。
语法:
pipeline = dai.Pipeline()
xlinkOut = pipeline.create(dai.node.XLinkOut)
3.2 彩色相机
ColorCamera节点是从RGB相机模块捕获的图像帧的来源。
可以使用InputControl和InputConfig在运行时控制和操作来自节点的输出图像帧,这可以用于更改不同的参数,如白平衡、曝光、聚焦等。
Camera节点本身内部有不同的组件:
- 1.图像传感器
正是物理图像传感器捕捉光线并产生原始图像帧。
- 2.ISP(图像信号处理器)
ISP与图像传感器通信,用于Bayer变换、去马赛克、降噪和其他图像增强。它还根据3A算法(自动对焦、自动曝光和自动白平衡)处理图像传感器调整,如曝光时间、感光度(ISO)和镜头位置。
- 3.后处理器Postprocessor
它将来自ISP的平面帧转换为视频/预览/静止帧。
输入:
- inputConfig – ImageManipConfig
- inputControl – CameraControl
输出:
- raw–img frame–raw 10 Bayer数据。
- ISP–img frame–YUV 420 planar(与YU12/IYUV/I420相同)
- still–img
frame–NV12,适合较大尺寸的帧。当一个捕获事件被发送到ColorCamera时,这个图像就被创建了,所以它就像照一张照片。 - preview–img frame–RGB(或BGR平面/交错,如果已配置),最适合小尺寸预览并将图像输入到神经网络。
- video–img frame–NV12,适合较大尺寸的帧。
语法:
pipeline = dai.Pipeline()
cam = pipeline.create(dai.node.ColorCamera)
演示:

3.3 边缘检测器EdgeDetector
边缘检测器节点使用Sobel滤波器来强调和查找图像帧中的边缘。

输入:
- inputImage – ImgFrame
- inputConfig – EdgeDetectorConfig
输出:
- output image–输出带有强调边缘的图像帧
语法:
pipeline = dai.Pipeline()
edgeDetector = pipeline.create(dai.node.EdgeDetector)
演示:

3.4 特征跟踪器FeatureTracker
FeatureTracker检测一帧上的关键点(特征),并在下一帧跟踪它们。
有效特征从Harris score或Shi-Tomasi中获得。目标要素的默认数量为320,最大默认数量为480。
它目前支持的分辨率:720p和480p。
输入:
- inputConfig – FeatureTrackerConfig
- inputImage – ImgFrame
输出:
- outputFeatures – TrackedFeatures
- passthroughInputImage–img frame
语法:
pipeline = dai.Pipeline()
featureTracker = pipeline.create(dai.node.FeatureTracker)
演示:
3.5 ImageManip
ImageManip节点可用于裁剪、旋转矩形区域或在图像帧上执行各种图像变换,如旋转、镜像、翻转、透视变换。
输入:
- inputImage – ImgFrame
- inputConfig – ImageManipConfig
输出:
- Modified Image Frame
语法:
pipeline = dai.Pipeline()manip = pipeline.create(dai.node.ImageManip)
演示:

3.6 IMU
IMU(惯性测量单元)节点可用于接收来自器件上IMU芯片的数据。
DepthAI设备使用BNO085 9轴传感器,支持(IMU(芯片本身的传感器融合。IMU芯片具有多个板载传感器,即加速度计、陀螺仪和磁力计。
注:OAK-D 配有IMU传感器,OAK-D-Lite 没有。如果你想使用IMU传感器,建议你在购买前检查设备规格。
输入:
这个节点不需要任何输入。
输出:
IMU数据
语法:
pipeline = dai.Pipeline()imu = pipeline.create(dai.node.IMU)
演示:
3.7 对象跟踪器ObjectTracker
对象跟踪器节点从检测输入中跟踪检测到的对象。它使用卡尔曼滤波器和匈牙利算法进行跟踪。
输入:
- inputDetectionFrame–img frame
- inputTrackerFrame–img frame
- inputDetections – ImgDetections
输出:
- out – Tracklets
- passthroughDetectionFrame – ImgFrame
- passthroughTrackerFrame – ImgFrame
- passthroughDetections – ImgDetections
语法:
pipeline = dai.Pipeline()objectTracker = pipeline.create(dai.node.ObjectTracker)
演示:
3.8 脚本Script
脚本节点允许用户在设备上运行自定义Python脚本。由于计算资源的限制,脚本节点不应该用于繁重的计算(例如,图像处理/CV),而是用于管理管道的流动。
示例用例包括控制ImageManip、ColorCamera、SpatialLocationCalculator等节点、解码NeuralNetwork结果或与GPIOs接口。
输入/输出:
用户可以根据需要定义任意多的输入和输出,输入和输出可以是DepthAI支持的任何Message类型。
语法:
pipeline = dai.Pipeline()script = pipeline.create(dai.node.Script)
3.9 空间位置计算器SpatialLocationCalculator
SpatialLocationCalculator可以基于来自inputDepth的深度图和由inputConfig提供的ROI(region-of-interest)来计算深度。
该节点将对ROI中的深度值进行平均,并移除超出范围的深度值。
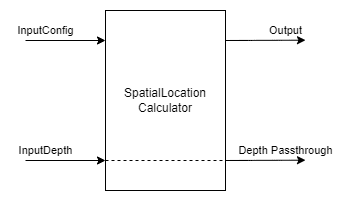
输入:
- inputConfig – SpatialLocationCalculatorConfig
- inputDepth – ImgFrame
输出:
- out – SpatialLocationCalculatorData
- passthroughDepth – ImgFrame
语法:
pipeline = dai.Pipeline()spatialCalc = pipeline.SpatialLocationCalculator()
演示:
3.10 视频编码器VideoEncoder
VideoEncoder节点用于将图像帧编码成H264/H265/JPEG,这可用于保存设备的视频输出。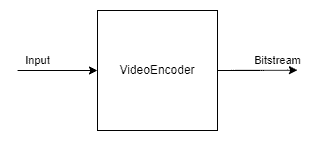
输入:
- input – ImgFrame
输出:
- bitstream – ImgFrame
语法:
pipeline = dai.Pipeline()encoder = pipeline.create(dai.node.VideoEncoder)
3.11 系统记录器SystemLogger
SystemLogger节点用于获取设备的系统信息。
该节点提供设备上所有资源(如内存和存储)的使用信息,它还提供处理器利用率和芯片温度等统计数据。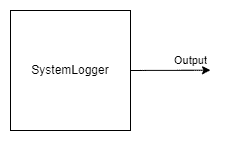
输出:
- out – SystemInformation
语法:
pipeline = dai.Pipeline()logger = pipeline.create(dai.node.SystemLogger)
演示:

▌4.通过链接节点实现复杂管道
现在我们已经了解了不同的DepthAI节点以及如何创建一个简单的管道。让我们更进一步,利用这些知识创建一个稍微复杂的管道。
我们将创建一个管道来进行人脸检测,此外,在检测人脸区域进行地标检测。所有这些都将在设备上完成,我们将只获得管道的最终输出,即检测到的面部边界框和检测到的界标。
在查看代码之前,让我们先了解一下管道的概况,以及管道中使用的不同节点是如何连接的。
4.1 代码(面部检测+面部标志检测)
导入所需模块
import cv2
import depthai as dai
import time
import blobconverter
定义帧大小
FRAME_SIZE = (640, 400)
定义检测神经网络模型名称和输入大小
我们将使用来自Depthai model zoo的“face-detection-retail-0004”模型。
它是一个人脸检测模型,给出图像帧中检测到的人脸的边界框坐标。
# If you define the blob make sure the FACE_MODEL_NAME and ZOO_TYPE are None
DET_INPUT_SIZE = (300, 300)
FACE_MODEL_NAME = "face-detection-retail-0004"
ZOO_TYPE = "depthai"
blob_path = None
定义地标神经网络模型名称和输入大小
我们将使用Open Model Zoo中的”landmarks-regression-retail-0009”模型。
这是一个面部标志检测模型,提供了面部的五个标志:左眼,右眼,鼻子,嘴唇的左角和嘴唇的右角。
# If you define the blob make sure the LANDMARKS_MODEL_NAME and ZOO_TYPE are None
LANDMARKS_INPUT_SIZE = (48, 48)
LANDMARKS_MODEL_NAME = "landmarks-regression-retail-0009"
LANDMARKS_ZOO_TYPE = "intel"
landmarks_blob_path = None
开始定义管道
pipeline = dai.Pipeline()
定义源-RGB相机
cam = pipeline.createColorCamera()
cam.setPreviewSize(FRAME_SIZE[0], FRAME_SIZE[1])
cam.setInterleaved(False)
cam.setResolution(dai.ColorCameraProperties.SensorResolution.THE_1080_P)
cam.setBoardSocket(dai.CameraBoardSocket.RGB)
定义用于人脸检测的神经网络节点
# Convert model from OMZ to blob
if FACE_MODEL_NAME is not None:
    blob_path = blobconverter.from_zoo(
        name=FACE_MODEL_NAME,
        shaves=6,
        zoo_type=ZOO_TYPE
    )

# Define face detection NN node
faceDetNn = pipeline.createMobileNetDetectionNetwork()
faceDetNn.setConfidenceThreshold(0.75)
faceDetNn.setBlobPath(blob_path)
为地标检测模型定义神经网络节点
# Convert model from OMZ to blob
if LANDMARKS_MODEL_NAME is not None:
    landmarks_blob_path = blobconverter.from_zoo(
        name=LANDMARKS_MODEL_NAME,
        shaves=6,
        zoo_type=LANDMARKS_ZOO_TYPE
    )

# Define landmarks detection NN node
landmarksDetNn = pipeline.createNeuralNetwork()
landmarksDetNn.setBlobPath(landmarks_blob_path)
定义用于人脸和地标检测的ImageManip节点
# Define face detection input config
faceDetManip = pipeline.createImageManip()
faceDetManip.initialConfig.setResize(DET_INPUT_SIZE[0], DET_INPUT_SIZE[1])
faceDetManip.initialConfig.setKeepAspectRatio(False)

# Define landmark detection input config
lndmrksDetManip = pipeline.createImageManip()
链接相机、人脸图像映射和人脸检测神经网络节点
# Linking
cam.preview.link(faceDetManip.inputImage)
faceDetManip.out.link(faceDetNn.input)
定义脚本节点
脚本节点将把面部检测神经网络的输出作为输入,并为界标神经网络设置ImageManipConfig。
script = pipeline.create(dai.node.Script)
script.setProcessor(dai.ProcessorType.LEON_CSS)
script.setScriptPath("script.py")
script.py
import time


# Correct the bounding box
def correct_bb(bb):
    bb.xmin = max(0, bb.xmin)
    bb.ymin = max(0, bb.ymin)
    bb.xmax = min(bb.xmax, 1)
    bb.ymax = min(bb.ymax, 1)
    return bb


# Main loop
while True:
    time.sleep(0.001)

    # Get image frame
    img = node.io['frame'].get()

    # Get detection output
    face_dets = node.io['face_det_in'].tryGet()
    if face_dets and img is not None:

        # Loop over all detections
        for det in face_dets.detections:

            # Correct bounding box
            correct_bb(det)
            node.warn(f"New detection {det.xmin}, {det.ymin}, {det.xmax}, {det.ymax}")

            # Set config parameters
            cfg = ImageManipConfig()
            cfg.setCropRect(det.xmin, det.ymin, det.xmax, det.ymax)
            cfg.setResize(48, 48)
            cfg.setKeepAspectRatio(False)

            # Output image and config
            node.io['manip_cfg'].send(cfg)
            node.io['manip_img'].send(img)
链接到脚本输入
cam.preview.link(script.inputs['frame'])
faceDetNn.out.link(script.inputs['face_det_in'])
将脚本输出链接到地标ImageManipconfig
script.outputs['manip_cfg'].link(lndmrksDetManip.inputConfig)
script.outputs['manip_img'].link(lndmrksDetManip.inputImage)
将ImageManip输出链接到Landmark NN
lndmrksDetManip.out.link(landmarksDetNn.input)
创建输出流
# Create preview output
xOutPreview = pipeline.createXLinkOut()
xOutPreview.setStreamName("preview")
cam.preview.link(xOutPreview.input)

# Create face detection output
xOutDet = pipeline.createXLinkOut()
xOutDet.setStreamName('det_out')
faceDetNn.out.link(xOutDet.input)

# Create cropped face output
xOutCropped = pipeline.createXLinkOut()
xOutCropped.setStreamName('face_out')
lndmrksDetManip.out.link(xOutCropped.input)

# Create landmarks detection output
xOutLndmrks = pipeline.createXLinkOut()
xOutLndmrks.setStreamName('lndmrks_out')
landmarksDetNn.out.link(xOutLndmrks.input)
在图像框上显示信息
def display_info(frame, bbox, landmarks, status, status_color, fps):
    # Display bounding box
    cv2.rectangle(frame, bbox, status_color[status], 2)

    # Display landmarks
    if landmarks is not None:
        for landmark in landmarks:
            cv2.circle(frame, landmark, 2, (0, 255, 255), -1)

    # Create background for showing details
    cv2.rectangle(frame, (5, 5, 175, 100), (50, 0, 0), -1)

    # Display authentication status on the frame
    cv2.putText(frame, status, (20, 40), cv2.FONT_HERSHEY_SIMPLEX, 0.5, status_color[status])

    # Display instructions on the frame
    cv2.putText(frame, f'FPS: {fps:.2f}', (20, 80), cv2.FONT_HERSHEY_SIMPLEX, 0.6, (255, 255, 255))
定义一些我们将在主循环中使用的变量
# Frame count
frame_count = 0

# Placeholder fps value
fps = 0

# Used to record the time when we processed last frames
prev_frame_time = 0

# Used to record the time at which we processed current frames
new_frame_time = 0

# Set status colors
status_color = {
    'Face Detected': (0, 255, 0),
    'No Face Detected': (0, 0, 255)
}
主循环
我们启动管道,从“预览”队列中获取视频帧。我们还分别从“det_out”和“lndmrks_out”队列获得面部和标志检测输出。
一旦我们有了边界框和界标输出,我们就在图像帧上显示它们。
# Start pipeline
with dai.Device(pipeline) as device:

    # Output queue will be used to get the right camera frames from the outputs defined above
    qCam = device.getOutputQueue(name="preview", maxSize=1, blocking=False)

    # Output queue will be used to get nn detection data from the video frames.
    qDet = device.getOutputQueue(name="det_out", maxSize=1, blocking=False)

    # Output queue will be used to get cropped face region.
    qFace = device.getOutputQueue(name="face_out", maxSize=1, blocking=False)

    # Output queue will be used to get landmarks from the face region.
    qLndmrks = device.getOutputQueue(name="lndmrks_out", maxSize=1, blocking=False)

    while True:
        # Get camera frame
        inCam = qCam.get()
        frame = inCam.getCvFrame()

        bbox = None

        inDet = qDet.tryGet()

        if inDet is not None:
            detections = inDet.detections

            # if face detected
            if len(detections) is not 0:
                detection = detections[0]

                # Correct bounding box
                xmin = max(0, detection.xmin)
                ymin = max(0, detection.ymin)
                xmax = min(detection.xmax, 1)
                ymax = min(detection.ymax, 1)

                # Calculate coordinates
                x = int(xmin*FRAME_SIZE[0])
                y = int(ymin*FRAME_SIZE[1])
                w = int(xmax*FRAME_SIZE[0]-xmin*FRAME_SIZE[0])
                h = int(ymax*FRAME_SIZE[1]-ymin*FRAME_SIZE[1])

                bbox = (x, y, w, h)

        # Show cropped face region
        inFace = qFace.tryGet()
        if inFace is not None:
            face = inFace.getCvFrame()
            cv2.imshow("face", face)

        landmarks = None

        # Get landmarks NN output
        inLndmrks = qLndmrks.tryGet()
        if inLndmrks is not None:
            # Get NN layer names
            # print(f"Layer names: {inLndmrks.getAllLayerNames()}")

            # Retrieve landmarks from NN output layer
            landmarks = inLndmrks.getLayerFp16("95")

            x_landmarks = []
            y_landmarks = []

            # Landmarks in following format [x1,y1,x2,y2,..]
            # Extract all x coordinates [x1,x2,..]
            for x_point in landmarks[::2]:
                # Get x coordinate on original frame
                x_point = int((x_point * w) + x)
                x_landmarks.append(x_point)

            # Extract all y coordinates [y1,y2,..]
            for y_point in landmarks[1::2]:
                # Get y coordinate on original frame
                y_point = int((y_point * h) + y)
                y_landmarks.append(y_point)

            # Zip x & y coordinates to get a list of points [(x1,y1),(x2,y2),..]
            landmarks = list(zip(x_landmarks, y_landmarks))

        # Check if a face was detected in the frame
        if bbox:
            # Face detected
            status = 'Face Detected'
        else:
            # No face detected
            status = 'No Face Detected'

        # Display info on frame
        display_info(frame, bbox, landmarks, status, status_color, fps)

        # Calculate average fps
        if frame_count % 10 == 0:
            # Time when we finish processing last 100 frames
            new_frame_time = time.time()

            # Fps will be number of frame processed in one second
            fps = 1 / ((new_frame_time - prev_frame_time)/10)
            prev_frame_time = new_frame_time

        # Capture the key pressed
        key_pressed = cv2.waitKey(1) & 0xff

        # Stop the program if Esc key was pressed
        if key_pressed == 27:
            break

        # Display the final frame
        cv2.imshow("Face Cam", frame)

        # Increment frame count
        frame_count += 1

# Close all output windows
cv2.destroyAllWindows
▌5.效果演示

▌6.结论
在这篇文章中,我们概述了DepthAI管道的不同部分,以及如何使用它们在节点之间创建连接来完成复杂的任务。
在下一篇文章中,我们将使用目前为止所学的一切,创建一个有趣的应用程序。
▌参考资料
https://learnopencv.com/depthai-pipeline-overview-creating-a-complex-pipeline/
https://docs.oakchina.cn/en/latest/
https://www.oakchina.cn/selection-guide/
OAK中国
| OpenCV AI Kit在中国区的官方代理商和技术服务商
| 追踪AI技术和产品新动态
戳「+关注」获取最新资讯
边栏推荐
- 面试题 02.02. 返回倒数第 k 个节点
- OpenCV CEO教你用OAK(五):基于OAK-D和DepthAI的反欺骗人脸识别系统
- 2161. 根据给定数字划分数组
- [C language - data storage] how is data stored in memory?
- 【方案开发】血压计方案压力传感器SIC160
- 报错[error] input tesnor exceeds available data range [NeuralNetwork(3)] [error] Input tensor ‘0‘ (0)
- Machine learning notes - convolutional neural network memo list
- E. Zoom in and zoom out of X (operator overloading)
- 小型制氧机解决方案PCBA电路板开发
- 报错ModularNotFoundError: No module named ‘find_version’
猜你喜欢

山东大学项目实训(四)—— 微信小程序扫描web端二维码实现web端登录

矩阵求逆操作的复杂度分析(逆矩阵的复杂度分析)

Console you don't know

Redis source code analysis hash object (z\u hash)

报错ModularNotFoundError: No module named ‘find_version’

typescript高阶特性一 —— 合并类型(&)

ArcGIS 10.9.1 地质、气象体元数据处理及服务发布调用

Textview text size auto fit and textview margin removal

机器学习笔记 - 使用TensorFlow的Spatial Transformer网络
Typescript -- preliminary study of variable declaration
随机推荐
Matlab learning 9- nonlinear sharpening filter for image processing
Complexity analysis of matrix inversion operation (complexity analysis of inverse matrix)
【ERP体系】专业技术层面的评估,你了解多少?
E. Zoom in and zoom out of X (operator overloading)
Strength and appearance Coexist -- an exclusive interview with Liu Yu, a member of Apache pulsar PMC
剑指 Offer 31. 栈的压入、弹出序列
Success and failure of ERP software from the perspective of enterprise evaluation
2095. delete the intermediate node of the linked list
Talk about how to customize data desensitization
Vagrant mounting pit
企业决议时,哪个部分应该主导ERP项目?
【237. 删除链表中的节点】
Intelligent control theory question bank
20. 有效的括号
SAP ABAP internal table classification, addition, deletion, modification and query
预编译,编译,汇编,链接,静态库,动态库都是什么
CUMT learning diary - theoretical analysis of uCOSII - Textbook of Renzhe Edition
Matlab learning 7- linear smoothing filtering of image processing
SAP ABAP data types and data objects
[C language - function stack frame] analyze the whole process of function call from the perspective of disassembly