当前位置:网站首页>Airsim radar camera fusion to generate color point cloud
Airsim radar camera fusion to generate color point cloud
2022-07-01 08:09:00 【one hundred and eleven thousand one hundred and eleven trillion】
Code ,cmake,launch And so on in the network disk link
link : https://pan.baidu.com/s/14hWBDnRZC41xkqAk6FirtA Extraction code : 1een
-- From Baidu network disk super member v4 The share of
1、 brief introduction
3D The fusion of lidar and camera refers to the integration of lidar 3D spot , Projected onto the camera image , Thus, the depth information is added to each pixel of the image or acquired by the radar 3D Point adding RGB Information . The effect is as shown in the picture :


You can know , To put 3D The transformation matrix of the coordinate system of the camera and radar and the internal parameters of the camera are needed for point projection to the image
2、 Introduction to radar camera fusion theory
The theory is simply a sentence : Through the transformation matrix of the radar camera, the radar system / The design of the world coordinate system 3D Point projection to camera

2.1、Airsim Each matrix in
External reference
External parameters include rotation and Translation , Will the world / Radar coordinate system 3D Point conversion to camera coordinate system
The main reference here is
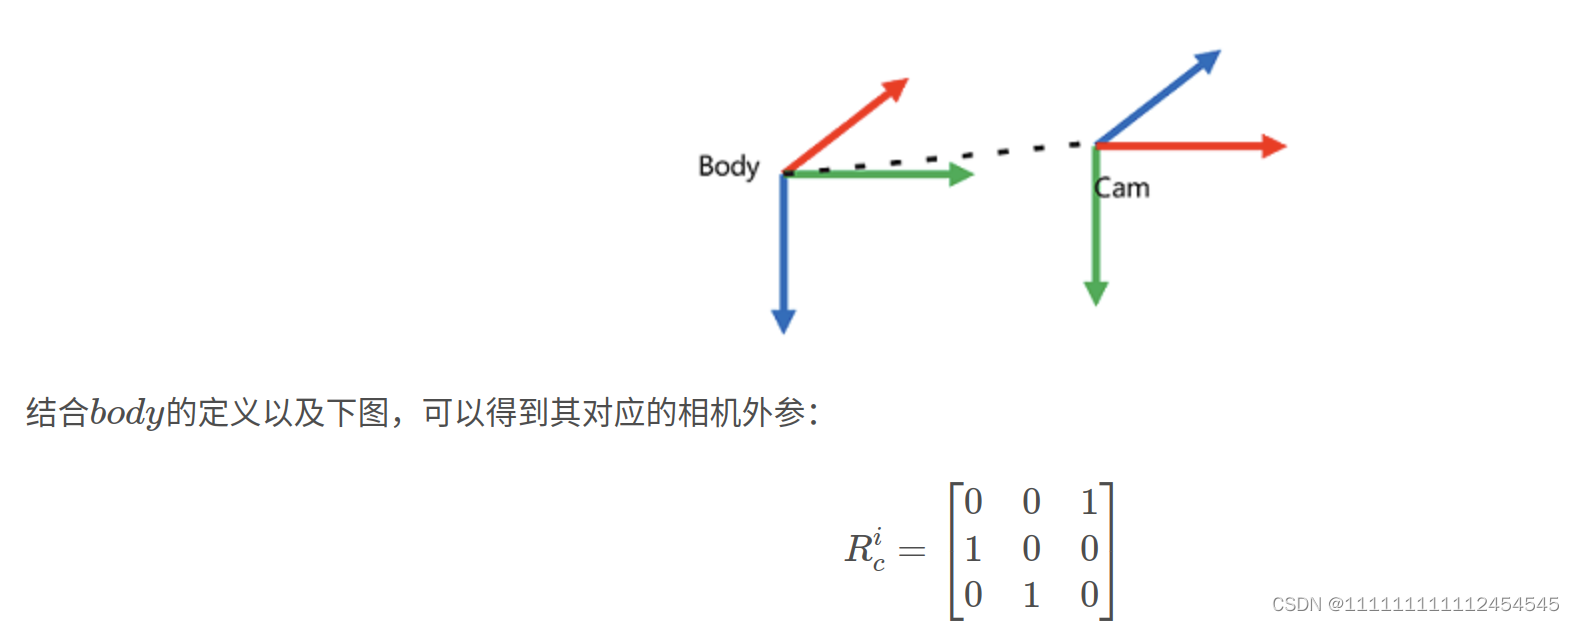
The rotation matrix is from the camera to the world coordinate system , What we want is from the world coordinate system to the camera coordinate system . All should find the transpose of the matrix , as follows :

The translation matrix can be based on settings At the middle camera x,y,z give
Internal reference
Still refer to the blog above

among width,heigth,fov Can be in settings Set in

Radar system / The World Department
Whether the point cloud returns to the radar system or the world system can be passed through settings Set the radar parameters in

The radar system is used in this paper , But I don't know the relationship between radar and the world coordinate system , After trying, the orientation of each coordinate axis of the radar system and the world coordinate system should be consistent , Just guess from the results , Not sure if it's right
Now we know the internal and external parameters , Now you can test according to the recorded data
3、Airsim Recording bag data
For the process of recording point cloud data, please refer to another article of mine , except settings The file is different and the others are the same
Airsim+Lego-Loam_111111111112454545 The blog of -CSDN Blog
{
  "SeeDocsAt": "https://github.com/Microsoft/AirSim/blob/master/docs/settings.md",
  "SettingsVersion": 1.2,
  "SimMode": "Multirotor",
  "ViewMode": "SpringArmChase",
  "ClockSpeed": 1,
  "Vehicles": {
    "imulink": {
      "VehicleType": "SimpleFlight",
      "DefaultVehicleState": "Armed",
      "EnableCollisionPassthrogh": false,
      "EnableCollisions": true,
      "AllowAPIAlways": true,
      "Sensors": {
        "Imu" : {
          "SensorType": 2,
          "Enabled": true,
          "AngularRandomWalk": 0.3,
          "GyroBiasStabilityTau": 500,
          "GyroBiasStability": 4.6,
          "VelocityRandomWalk": 0.24,
          "AccelBiasStabilityTau": 800,
          "AccelBiasStability": 36
        },
        "LidarCustom": {
          "SensorType": 6,
          "Range": 50,
          "Enabled": true,
          "NumberOfChannels": 16,
          "PointsPerSecond": 288000,
          "RotationsPerSecond": 10,
          "VerticalFOVUpper": 15,
          "VerticalFOVLower": -15,
          "HorizontalFOVStart": -180,
          "HorizontalFOVEnd": 180,
          "X": 2, "Y": 0, "Z": -1,
          "DrawDebugPoints": false,
          "Pitch":0, "Roll": 0, "Yaw": 0,
          "DataFrame": "SensorLocalFrame"
        }
      },
	"Cameras": {
	"camera_1": {
          "CaptureSettings": [
            {
              "ImageType": 0,
              "Width": 640,
              "Height": 480,
              "FOV_Degrees": 90,
              "TargetGamma": 1.5
            }
          ],
          "X": 2, "Y": 0, "Z": -1,
          "Pitch": 0, "Roll": 0, "Yaw": 0
        }
	}
    }
  },

	"SubWindows": [

	  ]
}
3.1、 Control aircraft flight
3.1.1、 Code control
The flight route of the aircraft can be set by code. See my other blog ( From Ning Zian boss );
3.1.2、 Keyboard control
AirSim UAV keyboard control _Sabersaber- The blog of -CSDN Blog _python control airsim
It can also be done through pygame It is more convenient to control UAV with keyboard , But there is one caveat :UE4 The settings over there , You need to uncheck the option of using less computing resources when the window is not in focus, otherwise when you mouse out UE4 Window to keyboard control that window UE4 Will become special card ;
Editing -> preferences -> performance -> Less used in the background CPU

4、 Code implementation
The code mainly includes the following parts
4.1、 Constructors
pcl_fusion():it(n)
    {
        subCloud = n.subscribe<sensor_msgs::PointCloud2>("/velodyne_points", 100, &pcl_fusion::getcloud, this); // receive velodyne Point cloud data , Enter the callback function getcloud()
        pubCloud = n.advertise<sensor_msgs::PointCloud2>("/fusion_cloud", 100);  // Set up a publisher , The theme is /adjustd_cloud, It is convenient to release the point cloud after adding color
        image_sub_ = it.subscribe("/airsim_node/imulink/camera_1/Scene", 100, &pcl_fusion::imageCallback,this);
        //image_transport::Publisher img_pub = it.advertise("camera/image", 100);
        R<<0,1,0,
        0,0,1,
        1,0,0;
        K<<320,0,320,
                0,320,240,
                0,0,1;
        t<<0,0,0;
    }
1、 Initialize the variables of the subscription point cloud
2、 Subscribe to the image variables
3、 Initialize publishing fusion RGB Variables of information
4、 Initialize internal and external parameters
4.2、 Subscribe to image functions
  void imageCallback(const sensor_msgs::ImageConstPtr& msg){
  try{
        image  = cv_bridge::toCvShare(msg, "bgr8")->image;
        //cv::Mat image  = cv_bridge::toCvShare(msg, "bgr8")->image; //image_raw That's the image we got

    // cv::circle(image,cv::Point(100,250),5,cv::Scalar(0,0,255),3); // Pay attention to column before row
    for (int row = 0; row < 480; row++ )
    {
      for (int  col= 0; col< 640; col++ )
      {
        image_color[row][col] = (cv::Vec3b)image.at<cv::Vec3b>(row, col);
      }
    }
    // cv::imshow("view", image);
  }
    catch (cv_bridge::Exception& e){
    ROS_ERROR("Could not convert from '%s' to 'bgr8'.", msg->encoding.c_str());
  }
}
There are two main functions
1、 Will receive ros Format image through cv_bridge convert to cv::Mat
2、 take cv::Mat convert to cv::Vec3b( This step should not also be OK , adopt cv::Mat obtain RGB Information )
4.3、 Point cloud subscription function ( The fusion )
  // Point cloud callback function
  void getcloud(const sensor_msgs::PointCloud2ConstPtr& laserCloudMsg){
    pcl::PointCloud<pcl::PointXYZRGB>::Ptr  fusion_pcl_ptr (new pcl::PointCloud<pcl::PointXYZRGB>);   // Put it here because , You need to reinitialize each time , Abandoned the original but useless two channels intensity、ring
    //pcl::PointCloud<PointXYZIR>::Ptr   raw_pcl_ptr (new pcl::PointCloud<PointXYZIR>);   //VLP-16 The point cloud message for contains xyz and intensity、ring Of , There is no ring I don't know why , Define a point type if necessary PointXYZIR
    pcl::PointCloud<pcl::PointXYZ>::Ptr   raw_pcl_ptr (new pcl::PointCloud<pcl::PointXYZ>);
    pcl::fromROSMsg(*laserCloudMsg, *raw_pcl_ptr);  // hold msg The message pointer is converted to a point cloud

    // Another way to do it
    Eigen::Vector3f c_tmp;
    Eigen::Vector3f p_result;
    for (int i = 0; i <  raw_pcl_ptr->points.size(); i++)
    {
      c_tmp<<raw_pcl_ptr->points[i].x, raw_pcl_ptr->points[i].y, raw_pcl_ptr->points[i].z;

      p_result = K * (R* c_tmp+t);  // Coordinate transformation
      cv::Point pt;
      pt.x =  (int)((p_result[0] / p_result[2])) ;
      pt.y =  (int)((p_result[1] / p_result[2])) ;
      // std::cout<<  pt << std::endl;

      if ( pt.x >=0 &&pt.x <  640 && pt.y>=0 && pt.y<480 && raw_pcl_ptr->points[i].x>0) //&& raw_pcl_ptr->points[i].x>0 Remove the point cloud behind the image
      {
        // PointXYZRGBIR  p;
        pcl::PointXYZRGB p;
        p.x=raw_pcl_ptr->points[i].x;
        p.y=raw_pcl_ptr->points[i].y;
        p.z=raw_pcl_ptr->points[i].z;

        // The color of the point cloud is determined by the corresponding points on the image
        p.b = image_color[pt.y][pt.x][0];
        p.g = image_color[pt.y][pt.x][1];
        p.r = image_color[pt.y][pt.x][2];
        // Draw the point cloud on the image
        // std::cout<<pt.y<<"   "<<pt.x<<std::endl;
        // cv::Point center(pt.y,pt.x);
        // cv::Scalar colorCircle1(0, 0, 255);
        // cv::circle(image_copy, center, 0.1, colorCircle1, 0.1 );
        // If the point cloud type is XYZRGBIR You need to add IR Information
        //p.label = (rand() % (10+1));  // Set up 10 A label , The label is random
        //p.intensity = raw_pcl_ptr->points[i].intensity;  // Inherit the previous point cloud intensity
        //p.ring = raw_pcl_ptr->points[i].ring;  // Inherit the previous point cloud ring

        fusion_pcl_ptr->points.push_back(p);
      }
    }
    // Publish an image with a point cloud
    // sensor_msgs::ImagePtr msg2 = cv_bridge::CvImage(std_msgs::Header(), "bgr8", image_copy).toImageMsg();
    // img_pub.publish(msg2);

    fusion_pcl_ptr->width = 1;
    fusion_pcl_ptr->height = fusion_pcl_ptr->points.size();
    // std::cout<<  fusion_pcl_ptr->points.size() << std::endl;
    pcl::toROSMsg( *fusion_pcl_ptr, fusion_msg);  // Convert the point cloud into a message before publishing
    fusion_msg.header.frame_id = "world_enu";// frame id Change to and velodyne Same
    pubCloud.publish( fusion_msg); // Publish adjusted point cloud data , The theme is /adjustd_cloud
  }
The main functions are
1、 establish XYZRGB Type point clouds and used to store fused point clouds
2、 Will receive ros The point cloud of type is converted to pcl::pointxyz type
3、 The point cloud is projected onto the camera
4、 Fusion storage
5、 take pcl The point cloud is converted to ros Format and publish
5、 Running effect
launch
First you can create a simple launch File for startup , Avoid adding new nodes every time
<launch>
    <node pkg="selfslam" type="fucon2" name="fucon2" output="screen" />
       <arg name="rviz" default="true" />
    <group if="$(arg rviz)">
        <node launch-prefix="nice" pkg="rviz" type="rviz" name="rviz" args="-d $(find selfslam)/rviz_cfg/aloam_velodyne.rviz" />
    </group>
</launch>
function
 Open a terminal
roscore
 Open another terminal
catkin_make
source devel/setup.bash
roslaunch selfslam xxx(selfslam It's the name of my own feature pack. You need to change it to your own )

 Open another terminal
rosbag play xxxx.bag ( Replace it with your own )
result
If you feel your own point cloud is rviz The inside is reversed and cannot be adjusted. You can adjust the reverse through this button z Axis


边栏推荐
- LSTM of RNN
- ContentType所有类型对比
- Gui Gui programming (XV) - use scale to control font size changes
- web254
- Vhost kick & call principle
- Significance and measures of source code encryption
- Access report realizes subtotal function
- How to troubleshoot SharePoint online map network drive failure?
- Teach you how to apply for domestic trademark online step by step
- Long way to go with technology
猜你喜欢
![[untitled]](/img/c2/63286ba00321c9cdef43ff40635a67.png)
[untitled]

使用beef劫持用户浏览器

Airsim雷达相机融合生成彩色点云

【入门】取近似值

Thesis learning -- Analysis and Research on similarity query of hydrological time series
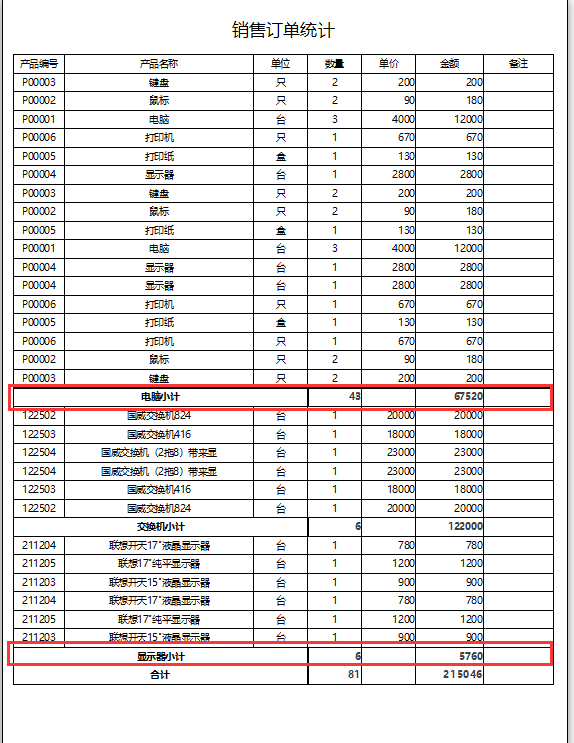
Access报表实现小计功能

Latex formula code
![[getting started] enter the integer array and sorting ID, and sort its elements in ascending or descending order](/img/87/07783593dbabcf29700fa207ecda08.png)
[getting started] enter the integer array and sorting ID, and sort its elements in ascending or descending order

【入门】截取字符串
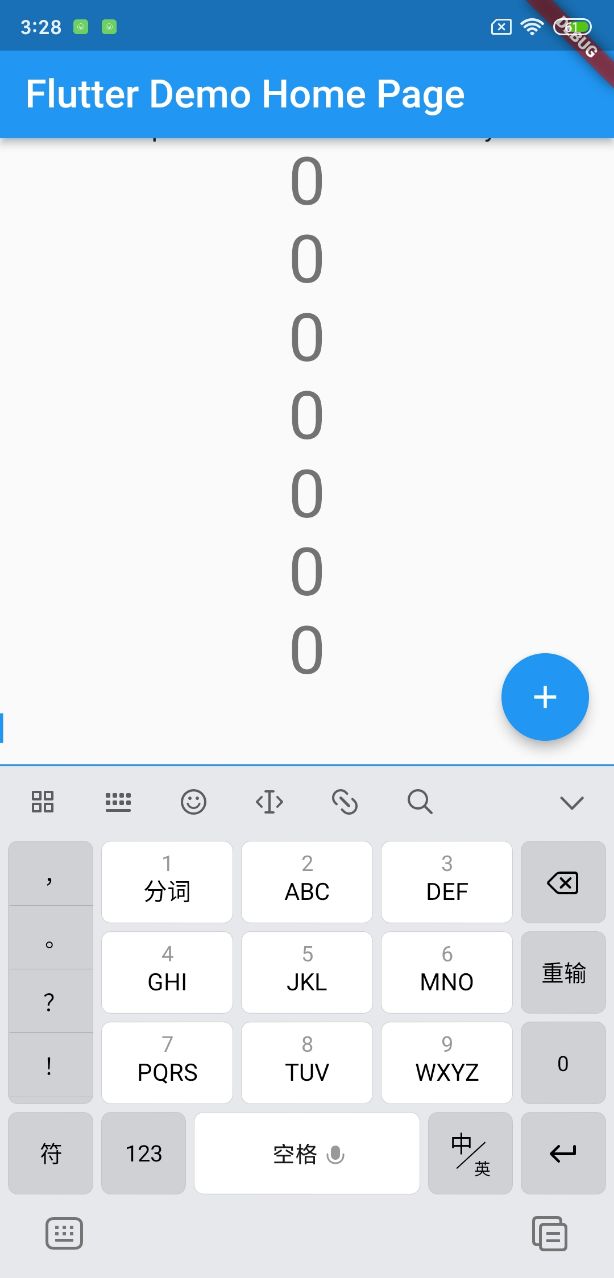
Soft keyboard height error
随机推荐
量化交易之读书篇 - 《征服市场的人》读书笔记
STM32 uses esp01s to go to the cloud, mqtt FX debugging
[MySQL learning notes27] stored procedure
ContentType所有类型对比
Contenttype comparison of all types
golang中的正则表达式使用注意事项与技巧
How to make the two financial transactions faster
On June 30, 2022, the record of provincial competition + national competition of Bluebridge
The Windows C disk is full
php laravel微信支付
How to use layui to display the data in the database in the form of tables
[force deduction 10 days SQL introduction] Day10 control flow
EDA open source simulation tool verilator beginner 6: debugging examples
Microsoft stream - how to modify video subtitles
軟鍵盤高度報錯
一套十万级TPS的IM综合消息系统的架构实践与思考
She is the "HR of others" | ones character
The difference between interceptors and filters
Cmake I two ways to compile source files
web254