当前位置:网站首页>Mongodb slice summary
Mongodb slice summary
2022-07-07 13:12:00 【cui_ yonghua】
The basic chapter ( Can solve the problem of 80% The problem of ):
MongoDB data type 、 Key concepts and shell Commonly used instructions
MongoDB Various additions to documents 、 to update 、 Delete operation summary
Advanced :
Other :
One . Slice Overview
Fragmentation (sharding) Refer to : Split the data , The process of dispersing it in different machines , Sometimes you use partitions (partitioning) To express the concept . Spread the data across different machines , You don't need a powerful mainframe computer to store more data , You can meet MongoDB The demand for a huge increase in data volume .
When MongoDB When storing massive amounts of data , A machine may not be enough to store data , It may not be enough to provide acceptable read and write throughput . At this time , We can split data on multiple machines , Make database system can store and process more data .
Be careful :
Replica set : Can solve automatic failover , Master slave copy , colony . Problem solved : Data redundancy backup , High availability of Architecture ; But it can't solve the problem of single node pressure ( Hardware limitations , Concurrent access pressure )
Why use shards :
1、 The local disk is not large enough
2、 When the request volume is large, there will be insufficient memory .
3、 Vertical expansion is expensive ( Memory 、 disk 、cpu)
Two . Fragment cluster structure
stay MongoDB Use the partition cluster structure to distribute :
[ Failed to transfer the external chain picture , The origin station may have anti-theft chain mechanism , It is suggested to save the pictures and upload them directly (img-vs4UlO1S-1657022797641)(evernotecid://B1CD39FE-B044-413D-A086-0649DB3F0070/appyinxiangcom/26430792/ENResource/p1225)]
In the figure above, there are three main components as follows :Shard: Used to store actual data blocks , In a real production environment shard server A character can be made up of several machines replica set To undertake , Prevent single point failure of the main engine
Config Server:mongod example , Store the whole ClusterMetadata, These include chunk Information .
Query Routers: Front-end routing , The client is connected by this , And make the whole cluster look like a single database , Front end applications can be used transparently .
3、 ... and . Slice instance
The port distribution of slice structure is as follows :
Shard Server 1:27031
Shard Server 2:27032
Config Server: 27100
Route Process: 27777
Step one : start-up Shard Server
sudo rm -rf /MongoDB/shard/s1 /MongoDB/shard/s2 /MongoDB/shard/log
sudo mkdir -p /MongoDB/shard/s1 /MongoDB/shard/s2 /MongoDB/shard/log
sudo mongod --port 27031 --dbpath=/MongoDB/shard/s1
sudo mongod --port 27032 --dbpath=/MongoDB/shard/s2
Step two : start-up Config Server
sudo rm -rf /MongoDB/shard/config
sudo mkdir -p /MongoDB/shard/config
sudo mongod --port 27100 --dbpath=/MongoDB/shard/config
Be careful : Here we can start up like ordinary mongodb Start like a service , No need to add —shardsvr and configsvr Parameters . Because the function of these two parameters is to change the startup port , So we can specify the port by ourselves .
Step three : start-up Route Process
mongos --port 27777 --configdb 192.168.17.129:27100
Step four : To configure Sharding
Next , We use MongoDB Shell Log in to mongos, add to Shard node
mongo admin --port 27777
MongoDB shell version: 2.0.7
connecting to: 127.0.0.1:27777/admin
mongos> db.runCommand({
     addshard:"192.168.17.129:27031" })
{
     "shardAdded" : "shard0000", "ok" : 1 }
......
mongos> db.runCommand({
     addshard:"192.168.17.129:27032" })
{
     "shardAdded" : "shard0009", "ok" : 1 }
Step five : For a database test Enable sharding
# Set the database stored in slices
mongos> db.runCommand({
     enablesharding:"test" })

{
     "ok" : 1 }
Step six : Yes collection Slice
mongos> db.runCommand({
     shardcollection: "test.mycol", key: {
     _id:1}})
{
     "collectionsharded" : "test.mycol", "ok" : 1 }
Step seven : test
mongo test --port 27777
Output 10000 Data
use testvar
num =10000
for (var i=0;i<num;i++){

    db.mycol.save({
    '_id':i})
}
No major changes are needed in the program code , Connect ordinary... Directly according to mongo Like the database , Connect the database to the interface 27777
Step eight : Check the fragmentation
When checking the segmentation , Must be in config( Configure execution on the server ) And it has to be in admin( Such as mongo 127.0.0.1:27100/admin) Execute under set
mongo admin --port 27100  #config( Configure execution on the server )
sh.status()

#  Output is as follows :
-- Sharding Status ---
  sharding version: {

    "_id" : 1,
    "minCompatibleVersion" : 5,
    "currentVersion" : 6,
    "clusterId" : ObjectId("57cfcdfef06b33543fdeb52e")
}
  shards:
    {
      "_id" : "shard0000",  "host" : "localhost:27031" }
    {
      "_id" : "shard0001",  "host" : "localhost:27032" }
  active mongoses:
    "3.2.7" : 1
  balancer:
    Currently enabled:  yes
    Currently running:  no
    Failed balancer rounds in last 5 attempts:  0
    Migration Results for the last 24 hours:
        1 : Success
  databases:
    {
      "_id" : "test",  "primary" : "shard0000",  "partitioned" : true }
        test.mycol
            shard key: {
     "_id" : 1 }
            unique: false
            balancing: true
            chunks:
                shard0000    2
                shard0001    1
            {
     "_id" : {
     "$minKey" : 1 } } -->> {
     "_id" : 1 } on : shard0001 Timestamp(2, 0)
            {
     "_id" : 1 } -->> {
     "_id" : 57 } on : shard0000 Timestamp(2, 1)
            {
     "_id" : 57 } -->> {
     "_id" : {
     "$maxKey" : 1 } } on : shard0000 Timestamp(1, 3)
Four . Hashed Sharding
The biggest advantage of choosing hash slice key is to ensure that the data is basically evenly distributed in each node , Use _id Do a simple test as a hash key :
mongo admin --port 27777
mongos> db.runCommand({
     shardcollection: "test.myhash", key: {
     _id:"hashed"}})
{
     "collectionsharded" : "test.myhash", "ok" : 1 }
use test
var num =10000
for (var i=0;i<num;i++){

    db.myhash.save({
    '_id':i})
}
summary : Hash sharding hashes the provided slice keys into a very large long integer as the final slice key .
边栏推荐
- API query interface for free mobile phone number ownership
- 测试下摘要
- PAcP learning note 3: pcap method description
- 靠卖概念上市,认养一头牛能走多远?
- Ogre入门尝鲜
- .Net下极限生产力之efcore分表分库全自动化迁移CodeFirst
- Per capita Swiss number series, Swiss number 4 generation JS reverse analysis
- MongoDB的用户管理总结
- MongoDB优化的几点原则
- HZOJ #240. Graphic printing IV
猜你喜欢

【无标题】

Star Enterprise Purdue technology layoffs: Tencent Sequoia was a shareholder who raised more than 1billion
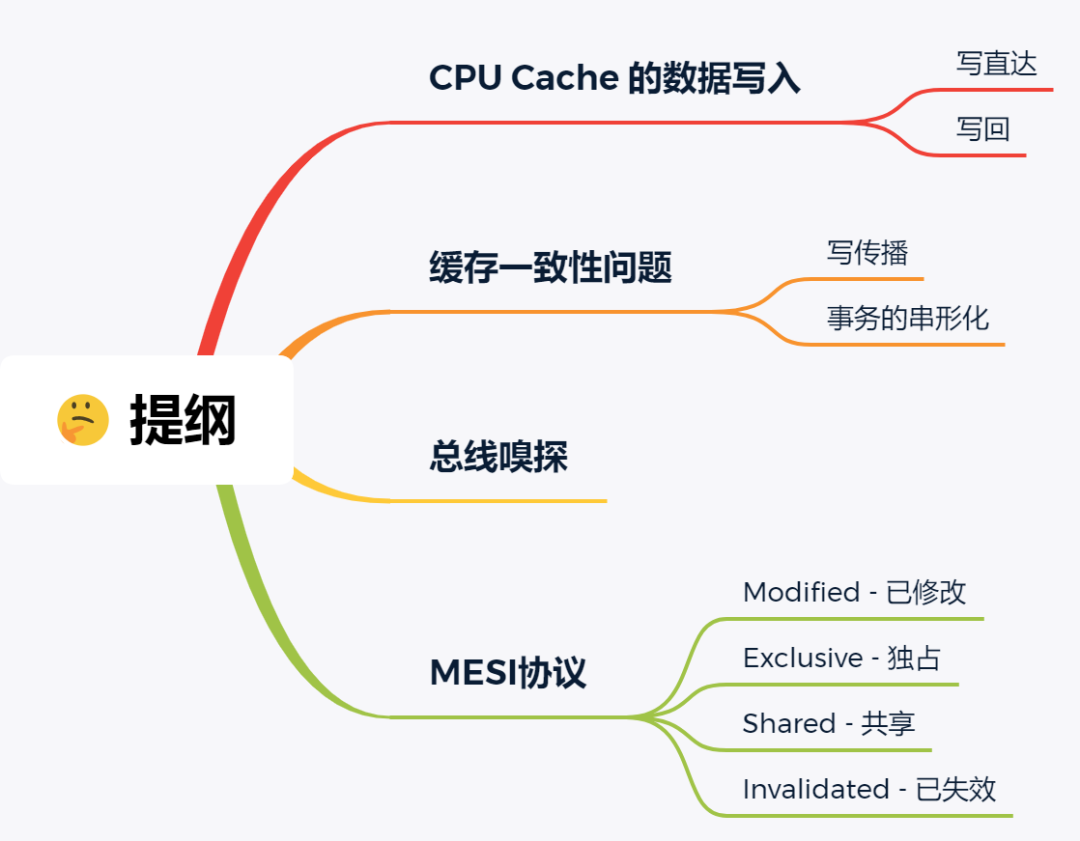
10 张图打开 CPU 缓存一致性的大门
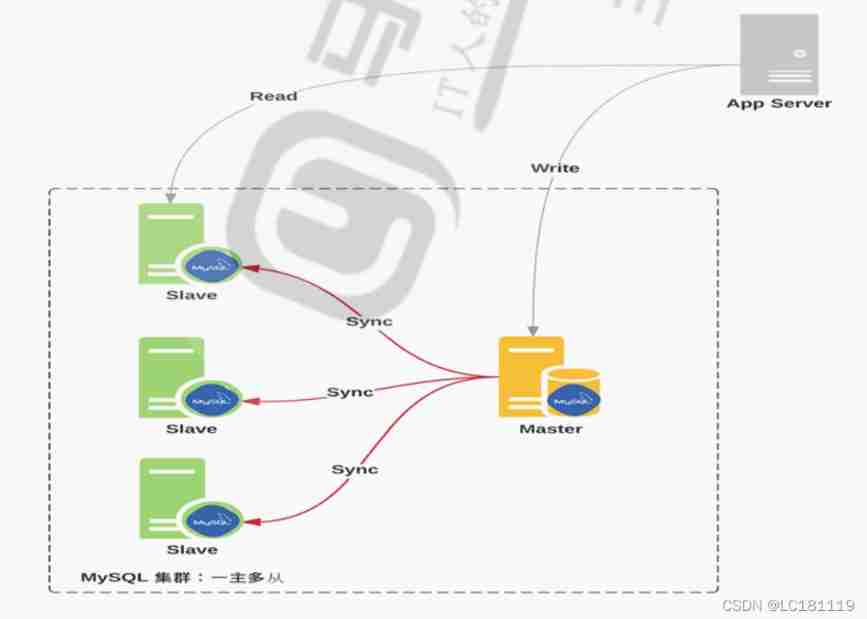
MySQL master-slave replication

关于 appium 启动 app 后闪退的问题 - (已解决)
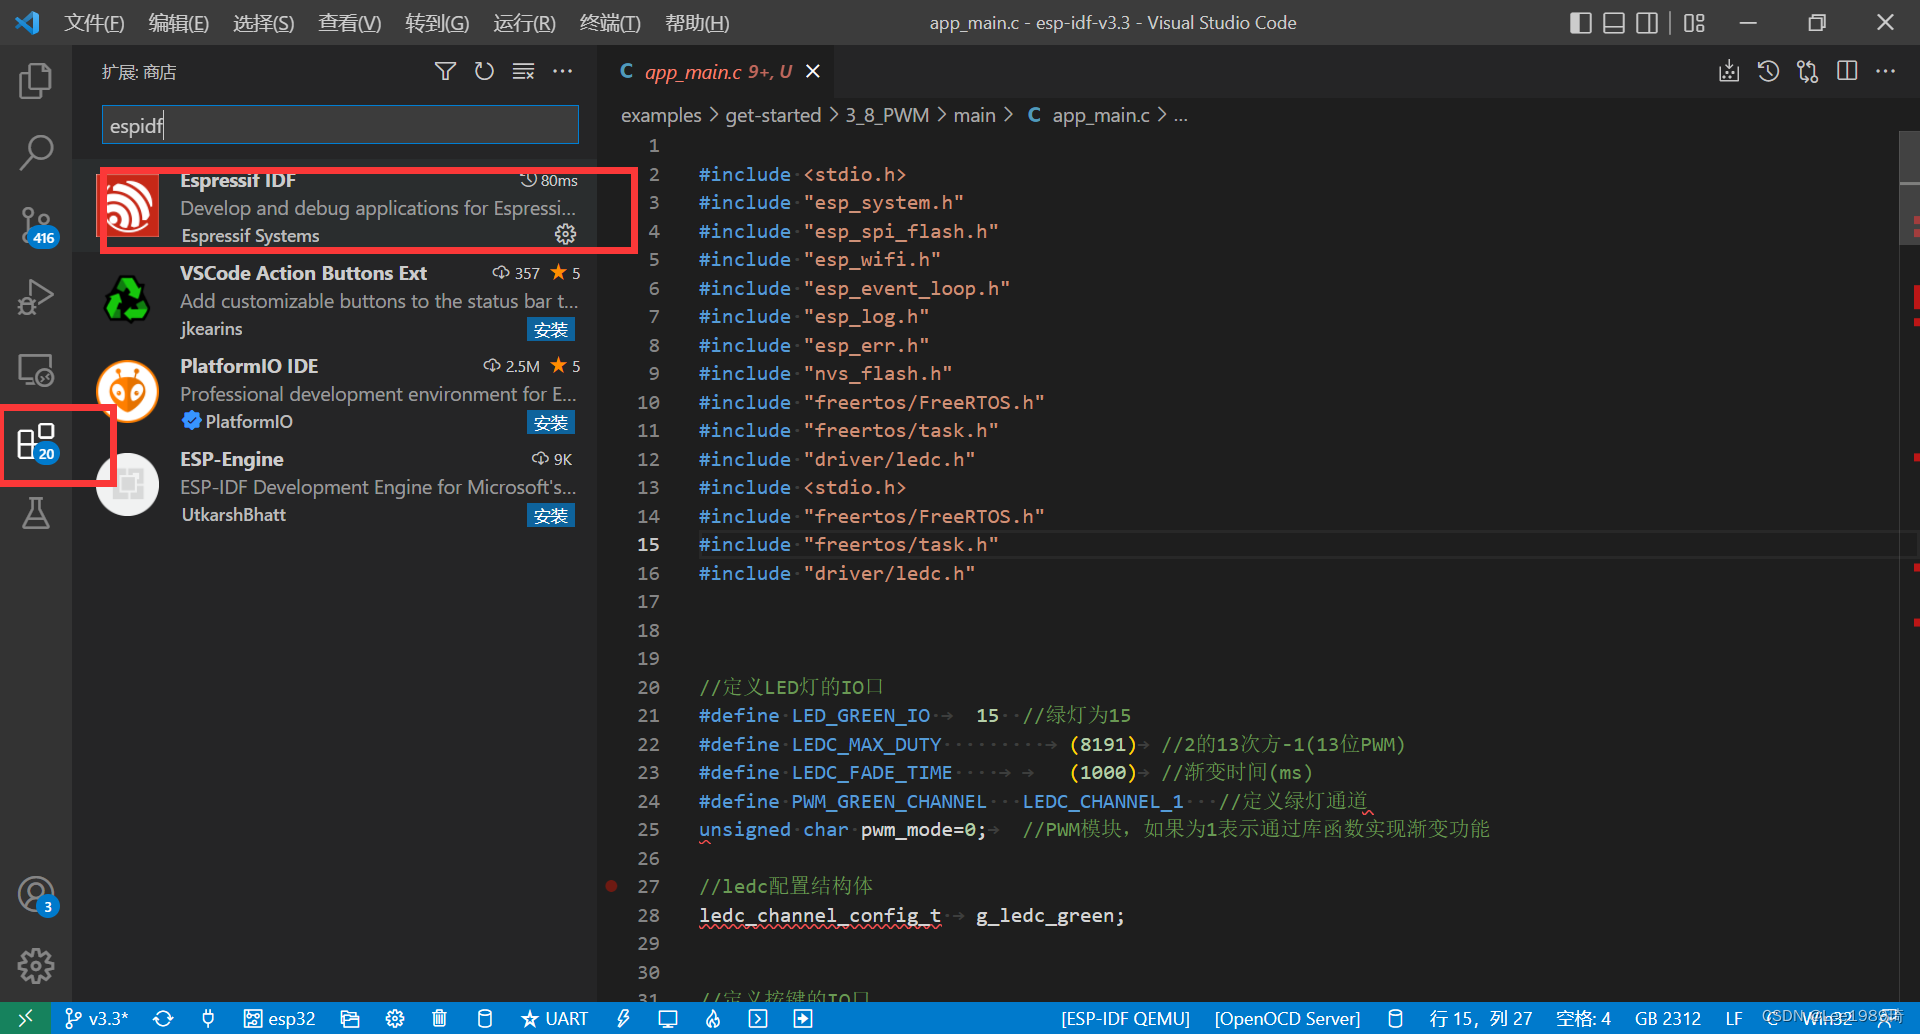
Vscade editor esp32 header file wavy line does not jump completely solved
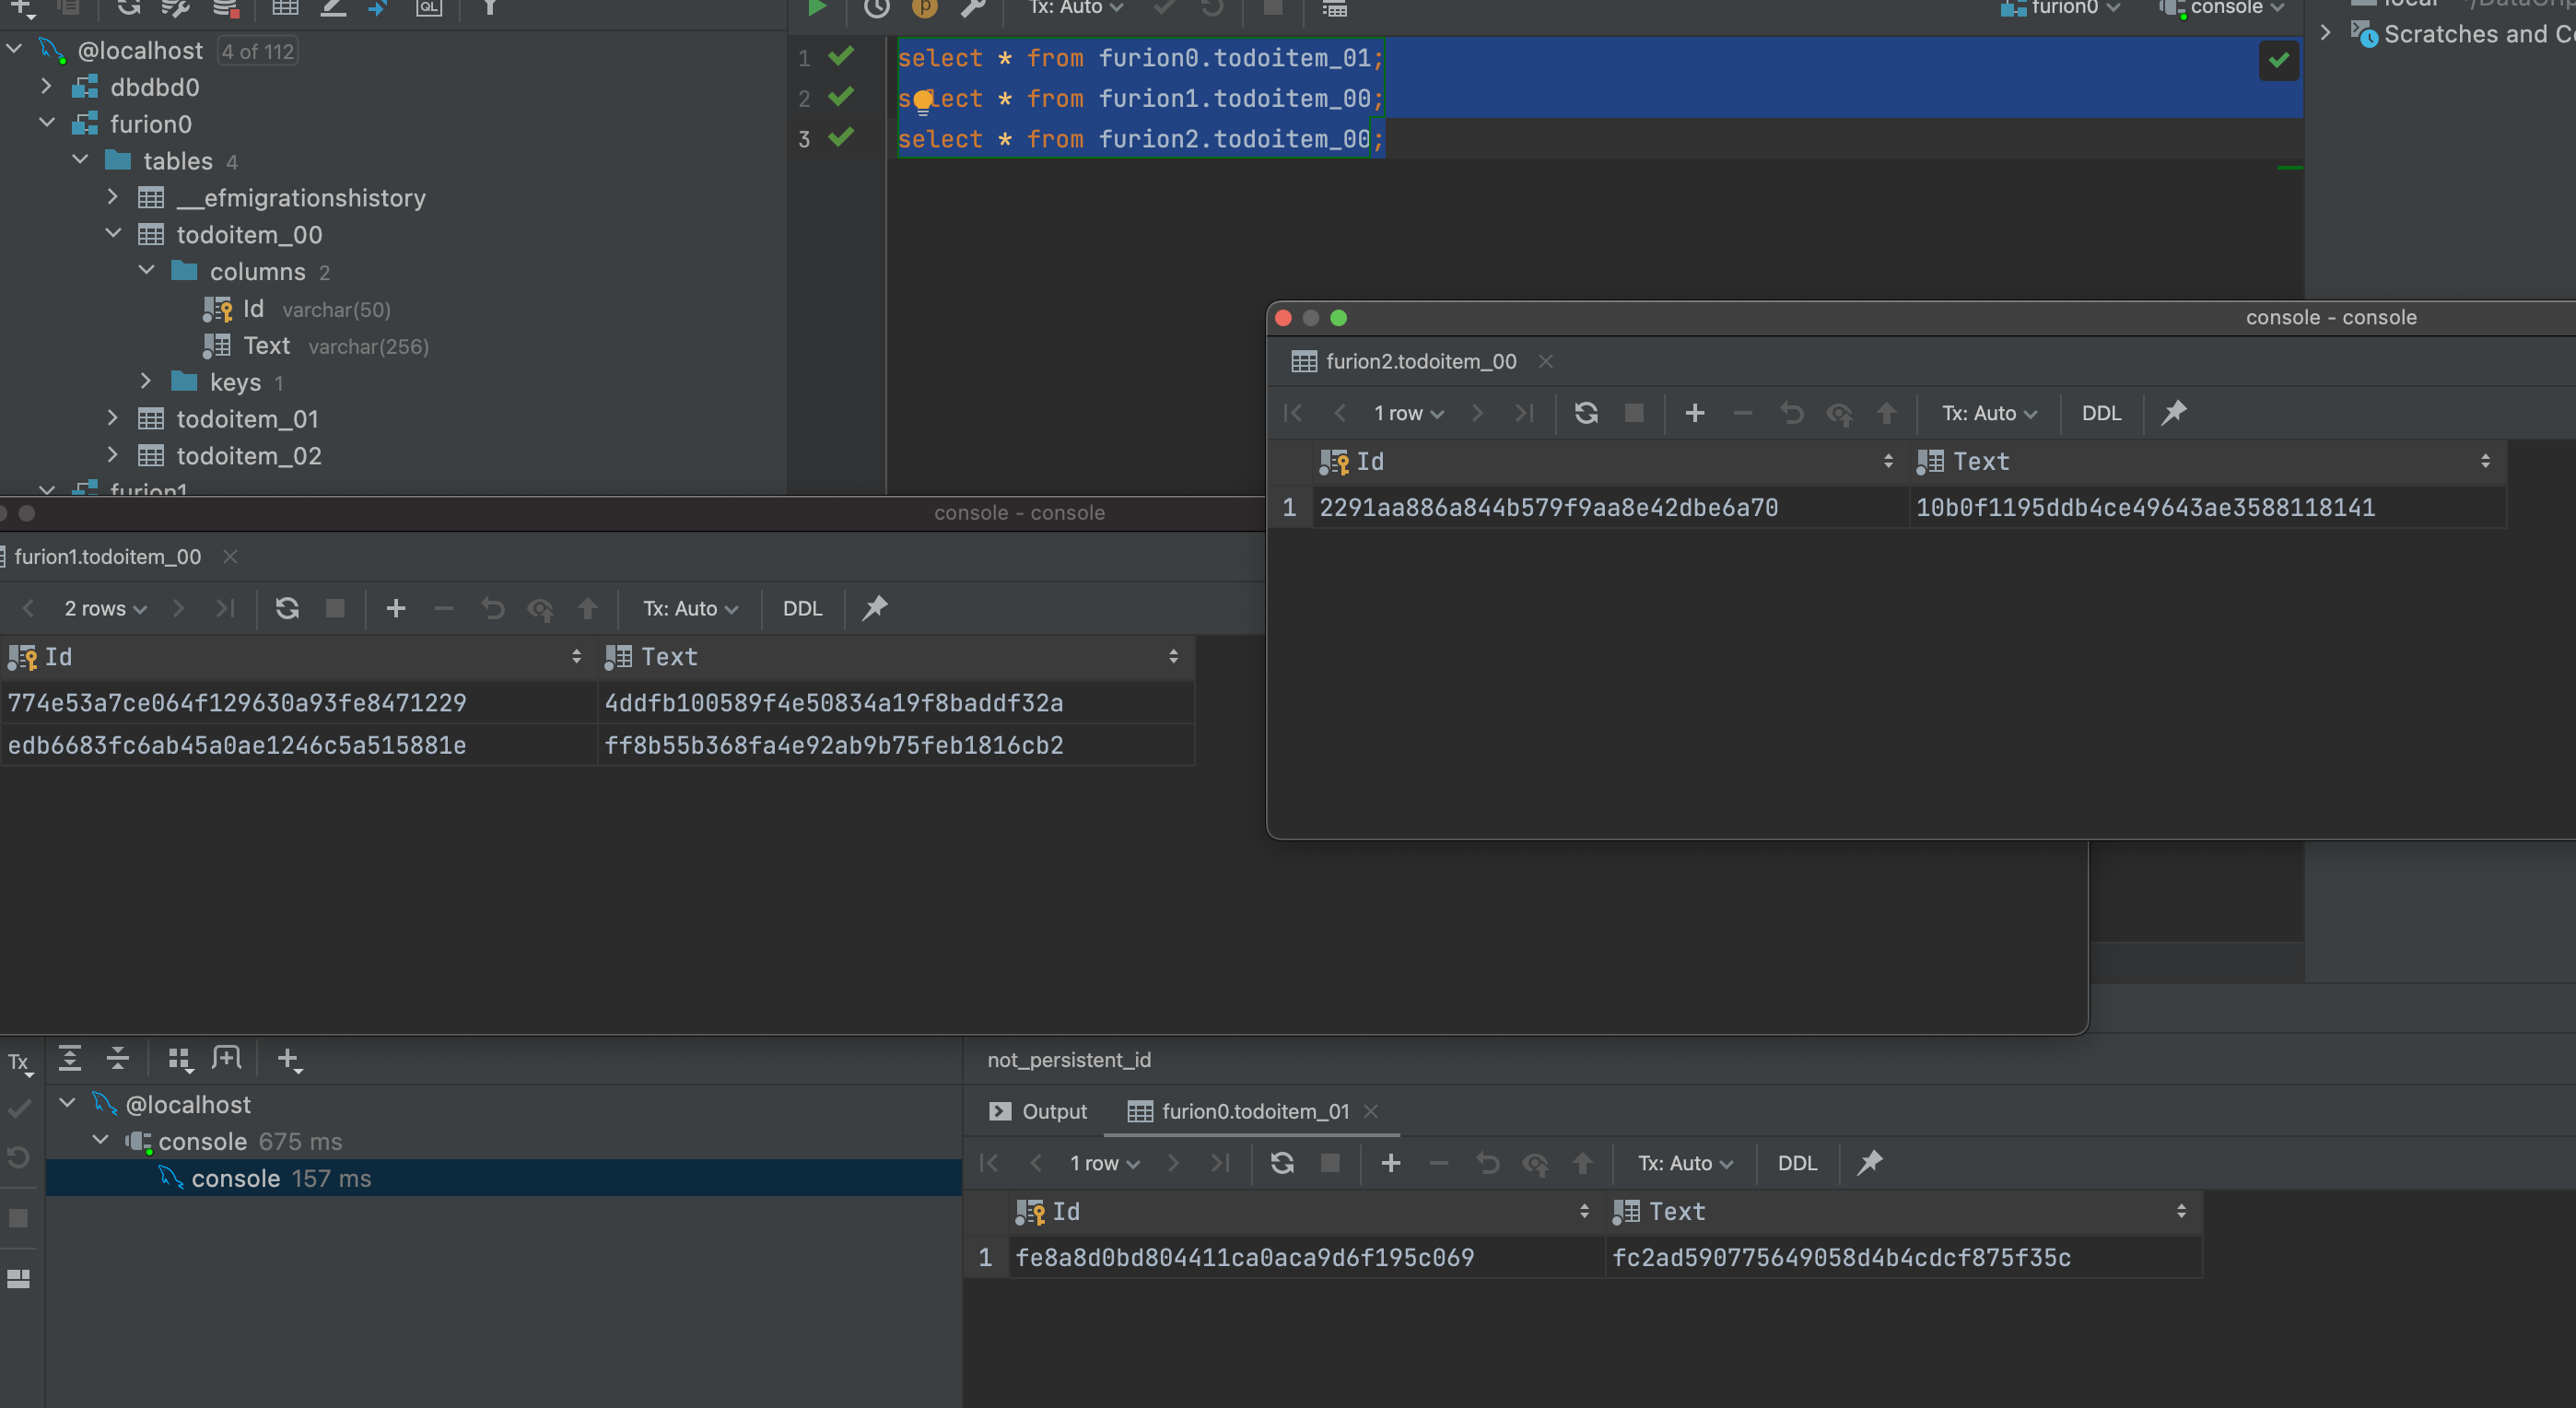
.Net下極限生產力之efcore分錶分庫全自動化遷移CodeFirst
自定义线程池拒绝策略

共创软硬件协同生态:Graphcore IPU与百度飞桨的“联合提交”亮相MLPerf
【无标题】
随机推荐
Pcap learning notes II: pcap4j source code Notes
【学习笔记】zkw 线段树
Blog recommendation | Apache pulsar cross regional replication scheme selection practice
Initialization script
JS缓动动画原理教学(超细节)
Lingyunguang of Dachen and Xiaomi investment is listed: the market value is 15.3 billion, and the machine is implanted into the eyes and brain
Isprs2021/ remote sensing image cloud detection: a geographic information driven method and a new large-scale remote sensing cloud / snow detection data set
Sample chapter of "uncover the secrets of asp.net core 6 framework" [200 pages /5 chapters]
一文读懂数仓中的pg_stat
Test next summary
Enterprise custom form engine solution (XII) -- experience code directory structure
单片机原理期末复习笔记
简单好用的代码规范
国泰君安证券开户怎么开的?开户安全吗?
Pay close attention to the work of safety production and make every effort to ensure the safety of people's lives and property
Differences between MySQL storage engine MyISAM and InnoDB
DHCP 动态主机设置协议 分析
[untitled]
php——laravel缓存cache
一文读懂数仓中的pg_stat