当前位置:网站首页>Embedded system migration [8] - device tree and root file system migration
Embedded system migration [8] - device tree and root file system migration
2022-07-26 23:39:00 【imysy_ 22_】
Linux Device driver porting
Device tree Is a description of hardware Information Data structure of ,Linux When the kernel is running, the hardware information can be passed directly to through the device tree Linux kernel , And no longer need to be in Linux The kernel contains a lot of redundant coding
Device tree syntax overview
dts Device tree source file
dtsi Similar to header file , Contains some public information , Can be referenced by other device tree files
dtb Compiled device tree file
The syntax of the device tree is tree structure , It consists of a series of nodes and attributes , The root node contains child nodes
Child nodes can also be included under child nodes , The node contains the attributes of the corresponding device
Linux Kernel driver migration
1. stay make menuconfig Select the driver to be installed in the interface
2. Add... To the device tree / Modify the corresponding equipment information
3. Recompile the kernel / Device tree
Experiment 8 Network card driver transplantation
【 The experiment purpose 】
master Linux Basic methods of kernel configuration , Complete the network card drive 、NFS And other related functions
【 Experimental environment 】
1、 ubuntu 14.04 Distribution version
2、 FS4412 The experiment platform
3、 Cross compiler tool :arm-none-linux-gnueabi-
【 matters needing attention 】
1、 In the experimental steps “$” The first command means ubuntu Execution in environment , With “#” The first command means to execute under the development board
【 The experimental steps 】
1、 Execute the following commands under the top directory of the kernel source code , Modify kernel configuration
$ make menuconfig
Optional for the kernel DM9000 Network card driver , And then choose “Save” preservation
Device Drivers ---> [*] Network device support ---> [*] Ethernet driver support ---> <*> DM9000 support |
Because the kernel uses NFS Mount the root file system , and NFS Is based on TCP Protocol implemented , So here we need Optional TCP Related network protocols ( Some functions have been selected by default ), And then choose “Save” preservation
[*] Networking support ---> Networking options ---> <*> Packet socket <*> Unix domain sockets [*] TCP/IP networking [*] IP: kernel level autoconfiguration |
Because the kernel uses NFS Mount the root file system , So you need to choose the kernel NFS Client and related functions
[*] Root file system on NFS |
NFS client support for the NFSv3 ACL protocol extension |
[*] |
NFS client support for NFS version 3 (NEW) |
<*> |
File systems ---> [*] Network File Systems ---> <*> NFS client support |
After setting, use the direction key to select ‘Save’ Save it , And then choose ‘Exit’ Exit the configuration interface
2、 Add the hardware information of the network card to the device tree
$ vi arch/arm/boot/dts/exynos4412-fs4412.dts
At the end of the file , Before the last curly bracket Add the following ( That is, it should be written in the root node )
[email protected] { compatible = "simple-bus"; #address-cells = <1>; #size-cells = <1>; reg = <0x5000000 0x1000000>; ranges; compatible = "davicom,dm9000"; reg = <0x5000000 0x2 0x5000004 0x2>; interrupt-parent = <&gpx0>; interrupts = <6 4>; davicom,no-eeprom; mac-address = [00 0a 2d a6 55 a2]; }; }; |
3、 Modify clock related configuration ( Ignore useless clocks )
$ vi drivers/clk/clk.c
take
static bool clk_ignore_unused;
Change to the following , Then save to exit
static bool clk_ignore_unused=true; 4、 modify EMMC Related configuration
$ vi drivers/mmc/core/mmc.c
take
if (card->ext_csd.rev > 7) { pr_err("%s: unrecognised EXT_CSD revision %d\n", mmc_hostname(card->host), card->ext_csd.rev); err = -EINVAL; goto out; } |
Change to the following , Then save to exit
#if 0 if (card->ext_csd.rev > 7) { #else if (card->ext_csd.rev > 8) { #endif pr_err("%s: unrecognised EXT_CSD revision %d\n", mmc_hostname(card->host), card->ext_csd.rev); err = -EINVAL; goto out; } |
5、 Compile kernel and device tree
$ make uImage $ make dtbs |
6、 Test the kernel and device tree
Copy the compiled kernel and device tree to tftp Working directory of
$ sudo | cp arch/arm/boot/uImage /tftpboot | |
$ sudo | cp arch/arm/boot/dts/exynos4412-fs4412.dtb | /tftpboot/ |
$ sudo | chmod 777 /tftpboot/* |
heavy Qi tftp and nfs The server
$ sudo service tftpd-hpa restart $ sudo service nfs-kernel-server restart |
Restart the development board to check the phenomenon , As shown in the figure , here Linux The kernel has passed NFS Mount the root file system and execute it under the terminal ‘ls’ Command, we can see the contents of the root file system

The root file system
The root file system is the first file system mounted after the kernel starts. The boot program will load some basic initialization scripts and services into memory to run after the root file system is mounted .
Root file system content
Root file system migration
BusyBox
BusyBox Integrate many common tools into a small executable , Provide most commonly used commands for ordinary users ,BusyBox The implemented commands are simplified , Many extensions do not support ( Some extensions with bars after commands are not supported ).BusyBox go by the name of Linux The Swiss Army knife in the tool .
https://busybox.net/downloads/
Experiment 9 Root file system migration
【 The experiment purpose 】
Familiar with the directory structure of the root file system , Build your own root file system
【 Experimental environment 】
1、 ubuntu 14.04 Distribution version
2、 FS4412 The experiment platform
3、 Cross compiler tool :arm-none-linux-gnueabi-
【 matters needing attention 】
1、 In the experimental steps “$” The first command means ubuntu Execution in environment
【 The experimental steps 】
One 、 Build your own root file system
1、 stay busybox Download from the official website busybox Source code ( Here we download busybox-1.22.1.tar.bz2)
2、 Copy busybox Source package to ubuntu Home directory , Unzip and enter its top-level directory
$ tar xvf busybox-1.22.1.tar.bz2 $ cd busybox-1.22.1/ |
3、 Get into busybox Configuration interface ( And Linux The kernel configuration method is the same )
$ make menuconfig
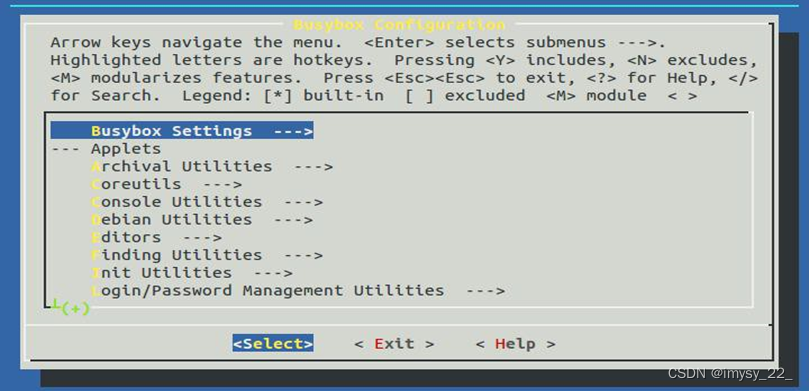
4、 Refer to the following information to configure busybox
Busybox Settings ---> Build Options ---> [*] Build BusyBox as a static binary (no shared libs) [ ] Build with Large File Support (for accessing files > 2 GB) (arm-none-linux-gnueabi-) Cross Compiler prefix |
After the configuration is completed, select through the direction key ‘Exit’ sign out , And save the configuration information
5、 compile busybox
$ make
After compilation, it will be generated in the top-level directory of the source code busybox file

6、 install busybox
$ make install
After installation, it will be generated in the top-level directory of the source code _install Catalog
7、 Enter the installation directory to view the generated files
$ cd _install/ $ ls |
As shown in the figure below , Generate the required in the root file system under the installation directory shell Command file

8、 Copy the library files in the cross compilation tool chain to _install Under the table of contents
$ cp /home/linux/Linux_4412/toolchain/gcc-4.6.4/arm-arm1176jzfssf-linux-gnueabi/lib/ . -a
As shown in the figure below , In the installation directory, you have the library files required in the root file system

9、 Delete the static library in the library file
|
$ sudo rm lib/*.a
10、 Delete the symbol table in the shared library ( Need to be in root User down operation )
11、 Put the data in the database “ Migrate related files ” Under the etc Catalog ( The configuration file ) Copy to current directory

12、 to etc/init.d/ Under the rcS Script add executable rights
$ chmod +x etc/init.d/rcS
13、 Create other directories
$ mkdir dev mnt proc root sys tmp var
As shown in the figure below , So far, we have built our own root file system

14、 Delete the original root file system
$ sudo rm -rf /opt/4412/rootfs/*
15、 Copy your own root file system to NFS Test under the working directory of
$ sudo cp -rf ./* /opt/4412/rootfs
边栏推荐
- [interview: concurrent Article 27: multithreading: hesitation mode]
- What is Base64?
- [Luogu] p2341 popular cattle
- An online accident, I suddenly realized the essence of asynchrony
- Custom type
- Part II - C language improvement_ 10. Function pointer and callback function
- 【2016】【论文笔记】差频可调谐THz技术——
- Security team: Recently, there is an rce vulnerability in the COREMAIL email client of windows, which may lead to the disclosure of the private key of the wallet
- Three person management of system design
- 带你熟悉云网络的“电话簿”:DNS
猜你喜欢

Vit:vision transformer super detailed with code

Sign up now | frontier technology exploration: how to make spark stronger and more flexible

Lesson 2 of Silicon Valley classroom - building project environment and developing lecturer management interface

18. Opening and saving file dialog box usage notes

Machine learning notes - building recommendation system (3) six research directions of deep recommendation system

Part II - C language improvement_ 6. Multidimensional array

Thousands of tiles' tilt model browsing speeds up, saying goodbye to the embarrassment of jumping out one by one

会议OA之我的会议

Part II - C language improvement_ 13. Recursive function

华测RTK采集的GPX数据如何带属性转出kml、shp进行后续的管理和分析
随机推荐
第二部分—C语言提高篇_11. 预处理
Esmfold: a new breakthrough in protein structure prediction after alphafold2
力扣155题,最小栈
Part II - C language improvement_ 11. Pretreatment
How to use data pipeline to realize test modernization
Professor Ashe, a Chinese scientist, made a positive response to the suspected fake Nature paper
How can enterprises mitigate the security risks of Internet of things and industrial Internet of things
力扣152题:乘积最大子数组
Related functions of strings
第二部分—C语言提高篇_5. 位运算
科研太忙无法顾家?陈婷:人生不能只有一个支点
第二部分—C语言提高篇_8. 文件操作
嵌入式系统移植【8】——设备树和根文件系统移植
Basic select statement
Cheaper than seals, with a large space for shape explosion. Is there really no match for 200000 or so? Chang'an's new "King fried" is cost-effective
2. Realize the map of navigation bar and battle page
Dynamic memory management and related topics
In simple terms, cchart daily lesson - happy high school lesson 57 new starting point, the old tree and new bud of colorful interface library
SQL Basics
Typescript stage learning