当前位置:网站首页>三.芯片启动和时钟系统
三.芯片启动和时钟系统
2022-07-02 07:33:00 【车水码浓】
芯片启动和时钟系统
1.芯片启动
首先stm32会根据启动方式(参考手册2.4节)从启动位置加载启动代码到内存中,之后开始执行启动代码,一般启动代码使用官方提供的即可 ---------- xxx.s
启动代码的工作:
初始化堆栈空间,定义异常向量表 调用SystemInit ----------- 系统初始化 初始化时钟,调整异常向量表 执行main ---------- 主函数
芯片要开始工作,必须初始化时钟和内存,stm32的内存使用片内SRAM,可以直接使用,时钟需要初始化,ARM芯片需要定义异常向量表,执行C语言代码必须初始化堆栈。
stm32f407推荐的主时钟频率 168MHz
2.产生原始频率的硬件
(1)晶振
(2)RC(LC)振荡电路
原始频率不会很高,使用前必须升频,升频使用PLL(升频)电路
CPU时钟系统的大体结构

3.stm32f407的原始时钟
HSI RC -------------- 高速内部振荡时钟 16M HSE OSC ------------- 高速外部晶振 4~26M(8M) //以上两个时钟源可以直接作为系统主时钟,也可以通过PLL升频后作为主时钟 LSI RC --------------- 低速内部振荡时钟 32K ----- 看门狗 LSE OSC -------------- 低速外部晶振 32.768K ----- RTC
stm32f407的时钟树
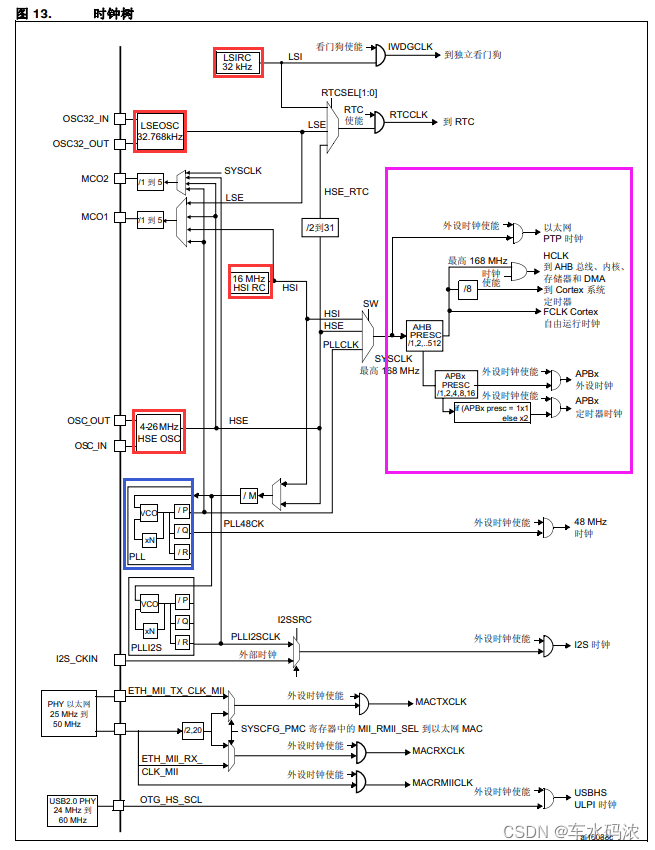
PLL的输出时钟 = PLL输入时钟 X PLLN / PLLM / PLLP
168M = 8M X 336 / 8 / 2
4.将keil5的工程的系统时钟配置为168MHz
(1)修改system_stm32f4xx.c的254行
#define PLL_M 8
(2)修改stm32f4xx.h的127行
//该文件是只读属性文件,要去文件系统中找到该文件,去掉只读属性 #define HSE_VALUE ((uint32_t)8000000) /*!< Value of the External oscillator in Hz */
练习:
将系统主频配置为168M
修改PLL,调节系统主频
#define PLL_N 336//168M #define PLL_N 432//216M 超频 #define PLL_N 168//84M 降频
系统总线时钟频率:
SYSCLK时钟 ------------ 168MHz HCLK/AHB总线 ---------- 168MHz APB1时钟 -------------- 42MHz APB2时钟 -------------- 84MHz
__________________________________________________________________________________________________________________________________________________________
按键驱动
1.看原理图


从原理图可知:
按键松开 -------- 引脚高电平
按键按下 -------- 引脚低电平
按键对应的引脚:
S1 ----- PA0
S2 ----- PE2
S3 ----- PE3
S4 ----- PE4
如何读取输入引脚的电平
(1)读取输入数据寄存器(IDR)对应位的值 1 ----- 输入高电平 0 ----- 输入低电平
(2)位段操作 PAin(0)==0 ----- 输入低电平 PAin(0)==1 ----- 输入高电平
(3)库函数 uint8_t GPIO_ReadInputDataBit(GPIO_TypeDef* GPIOx, uint16_t GPIO_Pin); //传入哪一组哪个脚,返回该引脚的电平
——————————————————————————————————————————————————————————————————————————————————————
练习:
完成其他三个按键的检测程序,分别使用 寄存器 位段 库函数判断
实现一下功能:
按下S2,D2亮 按下S3,D3亮 按下S4,D4亮
//key.c
#include <stm32f4xx.h>
#include <key.h>
void key_init(void)
{
    GPIO_InitTypeDef GPIO_InitStruct;

    //1.开启GPIOA的时钟
    RCC_AHB1PeriphClockCmd(RCC_AHB1Periph_GPIOA|RCC_AHB1Periph_GPIOE,ENABLE);

    //2.GPIO初始化 PA0
    GPIO_InitStruct.GPIO_Mode = GPIO_Mode_IN;//输入模式
    GPIO_InitStruct.GPIO_PuPd = GPIO_PuPd_NOPULL;//无上下拉
    GPIO_InitStruct.GPIO_Pin = GPIO_Pin_0;//PA0
    GPIO_Init(GPIOA,&GPIO_InitStruct);

    GPIO_InitStruct.GPIO_Pin = GPIO_Pin_2|GPIO_Pin_3|GPIO_Pin_4;//PE2 PE3 PE4
    GPIO_Init(GPIOE,&GPIO_InitStruct);
//main.c
#include <stm32f4xx.h>
#include <led.h>
#include <sys.h>
#include <key.h>

int main()
{
	int key_flag = 0;

	//初始化
	led_init();
	key_init();

	while(1){
		if(S1==0){
			//延时消抖10ms
			delay(100);
			if(S1==0){
				//真实按键事件
				if(key_flag==0){//按下没有松开
					D1 = ~D1;//取反
					key_flag = 1;
				}
			}
		}
		else{
			//延时消抖10ms
			delay(100);
			if(S1){
				key_flag = 0;
			}
		}
	}

}
//lcd.c
include <stm32f4xx.h>
#include <led.h>

void delay(unsigned int ms)
{
	int i,j;

	for(i=0;i<ms;i++)
		for(j=0;j<5000;j++);
}

void led_init(void)
{
	GPIO_InitTypeDef GPIO_InitStruct;

	//1.开启GPIOE GPIOF的时钟
	RCC_AHB1PeriphClockCmd(RCC_AHB1Periph_GPIOE|RCC_AHB1Periph_GPIOF,ENABLE);

	//2.GPIO初始化 PF9 PF10 PE13 PE14
	GPIO_InitStruct.GPIO_Mode = GPIO_Mode_OUT;//输出模式
	GPIO_InitStruct.GPIO_OType = GPIO_OType_PP;//推挽输出
	GPIO_InitStruct.GPIO_Speed = GPIO_Speed_50MHz;//高速
	GPIO_InitStruct.GPIO_PuPd = GPIO_PuPd_NOPULL;//无上下拉
	GPIO_InitStruct.GPIO_Pin = GPIO_Pin_9|GPIO_Pin_10;//PF9 PF10
	GPIO_Init(GPIOF,&GPIO_InitStruct);

	GPIO_InitStruct.GPIO_Pin = GPIO_Pin_13|GPIO_Pin_14;//PE13 PE14
	GPIO_Init(GPIOE,&GPIO_InitStruct);

	//3.LED默认关闭
	GPIO_SetBits(GPIOF,GPIO_Pin_9|GPIO_Pin_10);
	GPIO_SetBits(GPIOE,GPIO_Pin_13|GPIO_Pin_14);
}
//lcd.h
#ifndef _LED_H_
#define _LED_H_

#define D1 PFout(9)
#define D2 PFout(10)
#define D3 PEout(13)
#define D4 PEout(14)

void delay(unsigned int ms);
void led_init(void);

#endif
//key.h
#ifndef _KEY_H_
#define _KEY_H_

#define S1 PAin(0)
#define S2 PEin(2)
#define S3 PEin(3)
#define S4 PEin(4)

void key_init(void);

#endif
//sys.h 该文件由系统定义
#ifndef __SYS_H_
#define __SYS_H_
#include "stm32f4xx.h"

//IO口操作宏定义
#define BITBAND(addr, bitnum) ((addr & 0xF0000000)+0x2000000+((addr &0xFFFFF)<<5)+(bitnum<<2))
#define MEM_ADDR(addr)  *((volatile unsigned long  *)(addr))
#define BIT_ADDR(addr, bitnum)   MEM_ADDR(BITBAND(addr, bitnum))
//IO口地址映射
#define GPIOA_ODR_Addr    (GPIOA_BASE+20) //0x40020014
#define GPIOB_ODR_Addr    (GPIOB_BASE+20) //0x40020414
#define GPIOC_ODR_Addr    (GPIOC_BASE+20) //0x40020814
#define GPIOD_ODR_Addr    (GPIOD_BASE+20) //0x40020C14
#define GPIOE_ODR_Addr    (GPIOE_BASE+20) //0x40021014
#define GPIOF_ODR_Addr    (GPIOF_BASE+20) //0x40021414    20 = 0x14
#define GPIOG_ODR_Addr    (GPIOG_BASE+20) //0x40021814
#define GPIOH_ODR_Addr    (GPIOH_BASE+20) //0x40021C14
#define GPIOI_ODR_Addr    (GPIOI_BASE+20) //0x40022014

#define GPIOA_IDR_Addr    (GPIOA_BASE+16) //0x40020010    16 = 0x10
#define GPIOB_IDR_Addr    (GPIOB_BASE+16) //0x40020410
#define GPIOC_IDR_Addr    (GPIOC_BASE+16) //0x40020810
#define GPIOD_IDR_Addr    (GPIOD_BASE+16) //0x40020C10
#define GPIOE_IDR_Addr    (GPIOE_BASE+16) //0x40021010
#define GPIOF_IDR_Addr    (GPIOF_BASE+16) //0x40021410
#define GPIOG_IDR_Addr    (GPIOG_BASE+16) //0x40021810
#define GPIOH_IDR_Addr    (GPIOH_BASE+16) //0x40021C10
#define GPIOI_IDR_Addr    (GPIOI_BASE+16) //0x40022010

//IO口操作,只对单一的IO口!
//确保n的值小于16!
#define PAout(n)   BIT_ADDR(GPIOA_ODR_Addr,n)  //输出
#define PAin(n)    BIT_ADDR(GPIOA_IDR_Addr,n)  //输入

#define PBout(n)   BIT_ADDR(GPIOB_ODR_Addr,n)  //输出
#define PBin(n)    BIT_ADDR(GPIOB_IDR_Addr,n)  //输入

#define PCout(n)   BIT_ADDR(GPIOC_ODR_Addr,n)  //输出
#define PCin(n)    BIT_ADDR(GPIOC_IDR_Addr,n)  //输入

#define PDout(n)   BIT_ADDR(GPIOD_ODR_Addr,n)  //输出
#define PDin(n)    BIT_ADDR(GPIOD_IDR_Addr,n)  //输入

#define PEout(n)   BIT_ADDR(GPIOE_ODR_Addr,n)  //输出
#define PEin(n)    BIT_ADDR(GPIOE_IDR_Addr,n)  //输入

#define PFout(n)   BIT_ADDR(GPIOF_ODR_Addr,n)  //输出
#define PFin(n)    BIT_ADDR(GPIOF_IDR_Addr,n)  //输入

#define PGout(n)   BIT_ADDR(GPIOG_ODR_Addr,n)  //输出
#define PGin(n)    BIT_ADDR(GPIOG_IDR_Addr,n)  //输入

#define PHout(n)   BIT_ADDR(GPIOH_ODR_Addr,n)  //输出
#define PHin(n)    BIT_ADDR(GPIOH_IDR_Addr,n)  //输入

#define PIout(n)   BIT_ADDR(GPIOI_ODR_Addr,n)  //输出
#define PIin(n)    BIT_ADDR(GPIOI_IDR_Addr,n)  //输入


#endif
3.按键消抖————延时消抖

以上按键程序不管是否有按键事件发生,都会占用CPU来进行判断,这种方式叫做轮询,效率比较低,CPU提供了效率更高的方式 --------- 中断。
边栏推荐
- In the face of uncertainty, the role of supply chain
- Set the playback speed during the playback of UOB equipment
- 使用华为性能管理服务,按需配置采样率
- 二叉树专题--AcWing 3540. 二叉搜索树建树(实用板子 构建二叉搜索树 并输出前、中、后序遍历)
- P1055 [noip2008 popularization group] ISBN number
- C#中索引器
- 《实习报告》Skywalking分布式链路追踪?
- Use Huawei performance management service to configure the sampling rate on demand
- 2. Hacking lab script off [detailed writeup]
- 二叉树专题--【深基16.例7】普通二叉树(简化版)(multiset 求前驱 后继 哨兵法)
猜你喜欢
Special topic of binary tree -- acwing 47 Path with a certain value in binary tree (preorder traversal)

Uncover the secrets of Huawei application market application statistics

Disassembling Meitu SaaS: driving the plane to change the engine

Nodejs+express+mysql simple blog building

使用华为性能管理服务,按需配置采样率
JSP webshell免杀——JSP的基础
Use Huawei performance management service to configure the sampling rate on demand

Analysis of hot spots in AI technology industry

Mysql database remote access permission settings
The most detailed MySQL installation tutorial
随机推荐
How to implement tabbar title bar with list component
From Read and save in bag file Jpg pictures and PCD point cloud
HDU1236 排名(结构体排序)
Luogu p5536 [xr-3] core city (greed + tree DP looking for the center of the tree)
(5) Gear control setting of APA scene construction
Use of vscode tool
正则及常用公式
华为游戏初始化init失败,返回错误码907135000
【AppLinking实战案例】通过AppLinking分享应用内图片
Primary key policy problem
nodejs+express+mysql简单博客搭建
如何使用IDE自动签名调试鸿蒙应用
力扣(LeetCode)182. 查找重复的电子邮箱(2022.07.01)
Flick two open, realized a batch lookup join (with source code)
P1055 [NOIP2008 普及组] ISBN 号码
华为AppLinking中统一链接的创建和使用
Special topic of binary tree -- acwing 3384 Binary tree traversal (known preorder traversal, while building a tree, while outputting middle order traversal)
Special topic of binary tree -- acwing 19 The next node of the binary tree (find the successor of the node in the tree)
Mysql database remote access permission settings
Creation and use of unified links in Huawei applinking