当前位置:网站首页>八大排序(一)
八大排序(一)
2022-06-30 09:32:00 【萱萱不会秃头】
八大排序
- 冒泡排序
- 选择排序
- 插入排序
- 希尔排序
- 归并排序
- 快速排序
- 基数排序
- 堆排序
一、冒泡排序
代码如下(示例):
public static void main(String[] args) {

		int[] arr  = new int[] {
    2,3,69,4,5,6};
		for(int i=0;i<arr.length;i++) {

			for(int j=0;j<arr.length-1;j++) {

				if(arr[j]>arr[j+1]) {

					int temp=arr[j];
					arr[j]=arr[j+1];
					arr[j+1]=temp;
				}
			}
		}
		System.out.println("冒泡排序法的输出结果为:");
		for(int i=0;i<arr.length;i++) {

			System.out.print(arr[i]+",");
		}
	}
输出的结果:
二、选择排序
代码如下(示例):
	public static void main(String[] args) {

		int[] arr=new int[] {
    8,9,5,52,1,3,6};

		sort(arr);
		System.out.println(Arrays.toString(arr));
	}
	public static void sort(int[] arr) {

		for (int i=0;i<arr.length-1;i++) {

			int minIndex=i;
			int min=arr[i];
			for(int j=i+1;j<arr.length;j++) {

				if(min>arr[j]) {


					min=arr[j];
					minIndex=j;
				}
			}
			arr[minIndex]=arr[i];
			arr[i]=min;
		}
	}
输出结果:

三、插入排序
认定一个排好序的数组,后面的数据一次插入到其对应的位置当中去。
代码如下(示例):
public static void main(String[] args) {


	int[] arr=new int[] {
    3,9,6,4,5,7};

	sort(arr);
	System.out.println("插入排序的输出结果是:");
	System.out.println(Arrays.toString(arr));
}


public static void sort(int[] arr) {

	for(int i=1;i<arr.length;i++) {

		for(int j=i-1;j>=0;j--) {

			if(arr[j]>arr[j+1]) {

				int temp=arr[j];
				arr[j]=arr[j+1];
				arr[j+1]=temp;
			}
			else {

				break;
			}
		}
	}
}
代码输出结果图为:
例:
一个数组为[2,3,4,5,6,1]
[2,3,4,5,6,1]—>[2,3,4,5,1,6]—>[2,3,4,1,5,6]—>[2,3,1,4,5,6]—>[2,1,3,4,5,6]–>[1,2,3,4,5,6]
由此可以知道插入的数据越小,后移的次数就越多,效率也就明显越低
四、希尔排序
希尔排序的步骤:
希尔排序类似于插入排序,是一种缩小增量的排序。
①首先设置整个数组的步长,设置步长为数组的一半;
②继续将步长设置为原步长的一半;
③当步长为一时,结束。
例如:
一个数组为:
- 第一轮
将数组按照数组长度(8)的一半(4)设为步长,并分好组
此时颜色对应的数据进行比较
5和4比较:5>4 5和4互换位置
9和6比较: 9>6 9和6互换位置
7和8比较: 7<8 7和8位置不变
3和0比较: 3>0 3和0位置互换
经过一轮的比较此时的数组为: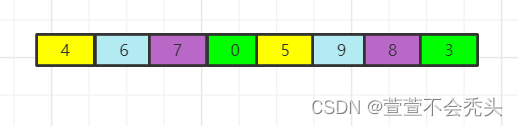
第一轮的代码:
//第一轮
		for(int i=4;i<arr.length;i++) {

			for(int j=i-4;j>=0;j-=4) {

				if(arr[j]>arr[j+4]) {

					int temp=arr[j];
					arr[j]=arr[j+4];
					arr[j+4]=temp;
				}
			}
		}
- 第二轮
和第一轮一样 此时的步长为数组长度一半的一半(2)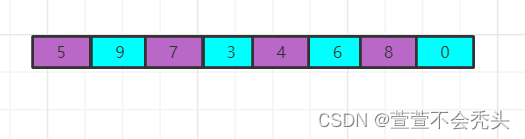
经过此次排序结果为:
第二轮的代码:
for(int i=2;i<arr.length;i++) {

			for(int j=i-2;j>=0;j-=4) {

				if(arr[j]>arr[j+2]) {

					int temp=arr[j];
					arr[j]=arr[j+2];
					arr[j+2]=temp;
				}
			}
		}
- 第三轮
第三轮 步长为1
通过比较变换之后得到:
第三轮的代码如下:
for(int i=1;i<arr.length;i++) {

			for(int j=i-1;j>=0;j--) {

				if(arr[j]>arr[j+1]) {

					int temp=arr[j];
					arr[j]=arr[j+1];
					arr[j+1]=temp;
				}
				else {

					break;
				}
			}
		}
综上可以得到一个综合的代码:
	public static void main(String[] args) {


		int[] arr=new int[] {
    5,9,7,3,4,6,8,0};
		ShellSort(arr);
		//sort(arr);

		System.out.println("希尔排序的输出结果:");
		System.out.println(Arrays.toString(arr));
	}

	public static void ShellSort(int[] arr) {

		for(int gap=arr.length;gap>0;gap/=2) {

			for(int i=gap;i<arr.length;i++) {

				for(int j=i-gap;j>=0;j-=gap) {

					if(arr[j]>arr[j+gap]) {

						int temp=arr[j];
						arr[j]=arr[j+gap];
						arr[j+gap]=temp;
					}
				}
			}
		}

	}
}
输出结果图为:

五、基数排序
基数排序又称为桶排序 ,把数组放到0-9的桶内,进行排序
现在有一个数组:
下面对个位进行排序
将数组的数据中个位的0-9排好在桶内,如下所示: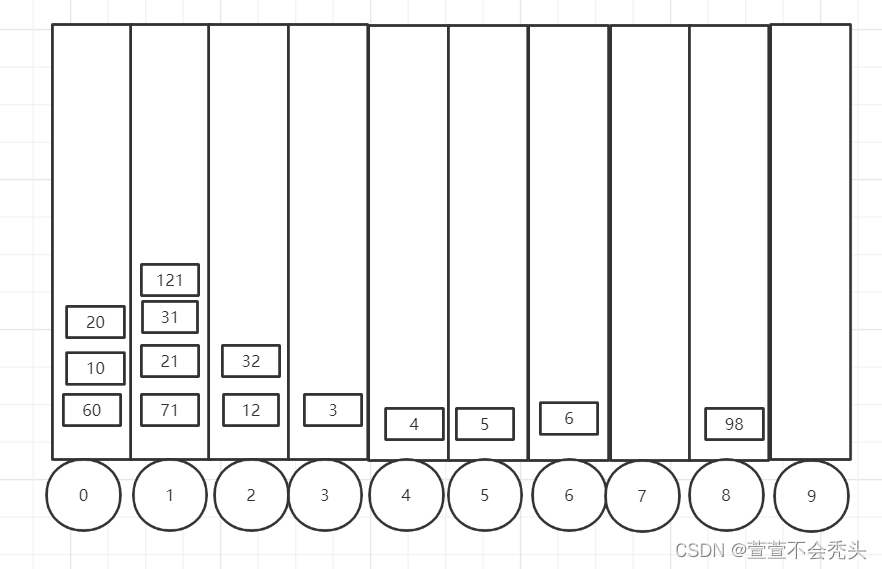
此时拍好之后将数据取出(取出的数据会覆盖原数组):
个位数的排序所使用的代码如下:
首先我们要先定义一个桶:
int[][] bucket=new int[10][arr.length];
定义一个桶记录器,记录桶内元素的个数:
int[] elementCounts=new int[10];
下面向桶内存放数据:
		//向桶内放数据
		for(int i=0;i<arr.length;i++) {

			//计算个位的值
			int element=arr[i]/1%10;
			int count=elementCounts[element];
			bucket[element][count]=arr[i];
			elementCounts[element]=elementCounts[element]+1;
		}

		//将桶内的数据取出
		int index1=0;
		for(int k=0;k<elementCounts.length;k++) {

			if(elementCounts[k]!=0) {

				for(int l=0;l<elementCounts[k];l++) {

					arr[index1]=bucket[k][l];
					index1++;
				}
			}
			elementCounts[k]=0;
		}
最后需要把桶记录器清空,以保证后续的排序不受影响
elementCounts[k]=0;
如此十位百位也是使用此方法来排序,直到排好序为止
那么十位百位排序所用到的代码如下:
//向桶内放数据
				for(int i=0;i<arr.length;i++) {

					//计算十位的值
					int element=arr[i]/10%10;
					int count=elementCounts[element];
					bucket[element][count]=arr[i];
					elementCounts[element]=elementCounts[element]+1;
				}

				//将桶内的数据取出
				int index2=0;
				for(int k=0;k<elementCounts.length;k++) {

					if(elementCounts[k]!=0) {

						for(int l=0;l<elementCounts[k];l++) {

							arr[index2]=bucket[k][l];
							index2++;
						}
					}
					elementCounts[k]=0;
				}
				//向桶内放数据
				for(int i=0;i<arr.length;i++) {

					//计算百位的值
					int element=arr[i]/100%10;
					int count=elementCounts[element];
					bucket[element][count]=arr[i];
					elementCounts[element]=elementCounts[element]+1;
				}

				//将桶内的数据取出
				int index3=0;
				for(int k=0;k<elementCounts.length;k++) {

					if(elementCounts[k]!=0) {

						for(int l=0;l<elementCounts[k];l++) {

							arr[index3]=bucket[k][l];
							index3++;
						}
					}
					elementCounts[k]=0;
				}
综上,整体代码为:
public static void main(String[] args) {


		int[] arr=new int[] {
    522,293,37,373,414,44,625,82,12,20};

		sort(arr);

		System.out.println("基数排序的输出结果:");
		System.out.println(Arrays.toString(arr));
	}


	public static void sort(int[] arr) {

		//定义桶
		int[][] bucket=new int[10][arr.length];

		//定义桶记录器
		int[] elementCounts=new int[10];


		//找到数组中的最大值
		int max=arr[0];
		for(int a=0;a<arr.length;a++) {

			if(arr[a]>max) {

				max=arr[a];
			}
		}

		//找到数组中的最大位数
		int maxLength=(max+"").length();

		int n=1;
		for(int h=0;h<maxLength;h++) {

			//向桶内存放数据
			for(int i=0;i<arr.length;i++) {

				//计算--位的值
				int element=arr[i]/n%10;
				//放入道统中
				int count=elementCounts[element];
				bucket[element][count]=arr[i];
				elementCounts[element]=elementCounts[element]+1;
			}
			int index=0;
			//将桶内的数据取出
			for(int k=0;k<elementCounts.length;k++) {

				if(elementCounts[k]!=0) {

					for(int l=0;l<elementCounts[k];l++) {

						arr[index]=bucket[k][l];
						index++;
					}
				}
				elementCounts[k]=0;
			}
			n=n*10;

		}
六、堆排序
1.大顶堆的构建
(大、小顶堆)
堆排序运用到完全二叉树(完全二叉树:从上到下,从左到右依次铺满)
堆排序是利用了平衡二叉树的一些特点来实现完全二叉树
完全二叉树:
完全二叉树是一种特殊的二叉树,要求从上到下从左到右依次平铺
[5,7,4,2,0,3,1,6]
大顶堆:
在完全二叉树的基础之上,每个节点的值都大于或者等于左右孩子的值
小顶堆:
在完全二叉树的基础之上,每个节点的值都小于或者等于左右孩子的值
上述完全二叉树转换为大顶堆为

实际上是利用了完全二叉树的特点来构建大顶堆
任何一个节点的左子节点:arr[2i+1]
任何一个节点的右子节点:arr[2i+2]
任何一个节点的父子节点:arr[(i-1)/2]
构建大顶堆
1.parent游标从后往前移动,如果当前节点没有子树直接跳过
2.如果当前节点有字数,先让child游标执行左子树
3.判断该节点有没有左子树,如果有child游标指向左右子树当前最大的值
4.当前节点和child节点的值进行对比,如果当前节点大于child的值,parent游标继续向前移动
5.如果当前节点小于child的值,父子节点的值进行交换
5.1parent游标指向child游标的位置,child游标的地址:2*child+1
5.1.1如果child游标指向空,parent游标继续向前移动
5.1.2如果child游标指向不为空,那么重复第五步
构建大顶堆的代码如下:
	public static void main(String[] args) {

		int[] arr=new int[] {
    5,7,4,2,0,3,1,6};
		for(int p=arr.length-1;p>=0;p--) {

			sort(arr,p);

		}

	}

	public static void sort(int[] arr,int parent) {

		//定义左子树
		int child=2*parent+1;
		while(child<arr.length-1) {

			//排序
			//判断有没有右子树,以及比较左右字数谁大,child指针指向大的
			int rchild=child+1;
			if(rchild<=arr.length-1 && arr[rchild]>arr[child]) {

				child++;
			}
			//父子节点进行对比交换
			if(arr[parent]<arr[child]) {

				//交换
				int temp=arr[parent];
				arr[parent]=arr[child];
				arr[child]=temp;

				parent=child;

				 child = 2 * child+1;

			}else {

				break;
			}

		}

	}
边栏推荐
- Microsoft. Bcl. Async usage summary -- in Net framework 4.5 project Net framework version 4.5 and above can use async/await asynchronous feature in C 5
- Opencv learning notes -day 12 (ROI region extraction and inrange() function operation)
- Why must redis exist in distributed systems?
- Esp32 things (3): overview of the overall system design
- JVM family
- [shutter] solve failed assertion: line 5142 POS 12: '_ debugLocked‘: is not true.
- QR code generation and analysis
- ES6 learning path (IV) operator extension
- Numpy (data type)
- Esp32 things (I): Preface
猜你喜欢

Abstract factory pattern

Express file upload

Set, map and modularity

Deep understanding of continuation principle

Idea shortcut key settings

Duplicate entry '2' for key 'primary appears in JPA‘

Distributed things

Dart asynchronous task

Using appbarlayout to realize secondary ceiling function

Opencv learning notes -day2 (implemented by the color space conversion function cvtcolar(), and imwrite image saving function imwrite())
随机推荐
Talking about the difference between kotlin collaboration and thread
CentOS MySQL installation details
[shutter] solve failed assertion: line 5142 POS 12: '_ debugLocked‘: is not true.
What are the SQL add / delete / modify queries?
Opencv learning notes -day2 (implemented by the color space conversion function cvtcolar(), and imwrite image saving function imwrite())
小程序开发踩坑之旅
[wechat applet] realize applet pull-down refresh and pull-up loading
Installation, use and explanation of vulnerability scanning tool OpenVAS
Deep Learning with Pytorch- A 60 Minute Blitz
2021-10-20
Small program learning path 1 - getting to know small programs
Properties of string
Niuke walks on the tree (ingenious application of parallel search)
Find the number that appears only once in the array
Deep Learning with Pytorch-Train A Classifier
Opencv learning notes -day 11 (split() channel separation function and merge() channel merge function)
Esp32 things (II): sharpening the knife without mistaking firewood - make preparations before project development
Pass anonymous function to simplification principle
[cmake] make command cannot be executed normally
Esp32 things (3): overview of the overall system design