当前位置:网站首页>Learnopongl notes (IV) - Advanced OpenGL II
Learnopongl notes (IV) - Advanced OpenGL II
2022-06-11 15:10:00 【Small margin, punch】
Catalog
Multisampling anti aliasing (Multisample Anti-aliasing, MSAA)
8、 ... and 、 Advanced data
Buffer function
OpenGL The buffer in is just an object that manages a specific memory block , Before we bind it to a buffer target (Buffer Target) when , We gave it meaning .
glBufferData function : Allocate a piece of memory , And add the data to this memory , If we put it data Parameter set to NULL, Then this function will only allocate memory , But no filling .4
glBufferSubData: We can provide an offset , Specify from where Start filling the buffer . The buffer needs to have enough allocated memory , So call a buffer glBufferSubData You have to call glBufferData.
glBufferSubData(GL_ARRAY_BUFFER, 24, sizeof(data), &data); //  Range : [24, 24 + sizeof(data)]
// A buffer target 、 An offset 、 The size of the data and the data itself
glMapBuffer: Pointer to request buffer memory , Copy the data directly into the buffer . Returns the memory pointer of the current binding buffer
float data[] = {
  0.5f, 1.0f, -0.35f
  ...
};
glBindBuffer(GL_ARRAY_BUFFER, buffer);
//  Get the pointer
void *ptr = glMapBuffer(GL_ARRAY_BUFFER, GL_WRITE_ONLY);
//  Copy data to memory
memcpy(ptr, data, sizeof(data));
//  Remember to tell OpenGL We don't need this pointer anymore
glUnmapBuffer(GL_ARRAY_BUFFER);
// Use glUnmapBuffer function , tell OpenGL After we have finished the pointer operation , The pointer will no longer be available
Batch vertex properties
glVertexAttribPointer: Specifies the attribute layout of the vertex array buffer contents .
float positions[] = { ... };
float normals[] = { ... };
float tex[] = { ... };
//  Fill buffer
glBufferSubData(GL_ARRAY_BUFFER, 0, sizeof(positions), &positions);
glBufferSubData(GL_ARRAY_BUFFER, sizeof(positions), sizeof(normals), &normals);
glBufferSubData(GL_ARRAY_BUFFER, sizeof(positions) + sizeof(normals), sizeof(tex), &tex);// Merge into a large array
// Pass the attribute array directly to the buffer as a whole , Without having to deal with them in advance


// Update vertex attribute pointer
glVertexAttribPointer(0, 3, GL_FLOAT, GL_FALSE, 3 * sizeof(float), 0);
glVertexAttribPointer(1, 3, GL_FLOAT, GL_FALSE, 3 * sizeof(float), (void*)(sizeof(positions)));
glVertexAttribPointer(
  2, 2, GL_FLOAT, GL_FALSE, 2 * sizeof(float), (void*)(sizeof(positions) + sizeof(normals)));
Copy buffer
Share the data with other buffers , Or you want to copy the contents of the buffer to another buffer :
void glCopyBufferSubData(GLenum readtarget, GLenum writetarget, GLintptr readoffset,
                         GLintptr writeoffset, GLsizeiptr size);

//readtarget and writetarget The parameter needs to be filled in the buffer destination of the copy source and copy destination
// You cannot bind two buffers to the same buffer target at the same time
OpenGL Provide us with two other buffer targets , be called GL_COPY_READ_BUFFER and GL_COPY_WRITE_BUFFER
float vertexData[] = { ... };
glBindBuffer(GL_COPY_READ_BUFFER, vbo1);
glBindBuffer(GL_COPY_WRITE_BUFFER, vbo2);
glCopyBufferSubData(GL_COPY_READ_BUFFER, GL_COPY_WRITE_BUFFER, 0, 0, sizeof(vertexData));
//readtarget Read from size Size data , And write it in writetarget Buffered writeoffset At offset
Nine 、 senior GLSL
GLSL Built in variables for
GLSL There are also several other definitions to gl_ Variable with prefix , They can give us more ways to read / Write data : The output vector of the vertex shader gl_Position, And clip shaders gl_FragCoord.
Vertex shader variables : Show anything on the screen , Set... In the vertex shader gl_Position Is a must
gl_PointSize: Every vertex is an entity , Will be rendered as a point . adopt OpenGL Of glPointSize Function to set the size of the rendered point .gl_Position and gl_PointSize All are Output variables
glEnable(GL_PROGRAM_POINT_SIZE);
// Enable OpenGL Of GL_PROGRAM_POINT_SIZE

// Set the size of the point to the position of the crop space z value
void main()
{
    gl_Position = projection * view * model * vec4(aPos, 1.0);
    gl_PointSize = gl_Position.z;
}
gl_VertexID: The input variable , We can only read it , Stores the current... Of the vertices being drawn ID.
Clip shader variables
GLSL Give us two interesting input variables :gl_FragCoord and gl_FrontFacing.
gl_FragCoord:gl_FragCoord Of z The component is equal to the depth value of the corresponding segment ,gl_FragCoord Of x and y The component is the window space of the fragment (Window-space) coordinate , Its origin is the lower left corner of the window . Use glViewport Set a 800x600 The window of , So the space coordinates of the fragment window x Component will be 0 To 800 Between ,y Component in 0 To 600 Between .
gl_FragCoord Let's read the window space coordinates of the current clip , And get its depth value , But it's a read-only (Read-only) Variable .
gl_FrontFacing:bool, Tell us whether the current clip belongs to a part of the front face or a part of the back face . If the current clip is part of a positive face, it is true, Otherwise, it would be false.
gl_FragDepth: Use it to set the depth value of the clip in the shader . If the shader does not write a value to gl_FragDepth, It will automatically access gl_FragCoord.z Value .
gl_FragDepth = 0.0; //  The depth value of this fragment is now  0.0

// Write directly to a 0.0 To 1.0 Between float Value to output variable
As long as we are in the fragment shader gl_FragDepth To write ,OpenGL All advanced depth tests will be disabled (Early Depth Testing).OpenGL Cannot run on fragment shaders Before Know the depth value that the clip will have , Because the clip shader may completely modify this depth value .
Use the depth condition at the top of the clip shader (Depth Condition) To declare gl_FragDepth Variable :
layout (depth_<condition>) out float gl_FragDepth;

Interface block
Declaration and of interface blocks struct Your statement is a bit similar , The difference is , Now, depending on whether it is an input or output block (Block), Use in or out Keywords to define . As long as the names of the two interface blocks are the same , Their corresponding inputs and outputs will match .
out VS_OUT
{
    vec2 TexCoords;
} vs_out;

// Fragment Shader , Define an input interface block in
in VS_OUT
{
    vec2 TexCoords;
} fs_in;
Uniform Buffer objects
It allows us to define a series of... That are the same in multiple shaders overall situation Uniform Variable . When using Uniform When buffering objects , We just need to set the relevant uniform once .
Uniform The buffered object is still a buffer , We can use glGenBuffers To create it , Bind it to GL_UNIFORM_BUFFER Buffer target , And all relevant uniform Data is stored in the buffer .
#version 330 core
layout (location = 0) in vec3 aPos;

layout (std140) uniform Matrices// Set up Uniform Block layout
// take projection and view The matrix is stored in the so-called Uniform block (Uniform Block) in
{
    mat4 projection;
    mat4 view;
};

uniform mat4 model;

void main()
{
    gl_Position = projection * view * model * vec4(aPos, 1.0);
}
Uniform Block layout :Uniform The contents of the block are stored in a buffer object , It's actually just a piece of reserved memory .
GLSL Will use a called sharing (Shared) Layout Uniform Memory layout , Sharing is because once the hardware defines the offset , They are shared and consistent across multiple programs . Although shared layout gives us a lot of space saving optimization , But we need to query every uniform The offset of the variable , This creates a lot of work . The usual way is , Do not use shared layouts , But use std140 Layout .
layout (std140) uniform ExampleBlock
{
    float value;//4
    vec3  vector;//16
    mat4  matrix;//16-16-16-16
    float values[3];//16-16-16
    bool  boolean;//4
    int   integer;//4
};

Use Uniform buffer
// call glGenBuffers, Create a Uniform Buffer objects
unsigned int uboExampleBlock;
glGenBuffers(1, &uboExampleBlock);
glBindBuffer(GL_UNIFORM_BUFFER, uboExampleBlock);
glBufferData(GL_UNIFORM_BUFFER, 152, NULL, GL_STATIC_DRAW); //  Distribute 152 Bytes of memory
// Bound to the GL_UNIFORM_BUFFER The goal is , And call glBufferData, Allocate enough memory

glBindBuffer(GL_UNIFORM_BUFFER, 0);


// take Uniform Blocks are bound to a specific binding point , We need to call glUniformBlockBinding function

unsigned int lights_index = glGetUniformBlockIndex(shaderA.ID, "Lights");
// Accept a program object and Uniform The name of the block

glUniformBlockBinding(shaderA.ID, lights_index, 2);
// The first parameter is a program object , And then there's a Uniform The binding point to which the block index and link


// binding Uniform Buffer objects to the same binding point
// One goal , A binding point index and a Uniform Buffer objects
glBindBufferBase(GL_UNIFORM_BUFFER, 2, uboExampleBlock);
//  or glBindBufferRange(GL_UNIFORM_BUFFER, 2, uboExampleBlock, 0, 152);
from OpenGL 4.2 Since version , You can also add a layout identifier , Explicitly Uniform The binding point of the block is stored in the shader :
layout(std140, binding = 2) uniform Lights { ... };
Uniform Buffered objects are better than independent objects uniform There are many benefits . First of all , Set many at one time uniform There will be more than one setting uniform Much faster . second , Rather than modifying the same... In multiple shaders uniform, stay Uniform It's easier to modify it once in the buffer .
Ten 、 Instantiation
If we need to render a large number of objects , Code :
for(unsigned int i = 0; i < amount_of_models_to_draw; i++)
{
    DoSomePreparations(); //  binding VAO, Bind texture , Set up uniform etc.
    glDrawArrays(GL_TRIANGLES, 0, amount_of_vertices);
}
If you draw a large number of instances of the model like this (Instance), You will soon reach a performance bottleneck due to too many drawing calls . Use glDrawArrays or glDrawElements The function tells GPU Drawing your vertex data will consume more performance .( Even if rendering vertices is very fast , command GPU To render is not necessarily .)
Instantiation of this technique allows us to draw multiple objects using one render call , To save every time you draw an object CPU -> GPU Communication for , It only takes one time . Only need to glDrawArrays and glDrawElements The rendering calls are changed to glDrawArraysInstanced and glDrawElementsInstanced Can .
Instantiation Version requires an additional parameter , It's called the number of instances (Instance Count), It can set the number of instances we need to render .
glDrawArraysInstanced(GL_TRIANGLES, 0, 6, 100);
gl_InstanceID: When using instanced render calls ,gl_InstanceID From 0 Start , Increment as each instance is rendered 1.
Instantiate arrays
If the maximum number of... That can be sent to the shader is exceeded uniform Maximum data size , Then select instantiate array . It is defined as a vertex attribute ( It allows us to store more data ), Updates only when the vertex shader renders a new instance .
#version 330 core
layout (location = 0) in vec2 aPos;
layout (location = 1) in vec3 aColor;
layout (location = 2) in vec2 aOffset;

out vec3 fColor;

void main()
{
    gl_Position = vec4(aPos + aOffset, 0.0, 1.0);
    fColor = aColor;
}

// Exists in vertex buffer object , And configure its property pointer
unsigned int instanceVBO;
glGenBuffers(1, &instanceVBO);
glBindBuffer(GL_ARRAY_BUFFER, instanceVBO);
glBufferData(GL_ARRAY_BUFFER, sizeof(glm::vec2) * 100, &translations[0], GL_STATIC_DRAW);
glBindBuffer(GL_ARRAY_BUFFER, 0);

// Set its vertex attribute pointer , And enable vertex properties
glEnableVertexAttribArray(2);
glBindBuffer(GL_ARRAY_BUFFER, instanceVBO);
glVertexAttribPointer(2, 2, GL_FLOAT, GL_FALSE, 2 * sizeof(float), (void*)0);
glBindBuffer(GL_ARRAY_BUFFER, 0);
glVertexAttribDivisor(2, 1);
// Update the contents of vertex attributes to a new set of data
// The first parameter is the desired vertex attribute , The second parameter is the property divisor (Attribute Divisor).
// Divisor is 0: tell OpenGL We need to update the vertex attributes at each iteration of the vertex shader
//1: tell OpenGL We want to update vertex properties when rendering a new instance
//2: Hope every 2 Update the property once every instance
11、 ... and 、 Anti-Aliasing

This phenomenon is called aliasing (Aliasing). There are many kinds of anti aliasing (Anti-aliasing, Also known as anti aliasing ) Technology can help us alleviate this phenomenon , To produce more smooth The edge of .
Supersampling antialiasing (Super Sample Anti-aliasing, SSAA): It will use a higher resolution than normal ( Oversampling ) To render the scene , When the image output is updated in the frame buffer , The resolution will be down sampled (Downsample) To normal resolution . It also brings a lot of performance overhead .
Multisampling anti aliasing (Multisample Anti-aliasing, MSAA)
OpenGL How the raster works :
The rasterizer is the sum of all the algorithms and processes from the final processed vertex to the fragment shader . The raster takes all vertices of an entity as input , And convert it into a series of fragments .

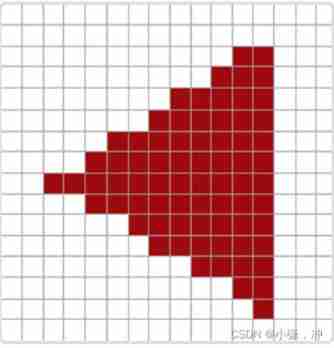
A grid of screen pixels , The center of each pixel contains a sampling point (Sample Point), It will be used to determine whether the triangle covers a pixel . The red sampling points in the figure are covered by triangles , A fragment is generated at each obscured pixel .
What multisampling does is to change a single sampling point into multiple sampling points , The number of sampling points can be arbitrary , More sampling points can lead to more accurate coverage .

MSAA The real way of working is , No matter how many sub sampling points the triangle covers ,( In each element ) Each pixel only runs once Fragment Shader . When the sub samples of the color buffer are filled with all the colors of the element , All these colors will be averaged within each pixel .


Each pixel contains 4 Subsampling points , The blue sample points are covered by triangles , The gray ones don't . And at the edge of the triangle , Not all sub sampling points are covered , According to the number of subsamples covered , The final pixel color will be determined by the color of the triangle and the color stored in other sub samples .
OpenGL Medium MSAA
Use one that can store more than in each pixel 1 A color buffer of color values ( Because multiple sampling requires us to store a color for each sampling point ). Multisampling buffer (Multisample Buffer).
glfwWindowHint(GLFW_SAMPLES, 4);
// Now call glfwCreateWindow When creating a render window , Each screen coordinate will use a containing 4 The color of sub sampling points is buffered

// call glEnable And enable the GL_MULTISAMPLE, To enable multisampling
glEnable(GL_MULTISAMPLE);
边栏推荐
- 汤峥嵘:CTO 是商业思维和技术思维交汇的那个点
- Uniapp settings page Jump effect - navigateto switching effect - Global animationtype animation
- 2022 Hunan Provincial Safety officer-c certificate examination practice questions and online simulation examination
- C语言简易版webserver
- Nexus configuration Yum repository for repository manager
- China's technology goes to sea, tidb database's overseas exploration road | interview with excellent technical team
- 回溯法/解空间树 排列树
- 2022年湖南省安全员-C证考试练习题及在线模拟考试
- In depth interpretation: distributed system resilience architecture ballast openchaos
- High number_ Chapter 6 infinite series__ Marklaurin series
猜你喜欢

数据库优化

See from the minute, carve on the details: Exploration of SVG generated vector format website icon (favicon)

Knowledge of affairs

大道至簡 | 設計 ViT 到底怎麼配置Self-Attention才是最合理的?

数据分析系统的设计与实现

Station B executives interpret the financial report: the epidemic has no impact on the company's long-term development, and the video trend is irresistible

基于 GateWay 和 Nacos 实现微服务架构灰度发布方案

3年亏损136亿,上市能救活威马吗?

19. insertion, deletion and pruning of binary search tree

Oauth2的理解
随机推荐
浅谈居家办公后的感想| 社区征文
多云安全合规扫描平台之RiskScanner
Arthas实践操作文档记录
gensim. Models word2vec parameter
uniapp开发微信小程序,从构建到上线
C language simple webserver
Hashicopy之nomad应用编排方案04(伸缩及更新一个Job)
数据库“百亿蓝海”中,每位玩家都能找到一叶扁舟 | C位面对面
新华三交换机系统基本配置命令
老虎国际季报图解:营收5263万美元 持续国际化布局
见微知著,细节上雕花:SVG生成矢量格式网站图标(Favicon)探究
MySQL user authority summary [user authorization required]
Riskscanner of multi Cloud Security compliance scanning platform
百度某离职员工跳槽字节被判赔107万元;苹果谷歌微软拟“干掉”密码;传吉利已收购魅族|Q资讯
以 Log4j 为例,如何评估和划分安全风险
How about art plus online school? Is it a new online organization?
[SystemVerilog interface] ~ interface
数字化转型项目做了多年,主架构师都绝望了:当初就不应该用外包!
数据库优化
Repository Manager之Nexus配置yum仓库