当前位置:网站首页>AntV X6制作画板工具(图形,线段,图片上传)
AntV X6制作画板工具(图形,线段,图片上传)
2022-08-02 02:58:00 【噢,我明白了】
前后端配合问题总结:
1.使用upload上传组件时,需要在接口调用成功之后的函数中进行图片展示,action调用接口,formatter配合拿取后端接口返回的图片数据
2.upload内部只可包含一个标签元素否则会失效
3.保存画布元素之后,可能会出现img的url丢失的情况,请提前做好存值准备
4.使用input进行图片文件上传,需要将文件进行base64格式转换之后才可以在页面上成功展示(使用upload组件可忽略此条)
以下实例仅提供本地图片上传展示功能
一.用antv X6准备画布容器
(1). 官网antv x6
$ npm install @antv/x6 --save //下载使用x6
注明:详细使用请参考官方文档,此篇文章只对需要使用部分进行简单说明
(2).以react框架进行构造
实现思路
- 先准备一个container容器
- 准备数据(X6 支持 JSON 格式数据,该对象中需要有节点 nodes 和边 edges 字段,分别用数组表示)
- 渲染画布
//画布准备
 const graph = new Graph({

        container: document.getElementById('container'),
        width: 900,
        height: 900,
        background: {

            color: '#fffbe6', // 设置画布背景颜色
        },
    })
二.在画布上进行节点渲染
//节点渲染,完整代码

import {
     Graph, Shape, Addon } from '@antv/x6';
import React from 'react';
import '@antv/x6-react-shape'


export default class PicturesWall extends React.Component {


    constructor(props) {

        super(props)
        this.state = {


          };
          this.graph=null
    }

  componentDidMount(){

    this.initGraph();
  }

  initContainer(container){

    this.container = container || {
    }
  }

  initGraph() {

    //创建画布
    const graph = new Graph({

        container: document.getElementById('container'),
        width: 900,
        height: 900,
        background: {

            color: '#fffbe6', // 设置画布背景颜色
        },
    })

    Graph.registerNode(
      'image',
      {

        width: 240,
        height: 40,
        inherit: 'react-shape',
        preserveAspectRatio: true,
        component: <img />,
        attrs: {

          body: {

            fill: 'none',
            stroke: 'none',
          },
         },
      },
      true, );
    this.graph = graph
  }


  addSquare=()=>{

    this.graph.addNode({

      shape: 'rect',
      x: 40,
      y: 40,
      width: 50,
      height: 50,
      attrs:{

        body: {

          fill: 'transparent',
          stroke: '#aaaa',
        },
      }//attrs是用来对节点定义样式的
    })
  }

  addLine=()=>{

    this.graph.addEdge({

      source: {
     x: 100, y: 40 },
      target: {
     x: 400, y: 40 },
      attrs: {

        line: {

          stroke: "#7c68fc", // 指定 path 元素的填充色
        },
      },
    })
  }

  handleChange = (event) => {

    let imgfile = event.currentTarget.files[0];///获得input的第一个图片
    let _this = this
    //使用readAsDataURL来进行回显图片
    let reader = new FileReader();
    reader.readAsDataURL(imgfile);

    reader.onload = function (event) {
    //会触发一个load事件
        let imgs = this.result
        console.log('回显的Base64图片文件',imgs)
        _this.graph.addNode({

          shape: 'image',
          x: 40,
          y: 40,
          width: 50,
          height: 50,
          component:  <img src={
    imgs} style={
    {
     width: '40px', height: '40px' }} />
        })

    };

}

  render() {

    const {
     previewVisible, previewImage, fileList } = this.state;

    return (
      <div className="clearfix">
        {
    /* <div id="container-wrap" ref={this.initContainer} /> */}
        <div style={
    {
    display:'flex'}}>
          <div
          style={
    {
    width: '50px', height:'20px',background:'#aaa', cursor:'pointer'}}
          onClick={
    this.addSquare}
          >
            正方形
          </div>
          <div
          style={
    {
    width: '35px', height:'20px',background:'#aaa', cursor:'pointer',marginLeft:'5px'}}
          onClick={
    this.addLine}
          >
            线段
          </div>
          <div
          style={
    {
    width: '70px', height:'20px',background:'#aaa', cursor:'pointer',marginLeft:'5px'}}
          >
            <label class="control-label file" style={
    {
    position:'relative' ,width:'70px'}}>
            <input  type='file' accept='image/png' onChange={
    this.handleChange}
             style={
    {
     position: 'absolute',fontSize: '18px',right: 0,top: 0,opacity: 0,width:'100%'}}/>
              点击上传
            </label>

          </div>
        </div>
        <div id='container'></div>
      </div>
    );
  }
}
结果展示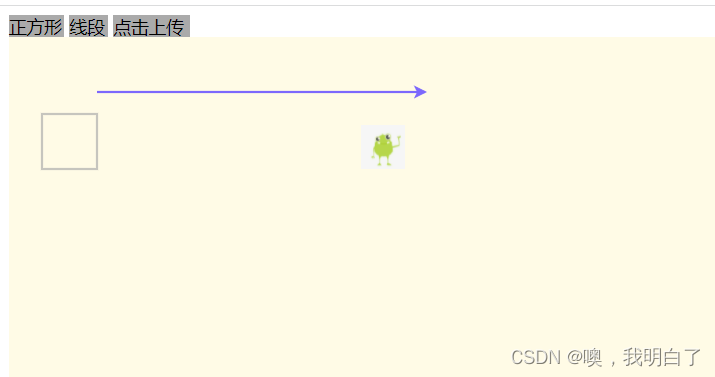
边栏推荐
猜你喜欢


随机推荐
node:internal/modules/cjs/loader:936 throw err; ^ Error: Cannot find module ‘./scope‘
analog IC layout-Design for reliability
"Paid paddling" stealthily brushes Brother Ali's face scriptures, challenges bytes three times, and finally achieves positive results
消息队列经典十连问
8万字带你入门Rust
MySQL索引优化实战
Chapter 10_Index Optimization and Query Optimization
CentOS7安装Oracle数据库的全流程
Go语学习笔记 - gorm使用 - 事务操作 Web框架Gin(十一)
leetcode 143. 重排链表
analog IC layout
Nacos源码分析专题(一)-环境准备
MySQL中根据日期进行范围查询
暴力破解全攻略
MySQL8 -- use msi (graphical user interface) under Windows installation method
MySQL index optimization in practice
[LeetCode] 94. Inorder traversal of binary tree
JunitTest单元测试
分布式事务解决方案模型
JSP WebSehll 后门脚本