当前位置:网站首页>TensorRT例程解读之语义分割demo
TensorRT例程解读之语义分割demo
2022-08-04 05:24:00 【单胖】
TensorRT例程解读之语义分割demo
例程GitHub地址:https://github.com/NVIDIA/TensorRT/tree/main/quickstart/SemanticSegmentation
在解析之前,先简单看下TensorRT的推理流程。

SampleSegmentation类class SampleSegmentation { public: SampleSegmentation(const std::string& engineFilename); bool infer(const std::string& input_filename, int32_t width, int32_t height, const std::string& output_filename); private: std::string mEngineFilename; //!< Filename of the serialized engine. nvinfer1::Dims mInputDims; //!< The dimensions of the input to the network. nvinfer1::Dims mOutputDims; //!< The dimensions of the output to the network. util::UniquePtr<nvinfer1::ICudaEngine> mEngine; //!< The TensorRT engine used to run the network };此处
SampleSegmentation这个类的注释已经很明白了,成员函数一共有两个,分别是构造函数SampleSegmentation(const std::string& engineFilename),另一个是执行推理的函数bool infer(const std::string& input_filename, int32_t width, int32_t height, const std::string& output_filename);,类内的成员的注释非常明确,mEngineFilename即序列化引擎的文件名,mInputDims为输入维度,mOutputDims为输出的维度,mEngine为待会推理神经网络的engine。SampleSegmentation构造函数SampleSegmentation::SampleSegmentation(const std::string& engineFilename) : mEngineFilename(engineFilename) , mEngine(nullptr) { // De-serialize engine from file std::ifstream engineFile(engineFilename, std::ios::binary); if (engineFile.fail()) { return; } engineFile.seekg(0, std::ifstream::end); // 将指针移动至距离文件末尾0处的位置 auto fsize = engineFile.tellg(); // 获得当前字符的位置 engineFile.seekg(0, std::ifstream::beg); // 将指针移动至距离文件开头0处的位置 std::vector<char> engineData(fsize); engineFile.read(engineData.data(), fsize); util::UniquePtr<nvinfer1::IRuntime> runtime{nvinfer1::createInferRuntime(sample::gLogger.getTRTLogger())}; mEngine.reset(runtime->deserializeCudaEngine(engineData.data(), fsize, nullptr)); assert(mEngine.get() != nullptr); }首先观察这个构造函数,传参只需要传已经序列化的文件名就可以,并且用该参数作为类内成员
mEngineFilename的初始值,并且给mEngine这个指针初始化成nullptr。读取这个序列化文件的方式非常简单,只需要用正常的std::ifstream即可读入,并且用
seekg和tellg获得该文件的长度,方便建立engineData这个数组(例子中用的是std::vector),再将engineFile中的内容拷贝至engineData之内。得到该数组后,通过
nvinfer1::createInferRuntime这个函数来创建一个runtime实例。与构造序列化模型相同的是,构造runtime也需要用到logger。得到runtime之后,再通过
runtime->deserializeCudaEngine函数将序列化模型反序列化,该函数将会返回一个ICudaEngine*的engine,使用unique_ptr.reset()函数将mEngine的值设置为runtime->deserializeCudaEngine返回回来的ICudaEngine*。SampleSegmentation::infer(const std::string& input_filename, int32_t width, int32_t height, const std::string& output_filename)- 生成
IExecutionContext*
auto context = util::UniquePtr<nvinfer1::IExecutionContext>(mEngine->createExecutionContext());
if (!context)
{
    return false;
}
实际推理时并不是通过
ICudaEngine进行图例,而是需要创建一个类型为IExecutionContext*类型的context。具体的创建方式即为engine->createExecutionContext(),此处的"context"应该翻译为环境更为贴切,即创建一个能够运行的环境供TensorRT去运行。- 获得输入和输出的index
auto input_idx = mEngine->getBindingIndex("input");
if (input_idx == -1)
{
    return false;
}
assert(mEngine->getBindingDataType(input_idx) == nvinfer1::DataType::kFLOAT);
auto input_dims = nvinfer1::Dims4{1, 3 /* channels */, height, width};
context->setBindingDimensions(input_idx, input_dims);
auto input_size = util::getMemorySize(input_dims, sizeof(float));

auto output_idx = mEngine->getBindingIndex("output");
if (output_idx == -1)
{
    return false;
}
assert(mEngine->getBindingDataType(output_idx) == nvinfer1::DataType::kINT32);
auto output_dims = context->getBindingDimensions(output_idx);
auto output_size = util::getMemorySize(output_dims, sizeof(int32_t));
为什么需要获取模型中输入和输出的index呢?因为如果用TensorRT去推理模型,就必须要传入一个存有输入和输出数据(的指针)的缓冲区,因此我们需要用
engine->getBindingIndex这个函数去拿到输入和输出在网络中的位置。本例中作者通过自己实现了
getMemorySize获得了输入和输出占用内存的量,因此显得比较长,但是实际上获得模型中输入和输出的index,只需要通过两行代码即可实现:int32_t inputIndex = engine->getBindingIndex(INPUT_NAME); int32_t outputIndex = engine->getBindingIndex(OUTPUT_NAME);具体的
INPUT_NAME和OUTPUT_NAME是自己在生成序列化模型的时候设置的,如果不知道怎么查,可以参考以下流程:如果是像类似TensorRTx那样的工程,从头到尾用TensorRT的API去实现一个模型,那么
INPUT_NAME和OUTPUT_NAME就是在设置输入层和输出层自己设置的name。比如resnet中:// 输入层的name设置为INPUT_BLOB_NAME ITensor* data = network->addInput(INPUT_BLOB_NAME, dt, Dims3{3, INPUT_H, INPUT_W}); // 输出层用setName函数设置为OUTPUT_BLOB_NAME fc1->getOutput(0)->setName(OUTPUT_BLOB_NAME);如果是通过ONNX转出来的TensorRT模型,则在使用
torch.onnx.export函数时就要设置好input_names和output_names这两个参数(参数类型为列表)。torch.onnx.export(model, input_tensor, output_onnx, opset_version=12, do_constant_folding=True, input_names=["input"], output_names=["output"], dynamic_axes={ "input": { 0: "batch", 2: "height", 3: "width"}, "output": { 0: "batch", 2: "height", 3: "width"}}, verbose=False)
在GPU中开辟对应的输入和输出的空间
本例中作者使用的方式跟TensorRTx的方式略显不同,以下是作者的方法:
void* input_mem{nullptr};
if (cudaMalloc(&input_mem, input_size) != cudaSuccess)
{
    gLogError << "ERROR: input cuda memory allocation failed, size = " << input_size << " bytes" << std::endl;
    return false;
}
void* output_mem{nullptr};
if (cudaMalloc(&output_mem, output_size) != cudaSuccess)
{
    gLogError << "ERROR: output cuda memory allocation failed, size = " << output_size << " bytes" << std::endl;
    return false;
}
以下为TensorRTx中wangxinyu大佬的方法:
CHECK(cudaMalloc(&buffers[inputIndex], batchSize * 3 * INPUT_H * INPUT_W * sizeof(float)));
CHECK(cudaMalloc(&buffers[outputIndex], batchSize * OUTPUT_SIZE * sizeof(float)));
总的来说思路是相同的,都是使用
cudaMalloc这个函数进行内存的分配,也就是分别给存放输入输出数据的缓冲区在显卡中分配对应的内存。cudaMalloc可以获得一块显卡内的内存,第一个参数存放的就是分配的内存,第二个参数则是需要传入需要分配的显存大小,而input_mem和output_mem两个变量就组成了一个含有输入和输出数据地址的buffer。图像的预处理
总览图像预处理部分
// Read image data from file and mean-normalize it
const std::vector<float> mean{0.485f, 0.456f, 0.406f}; // mean
const std::vector<float> stddev{0.229f, 0.224f, 0.225f}; // std dev
auto input_image{util::RGBImageReader(input_filename, input_dims, mean, stddev)}; // 创建图像读取器的对象
input_image.read(); // 读取图像
auto input_buffer = input_image.process(); // 处理图像
具体的就不展开了,最后的目的就是把图像内每个像素点的数据读进数组内即可。
创建CUDA流
cudaStream_t stream;
if (cudaStreamCreate(&stream) != cudaSuccess)
{
    gLogError << "ERROR: cuda stream creation failed." << std::endl;
    return false;
}
这一步非常简单,创建一个cuda流即可,推理的时候需要用到。
执行推理步骤
// Copy image data to input binding memory
if (cudaMemcpyAsync(input_mem, input_buffer.get(), input_size, cudaMemcpyHostToDevice, stream) != cudaSuccess)
{
    gLogError << "ERROR: CUDA memory copy of input failed, size = " << input_size << " bytes" << std::endl;
    return false;
}

// Run TensorRT inference
void* bindings[] = {input_mem, output_mem};
bool status = context->enqueueV2(bindings, stream, nullptr);
if (!status)
{
    gLogError << "ERROR: TensorRT inference failed" << std::endl;
    return false;
}

// Copy predictions from output binding memory
auto output_buffer = std::unique_ptr<int>{new int[output_size]};
if (cudaMemcpyAsync(output_buffer.get(), output_mem, output_size, cudaMemcpyDeviceToHost, stream) != cudaSuccess)
{
    gLogError << "ERROR: CUDA memory copy of output failed, size = " << output_size << " bytes" << std::endl;
    return false;
}
cudaStreamSynchronize(stream);
对于TensorRT而言,实际的推理过程的代码其实非常简练,主要分为三步:
- 首先需要的是把图像数据拷贝进显存内,直接使用CUDA的函数
cudaMemcpyAsync即可,也就是把input_buffer内的数据拷贝到input_mem的显存地址之内; - 执行推理,调用
context->enqueueV2即可执行异步推理。如果更喜欢同步推理的话,可以调用context->executeV2; - 把结果从显存中取出,放置到内存中,同样使用
cudaMemcpyAsync即可,也就是把output_mem显存地址下的数据拷贝至output_buffer内。 - 用
cudaStreamSynchronize函数同步化之前创建的cuda流,原因很简单,直接使用的context->enqueueV2函数是异步推理,因此需要把cuda流同步一下。
- 首先需要的是把图像数据拷贝进显存内,直接使用CUDA的函数
后处理
const int num_classes{21};
const std::vector<int> palette{(0x1 << 25) - 1, (0x1 << 15) - 1, (0x1 << 21) - 1};
auto output_image{util::ArgmaxImageWriter(output_filename, output_dims, palette, num_classes)};
output_image.process(output_buffer.get());
output_image.write();

// Free CUDA resources
cudaFree(input_mem);
cudaFree(output_mem);
对输出的结果进行后处理,并且释放掉之前使用的显存即可。
- 生成
边栏推荐
- el-Select selector bottom fixed
- Use Patroni callback script to bind VIP pit
- CentOS7 —— yum安装mysql
- MySQL日志篇,MySQL日志之binlog日志,binlog日志详解
- 《看见新力量》第四期免费下载!走进十五位科技创业者的精彩故事
- 7.16 Day22---MYSQL(Dao模式封装JDBC)
- 字节最爱问的智力题,你会几道?
- 应届生软件测试薪资大概多少?
- 嵌入式系统驱动初级【4】——字符设备驱动基础下_并发控制
- C Expert Programming Chapter 5 Thinking about Linking 5.2 Advantages of Dynamic Linking
猜你喜欢
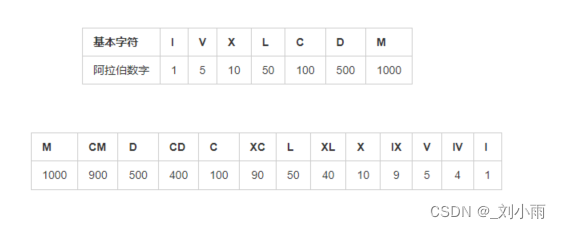
leetcode 12. 整数转罗马数字
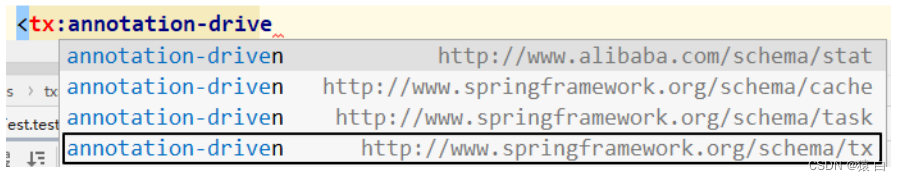
4.3 基于注解的声明式事务和基于XML的声明式事务

如何将 DevSecOps 引入企业?

Cannot read properties of null (reading ‘insertBefore‘)
Programming hodgepodge (4)
入坑软件测试的经验与建议
Tactile intelligent sharing - SSD20X realizes upgrade display progress bar
代码重构:面向单元测试
Resolved error: npm WARN config global `--global`, `--local` are deprecated

Teenage Achievement Hackers Need These Skills
随机推荐
力扣:746. 使用最小花费爬楼梯
What are the functions of mall App development?
Delphi-C端有趣的菜单操作界面设计
el-Select 选择器 底部固定
处理List<Map<String, String>>类型
7.16 Day22---MYSQL(Dao模式封装JDBC)
7.13 Day20----MYSQL
Do you think border-radius is just rounded corners?【Various angles】
Programming hodgepodge (4)
Performance testing with Loadrunner
嵌入式系统驱动初级【4】——字符设备驱动基础下_并发控制
The 2022 PMP exam has been delayed, should we be happy or worried?
Grain Mall - Basics (Project Introduction & Project Construction)
leetcode 12. Integer to Roman numeral
[Cocos 3.5.2]开启模型合批
C专家编程 第5章 对链接的思考 5.2 动态链接的优点
4.1 JdbcTemplate for declarative transactions
[Cloud Native--Kubernetes] Pod Resource Management and Probe Detection
8.03 Day34---BaseMapper查询语句用法
The idea setting recognizes the .sql file type and other file types