当前位置:网站首页>Burp suite Chapter 5 how to use burp target
Burp suite Chapter 5 how to use burp target
2022-07-26 08:04:00 【Watermelon that loves programming】
The fifth chapter How to use Burp Target
Burp Target The component mainly contains the site map 、 Target domain 、Target The tool consists of three parts , They help penetration testers better understand the overall state of the target application 、 What target domains are involved in the current work 、 Analyze the possible attack surface and other information , Now let's take a look at Burp Target The three components of .
The main contents of this chapter are as follows :
Target domain settings Target Scope
Target Scope The definition of scope in is broad , Generally speaking , When we do penetration testing on a product , You can restrict the intercepted content by domain name or host name , The domain name or host name is what we call the scope ; If we want to be more granular , such as , You just want to intercept login All requests in the directory , At this time, we can also set it here , here , The scope is the directory . On the whole ,Target Scope It is mainly used in the following scenarios :
- Limit site maps and Proxy The display in history
- tell Burp Proxy Which requests are blocked
- Burp Spider What to grab
- Burp Scanner Automatically scan for security vulnerabilities in which scopes
- stay Burp Intruder and Burp Repeater It is specified in URL
adopt Target Scope We can easily control Burp The interception range of 、 Action object , Reduce ineffective noise . stay Target Scope In the setting of , It mainly includes two parts : Allow rules and remove rules .
Among them, the allowed rules are as the name implies , In this rule list , It is considered that the operation allows 、 It works . If this rule is used to intercept , Then the request message matching contains the list of rules that will be intercepted ; conversely , Request message matching removal list will not be blocked .
We can see from the Add Rule dialog box in the above figure , Rules are mainly made up of agreements 、 Domain name or IP Address 、 port 、 file name 4 Component composition , This means that we can get from the agreement 、 Domain name or IP Address 、 port 、 file name 4 Dimensions to control which messages are allowed or removed from the rule list .
When we set up Target Scope ( All are allowed by default ), Use Burp Proxy Conduct proxy interception , When browsing an application through a browser proxy in penetration testing ,Burp It will automatically record the browsing information , Contains details of each request and response , Save in Target In the site map .
Site map Site Map
The site map shown in the figure below is in a penetration test , The display results of browsing history in the site map through the browser .
As we can see from the picture ,Site Map On the left is the visited URL, According to the level and depth of the site , The tree shows the structure of the whole application system and the connection of other domains url situation ; On the right is one of them url List of visited details of , What did you visit url, What are the contents of the request and the response , There are detailed records . Based on the tree structure on the left , We can choose a branch , Scan and grab the specified path .
meanwhile , We can also join a domain directly Target Scope in .
In addition to joining Target Scope Outside , From the above , We can also see that , For site map layering , You can fold and expand , Better analysis of site structure .
Target Tool use
Target The use of tools mainly includes the following parts :
- Get the site map manually
- Site comparison
- Attack surface analysis
When we get the site map manually , The following steps need to be followed : 1. Set browser proxy and Burp Proxy agent , And make it work properly . 2. close Burp Proxy The interception function of . 3. Manually browse the web , At this time ,Target It will automatically record the site map information . One advantage of manually obtaining the site map is , We can analyze according to our own needs , Autonomously control access to content , The recorded information is more accurate . Compared with automatic grabbing , It will take longer , If the product system requiring penetration testing is a large system , The energy and time required to operate the function points of the system in turn are great for the penetration testers .
Site comparison is a Burp Provide penetration testers with a sharp tool for dynamic analysis of the site , We often use it when comparing account permissions . When we log in to the application system , Use different accounts , The account itself is given different permissions in the application system , Then the function modules that the account can access 、 Content 、 The parameters are different , Use site comparison at this time , It can help penetration testers distinguish . Generally speaking , There are mainly the following 3 Kinds of scenes : 1. Same account number , Have different permissions , Compare the results of the two requests . 2. Two different accounts , Have different permissions , Compare the results of the two requests . 3. Two different accounts , Have the same permissions , Compare the results of the two requests .
Now let's take a look at how to compare sites .
- First, we right-click on the function link that needs to be compared , Find the site comparison menu , Click the menu to go to the next step .

- Because the site comparison is carried out between two site maps , Therefore, in the configuration process, we need to specify Site Map 1 and Site Map2. Usually ,Site Map 1 We default to the current session . As shown in the figure , Click on 【Next】.

- Then we will enter Site Map 1 Setup page , If it is a site wide comparison, we choose the first item , If we just compare the functions we selected , Choose the second one . Here's the picture , Click on 【Next】. If the whole site is more , And don't want to load other domains , We can check to select only the current field .

- The next step is Site Map 2 Configuration of , about Site Map 2 We also have two ways , The first is what we have saved before Burp Suite Site records , The second is to make a request again as Site Map2. here , We choose the second way .

5. If the second method is selected in the previous step , Then enter the request message setting interface . In this interface , We need to specify the number of concurrent threads of communication 、 Failed retries 、 Pause gap time .
- Set the Site Map 1 and Site Map 2 after , Enter the request message matching setting . In this interface , We can go through URL File path 、Http Request mode 、 Request parameters 、 Request header 、 request Body To filter the matching criteria .

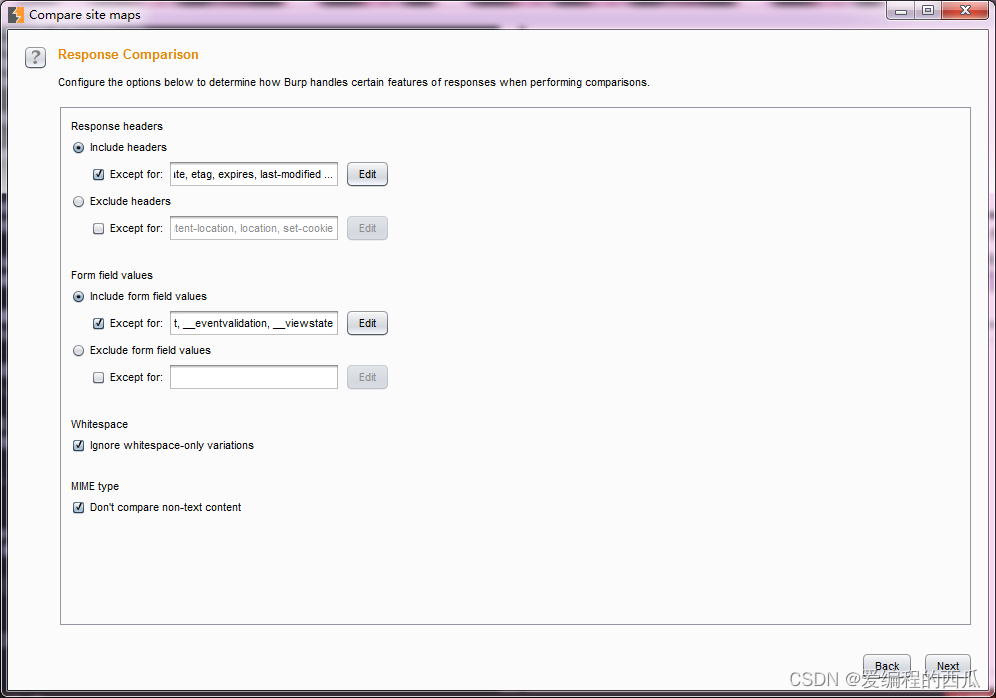
- Set request matching criteria , Then enter the response comparison setting interface . On this interface , We can set what we need to compare . We can see from the picture below , There are mainly response headers 、form Form field 、 Space 、MIME type . Click on 【Next】.
- If we compared the whole station before , And choose to happen again as Site Map2 The way , Then you will be constantly prompted about the progress of data loading during the loading process of the interface , If there are fewer links involving function requests , You will soon enter the comparison interface . Here's the picture .
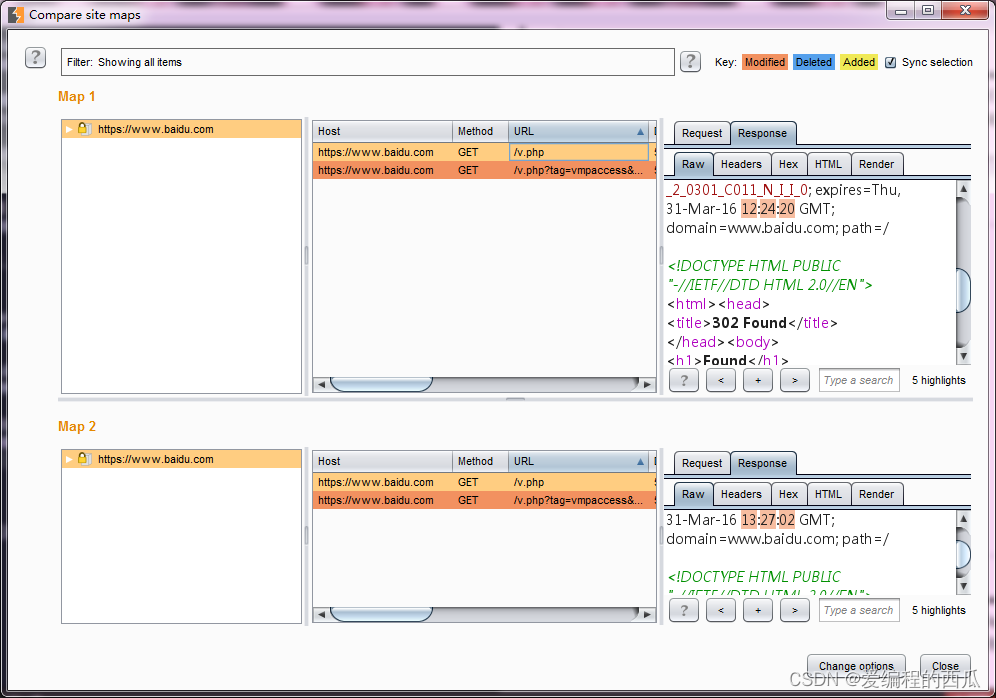
- As can be seen from the picture above , The upper part of the site comparison interface is the filter ( This filter is the same as other filters , No more details here ), The lower part is from the left 、 in 、 Three pieces on the right . On the left is the list of requested Links , In the middle Site Map 1 and Site Map 2 Message records for , On the right is the message details . When we choose Site Map 1 When a message is logged , By default... Will be automatically selected Site Map 2 The corresponding record , This is the one with the upper right corner 【 Synchronous selection 】 Check the box to control , meanwhile , In the message detail area on the right , Will automatically display Site Map 1 And Site Map 2 Differences in communication messages , Contains a request message and a reply message , Where there are differences, mark them with background color .

The attack surface analysis is Burp Suite Interactive tools (Engagement tools) The function of , Let's take a look at Analyze Target Use , Other functions will be described in the relevant chapters of advanced use . 1. First , We use the site map , open Analyze Target, As shown in the figure .
- In the pop-up analysis interface , We can see the Overview 、 dynamic URL、 static state URL、 Parameters 4 Individual view .
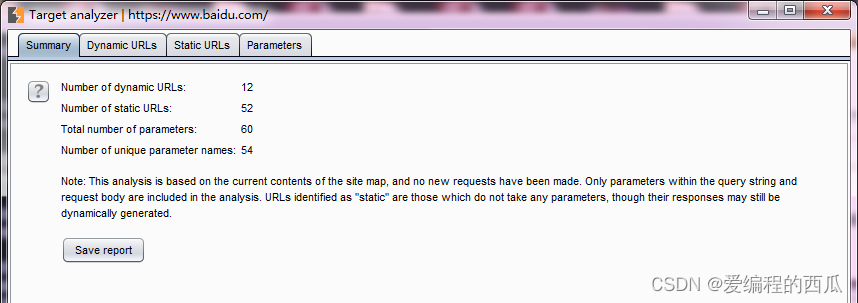
- The overview view mainly shows the current site dynamics URL Number 、 static state URL Number 、 The total number of parameters 、 Number of unique parameter names , Through this information , We have a rough understanding of the overall situation of the current site . 4. dynamic URL The view shows all dynamic URL Request and reply messages , Similar to other tools , When you select a message , The details of this message are displayed below .

- static state URL Views and dynamics URL The view is similar , Pictured .

- The parameter view consists of upper, middle and lower parts , The upper part is the parameter and parameter counting statistics area , You can sort by the number of times the parameter is used , Analyze frequently used parameters ; In the middle is a list of parameter usage , Record every use of the parameter ; The lower part is in a certain use process , Details of request message and reply message .

When using the attack surface analysis function , We need to pay attention to , This function is mainly used for requests in the site map URL Analyze , If some URL There is no record , Will not be analyzed to . meanwhile , In practical use , There are a few sites that use pseudo static , If requested URL There are no parameters in the , Then the analysis cannot distinguish , It can only be regarded as static URL To analyze .
边栏推荐
- Sort sort IP addresses
- 分布式相关面试题总结
- CentOS install mysql5.7
- Exam summary on June 30, 2022
- Interview question set
- Dynamic performance view overview
- 这是一张图片
- Burp Suite-第一章 Burp Suite 安装和环境配置
- Software engineering -- dental clinic -- demand acquisition
- Distributed system and distributed database system (Introduction)
猜你喜欢

利用js实现统计字符串数组中各字符串出现的次数,并将其格式化为对象数组。

Lambda and stream

Burp Suite-第九章 如何使用Burp Repeater

Software engineering -- dental clinic -- demand acquisition

JSP built-in object (implicit object) -- input / output object

线程崩了,为什么不会导致 JVM 崩溃呢?如果是主线程呢?

Strtus2历史漏洞复现
Now developers are beginning to do testing. Will there be no software testers in the future?

JSP built-in object (implicit object)

Excel file reading and writing (creation and parsing)
随机推荐
利用js实现统计字符串数组中各字符串出现的次数,并将其格式化为对象数组。
Shardingsphere data slicing
Burp Suite-第四章 SSL和Proxy高级选项
为啥谷歌的内部工具不适合你?
The idea of stack simulating queue
咱就是来聊聊并发编程的三大核心问题。
Jmeter性能测试之命令行执行和生成测试报告
2022/7/1
要不你给我说说什么是长轮询吧?
BGP选路原则
Basic knowledge of convolutional neural network
Interview question set
2022/7/7 exam summary
R language foundation
The difference between FileInputStream and bufferedinputstream
如何关闭高位端口
Vscode cannot start the problem solving idea
Libevent custom event (asynchronous)
Common database commands (special for review)
Summarize the common high-frequency interview questions of the software testing post