当前位置:网站首页>hyperf的启动源码分析(二)——请求如何到达控制器
hyperf的启动源码分析(二)——请求如何到达控制器
2022-07-31 13:30:00 【A黄俊辉A】
今天又看了一下 hyperf 的源码?着重看了一个 bin/hyperf.php 的最后一行 , 到底在做什么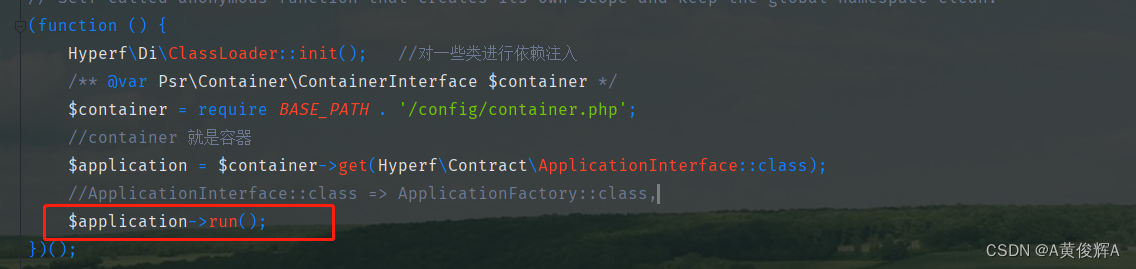
从上面的代码中, 我们可以知道 Hyperf\Contract\ApplicationInterface::class 在容器中是ApplicationFactory::class的键名, 从 ApplicationFactiory::class的代码中的我们可以看到
hyperf 的代码中, 如果通过 容器container- >get(…) 得到的对象, 都是会调用对应数的 __invoke()的方法
<?php

declare(strict_types=1);
/** * This file is part of Hyperf. * * @link https://www.hyperf.io * @document https://hyperf.wiki * @contact [email protected] * @license https://github.com/hyperf/hyperf/blob/master/LICENSE */
namespace Hyperf\Framework;
use Hyperf\Command\Annotation\Command;
use Hyperf\Contract\ConfigInterface;
use Hyperf\Di\Annotation\AnnotationCollector;
use Hyperf\Framework\Event\BootApplication;
use Psr\Container\ContainerInterface;
use Psr\EventDispatcher\EventDispatcherInterface;
use Symfony\Component\Console\Application;

class ApplicationFactory
{

    public function __invoke(ContainerInterface $container)
    {

        if ($container->has(EventDispatcherInterface::class)) {

            $eventDispatcher = $container->get(EventDispatcherInterface::class);
            $eventDispatcher->dispatch(new BootApplication());
        }

        //这里是通过 Hyperf\Config\ConfigFactory 中的 invoke方法
        $config = $container->get(ConfigInterface::class);
        $commands = $config->get('commands', []);
        // Append commands that defined by annotation.
        $annotationCommands = [];
        if (class_exists(AnnotationCollector::class) && class_exists(Command::class)) {

            $annotationCommands = AnnotationCollector::getClassesByAnnotation(Command::class);
            $annotationCommands = array_keys($annotationCommands);
        }
        //这里把注解的 command 和 config文件中指明的 commands一起合并起来
        $commands = array_unique(array_merge($commands, $annotationCommands));

        //这个application 是一个命令行工具类
        $application = new Application();

        if (isset($eventDispatcher) && class_exists(SymfonyEventDispatcher::class)) {

            $application->setDispatcher(new SymfonyEventDispatcher($eventDispatcher));
        }
        foreach ($commands as $command) {

            $application->add($container->get($command));
        }
        //这里最终返回的 application 其实就是一个命令行管理工具类
        //在它的 commands 属性中添加了很多 command
        return $application;
    }
}
所以, $application 其实就是一个 Symfony\Component\Console\Application的实例
此时, 我们进入 run() 方法, (注意,phpStorm 直接点是进不去的, 我们要找到 Application类才可看到run方法)
方法有很多, 我们这里主要看 run的方法
    public function run(InputInterface $input = null, OutputInterface $output = null)
    {


        if (\function_exists('putenv')) {

           ....
        }

        //这里的 ArgvInput 对象可以接收到命令行中的 参数, 如 php bin/hyperf.php start 这个$input 就可以得到我们的参数是start
        //如果我们输入 php bin/hyperf.php gohome 这个命令虽然会报错, 但是也可以接收到 gohome 的参数, 只不过没有过个命令罢了
        if (null === $input) {

            $input = new ArgvInput();
        }

        if (null === $output) {

            $output = new ConsoleOutput();
        }
		//这里的错误处理,暂时不看
        $renderException = function (\Throwable $e) use ($output) {

            if ($output instanceof ConsoleOutputInterface) {

                $this->renderThrowable($e, $output->getErrorOutput());
            } else {

                $this->renderThrowable($e, $output);
            }
        };
        if ($phpHandler = set_exception_handler($renderException)) {

          .......
        }
		//这里是配置输入输出,也暂时不管
        $this->configureIO($input, $output);
        try {

        	//这里是关键的代码, 我们进入 doRun
            $exitCode = $this->doRun($input, $output);
        } catch (\Exception $e) {

            ........
        } finally {

		...........
        return $exitCode;
    }
我们进入 doRun()方法
    public function doRun(InputInterface $input, OutputInterface $output)
    {

       	........
        $name = $this->getCommandName($input);
        //var_dump($name); 当启动的时候这个 $name 的值为 start; 也就是我们启动的时候传的参数 php bin/hyperf.php start
		........
		//这里合并了一些参数
        if (!$name) {

            $name = $this->defaultCommand;
            $definition = $this->getDefinition();
            $definition->setArguments(array_merge(
                $definition->getArguments(),
                [
                    'command' => new InputArgument('command', InputArgument::OPTIONAL, $definition->getArgument('command')->getDescription(), $name),
                ]
            ));
        }

        try {

            $this->runningCommand = null;
            // the command name MUST be the first element of the input
            $command = $this->find($name);
        } catch (\Throwable $e) {

         ........
        }

        if ($command instanceof LazyCommand) {

            $command = $command->getCommand();
        }

		//经过上面的代码, 我们可以看到 $command 现在是一个 startServer类
		//var_dump(get_class($command)); Hyperf\Server\Command\StartServer

        $this->runningCommand = $command;
		//最终走到了 doRunCommand方法
        $exitCode = $this->doRunCommand($command, $input, $output);
        $this->runningCommand = null;

        return $exitCode;
    }
我们进入 doRunCommand 方法
    protected function doRunCommand(Command $command, InputInterface $input, OutputInterface $output)
    {

   	 //var_dump(get_class($command)); Hyperf\Server\Command\StartServer
        ............
        //var_dump($this->dispatcher); 启动时这时的 $this->dispatcher不为null,所以走下面的 try
        if (null === $this->dispatcher) {

            return $command->run($input, $output);
        }

        // bind before the console.command event, so the listeners have access to input options/arguments
        try {

            $command->mergeApplicationDefinition();
            $input->bind($command->getDefinition());
        } catch (ExceptionInterface $e) {

            // ignore invalid options/arguments for now, to allow the event listeners to customize the InputDefinition
        }

        $event = new ConsoleCommandEvent($command, $input, $output);
        $e = null;

        try {

            $this->dispatcher->dispatch($event, ConsoleEvents::COMMAND);
 			//var_dump($event->commandShouldRun()); 这里返回的是true
            if ($event->commandShouldRun()) {

            //var_dump(get_class($command)); Hyperf\Server\Command\StartServer
			//因为 $command是 startServer类了, 所以我们要看 startServer 的 run方法了
                $exitCode = $command->run($input, $output);
            } else {

                $exitCode = ConsoleCommandEvent::RETURN_CODE_DISABLED;
            }
        } catch (\Throwable $e) {

            $event = new ConsoleErrorEvent($input, $output, $e, $command);
          ........
        }
        $event = new ConsoleTerminateEvent($command, $input, $output, $exitCode);
        $this->dispatcher->dispatch($event, ConsoleEvents::TERMINATE);

        if (null !== $e) {

            throw $e;
        }
        return $event->getExitCode();
    }
找到 Hyperf\Server\Command\StartServer 类 并找到它的 run 方法, startServer没有run方法, 所以就找到了它的父类, symfony\console\command\command.php 的 run 方法
    public function run(InputInterface $input, OutputInterface $output)
    {


        // add the application arguments and options
        $this->mergeApplicationDefinition();

        // bind the input against the command specific arguments/options
       	..............
        if ($this->code) {

            $statusCode = ($this->code)($input, $output);
        } else {

			//上面一堆的操作,都是配置相关的, 这里是主要的,可以看到, 它又到执行了, execute方法
			//于是我们到 Hyperf\Server\Command\StartServer 中,又找到 execute 方法
            $statusCode = $this->execute($input, $output);

            if (!\is_int($statusCode)) {

                throw new \TypeError(sprintf('Return value of "%s::execute()" must be of the type int, "%s" returned.', static::class, get_debug_type($statusCode)));
            }
        }

        return is_numeric($statusCode) ? (int) $statusCode : 0;
    }
于是我们又来到了 startServer 的 execute方法
    protected function execute(InputInterface $input, OutputInterface $output)
    {

        $this->checkEnvironment($output);

        $serverFactory = $this->container->get(ServerFactory::class)
            ->setEventDispatcher($this->container->get(EventDispatcherInterface::class))
            ->setLogger($this->container->get(StdoutLoggerInterface::class));

		//这里从 config server.php中读取了配置文件
        $serverConfig = $this->container->get(ConfigInterface::class)->get('server', []);
        if (! $serverConfig) {

            throw new InvalidArgumentException('At least one server should be defined.');
        }

        //我们要进入这个 configure 方法中查看一下,
        $serverFactory->configure($serverConfig);

		这是一键协程化的常量代码 注意这里只是一个常量, 在bin/hyperf.php 文件中已经定义了, 它的值是 SWOOLE_HOOK_ALL
        Coroutine::set(['hook_flags' => swoole_hook_flags()]);

		//走到这里, 进入serverFactory中, start方法
        $serverFactory->start();

        return 0;
    }
    public function configure(array $config)
    {

        $this->config = new ServerConfig($config);
		//这里它又走到了 init 方法
        $this->getServer()->init($this->config);
    }
    public function init(ServerConfig $config): ServerInterface
    {

    	//进入init , 又走到了 initServers 方法
        $this->initServers($config);
        return $this;
    }
在这里的 initServers方法中, 才是创建 swoole服务器, 并且添加 回调函数的地方
    protected function initServers(ServerConfig $config)
    {

        $servers = $this->sortServers($config->getServers());

		//这里使用的 foreach 函数,也就是说, 配置文件里可以配置多个服务器 都可以创建
		//比如 你可以配一个 HTTPServer 也可以同时配一个 tcpServer 都是可以了

        foreach ($servers as $server) {

			//这里是得到配置文件中的相应配置
            $name = $server->getName();
            $type = $server->getType();
            $host = $server->getHost();
            $port = $server->getPort();
            $sockType = $server->getSockType();
            $callbacks = $server->getCallbacks();


            if (! $this->server instanceof SwooleServer) {

                //这一行创建httpserver 服务器
                $this->server = $this->makeServer($type, $host, $port, $config->getMode(), $sockType);
                //这里得到了所有的 on 事件方法, 这里是把方法做了一个合并
                $callbacks = array_replace($this->defaultCallbacks(), $config->getCallbacks(), $callbacks);
                //这里把事件方法 绑定上对应的函数 此时, 就有了 onWorkStart onRequest 等方法的执行函数
                $this->registerSwooleEvents($this->server, $callbacks, $name);
                $this->server->set(array_replace($config->getSettings(), $server->getSettings()));
                ServerManager::add($name, [$type, current($this->server->ports)]);

                if (class_exists(BeforeMainServerStart::class)) {

                    // Trigger BeforeMainServerStart event, this event only trigger once before main server start.
                    $this->eventDispatcher->dispatch(new BeforeMainServerStart($this->server, $config->toArray()));
                }
            } else {

                /** @var bool|\Swoole\Server\Port $slaveServer */
                $slaveServer = $this->server->addlistener($host, $port, $sockType);
                if (! $slaveServer) {

                    throw new \RuntimeException("Failed to listen server port [{
      $host}:{
      $port}]");
                }
                $server->getSettings() && $slaveServer->set(array_replace($config->getSettings(), $server->getSettings()));
                $this->registerSwooleEvents($slaveServer, $callbacks, $name);
                ServerManager::add($name, [$type, $slaveServer]);
            }

            // Trigger beforeStart event.
            if (isset($callbacks[Event::ON_BEFORE_START])) {

                [$class, $method] = $callbacks[Event::ON_BEFORE_START];
                if ($this->container->has($class)) {

                    $this->container->get($class)->{
    $method}();
                }
            }

            if (class_exists(BeforeServerStart::class)) {

                // Trigger BeforeServerStart event.
                $this->eventDispatcher->dispatch(new BeforeServerStart($name));
            }
        }
    }
上面的方法都完成了, swoole 服务器也创建了, 我们再回到原来的代码中,就剩下服务器的开启命令 start() 了
    public function start()
   {

       return $this->getServer()->start();
   }
这里就是把服务开启了
那么, 我们的路由是怎么走到相应的控制器方法中的呢, 这就是看一下,我们的 onRequest 事件都做了什么了
上面的 initServers 方法中, 绑定了 onRequest ,onWorkstart 的事件处理方法, 我们就从那个里面找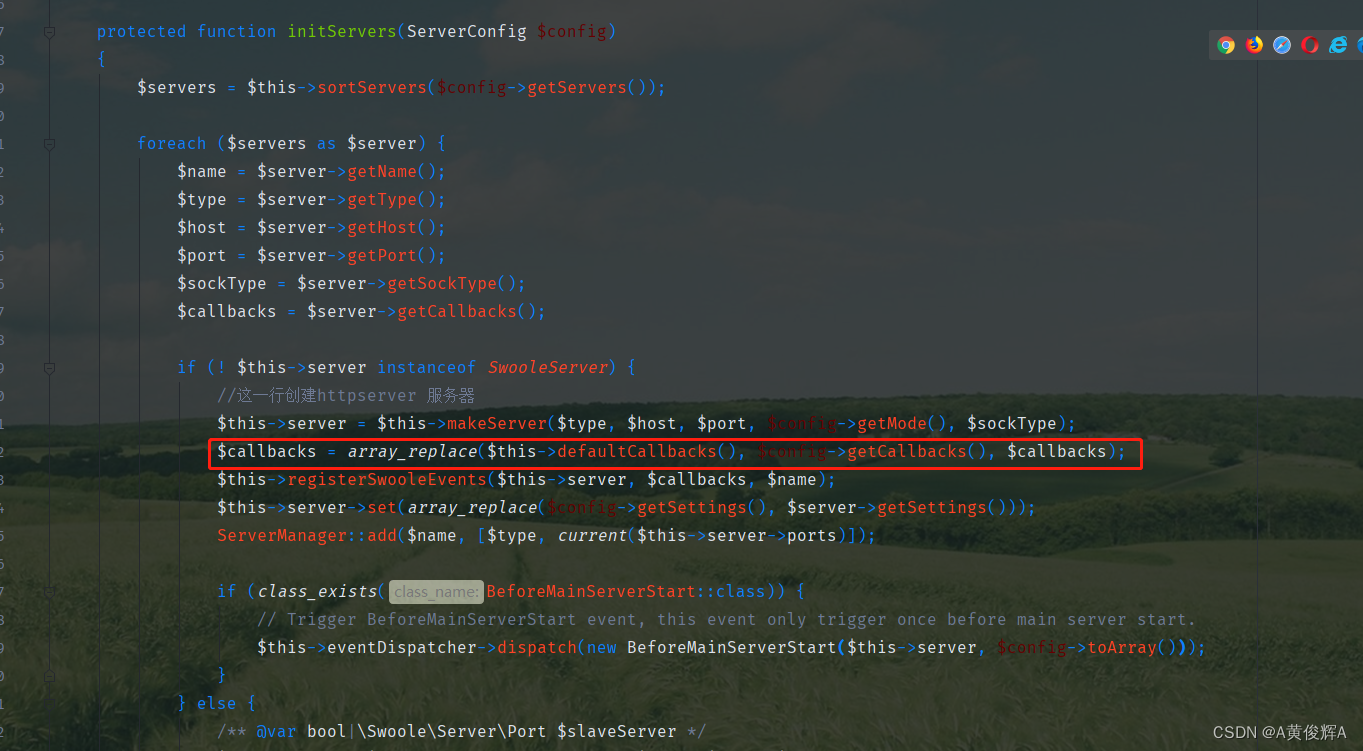
打印出 $callbacks
array(7) {

  ["start"]=>
  array(2) {

    [0]=>
    string(40) "Hyperf\Framework\Bootstrap\StartCallback"
    [1]=>
    string(7) "onStart"
  }
  ["managerStart"]=>
  array(2) {

    [0]=>
    string(47) "Hyperf\Framework\Bootstrap\ManagerStartCallback"
    [1]=>
    string(14) "onManagerStart"
  }
  ["workerStart"]=>
  array(2) {

    [0]=>
    string(46) "Hyperf\Framework\Bootstrap\WorkerStartCallback"
    [1]=>
    string(13) "onWorkerStart"
  }
  ["workerStop"]=>
  array(2) {

    [0]=>
    string(45) "Hyperf\Framework\Bootstrap\WorkerStopCallback"
    [1]=>
    string(12) "onWorkerStop"
  }
  ["workerExit"]=>
  array(2) {

    [0]=>
    string(45) "Hyperf\Framework\Bootstrap\WorkerExitCallback"
    [1]=>
    string(12) "onWorkerExit"
  }
  ["pipeMessage"]=>
  array(2) {

    [0]=>
    string(46) "Hyperf\Framework\Bootstrap\PipeMessageCallback"
    [1]=>
    string(13) "onPipeMessage"
  }
  ["request"]=>
  array(2) {

    [0]=>
    string(24) "Hyperf\HttpServer\Server"
    [1]=>
    string(9) "onRequest"
  }
}
可以看到 onRequest 对应的是 Hyperf\HttpServer\Server 的类
进入 Hyperf\HttpServer\Server 类, 找到 onRequest方法
    public function onRequest($request, $response): void
    {

        try {

            CoordinatorManager::until(Constants::WORKER_START)->yield();

            [$psr7Request, $psr7Response] = $this->initRequestAndResponse($request, $response);
            //这里可以看到, hyperf 把$request 和 $response 又封装了一下
            //进入内部看了一下, 为什么要这样封装一下才用, 大至的意思就是, 把这个新的 $psrRequest和新的$psrResponse 对象, 加入到了 上下文变量 Context中,
            //这里我们也能解释, 一个问题, 在中间件中, 我们要把 $request中添加一个变量, 传送到 控制器中, 为什么不可以使用 $request 了, 因为但入控制器中的是一个 $psrRequest对象

            $psr7Request = $this->coreMiddleware->dispatch($psr7Request);
            /** @var Dispatched $dispatched */
            $dispatched = $psr7Request->getAttribute(Dispatched::class);
            $middlewares = $this->middlewares;
            if ($dispatched->isFound()) {

                $registeredMiddlewares = MiddlewareManager::get($this->serverName, $dispatched->handler->route, $psr7Request->getMethod());
                $middlewares = array_merge($middlewares, $registeredMiddlewares);
            }
			//这里是 分发请求, 我们进入这个函数中
            $psr7Response = $this->dispatcher->dispatch($psr7Request, $middlewares, $this->coreMiddleware);
        } catch (Throwable $throwable) {

            // Delegate the exception to exception handler.
            $psr7Response = $this->exceptionHandlerDispatcher->dispatch($throwable, $this->exceptionHandlers);
        } finally {

            // Send the Response to client.
            if (! isset($psr7Response)) {

                return;
            }
            if (isset($psr7Request) && $psr7Request->getMethod() === 'HEAD') {

                $this->responseEmitter->emit($psr7Response, $response, false);
            } else {

                $this->responseEmitter->emit($psr7Response, $response, true);
            }
        }
    }
   public function dispatch(...$params): ResponseInterface
    {

        /** * @param RequestInterface $request * @param array $middlewares * @param MiddlewareInterface $coreHandler */
        [$request, $middlewares, $coreHandler] = $params;
        $requestHandler = new HttpRequestHandler($middlewares, $coreHandler, $this->container);
        //创建了一个处理对象, 并调用了 handle 处理方法, 我们再进入 handle
        return $requestHandler->handle($request);
    }
class HttpRequestHandler extends AbstractRequestHandler implements RequestHandlerInterface
{

    /** * Handles a request and produces a response. * May call other collaborating code to generate the response. */
    public function handle(ServerRequestInterface $request): ResponseInterface
    {

    	//没说的, 我们再进入 handleRequest 方法中
        return $this->handleRequest($request);
    }
}
    protected function handleRequest($request)
    {

		//从前面的代码中,我们可以发现, hyperf 把我们要执行的目录方法, 放在了 中间件数组 middlewares 中的最后一个执行, 所以 下面的
        if (! isset($this->middlewares[$this->offset]) && ! empty($this->coreHandler)) {

            $handler = $this->coreHandler;
        } else {

        	//这个$handler 其实就是我们要 执行的控制器的 目标方法
            $handler = $this->middlewares[$this->offset];
            is_string($handler) && $handler = $this->container->get($handler);
        }
        if (! method_exists($handler, 'process')) {

            throw new InvalidArgumentException(sprintf('Invalid middleware, it has to provide a process() method.'));
        }
       	//这里还是相当于中间件的用法,但是它执行的是我们要使用的 控制器的目标方法
        return $handler->process($request, $this->next());
    }
我们继续进入 process 的方法中
这个里面的代码 有点像 php的 fastRoute 插件的代码, 有兴趣的可以了解一下 nikic/fast-route
 public function process(ServerRequestInterface $request, RequestHandlerInterface $handler): ResponseInterface
    {

    	//这个地方 $request 就是之前的 $psrRequest 对象
        $request = Context::set(ServerRequestInterface::class, $request);

        /** @var Dispatched $dispatched */
        $dispatched = $request->getAttribute(Dispatched::class);

        if (! $dispatched instanceof Dispatched) {

            throw new ServerException(sprintf('The dispatched object is not a %s object.', Dispatched::class));
        }

        $response = null;
        switch ($dispatched->status) {

        	//如果没找到路由
            case Dispatcher::NOT_FOUND:
                $response = $this->handleNotFound($request);
                break;
           	//如果方法不被允许
            case Dispatcher::METHOD_NOT_ALLOWED:
                $response = $this->handleMethodNotAllowed($dispatched->params, $request);
                break;
            //如果找到就执行 handleFound方法
            case Dispatcher::FOUND:
                $response = $this->handleFound($dispatched, $request);
                break;
        }
        if (! $response instanceof ResponseInterface) {

            $response = $this->transferToResponse($response, $request);
        }
        return $response->withAddedHeader('Server', 'Hyperf');
    }
那么 handleFound 方法,就是执行的目标 控制器的方法了
    protected function handleFound(Dispatched $dispatched, ServerRequestInterface $request)
    {

        if ($dispatched->handler->callback instanceof Closure) {

            $parameters = $this->parseClosureParameters($dispatched->handler->callback, $dispatched->params);
            $response = call($dispatched->handler->callback, $parameters);
        } else {

        	//这里得到了 控制器 和 要执行的方法
            [$controller, $action] = $this->prepareHandler($dispatched->handler->callback);
            //这里从容器中得到 controller 这是swoole 读入内存的, 不会发生变化的,除非重启, 就是这样才叫常驻内存, 快的原因
            $controllerInstance = $this->container->get($controller);
            if (! method_exists($controllerInstance, $action)) {

                // Route found, but the handler does not exist.
                throw new ServerErrorHttpException('Method of class does not exist.');
            }
            $parameters = $this->parseMethodParameters($controller, $action, $dispatched->params);
            //这里就是控制器, 调用方法的位置, 并且还有参数
            $response = $controllerInstance->{
    $action}(...$parameters);
        }
        return $response;
    }
走到这里, 我们就可以看到一个请求, 到达控制器的具体步骤了
边栏推荐
- 技能大赛训练题:ftp 服务攻防与加固
- 操作符详解
- Spark学习:为Spark Sql添加自定义优化规则
- Adding data nodes and decommissioning data nodes in the cluster
- 网络协议及相关技术详解
- SAP 电商云 Spartacus SSR Optimization Engine 几处 timeout 的执行顺序
- [RPI]树莓派监控温度及报警关机保护「建议收藏」
- 20.nn.Module
- [CPU Design Practice] Simple Pipeline CPU Design
- Spark Learning: Add Custom Optimization Rules for Spark Sql
猜你喜欢

技能大赛训练题:交换机的远程管理
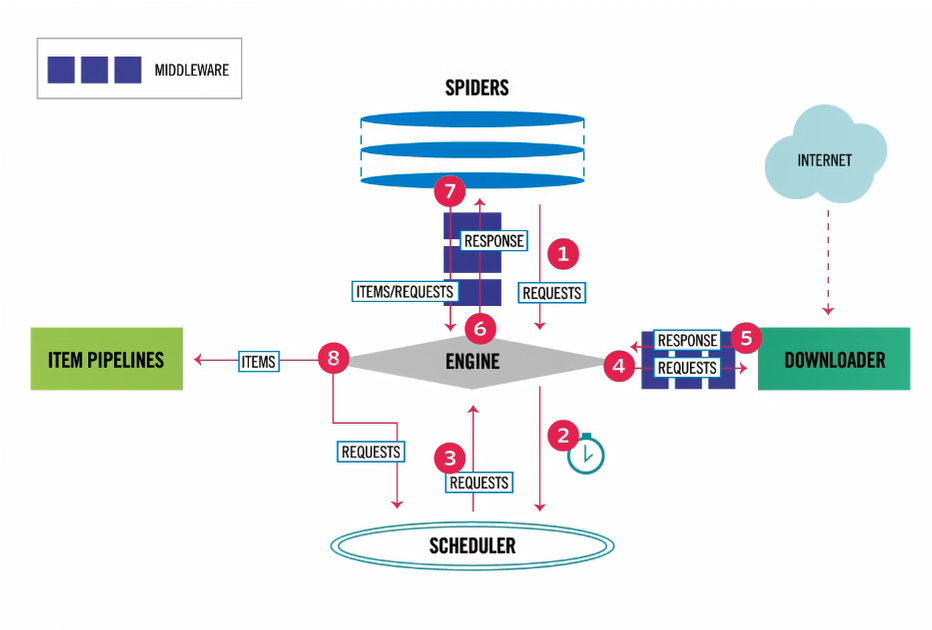
3.爬虫之Scrapy框架1安装与使用

C#控件CheckBox的使用
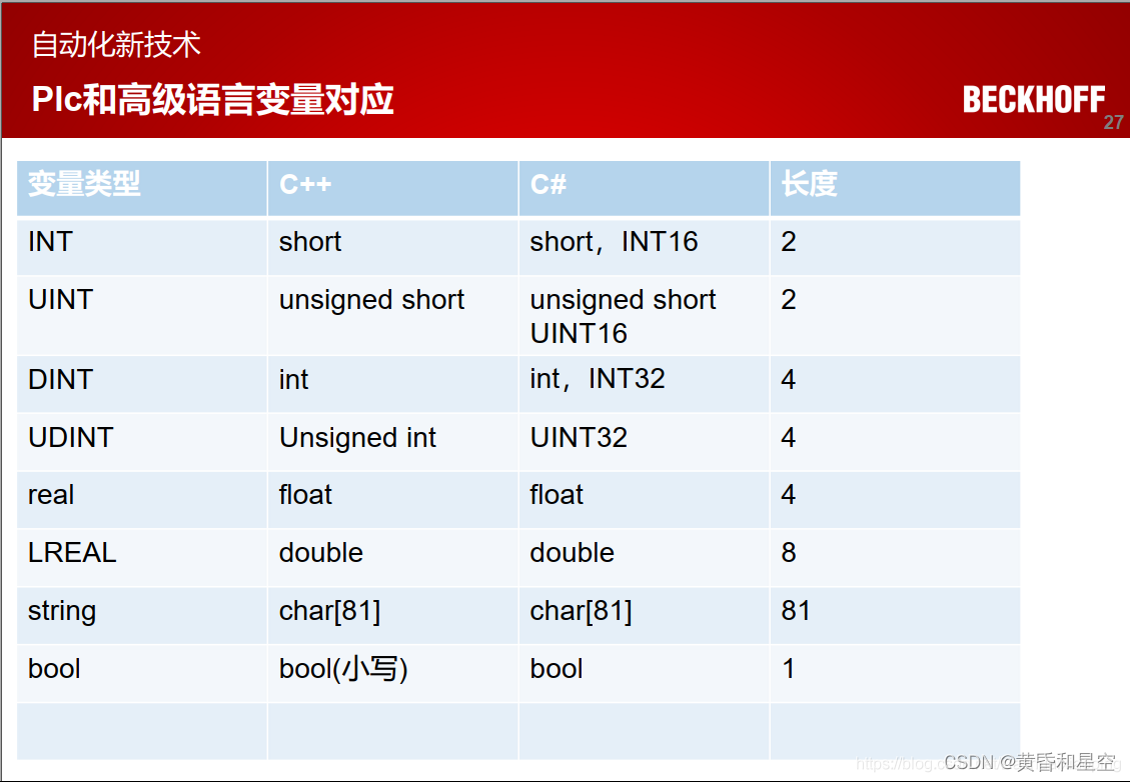
ADS与C#通信

报错:npm ERR code EPERM
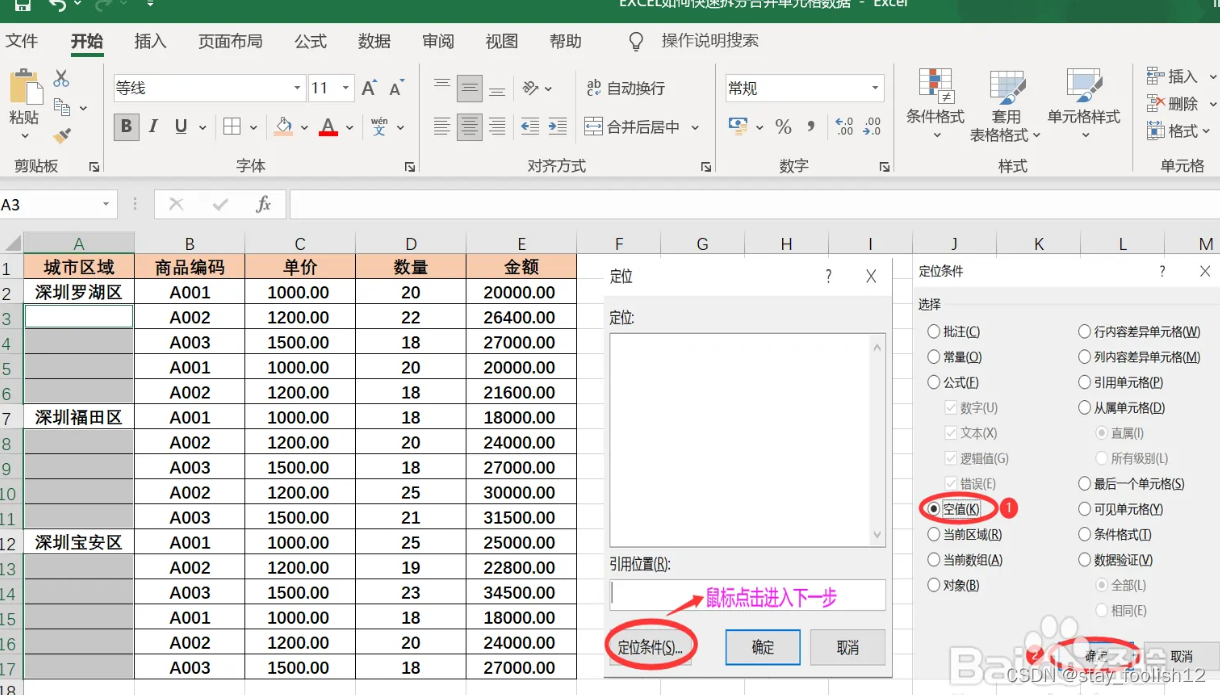
How to quickly split and merge cell data in Excel

IDEA can't find the Database solution

The batch size does not have to be a power of 2!The latest conclusions of senior ML scholars
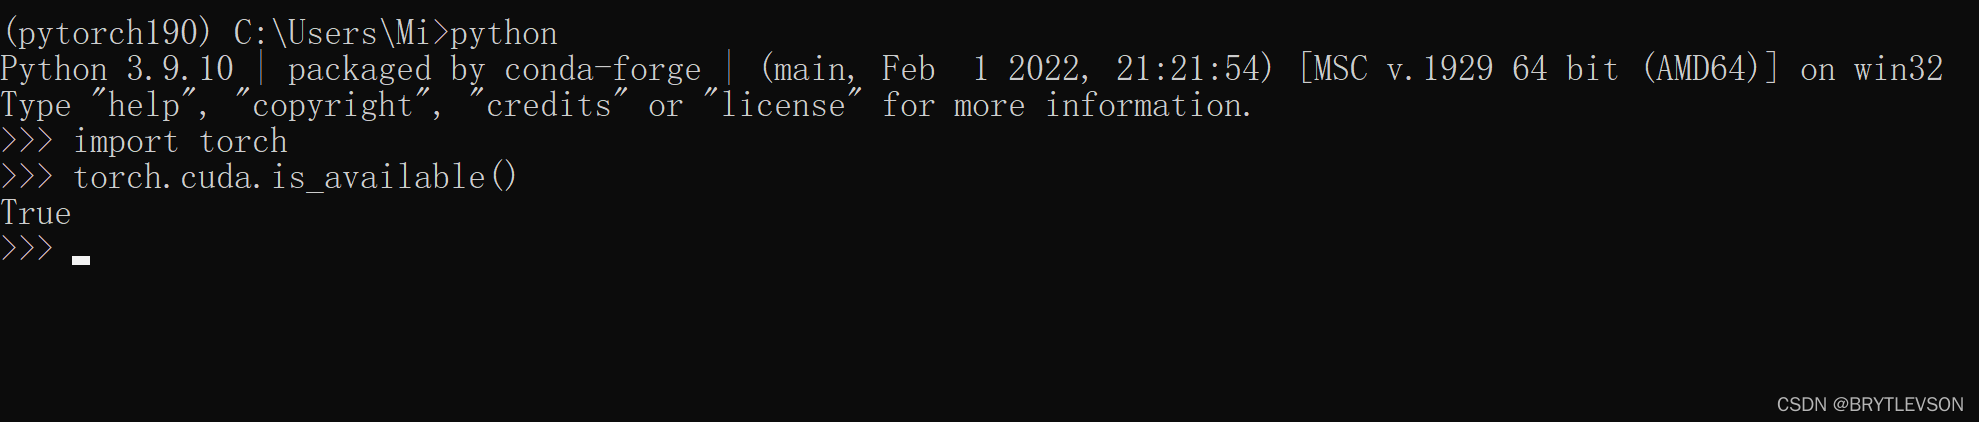
Install the latest pytorch gpu version
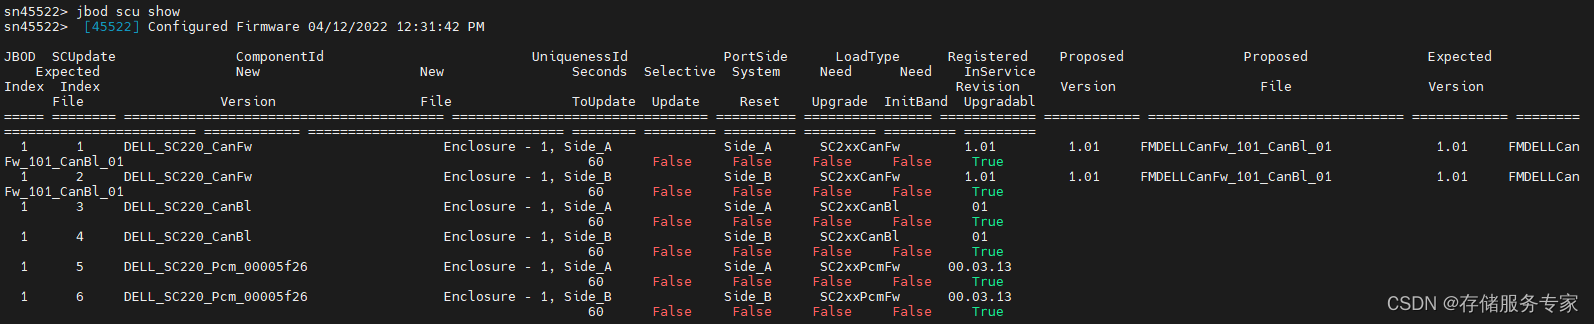
DELL SC compellent 康贝存储系统怎么抓取配置信息
随机推荐
Golang - gin - pprof - use and safety
如何使用StarUML画类图[通俗易懂]
深入浅出边缘云 | 4. 生命周期管理
Save and load numpy matrices and vectors, and use the saved vectors for similarity calculation
基于高阶微分器的无模型滑模控制器及其在自动电压调节器中的应用
How IDEA runs web programs
STM32——软件SPI控制AD7705[通俗易懂]
关于MySQL主从复制的数据同步延迟问题
技能大赛训练题:MS15_034漏洞验证与安全加固
Even if the image is missing in a large area, it can also be repaired realistically. The new model CM-GAN takes into account the global structure and texture details
ECCV 2022 | Robotic Interaction Perception and Object Manipulation
CLion用于STM32开发
VU 非父子组件通信
Four ways to clear the float and its principle understanding
PartImageNet物体部件分割(Semantic Part Segmentation)数据集介绍
0X7FFFFFFF,0X80000000「建议收藏」
AI cocoa AI frontier introduction (7.31)
查看Mysql数据库版本
C#控件StatusStrip使用
Istio微服务治理网格的全方面可视化监控(微服务架构展示、资源监控、流量监控、链路监控)