当前位置:网站首页>Free books! The best-selling book "Introduction and practice of OpenCV image processing" has been completed
Free books! The best-selling book "Introduction and practice of OpenCV image processing" has been completed
2022-06-29 10:47:00 【Novice learning Python】
OpenCV The basic image operations are only for the pixels in the image , It is not a direct operation on the whole image . In many cases, you can't just change the pixels to operate the image , To do this, we need to learn about the arithmetic operation of images .
1. Image addition
For two images of the same size , have access to cv2.add Function adds them . When using this function , The two images must be the same size , Or the addend is just a simple scalar .
cv2.add(img1,img2)
cv2.add The operation is to put two images on Add pixel values of , The syntax is as follows . The parameters are explained as follows .
img1: Augend , The first image .
img2: Addition number , The second image , It can also be a simple scalar .
2.OpenCV And NumPy The difference between module arithmetic addition
From 1 We already know in this chapter , The image is saved in the form of matrix in the program , So we can also use moments Matrix addition is used to add the pixels of two images . except OpenCV Medium cv2.add Function , We can also use NumPy Module to perform image addition operation .
But the two will produce different results in some cases , The reason lies in OpenCV and NumPy The module handles the overflow The method is different . What is overflow ? for instance , If the pixel value of a single channel image is 250, On another image The value of pixels in the same position is 10, Then the sum of the two is 260, But the upper limit of pixel value is 255, So this At that time, we encountered the overflow problem .
OpenCV The way to deal with overflow is saturation operation , and NumPy The method of module handling overflow is modular operation . for example , stay OpenCV in , If 250+10=260 This situation , It will pick the maximum value 255; And in the NumPy Module , It is equivalent to executing (250+10)%255=5. Based on our understanding , Generally, I hope there will be OpenCV Medium result , and NumPy The result of the module is quite different from the original two images , So I'm doing arithmetic on the image When adding , Compare with NumPy modular , We prefer to use OpenCV.
3. Image addition practice
I understand NumPy Modules and OpenCV The difference between image addition in , Now let's practice . this Two different images are used to test the code , Pictured 1 Sum graph 2 Shown . Now let's go through cv2.add Function performs arithmetic addition of the two images , The sample code is as follows .
import cv2
import numpy
img1=cv2.imread('1.jpg')
img2=cv2.imread('2.jpg')
img3=cv2.add(img1,img2)
cv2.imshow('img',img3)
cv2.waitKey(0)
 cv2.destroyAllWindows()
chart 1 Star chart chart 2 Cardiogram
After running the code , The result is shown in Fig. 3 Shown .

chart 3 Image addition result
4. Image weighting
Our simple image direct arithmetic addition , Just add the pixel values of the two images , and There was no other operation . Here is the concept of weight , For the use of cv2.add Image synthesized by function , It's like The prime value is set to c, chart 1 The pixel value of the image shown is set to a, chart 2 The pixel value of the image shown is set to b, that c=a+b, In this case, the weights of both sides are equal . But we can change the proportion of two images , For example, the proportion of the first image 70%, Proportion of the second image 30%, This is the time c=0.7×a+0.3×b; If we need to add another constant k, So the whole formula The child will become c=0.7×a+0.3×b+k. For this implementation , We can use cv2.addWeighted function , Its functional language The method is as follows .
cv2.addWeighted(src1,alpha,src2,beta,gamma)
The parameters are explained as follows .
src1: The first image .
alpha: Weight of the first image .
src2: Second image .
beta: The weight of the second image .
gamma: Additional constants .
The sample code is as follows .
img=cv2.addWeighted(img1,0.2,img2,0.3,10)
Now let's talk about the graph 1 The images and figures shown 2 The image shown is weighted , constant k The values for 0, The sample code is as follows .
import cv2
import numpy
img1=cv2.imread('1.jpg')
img2=cv2.imread('2.jpg')
img3=cv2.addWeighted(img1,0.7,img2,0.3,0)
cv2.imshow('img',img3)
cv2.waitKey(0)
cv2.destroyAllWindows()
The image weighting results are shown in Fig 4 Shown .

chart 4 Image weighting results
You can also use a constant k Add a fixed value to all pixels of the whole image , Readers can modify the code to Realization .
5. Image logic operations
Here we will introduce the mask (mask) The concept of , Literally, it's a film used to cover up . The mask has many functions , Here is a brief introduction .
Used to extract the area and region to be captured : Using pre made regions of interest (ROI) The mask is matched with the image to be processed ride ( Logic and operation ), Get the image of the region of interest , The image value in the region of interest remains unchanged , And feel happy The image values outside the interesting area are 0.
To act as a shield : Mask some areas on the image with a mask , Keep it out of the process , Used to reduce computation The amount ; You can also only process or count the shielding area .
Carry out structural feature extraction : Using similarity variable or image matching method to detect and extract the knot similar to the mask in the image Structural features .
Special shape image making : Cover the image with a mask of the desired shape ( A mold similar to plasticine ). In the operation functions of all basic image operations , Any processing function with mask , Its masks are involved in the operation ( Input After the function logic operation, the image is related to the mask image or matrix ). In computer vision , We often use the following logical operations .
The syntax of logical non is as follows .
cv2.bitwise_not(img,mask=None) # Invert the pixel values in the image bit by bit
The syntax of logic and is as follows .
cv2.bitwise_and (img1,img2,mask=None) # Compare the pixel values in the image with
The syntax of logical or is as follows .
cv2.bitwise_or(img1,img2,mask=None) # The pixel values in the image are bitwise OR
The syntax of logical XOR is as follows .
cv2.bitwise_xor (img1,img2,mask=None) # XOR the pixel values in the image
The parameters are explained as follows .
img: Processed image .
img1: The first image of the operation .
img2: The second image of the operation .
mask: The mask used in the operation , The default is no mask . The specific introduction of bitwise operation is as follows .
AND: If and only if both pixel values are greater than 0 when , Only true .
OR: If either of the two pixel values is greater than 0, It is true .
XOR: Exclusive or , XOR calculation is performed when and only when two pixel values are converted to binary .
NOT: Take the opposite , Invert... In the image “ open ” and “ Turn off ” Pixel values . Let's look at the effect of logical operation one by one .
The first is the mapping 1 Perform logical non operation on the image shown , The sample code is as follows .
import cv2
import numpy
img=cv2.imread('1.jpg',0)
img=cv2.bitwise_not(img)
cv2.imshow('img',img)
cv2.waitKey(0)
cv2.destroyAllWindows()
Be careful : Here, the author reads it directly in the form of gray image , Because of the picture 1 The image shown is only black and white , the So it can be regarded as a binary graph .
Run code , The effect is as shown in the picture 5 Shown .
Let's introduce the graph 2 The image shown is used as a mask , Pair graph 5 The image shown is subjected to mask type logical non-linear processing operation , The sample code is as follows .
import cv2
import numpy
img1=cv2.imread('1.jpg',0)
mask=cv2.imread('2.jpg',0)
img=cv2.bitwise_not(img1,mask=mask)
cv2.imshow('img',img)
 cv2.waitKey(0)
cv2.destroyAllWindows()
After running the code , The effect is as shown in the picture 6 Shown .
 chart 5 Logical non operation chart 6 Mask logic non operation
Observation map 6, You can see the picture 2 The black part shown ( Logic 0) And graph 5 The weight of the white part shown The overlap is blurred , This is the function of the mask .
Now let's try other logical operations , First create a square diagram , Pictured 7 Shown . We use the square as a mask , Mask logic and operation of star graph and heart graph , The sample code is as follows .
import cv2
import numpy
img1=cv2.imread('1.jpg',0)
img2=cv2.imread('2.jpg',0)
mask=cv2.imread('3.jpg',0)
img=cv2.bitwise_and(img1,img2,mask=mask)
cv2.imshow('img',img)
 cv2.waitKey(0)
cv2.destroyAllWindows()
The running result of the code is shown in Figure 8 Shown .

chart 7 Square chart 8 Mask logic and operation
Because the center of the mask is logic 0, So all the pieces in the middle were cut out . Next , Let's do the operation of mask logical or and mask logical XOR on star graph and heart graph , A mask The code of the logic or operation of the formula is as follows .
import cv2
import numpy
img1=cv2.imread('1.jpg',0)
img2=cv2.imread('2.jpg',0)
mask=cv2.imread('3.jpg',0)
img=cv2.bitwise_or(img1,img2,mask=mask)
cv2.imshow('img',img)
cv2.waitKey(0)
cv2.destroyAllWindows()
The code of mask logic XOR operation is as follows .
import cv2
import numpy
img1=cv2.imread('1.jpg',0)
img2=cv2.imread('2.jpg',0)
mask=cv2.imread('3.jpg',0)
img=cv2.bitwise_xor(img1,img2,mask=mask)
cv2.imshow('img',img)
cv2.waitKey(0)
cv2.destroyAllWindows()
The running results of the two sections of code are shown in Figure 9 And graph 10 Shown .
Mask is mainly used in color tracking , That is, after specifying the tracking color , Track the motion of objects with specified colors .
Be careful : For masks , It is recommended to use binary diagram , Because its own meaning is logic 0 And logic 1, Corresponding to two Values in the graph 0 and 255.
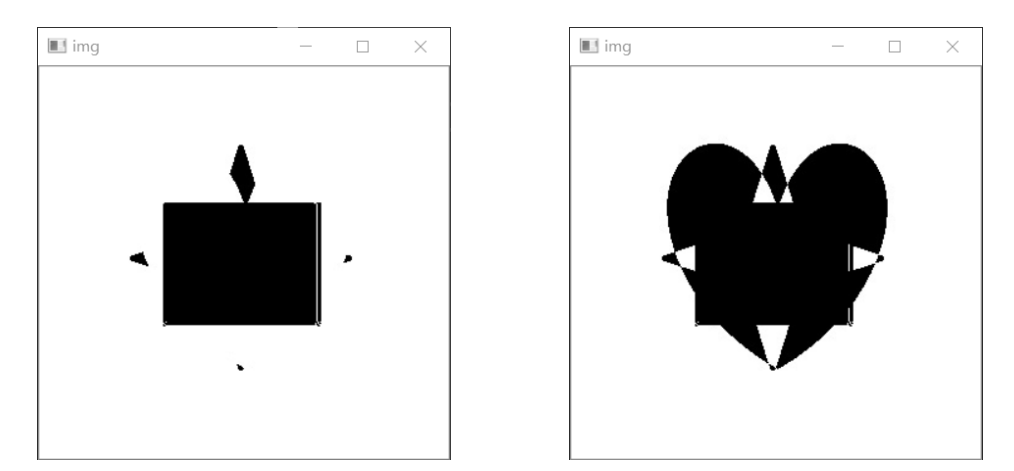
chart 9 Mask logic or operation chart 10 Masked logical XOR operation
This article is excerpted from 《 OpenCV Introduction and practice of image processing 》, Author Rong Jiaqi , This article has been reprinted by the people's post and Telecommunications Publishing House .

Book presented at the end of the article

OpenCV 4 Explain the tutorial , be based on Python Language implementation , Analysis and utilization OpenCV 4 Basic operation of image processing , Cooperate with the actual combat of the project , Real application scenarios , Complimentary source code 、 Explain the video and PPT.
How to get this book
Want to need this book students , You can enter... In the background of the following official account : Little helper , Ask him to get . Code :opencv . Students in need come quickly .
边栏推荐
- Reading notes of CLR via C -clr boarding and AppDomain
- Design of intelligent test paper generation system
- Alibaba cloud server is installed and configured with redis. Remote access is unavailable
- 《如何阅读一本书》读后总结
- C # use winexec to call exe program
- Win32exception (0x80004005): This program is blocked by group policy. For more information, contact your system administrator.
- Fully understand the volatile keyword
- C#MDI打开子窗体去掉自动生成的菜单栏
- Fully understand the MESI cache consistency protocol
- The process of updating a record in MySQL
猜你喜欢
2020-10-17:刷题1

2600 pages in total! Another divine interview manual is available~

基于STM32+RFID设计的宿舍检修管理系统

CLR via C reading notes - single instance application

【评论送书】适合初学者的 6 个有趣的 R 语言项目
View CSDN blog rankings

【C语言进阶】字符串和内存函数(二)

Atomic explanation of AQS

CS231n-2022 Module1: 神经网络要点概述(2)

产品力不输比亚迪,吉利帝豪L雷神Hi·X首月交付1万台
随机推荐
共2600页!又一份神级的面试手册面世~
Devaxpress double click to get cell data
UserWarning: Usage of dash-separated ‘script-dir‘ will not be supported in future versions. note
小米手机-解BL锁+开ROOT权限
WinForm uses zxing to generate QR code
BUUCTF--内涵的软件
Print 9*9 multiplication formula table (C language)
1-数据库了解
高薪程序员&面试题精讲系列117之怎么保证Redis缓存与数据库的数据一致性?
Essential for efficient work: how can testers improve their communication skills?
Downloading and installing VMware (basic idea + detailed process)
C language library function --strstr()
Redis installation and cluster setup under Linux
在实践中学习Spark计算框架(01)
October 17, 2020: question brushing 1
Basic operations during dev use
Ikvm Net project progress
Comprehensive understanding of synchronized
Real time value transfer from C form to another form
全面理解Volatile关键字