当前位置:网站首页>Dameng real-time active and standby cluster construction
Dameng real-time active and standby cluster construction
2022-07-24 14:03:00 【51CTO】
Read write separation cluster deployment
Hosting plan
Host name | service ip | heartbeat ip | Database name | Instance name |
dm-16 | 192.168.3.16 | No instance required , Only for monitoring and management | No instance required , Only for monitoring and management | |
dm-17 | 192.168.2.17 | 192.168.3.17 | dmrw | dmrw1 |
dm-18 | 192.168.3.18 | 192.168.3.18 | dmrw | dmrw2 |
Port planning
Instance name | Instance port | MAL System monitoring TCP Port of connection | The instance local daemon listens TCP Port of connection | Instance listening daemon TCP Port of connection |
dmrw1 | 5236 | 7336 | 7436 | 7536 |
dmrw2 | 5236 | 7336 | 7436 | 7536 |
The local store LVM disk
disk | LVM Disk name / purpose |
/dev/sda(25G) | /dev/mapper/centos-root Database installation disk ) |
/dev/sda(25G) | /dev/mapper/centos-root Data disk ) |
Directory planning
Database software installation directory | /home/dmdba/dmdbms |
Instance installation directory | /home/dmdba/dmdata/ |
Archive log storage directory | /home/dmdba/dmdata/arch |
Backup file storage directory | /home/dmdba/dmdata/dmbak/ |
Steps to build
Modify hostname
vi /etc/hostname
Modify the host name on the plan
Software installation
dm Database single node installation steps , Here slightly
Initialize instance
Both nodes need to operate (dm-17\dm-18)
dminit path=/home/dmdba/dmdata page_size=32 extent_size=32 charset=1 log_size=2048 db_name=dmrw instance_name=dmrw

To host dm-17 Separate the main library for reading and writing , Boot instance
dmserver /home/dmdba/dmdata/dmrw/dm.ini
appear system is ready Post input exit Stop database
Offline backup database
Host computer dmdb01 Execute the following command on , Confirm master library dmap Service started :
ps -ef|grep dmap

dmdba user start-up dmrman Tools
dmrman use_ap=2
perform backup Whole database :
backup database '/home/dmdba/dmdata/dmrw/dm.ini' backupset '/home/dmdba/dmdata/dmbak/bakfull';

Backup restore backup database
Backed up files /home/dmdba/dmdba/dmbak/bakfull Copy to server dm-18 On .
scp -r /home/dmdba/dmdata/dmbak/bakfull 192.168.2.18:/home/dmdba/dmdata/dmbak/.
Host computer dm-18 On
Use dmrman Restore the standby database with tools ,dmdba User execution :
dmrman use_ap=2
Get into dmrman Tool interface
perform restore:
restore database '/home/dmdba/dmdata/dmrw/dm.ini' from backupset '/home/dmdba/dmdata/dmbak/bakfull'

When it's done recover:
recover database '/home/dmdba/dmdata/dmrw/dm.ini' from backupset '/home/dmdba/dmdata/dmbak/bakfull '

Finally, execute recover update db_magic.
recover database '/home/dmdba/dmdata/dmrw/dm.ini' update db_magic;

modify dm.ini Parameters
All nodes need to be modified
Execute the following command :
vi /home/dmdba/dmdata/dmrw/dm.ini
Main library dm-17 Modify the following parameter values on :
INSTANCE_NAME = dmrw1
MAL_INI = 1
ARCH_INI = 1
ALTER_MODE_STATUS = 0
ENABLE_OFFLINE_TS = 2
For the library dm-18 Modify the following parameter values on :
INSTANCE_NAME = dmrw2
MAL_INI = 1
ARCH_INI = 1
ALTER_MODE_STATUS = 0
ENABLE_OFFLINE_TS = 2
Configure archive configuration file
Create a new file in the instance Directory dmarch.ini, Execute the following command :
vi /dmdata/dmdb/dmarch.ini
Create a new file in the instance Directory dmarch.ini, Execute the following command :
vi /dmdata/dmdb/dmarch.ini
Main library dm-17 Add the following on :
[ARCHIVE_REALTIME1]
ARCH_TYPE = REALTIME
ARCH_DEST = dmrw2
[ARCHIVE_REALTIME2]
ARCH_TYPE = REALTIME
ARCH_DEST = dmrw3
[ARCHIVE_LOCAL1]
ARCH_TYPE = LOCAL
ARCH_DEST = /home/dmdba/dmdata/arch
ARCH_FILE_SIZE = 2048
ARCH_SPACE_LIMIT = 102400
For the library dm-18 Add the following on :
[ARCHIVE_REALTIME1]
ARCH_TYPE = REALTIME
ARCH_DEST = dmrw1
[ARCHIVE_REALTIME2]
ARCH_TYPE = REALTIME
ARCH_DEST = dmrw3
[ARCHIVE_LOCAL1]
ARCH_TYPE = LOCAL
ARCH_DEST = /home/dmdba/dmdata/arch
ARCH_FILE_SIZE = 2048
ARCH_SPACE_LIMIT = 102400
To configure dmmal.ini( Heartbeat Network )
Both nodes should be configured , And the configuration must be the same
[[email protected] dmrw]$ cat dmmal.ini
MAL_CHECK_INTERVAL = 5
MAL_CONN_FAIL_INTERVAL = 15
[MAL_INST1]
MAL_INST_NAME = dmrw1
MAL_HOST = 192.168.3.17
MAL_PORT = 7336
MAL_INST_HOST = 192.168.2.17
MAL_INST_PORT = 5236
MAL_DW_PORT = 7436
MAL_INST_DW_PORT = 7536
[MAL_INST2]
MAL_INST_NAME = dmrw2
MAL_HOST = 192.168.3.18
MAL_PORT = 7336
MAL_INST_HOST = 192.168.2.18
MAL_INST_PORT = 5236
MAL_DW_PORT = 7436
MAL_INST_DW_PORT = 7536
Configuration daemon
Both nodes should be configured , And the configuration must be the same
[[email protected] dmrw]$ cat dmwatcher.ini
[GRP_RW]
DW_TYPE = GLOBAL
DW_MODE =MANUAL
DW_ERROR_TIME = 30
INST_RECOVER_TIME = 60
INST_ERROR_TIME = 20
INST_OGUID = 453331
INST_INI = /home/dmdba/dmdata/dmrw/dm.ini
INST_AUTO_RESTART = 1
INST_STARTUP_CMD = /home/dmdba/dmdbms/bin/dmserver
Start the database instance
Use dmdba user , Execute the following command on the main library ( Both active and standby databases execute ):
dmserver /home/dmdba/dmdata/dmrw/dm.ini mount
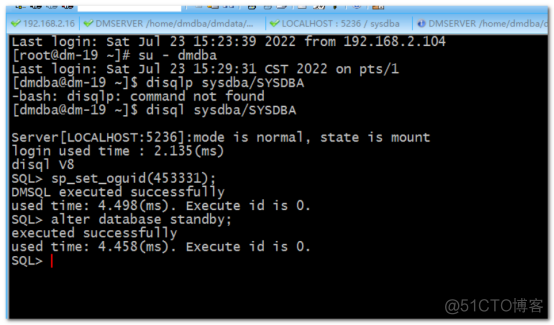
Use in new terminals disql Tools connect to the database :
./disql SYSDBA/SYSDBA
Both master and slave databases are modified oguid, Execute the following command :
sp_set_oguid(453331);

Main library dm-17 Modify the database mode to primary, Execute the following command :
alter database primary;

For the library dm-18 Similar operations on , But note that the database schema is modified to standby, Execute the following command :
alter database standby;
dmdba Under the user , To the database installation directory bin Execute the following command ( Both active and standby databases execute ):
dmwatcher /home/dmdba/dmdata/dmrw/dmwatcher.ini

Check the status
Use DM Management tools , Connect two instances to view


Configure the monitor ( The server 192.168.3.16)
192.168.3.16 First, install the database software, and then operate the following steps
vi /home/dmdba/dmdbms/bin/dmmonitor.ini
Add the following :
explain : Specific configuration , Please put # and # Later Chinese content is deleted .
MON_DW_CONFIRM = 1
MON_LOG_PATH = /home/dmdba/dmdbms/log
MON_LOG_INTERVAL = 60
MON_LOG_FILE_SIZE = 200
MON_LOG_SPACE_LIMIT = 1024
[GRP_RW]
MON_INST_OGUID = 453331
MON_DW_IP = 192.168.3.17:7436
MON_DW_IP = 192.168.3.18:7436

Start the monitor
On the server dm-16 On the operation :
dmmonitor /dmdata/dmdb/dmmonitor.ini

You can see the cluster status ok
The above proves that the cluster is built successfully
Guanku
Close by dmmonitor---dmwatcher After closing (dmwatcher The shutdown sequence starts with the main backup )---dmserver(dmserver The shutdown sequence starts with the main backup ) Close the database in order
Add service as system startup service
The following operations should be performed on both the primary and standby nodes , Execution order : Execute the main database first ---- Standby database execution :
cd /home/dmdba/dmdbms/script/root/
./dm_service_installer.sh -t dmwatcher -p dmrw -watcher_ini /home/dmdba/dmdata/dmrw/dmwatcher.ini
./dm_service_installer.sh -t dmserver -p dmrw -dm_ini /home/dmdba/dmdata/dmrw/dm.ini
The monitor executes (192.168.3.16) perform
Use root user , To the database installation directory script/root Next .
cd /home/dmdba/dmdbms/script/root/
./dm_service_installer.sh -t dmmonitor -p monitor-confirm -monitor_ini /home/dmdba/dmdbms/bin/dmmonitor.ini
Start command
systemctl start DmMonitorServicemonitor-confirm
host dm-16 Add another ordinary monitor
cd /home/dmdba/dmdbms/bin
cp dmmonitor.ini dmmonitor-normal.ini
modify dmmonitor-normal.ini
[[email protected] bin]$ cat dmmonitor-normal.ini
MON_DW_CONFIRM = 0
MON_LOG_PATH = /home/dmdba/dmdbms/log
MON_LOG_INTERVAL = 60
MON_LOG_FILE_SIZE = 200
MON_LOG_SPACE_LIMIT = 1024
[GRP_RW]
MON_INST_OGUID = 453331
MON_DW_IP = 192.168.3.17:7436
MON_DW_IP = 192.168.3.18:7436
Start cluster :
Start the standby database instance
192.168.2.18 Boot instance
systemctl start DmServicedmrw

Start the main library instance
192.168.2.17
systemctl start DmServicedmrw

Start the main library daemon
192.168.2.17
systemctl start DmWatcherServicedmrw

Start the standby database daemon
192.168.2.18
systemctl start DmWatcherServicedmrw
Start the monitoring service
192.168.3.16

View the cluster status
Law 1 : Check the log :
cat /home/dmdba/dmdbms/log/DmMonitorservicemonitor-confirm.log
Law two : Front end view
dmmonitor path= /home/dmdba/dmdbms/bin/dmmonitor-normal.ini

Compare and summarize the separation of active and standby and read-write
The essence of the separation of active and standby and read-write is the same , All right. redo There are several solutions produced by different log processing ,
Main library redo Standby mode | Realtime | Timely |
High performance Arch_wait_apply=0 | advantage : 1、 The standby database has little impact on the performance of the primary database 2、 Ensure that the standby database receives it as soon as possible redo journal | advantage : There are only a lot more logs in the primary database than in the standby database The standby database and the primary database can ensure the consistency of transactions |
shortcoming : Backup data because redo Not repeated in time , There may be delays | shortcoming : The standby database data may be delayed , On the one hand, it comes from redo Delay caused by not repeating in time , On the other hand, it comes from the delay caused by the time when the main database writes online logs | |
Architecture mode : Real time active standby | Architecture mode : Common active / standby architecture | |
Applicable scenario : Business consistency requirements are general , Scenarios that require high availability of the main library | Applicable scenario : The standby database has general requirements for real-time consistency of business , However, there is a requirement that the backup database for disaster recovery cannot lose transactions | |
Transaction consistency Arch_wait_apply=1 | advantage : On the basis of meeting transaction consistency , It has the lowest impact on the performance of the main library | advantage : Strong transaction consistency guarantee , The primary and standby databases can be synchronized |
shortcoming : 1、 The performance of the primary database is highly affected by the standby database 2、 When the primary database fails, the data of the standby database and the primary database may be inconsistent | shortcoming : The performance of the primary database is affected by the secondary database , | |
Architecture mode : Real time read / write separation cluster , The daemon is required to be in automatic mode | Architecture pattern : General read-write separation cluster | |
Applicable scenario : Business consistency requirements are general , Scenarios that require high availability of the main library | Applicable scenario : High requirements for business consistency , There are no high requirements for the availability of the main database |
Dameng community address : https://eco.dameng.com
边栏推荐
- 【C语言笔记分享】——动态内存管理malloc、free、calloc、realloc、柔性数组
- Detailed analysis of common command modules of ansible service
- Remove the treasure box app with the green logo that cannot be deleted from iPhone
- Summary of week 22-07-23
- Editor formula
- rhcsa第六次笔记
- Build ZABBIX monitoring service in LNMP architecture
- Network security - filtering bypass injection
- 2021年最新最全Flink系列教程_Flink原理初探和流批一体API(二.五)v2
- XSS white list
猜你喜欢
![The solution to the error of [installation detects that the primary IP address of the system is the address assigned by DHCP] when installing Oracle10g under win7](/img/25/aa9bcb6483bb9aa12ac3730cd87368.png)
The solution to the error of [installation detects that the primary IP address of the system is the address assigned by DHCP] when installing Oracle10g under win7

软链接、硬链接

rhce第一次作业

OWASP ZAP安全测试工具使用教程(高级)

Network security - file upload content check bypass

Solve the problem of repeated clicking of button uibutton
Nessus安全测试工具使用教程

Network security - error injection

【无标题】rhcsa第一次作业
Error importing header file to PCH
随机推荐
CSDN garbage has no bottom line!
The latest and complete Flink series tutorials in 2021_ Preliminary exploration of Flink principle and flow batch integration API (II. V) V2
在EXCEL表格中如何进行快速换行
One problem encountered:
Flink comprehensive case (IX)
Flink advanced features and new features (VIII)
Click event to create a new node
Network security - file upload competitive conditions bypass
Soft link, hard link
使用树莓派做Apache2 HA实验
bibliometrix: 从千万篇论文中挖掘出最值得读的那一篇!
Ggarrange function of R language ggpubr package combines multiple images and annotates them_ Figure add annotation, annotation, annotation information for the combined image, and add annotation inform
SQL server startup and shutdown job script
Nessus安全测试工具使用教程
SQL Server 启停作业脚本
Afnetworking data raw request mode
Network security - error injection
Csp2021 T3 palindrome
Mmdrawercontroller gets the current VC for push and pop
The fourth edition of probability and mathematical statistics of Zhejiang University proves that the absolute value of the correlation coefficient of random variables X and Y is less than 1, and some