当前位置:网站首页>Pytorch study notes 10 - detailed explanation of convolutional neural network and application of multi-classification task of mnist dataset
Pytorch study notes 10 - detailed explanation of convolutional neural network and application of multi-classification task of mnist dataset
2022-07-31 06:33:00 【qq_50749521】
卷积神经网络详解
We talked about it in the last episode,Black and white images are single channel,彩色图像是三通道的,The three channels are respectively:Red、Green、Blue,也就是我们所说的RGB.The corresponding image tensor for such a color image,我们一般用C(通道数)* H(图像高度)*W(图像宽度)来刻画.
Previously we used the fully connected model to connectsoftmaxto do multiple classifications,But in the full join model,Simply put the images together into a series,It will lead to the loss of the original spatial information.
Convolution, on the other hand, preserves the spatial structure of the image.
- Start with a single-channel image

Enter a single channel,宽为5,高为5的图像(1 * 5 * 5)
我们用一个3 * 3The convolution kernel and do convolution.
The convolution here is to do a number multiplication,不是矩阵乘法.Shift to the right after each calculation,最终得到:
- 3 input channels
for a three-channel image tensor:
We just need to convolve the tensor of each channel with a convolution kernel,最终得到3个3 * 3的张量,把这三个3 * 3The tensors are added to convolve the result.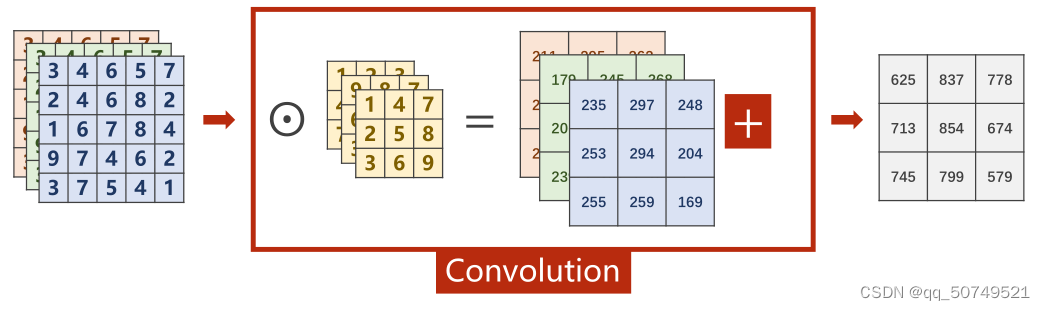
对于这样一个(3,5,5)的图像张量,与(3,3,3)的卷积核卷积,得到(1,3,3)的张量.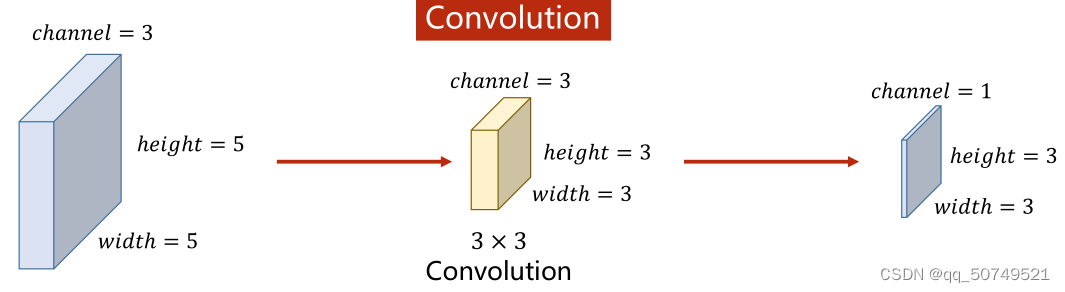
进一步总结:
对于(n, w, h)的图像张量,如果拿一个k * k的卷积核做卷积,Then this convolution kernel must also ben通道的,即(n, k, k),The final convolution result is (1, w-k+1, w-k+1)
- What if we want to get a multi-channel output?
Repeat the above process with different convolution kernelsm遍,得到m个(1, w-k+1, w-k+1),You can get it by splicing them together(m, w-k+1, w-k+1)了.
这样,For a more general representation of the convolution kernel,We further define the convolution kernel as
(m, n, w, h)
其中,
mIndicates the number of output channels we want
n表示输入的通道数
w表示卷积核宽
hIndicates the length of the convolution kernel
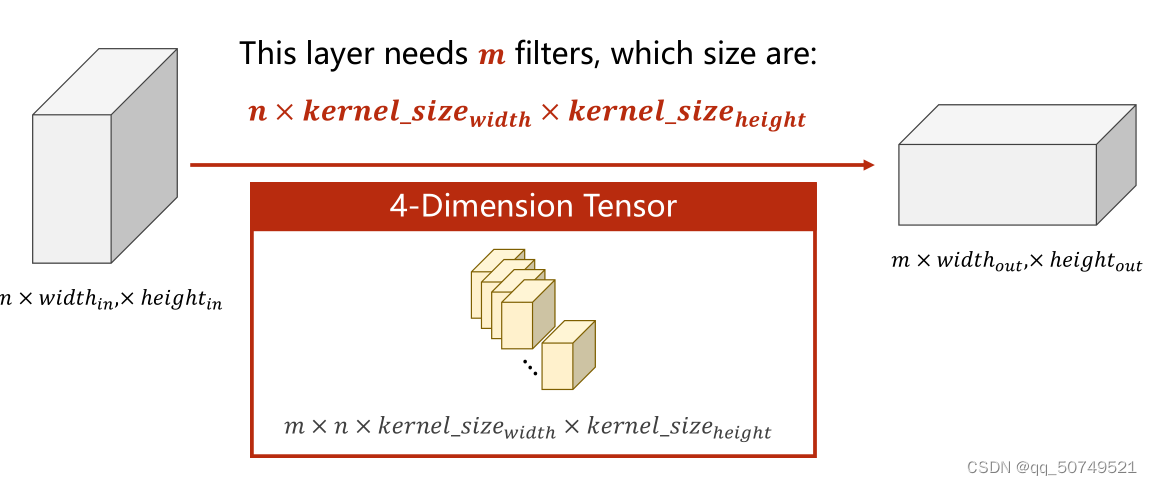
写一个(5, 100, 100)的输入,卷积核(10, 5, 3, 3).This means that the input is5通道,Both length and height100的图像张量,经过10The secondary channel is 5,大小为3 * 3的卷积核卷积,应该会得到一个(10, 98, 98)的输出.
import torch
in_channels, out_channels = 5, 10
width, height = 100, 100
kernel_size = 3
batch_size = 1
input = torch.randn(batch_size, in_channels, height, width)
conv_layer = torch.nn.Conv2d(in_channels, out_channels,
                            kernel_size = kernel_size)
output = conv_layer(input)
print(input.shape)
print(output.shape)
print(conv_layer.weight.shape)
torch.Size([1, 5, 100, 100])
torch.Size([1, 10, 98, 98])
torch.Size([10, 5, 3, 3])
这里面的batch_sizeThat is, the number of images we input in batches each time,1It means entering one at a time.
- if our image is tall5长5的,经过3 * 3After convolution is3 * 3的,But we want results too5 * 5的呢?
padding——Give the input a circle0
input = [3,4,6,5,7,
         2,4,6,8,2,
         1,6,7,8,4,
         9,7,4,6,2,
         3,7,5,4,1]
input = torch.Tensor(input).view(1, 1, 5, 5)#B C W H
conv_layer = torch.nn.Conv2d(1, 1, kernel_size=3, padding=1, bias= False)#input_channel, output_channel, 3*3卷积核, 一维padding, 不加偏置
kernel = torch.Tensor([1,2,3,4,5,6,7,8,9]).view(1, 1, 3, 3)#input_channel, output_channel ,3*3
conv_layer.weight.data = kernel.data#Assign convolution weights
output = conv_layer(input)
print(output)
print(output.shape)
tensor([[[[ 91., 168., 224., 215., 127.],
          [114., 211., 295., 262., 149.],
          [192., 259., 282., 214., 122.],
          [194., 251., 253., 169.,  86.],
          [ 96., 112., 110.,  68.,  31.]]]], grad_fn=<ConvolutionBackward0>)
torch.Size([1, 1, 5, 5])
- If we want the output length and width to become smaller,Compression is achieved faster.We can increase the stride of the convolution kernel scan translation.
默认情况下stride = 1. 这里我们设置stride = 2.
一个5 * 5The tensor will become 2 * 2的了.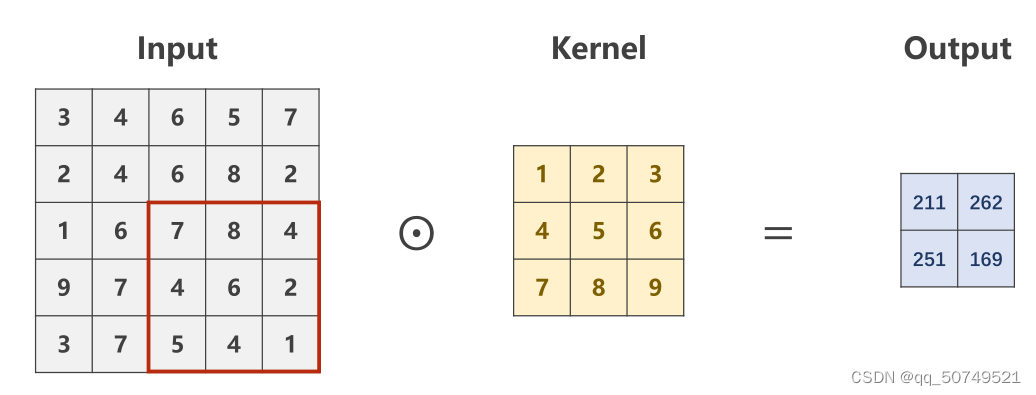
input = [3,4,6,5,7,
         2,4,6,8,2,
         1,6,7,8,4,
         9,7,4,6,2,
         3,7,5,4,1]
input = torch.Tensor(input).view(1, 1, 5, 5)#B C W H
conv_layer = torch.nn.Conv2d(1, 1, kernel_size=3, stride = 2, bias= False)#input_channel, output_channel, 3*3卷积核, 一维padding, 不加偏置
kernel = torch.Tensor([1,2,3,4,5,6,7,8,9]).view(1, 1, 3, 3)#input_channel, output_channel ,3*3
conv_layer.weight.data = kernel.data#Assign convolution weights
output = conv_layer(input)
print(output)
print(output.shape)
tensor([[[[211., 262.],
          [251., 169.]]]], grad_fn=<ConvolutionBackward0>)
torch.Size([1, 1, 2, 2])
- MaxPooling layer——Find the maximum value within each block,进行快速压缩

input = [3,4,6,5,
        2,4,6,8,
        1,6,7,8,
        9,7,4,6
        ]
input = torch.Tensor(input).view(1,1,4,4)
maxpooling_layer = torch.nn.MaxPool2d(kernel_size = 2)
output = maxpooling_layer(input)
print(output)
print(output.shape)
tensor([[[[4., 8.],
          [9., 8.]]]])
torch.Size([1, 1, 2, 2])
Pair with Convolutional Neural NetworksmnistThe dataset is multi-classified

输入(batch_size, 1, 28, 28)
->经过卷积层(1, 10, 5, 5), 输出(batch_size, 10, 24, 24)
single channel change10通道,grow tall28-5+1 = 24
->经过maxpooling下采样, 输出(bacth_size, 10, 12, 12)
->经过卷积层(10, 20, 5, 5), 输出(batch_size, 20, 8, 8)
10通道变20通道,grow tall12-5+1 = 8
->经过maxpooling下采样, 输出(bacth_size, 20, 4, 4)
->展成(batch_size, 320)
->经过(320, 10)全连接层,输出(bacth_size, 10), So as to be very classified
输出C * W * H,Channels will change,The height and width will also change.
代码:
import torch
from torchvision import transforms
from torchvision import datasets
from torch.utils.data import DataLoader
import torch.nn.functional as F
import torch.optim as optim
batch_size = 64
transform = transforms.Compose([
    transforms.ToTensor(),
    transforms.Normalize((0.1307, ), (0.3081, ))
])
train_dataset = datasets.MNIST(root='../dataset/mnist/',
                               train=True,
                               download=False,
                               transform=transform)
train_loader = DataLoader(train_dataset,
                          shuffle=True,
                          batch_size=batch_size)
test_dataset = datasets.MNIST(root='../dataset/mnist',
                              train=False,
                              download=False,
                              transform=transform)
test_loader = DataLoader(test_dataset,
                         shuffle=False,
                         batch_size=batch_size)
class Net(torch.nn.Module):
    def __init__(self):
        super(Net, self).__init__()
        self.conv1 = torch.nn.Conv2d(1, 10, kernel_size = 5)
        self.conv2 = torch.nn.Conv2d(10, 20, kernel_size = 5)
        self.pooling = torch.nn.MaxPool2d(2)
        self.fc = torch.nn.Linear(320, 10)
        self.relu = torch.nn.ReLU()

    def forward(self, x):
        x = self.relu(self.pooling(self.conv1(x)))
        x = self.relu(self.pooling(self.conv2(x)))
        x = x.view(x.size(0), -1)
        x = self.fc(x)
        return x
model = Net()
criterion = torch.nn.CrossEntropyLoss()
optimizer = optim.SGD(model.parameters(), lr = 0.01)
epoch_list = []
loss_list = []
loss_sum = 0
for epoch in range(10):
    for index, data in enumerate(train_loader, 0):
        inputs, labels = data
        optimizer.zero_grad()
        y_pred = model(inputs)
        loss = criterion(y_pred, labels)
        loss.backward()
        optimizer.step()

        loss_sum += loss.item()
        batch = index
    print('epoch = ', epoch, 'loss = ', loss_sum/batch)
    epoch_list.append(epoch)
    loss_list.append(loss_sum/batch)
    loss_sum = 0
epoch = 0 loss = 0.5009269244937085
epoch = 1 loss = 0.14979709709896094
epoch = 2 loss = 0.10758499573546451
epoch = 3 loss = 0.08902853002658426
epoch = 4 loss = 0.07835054308028938
epoch = 5 loss = 0.06980127688564892
epoch = 6 loss = 0.06388871054082568
epoch = 7 loss = 0.059718344841408866
epoch = 8 loss = 0.055480038152317834
epoch = 9 loss = 0.05270801689137835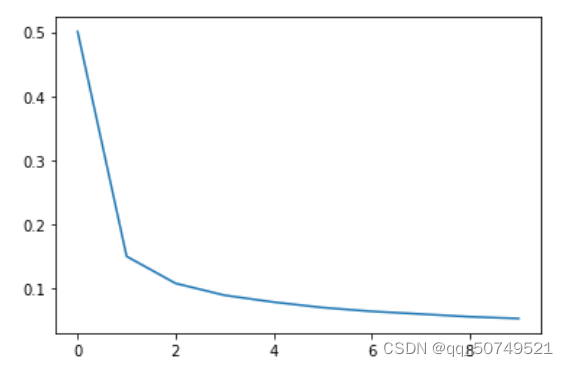
total = 0
correct = 0
with torch.no_grad():
    for data in test_loader:
        images, labels = data
        outputs = model(images)
        _,predicted = torch.max(outputs.data, dim = 1)
        total +=labels.size(0)
        correct += (predicted == labels).sum().item()
print( 'Accuracy on test set: %d %%' % (100 * correct / total))
Accuracy on test set: 98 %
比较
在上一篇文章当中,We use fully connected layers for multi-classification processing.
Comparison of the two models:
The output accuracy of the fully connected layer is 97%,The correct rate of the output of the convolutional layer is 98%.这也印证了前面所说的,in the fully connected model,Simply put the images together into a series,It will lead to the loss of the original spatial information.Convolution, on the other hand, preserves the spatial structure of the image,效果更好.
An enterprise-level understanding per day~
1%Increased accuracy
= 3%的错误率 -> 2%的错误率
= 提升了33%的性能
Great~
边栏推荐
- 数据分析之SQL面试真题
- CAS:474922-22-0 Maleimide-PEG-DSPE 磷脂-聚乙二醇-马来酰亚胺简述
- 化学试剂磷脂-聚乙二醇-氨基,DSPE-PEG-amine,CAS:474922-26-4
- Learning and understanding of ROS service programming
- pyspark.ml特征变换模块
- Research reagents Cholesterol-PEG-Maleimide, CLS-PEG-MAL, Cholesterol-PEG-Maleimide
- 2021-09-30
- Remote file xxx is mapped to the local path xxx and can't be found. You can continue debugging....
- 应用usb_cam同时打开多个摄像头方法
- 活体检测CDCN学习笔记
猜你喜欢
【Rhapsody学习笔记】1:Hello World
【解决问题】RuntimeError: The size of tensor a (80) must match the size of tensor b (56) at non-singleton
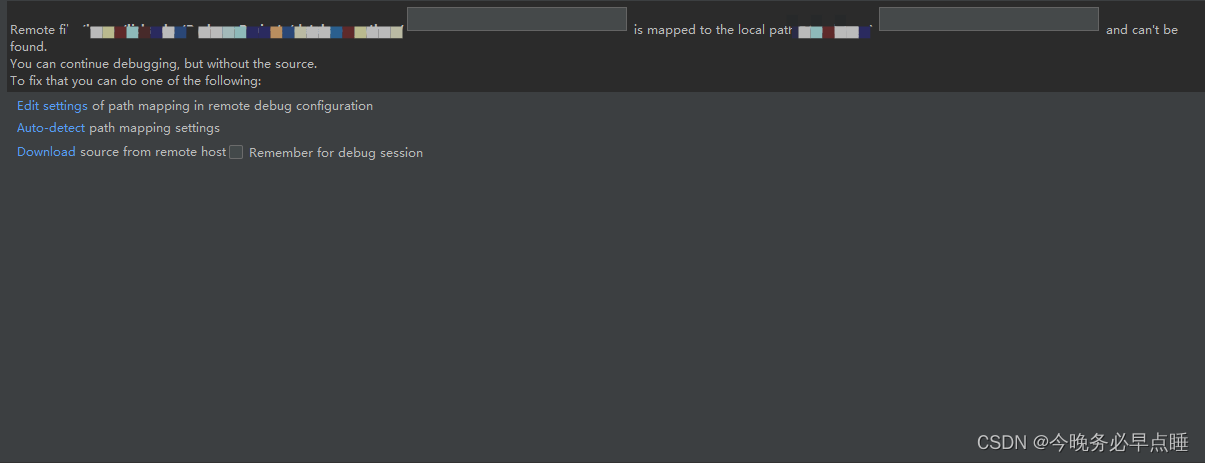
Remote file xxx is mapped to the local path xxx and can't be found. You can continue debugging....
Four common ways of POST to submit data

Cholesterol-PEG-NHS NHS-PEG-CLS cholesterol-polyethylene glycol-active ester can modify small molecular materials

Tensorflow steps on the pit while using it

Session和Cookie,Token

np.fliplr与np.flipud

PyTorch学习笔记08——加载数据集
pytorch模型微调finetuning训练image_dog(kaggle)
随机推荐
DSPE-PEG-Thiol DSPE-PEG-SH phospholipid-polyethylene glycol-thiol liposome for later use
数据预处理、特征工程和特征学习-摘抄
【Latex】TexLive+VScode+SumatraPDF 配置LaTex编辑环境
YOLOX中的SimOTA
Attention based ASR(LAS)
Cholesterol-PEG-DBCO 胆固醇-聚乙二醇-二苯基环辛炔化学试剂
Pytorch常用函数
Pytorch学习笔记13——Basic_RNN
ImportError: cannot import name ‘Xxxx‘ from partially initialized module ‘xx.xx.xx‘
Jupyter内核正忙、内核挂掉
Cholesterol-PEG-NHS NHS-PEG-CLS cholesterol-polyethylene glycol-active ester can modify small molecular materials
【Rhapsody学习笔记】3:Dishwasher
random.randint函数用法
pyspark.ml特征变换模块
Chemical Reagent Phospholipid-Polyethylene Glycol-Amino, DSPE-PEG-amine, CAS: 474922-26-4
Where can I find the private files set by myself?
拒绝采样小记
UR3机器人运动学分析之正运动学分析
Three methods of accessing image pixels in opencv
科研试剂Cholesterol-PEG-Maleimide,CLS-PEG-MAL,胆固醇-聚乙二醇-马来酰亚胺